

由于flutter一直存在内存泄漏的问题,导致很多开发者不胜困扰,博主在0.9.4就开始对其代码内部内存问题在engine层面修改代码,得到解决,但是对于每个版本都需要跟随官方打包,对于开发者并不是很友好。
然而喜出望外的是,在后来的几个版本中,官方内置开发了手动释放内存的方式😸
/**
 * Destroy running context for an engine.
 *
 * This method can be used to force the FlutterEngine object to release all resources.
 * After sending this message, the object will be in an unusable state until it is deallocated.
 * Accessing properties or sending messages to it will result in undefined behavior or runtime
 * errors.
 */
- (void)destroyContext;
翻译如下:
销毁引擎的运行上下文。 此方法可用于强制FlutterEngine对象释放所有资源。 发送此消息后,对象将处于不可用状态,直到解除分配为止。 访问属性或向其发送消息将导致未定义的行为或运行时错误。
但是,但是,但是,(重要的事说三遍) 在Flutter engine开发群里面,有群友反馈还有很多问题
无法完全释放内存
偶现崩溃
官方回复,慎用 github.com/flutter/flu…
偶现崩溃的是什么鬼,暂时没有遇到,不好说。 之前博主遇到的崩溃是自己使用方式的问题,在fluttervc关闭之后还有任务在执行methodchannel,即还在调用plugin,这个可以在开发上避免。 值得注意的是,flutter中使用c++实现,自己对于内存管理并不是很好
内存问题自测如下
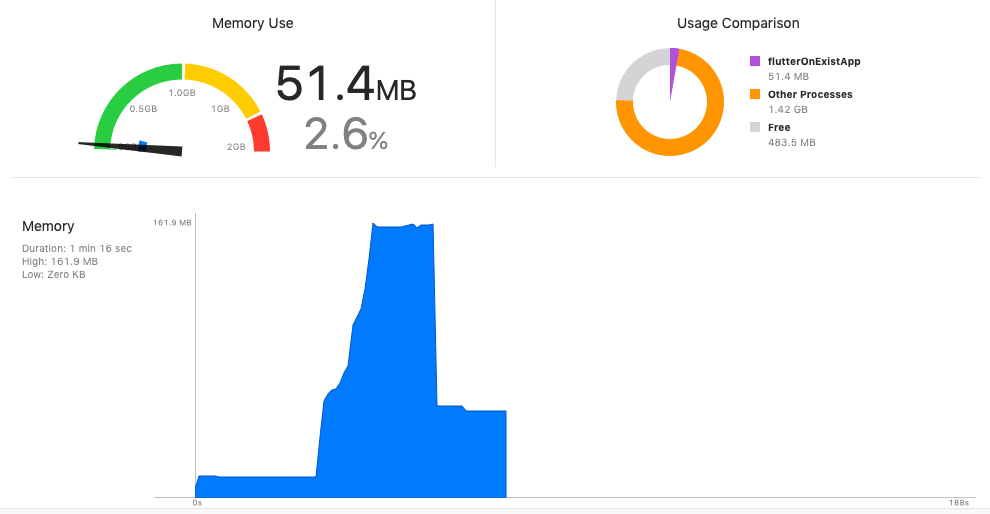
确实存在问题,还有将近30M没有被释放,查看一下当前内存对象,如下图
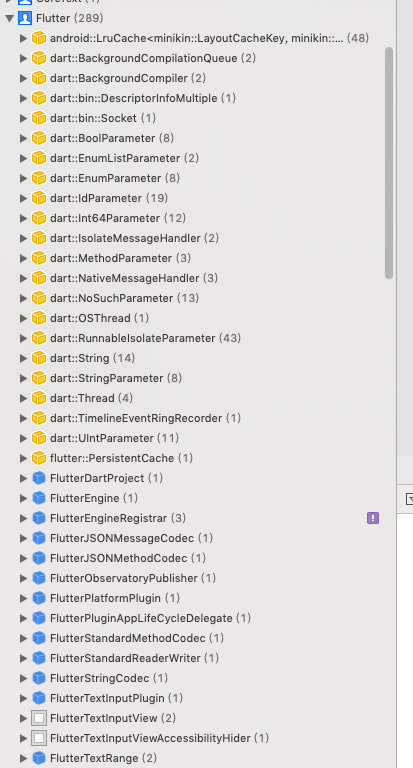
一个一个看还有那些没有被释放吧
android:LruCache
Least Recently Used 近期最少使用算法。 内存管理的一种页面置换算法,对于在内存中但又不用的数据块(内存块)叫做LRU,flutter engine 会根据哪些数据属于LRU而将其移出内存而腾出空间来加载另外的数据。
dart::BackgroundComplier 对isolate编译优化的类
BackgroundCompiler 在后台线程中运行优化编译的类。 实现:每个隔离一个任务,它与拥有isolate一起消失,后台编译器中没有OSR编译。
dart::bin::socket
vm和开发平台通信的机制,比如jit即时编译的dill文件,通过socket传递给dart vm,vm通过rpc加载文件,重置线程,从而实现hotreload热重载
dart::BoolPrameter
- dart::EnumParameter
- dart::IdParameter
- dart::IdParameter
- dart::xxxPrameter
定义在dart vm,service.cc中,都继承自MethodParameter,做对应参数校验,参数解析用。编译dart文件用的
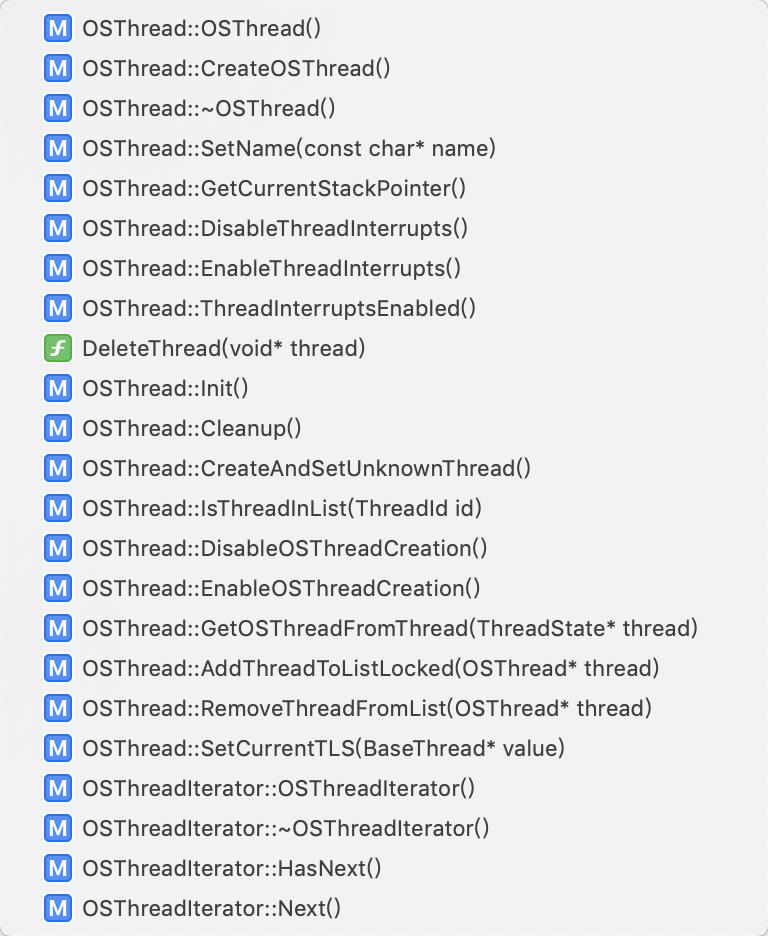
dart::OSThread
在dart 运行时负责操作系统线程,创建线程,移除线程,线程查找与管理。 如下图
FlutterEngineRegistrar 注册使用key注册plugin的地方,所有plugin调用dart底层的方法都会通过 handlemethodcall 回调给使用者, 其初始化的地方是引起内存泄漏的地方
- (instancetype)initWithPlugin:(NSString*)pluginKey flutterEngine:(FlutterEngine*)flutterEngine {
  self = [super init];
  NSAssert(self, @"Super init cannot be nil");
  _pluginKey = pluginKey;// [pluginKey retain];
  _flutterEngine = flutterEngine;// [flutterEngine retain];
  return self;
}
此处有一篇文章介绍,解决engine的循环引用 文章
FlutterStandardMethodCodec 标准方法编解码
FlutterStringCodec string编解码 FlutterJsonMessageCodec json编解码
不看不知道,一看吓一跳,也竟然是个单例,当然不会被释放了,也能理解,在flutter中用到jsonmssage的地方很多,用不着每次都初始化

代码实现的地方
@implementation FlutterJSONMessageCodec
+ (instancetype)sharedInstance {
  static id _sharedInstance = nil;
  if (!_sharedInstance) {
    _sharedInstance = [FlutterJSONMessageCodec new];
  }
  return _sharedInstance;
}
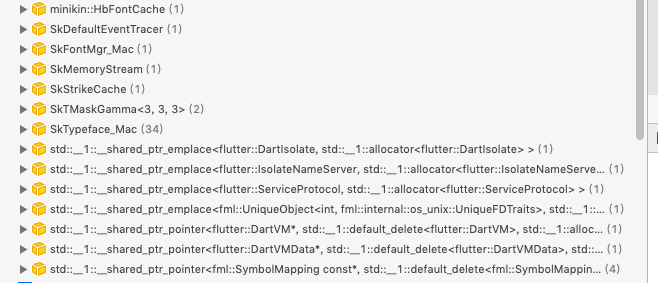
std:share_ptrxxx 共享指针
指针获取 flutter isolate service dartvm symbolmapping
~~ 文章完 ~~
如果你想深入讨论flutter的问题,欢迎加入我们的QQ群 217429001
完整测试代码如下
#import "FlutterTesterViewController.h"
#import <Flutter/Flutter.h>
#import "GeneratedPluginRegistrant.h"

@interface FlutterTesterViewController ()
@property (nonatomic, weak) FlutterViewController * ctr;
@property (nonatomic, weak) FlutterEngine * engine;
@end

@implementation FlutterTesterViewController
- (void)viewDidLoad {
    [super viewDidLoad];

    float Y = 210;
    [self createButton:@"加载boundle资源" frame:CGRectMake(80.0, Y, 160.0, 40.0) action:@selector(handleBoundleResource )];

    Y += 40.0 + 10;
    [self createButton:@"autorelease" frame:CGRectMake(80.0, Y, 160.0, 40.0) action:@selector(handleAutoRelase)];

    NSArray * paths = NSSearchPathForDirectoriesInDomains(NSDocumentDirectory, NSUserDomainMask, YES);
    NSString * path = [[paths objectAtIndex:0] stringByAppendingPathComponent:@"flutter_assets"] ;
    NSLog(@"path: %@",path);

}

-(void)handleNetWorkResource:(UIButton *)button{

}

/**

* 加载boundle资源

*/
- (void)handleBoundleResource {

    FlutterDartProject * dart = [[FlutterDartProject alloc] init];
    FlutterEngine * engine = [[FlutterEngine alloc] initWithName:@"ios.dart.flutter"
                                                         project:dart];
    [engine runWithEntrypoint:nil];
    FlutterViewController* flutterViewController = [[FlutterViewController alloc] initWithEngine:engine nibName:nil bundle:nil];
    [GeneratedPluginRegistrant registerWithRegistry:flutterViewController];
    [self addBackButton:flutterViewController];
     [flutterViewController setInitialRoute:@"route1"];
    [self presentViewController:flutterViewController animated:YES completion:nil];
    self.engine = engine;
}

-(void)handleAutoRelase{

     FlutterBasicMessageChannel* channel;
    FlutterEngine * engine;
    @autoreleasepool {
        FlutterViewController* flutterViewController =
        [[FlutterViewController alloc] init];
        channel = flutterViewController.engine.systemChannel;
        engine = flutterViewController.engine;
        NSLog(@"engine111:%@",engine);
    }
    NSLog(@"engine222:%@",engine);
    [channel sendMessage:@"Hello!"];
    [channel setMessageHandler:^(id  _Nullable message, FlutterReply  _Nonnull callback) { }];
}

-(void)addBackButton:(UIViewController *)flutterViewController{
    dispatch_after(dispatch_time(DISPATCH_TIME_NOW, (int64_t)(2  * NSEC_PER_SEC)), dispatch_get_main_queue(), ^{
        UIButton * btn = [UIButton buttonWithType:UIButtonTypeSystem];
        [btn setTitle:@"关闭" forState:UIControlStateNormal];
        btn.frame = CGRectMake(10, 100, 50, 30);
        [btn addTarget:self action:@selector(buttonTap:) forControlEvents:UIControlEventTouchUpInside];
        [flutterViewController.view addSubview:btn];
        self.ctr = flutterViewController;
    });
}

-(void)buttonTap:(id)sender{
//    [self.navigationController popViewControllerAnimated:YES];

    __weak __typeof(self)weakSelf = self;
    [self.ctr dismissViewControllerAnimated:YES completion:^{

        [weakSelf.engine destroyContext];
    }];

}

- (void)didReceiveMemoryWarning {
    [super didReceiveMemoryWarning];
    // Dispose of any resources that can be recreated.
}


-(UIButton *)createButton:(NSString *)title frame:(CGRect)frame action:(SEL)selector{

    UIButton *button = [UIButton buttonWithType:UIButtonTypeCustom];
    [button addTarget:self
               action:selector
     forControlEvents:UIControlEventTouchUpInside];
    [button setTitle:title forState:UIControlStateNormal];
    UIColor * bgcolor = [UIColor colorWithRed:arc4random()%256/255. green:arc4random()%256/255. blue:arc4random()%256/255. alpha:1];
    [button setBackgroundColor:bgcolor];
    button.frame = frame;
    [self.view addSubview:button];
    return button;
}

@end
