

在JNI层使用AssetManager读取文件
在JNI层进行二进制文件数据读取,可以通过AAssetManager读取asset内部的资源。需要头文件的支持:
#include <android/asset_manager_jni.h>
#include <android/asset_manager.h>
提供了对于访问文件的方式:
/** Available access modes for opening assets with {@link AAssetManager_open} */
enum {
    /** No specific information about how data will be accessed. **/
    AASSET_MODE_UNKNOWN      = 0,
    /** Read chunks, and seek forward and backward. */
    AASSET_MODE_RANDOM       = 1,
    /** Read sequentially, with an occasional forward seek. */
    AASSET_MODE_STREAMING    = 2,
    /** Caller plans to ask for a read-only buffer with all data. */
    AASSET_MODE_BUFFER       = 3
};
可以直接访问文件夹:
/**
 * Open the named directory within the asset hierarchy.  The directory can then
 * be inspected with the AAssetDir functions.  To open the top-level directory,
 * pass in "" as the dirName.
 *
 * The object returned here should be freed by calling AAssetDir_close().
 */
AAssetDir* AAssetManager_openDir(AAssetManager* mgr, const char* dirName);
直接访问文件:
/**
 * Open an asset.
 *
 * The object returned here should be freed by calling AAsset_close().
 */
AAsset* AAssetManager_open(AAssetManager* mgr, const char* filename, int mode);
可以根据访问得到的文件夹进行遍历:
/**
 * Iterate over the files in an asset directory.  A NULL string is returned
 * when all the file names have been returned.
 *
 * The returned file name is suitable for passing to AAssetManager_open().
 *
 * The string returned here is owned by the AssetDir implementation and is not
 * guaranteed to remain valid if any other calls are made on this AAssetDir
 * instance.
 */
const char* AAssetDir_getNextFileName(AAssetDir* assetDir);
可以重置遍历访问的状态:
/**
 * Reset the iteration state of AAssetDir_getNextFileName() to the beginning.
 */
void AAssetDir_rewind(AAssetDir* assetDir);
可以关闭文件夹访问:
/**
 * Close an opened AAssetDir, freeing any related resources.
 */
void AAssetDir_close(AAssetDir* assetDir);
可以读取文件信息:
/**
 * Attempt to read 'count' bytes of data from the current offset.
 *
 * Returns the number of bytes read, zero on EOF, or < 0 on error.
 */
int AAsset_read(AAsset* asset, void* buf, size_t count);
可以跳转读取文件的位置:
/**
 * Seek to the specified offset within the asset data.  'whence' uses the
 * same constants as lseek()/fseek().
 *
 * Returns the new position on success, or (off_t) -1 on error.
 */
off_t AAsset_seek(AAsset* asset, off_t offset, int whence)
    __RENAME_IF_FILE_OFFSET64(AAsset_seek64);
/**
 * Seek to the specified offset within the asset data.  'whence' uses the
 * same constants as lseek()/fseek().
 *
 * Uses 64-bit data type for large files as opposed to the 32-bit type used
 * by AAsset_seek.
 *
 * Returns the new position on success, or (off64_t) -1 on error.
 */
off64_t AAsset_seek64(AAsset* asset, off64_t offset, int whence);
还有很多功能:
/**
 * Close the asset, freeing all associated resources.
 */
void AAsset_close(AAsset* asset);
/**
 * Get a pointer to a buffer holding the entire contents of the assset.
 *
 * Returns NULL on failure.
 */
const void* AAsset_getBuffer(AAsset* asset);
/**
 * Report the total size of the asset data.
 */
off_t AAsset_getLength(AAsset* asset)
    __RENAME_IF_FILE_OFFSET64(AAsset_getLength64);
/**
 * Report the total size of the asset data. Reports the size using a 64-bit
 * number insted of 32-bit as AAsset_getLength.
 */
off64_t AAsset_getLength64(AAsset* asset);
/**
 * Report the total amount of asset data that can be read from the current position.
 */
off_t AAsset_getRemainingLength(AAsset* asset)
    __RENAME_IF_FILE_OFFSET64(AAsset_getRemainingLength64);
/**
 * Report the total amount of asset data that can be read from the current position.
 *
 * Uses a 64-bit number instead of a 32-bit number as AAsset_getRemainingLength does.
 */
off64_t AAsset_getRemainingLength64(AAsset* asset);
/**
 * Open a new file descriptor that can be used to read the asset data. If the
 * start or length cannot be represented by a 32-bit number, it will be
 * truncated. If the file is large, use AAsset_openFileDescriptor64 instead.
 *
 * Returns < 0 if direct fd access is not possible (for example, if the asset is
 * compressed).
 */
int AAsset_openFileDescriptor(AAsset* asset, off_t* outStart, off_t* outLength)
    __RENAME_IF_FILE_OFFSET64(AAsset_openFileDescriptor64);
/**
 * Open a new file descriptor that can be used to read the asset data.
 *
 * Uses a 64-bit number for the offset and length instead of 32-bit instead of
 * as AAsset_openFileDescriptor does.
 *
 * Returns < 0 if direct fd access is not possible (for example, if the asset is
 * compressed).
 */
int AAsset_openFileDescriptor64(AAsset* asset, off64_t* outStart, off64_t* outLength);
/**
 * Returns whether this asset's internal buffer is allocated in ordinary RAM (i.e. not
 * mmapped).
 */
int AAsset_isAllocated(AAsset* asset);
获取native层的AssetManager:
/**
 * Given a Dalvik AssetManager object, obtain the corresponding native AAssetManager
 * object.  Note that the caller is responsible for obtaining and holding a VM reference
 * to the jobject to prevent its being garbage collected while the native object is
 * in use.
 */
AAssetManager* AAssetManager_fromJava(JNIEnv* env, jobject assetManager);
-
传个AssetManager到JNI层;
AssetManager assetManager = getAssets();
-
将你的数据放到assets文件夹中,然后和对应的文件名字一起,通过JNI Native函数传递到JNI:
readFromAssets(assetManager, "yourdata.bin");
-
然后在JNI的Native实现函数中读取:(也可直接在对应的C函数调用,调用方法类似fopen,fread)
JNIEXPORT  jstring JNICALL Java_com_lib_MyLib_readFromAssets(JNIEnv* env, jclass clazz,
        jobject assetManager, jstring dataFileName) {

    AAssetManager* mManeger = AAssetManager_fromJava(env, assetManager);
    jboolean iscopy;
    const char *dataFile = env->GetStringUTFChars(dataFileName, &iscopy);

    int c = dataRead(mManeger, dataFile);  //call the C function

    env->ReleaseStringUTFChars(dataFileName, dataFile);

    jstring resultStr;
    resultStr = env->NewStringUTF("success");
    return resultStr;
}
char * dataRead(AAssetManager* mManeger, const char *dataFile) {

	char *content = NULL;

#ifndef __ANDROID_API__
	FILE *fp;

	size_t count=0;

	if (fileName != "") {
		fp = fopen(fileName,"rt");

		if (fp != NULL) {

			fseek(fp, 0, SEEK_END);
			count = ftell(fp);
			rewind(fp);

			if (count > 0) {
				content = (char *)malloc(sizeof(char) * (count+1));
				count = fread(content, sizeof(char), count, fp);
				content[count] = '\0';
			}
			fclose(fp);
		}
	}
	return content;
#else
	AAsset* asset = AAssetManager_open(mManeger, fileName, AASSET_MODE_UNKNOWN);
	if (NULL == asset) {
		return content;
	}
	size_t size = (size_t)AAsset_getLength(asset);
	content = (char*)malloc(sizeof(char)*size + 1);
	AAsset_read(asset, content, size);
	content[size] = '\0';
	AAsset_close(asset);
	return content;
#endif
}
在JNI层去操作 Bitmap
在 Android 通过 JNI 去调用 Bitmap,通过 CMake 去编 so 动态链接库的话,需要添加 jnigraphics 图像库。
target_link_libraries( # Specifies the target library.
                       native-operation
                       jnigraphics
                       ${log-lib} )
在 Android 中关于 JNI Bitmap 的操作,都定义在 bitmap.h 的头文件里面了
#include <android/bitmap.h>
检索 Bitmap 对象信息
AndroidBitmap_getInfo 函数允许原生代码检索 Bitmap 对象信息,如它的大小、像素格式等,函数签名如下:
/**
 * Given a java bitmap object, fill out the AndroidBitmapInfo struct for it.
 * If the call fails, the info parameter will be ignored.
 */
int AndroidBitmap_getInfo(JNIEnv* env, jobject jbitmap, AndroidBitmapInfo* info);
其中,第一个参数就是 JNI 接口指针,第二个参数就是 Bitmap 对象的引用,第三个参数是指向 AndroidBitmapInfo 结构体的指针。
/** Bitmap info, see AndroidBitmap_getInfo(). */
typedef struct {
    /** The bitmap width in pixels. */
    uint32_t    width;
    /** The bitmap height in pixels. */
    uint32_t    height;
    /** The number of byte per row. */
    uint32_t    stride;
    /** The bitmap pixel format. See {@link AndroidBitmapFormat} */
    int32_t     format;
    /** Unused. */
    uint32_t    flags;      // 0 for now
} AndroidBitmapInfo;
其中,width 就是 Bitmap 的宽,height 就是高,format 就是图像的格式,而 stride 就是每一行的字节数。
图像的格式有如下支持:
/** Bitmap pixel format. */
enum AndroidBitmapFormat {
    /** No format. */
    ANDROID_BITMAP_FORMAT_NONE      = 0,
    /** Red: 8 bits, Green: 8 bits, Blue: 8 bits, Alpha: 8 bits. **/
    ANDROID_BITMAP_FORMAT_RGBA_8888 = 1,
    /** Red: 5 bits, Green: 6 bits, Blue: 5 bits. **/
    ANDROID_BITMAP_FORMAT_RGB_565   = 4,
    /** Deprecated in API level 13. Because of the poor quality of this configuration, it is advised to use ARGB_8888 instead. **/
    ANDROID_BITMAP_FORMAT_RGBA_4444 = 7,
    /** Alpha: 8 bits. */
    ANDROID_BITMAP_FORMAT_A_8       = 8,
};
如果 AndroidBitmap_getInfo 执行成功的话,会返回 0 ,否则返回一个负数,代表执行的错误码列表如下:
/** AndroidBitmap functions result code. */
enum {
    /** Operation was successful. */
    ANDROID_BITMAP_RESULT_SUCCESS           = 0,
    /** Bad parameter. */
    ANDROID_BITMAP_RESULT_BAD_PARAMETER     = -1,
    /** JNI exception occured. */
    ANDROID_BITMAP_RESULT_JNI_EXCEPTION     = -2,
    /** Allocation failed. */
    ANDROID_BITMAP_RESULT_ALLOCATION_FAILED = -3,
};
访问原生像素缓存
AndroidBitmap_lockPixels 函数锁定了像素缓存以确保像素的内存不会被移动。
如果 Native 层想要访问像素数据并操作它,该方法返回了像素缓存的一个原生指针:
/**
 * Given a java bitmap object, attempt to lock the pixel address.
 * Locking will ensure that the memory for the pixels will not move
 * until the unlockPixels call, and ensure that, if the pixels had been
 * previously purged, they will have been restored.
 *
 * If this call succeeds, it must be balanced by a call to
 * AndroidBitmap_unlockPixels, after which time the address of the pixels should
 * no longer be used.
 *
 * If this succeeds, *addrPtr will be set to the pixel address. If the call
 * fails, addrPtr will be ignored.
 */
int AndroidBitmap_lockPixels(JNIEnv* env, jobject jbitmap, void** addrPtr);
其中,第一个参数就是 JNI 接口指针,第二个参数就是 Bitmap 对象的引用,第三个参数是指向像素缓存地址的指针。
AndroidBitmap_lockPixels 执行成功的话返回 0 ,否则返回一个负数,错误码列表就是上面提到的。
释放原生像素缓存
对 Bitmap 调用完 AndroidBitmap_lockPixels 之后都应该对应调用一次 AndroidBitmap_unlockPixels 用来释放原生像素缓存。
当完成对原生像素缓存的读写之后,就应该释放它,一旦释放后,Bitmap Java 对象又可以在 Java 层使用了,函数签名如下:
/**
 * Call this to balance a successful call to AndroidBitmap_lockPixels.
 */
int AndroidBitmap_unlockPixels(JNIEnv* env, jobject jbitmap);
其中,第一个参数就是 JNI 接口指针,第二个参数就是 Bitmap 对象的引用,如果执行成功返回 0,否则返回 1。
对 Bitmap 的操作,最重要的就是 AndroidBitmap_lockPixels 函数拿到所有像素的缓存地址,然后对每个像素值进行操作,从而更改 Bitmap 。
通过 JNI 将 Bitmap 旋转
首先定义一个这样的 native 函数:
// 顺时针旋转 90° 的操作
public native Bitmap rotateBitmap(Bitmap bitmap);
传入一个 Bitmap 对象,然后返回一个 Bitmap 对象。
然后在 C++ 代码中,首先检索 Bitmap 的信息,看看是否成功:
AndroidBitmapInfo bitmapInfo;
int ret;
if ((ret = AndroidBitmap_getInfo(env, bitmap, &bitmapInfo)) < 0) {
    LOGE("AndroidBitmap_getInfo() failed ! error=%d", ret);
    return NULL;
}
接下来就是获得 Bitmap 的像素缓存指针:
// 读取 bitmap 的像素内容到 native 内存
void *bitmapPixels;
if ((ret = AndroidBitmap_lockPixels(env, bitmap, &bitmapPixels)) < 0) {
    LOGE("AndroidBitmap_lockPixels() failed ! error=%d", ret);
    return NULL;
}
这个指针指向的就是 Bitmap 像素内容,它是一个以一维数组的形式保存所有的像素点的值,但是我们在定义 Bitmap 图像时,都会定义宽和高,这就相对于是一个二维的了,那么就存在 Bitmap 的像素内容如何转成指针指向的一维内容,是按照行排列还是按照列排列呢?
在这里是按照行进行排列的,而且行的排列是从左往右,列的排列是从上往下,起始点就和屏幕坐标原点一样,位于左上角。
通过 AndroidBitmap_lockPixels 方法,bitmapPixels 指针就指向了 Bitmap 的像素内容,它的长度就是 Bitmap 的宽和高的乘积。
要将 Bitmap 进行旋转,可以通过直接更改 bitmapPixels 指针指向的像素点的值,也可以通过创建一个新的 Bitmap 对象,然后将像素值填充到 Bitmap 对象中,这里选择后者的实现方式。
在 Java 代码中,通过 createBitmap 方法可以创建一个 Bitmap,如下所示:
Bitmap.createBitmap(int width, int height, @NonNull Config config)
所以在 JNI 中就需要调用 Bitmap 的静态方法来创建一个 Bitmap 对象:
jobject generateBitmap(JNIEnv *env, uint32_t width, uint32_t height) {

    jclass bitmapCls = env->FindClass("android/graphics/Bitmap");
    jmethodID createBitmapFunction = env->GetStaticMethodID(bitmapCls,
                                                            "createBitmap",
                                                            "(IILandroid/graphics/Bitmap$Config;)Landroid/graphics/Bitmap;");
    jstring configName = env->NewStringUTF("ARGB_8888");
    jclass bitmapConfigClass = env->FindClass("android/graphics/Bitmap$Config");
    jmethodID valueOfBitmapConfigFunction = env->GetStaticMethodID(
            bitmapConfigClass, "valueOf",
            "(Ljava/lang/String;)Landroid/graphics/Bitmap$Config;");

    jobject bitmapConfig = env->CallStaticObjectMethod(bitmapConfigClass,
                                                       valueOfBitmapConfigFunction, configName);

    jobject newBitmap = env->CallStaticObjectMethod(bitmapCls,
                                                    createBitmapFunction,
                                                    width,
                                                    height, bitmapConfig);
    return newBitmap;
}
首先通过 FindClass 方法找到 Config 类,得到一个 ARGB_8888 的配置,然后得到 Bitmap 类,调用它的静态方法 createBitmap 创建一个新的 Bitmap 对象。
在这里要传入新 Bitmap 的宽高,这个宽高也是通过 AndroidBitmap_getInfo 方法得到原来的宽高之后,根据不同的操作计算后得到的。
// 旋转操作,新 Bitmap 的宽等于原来的高,新 Bitmap 的高等于原来的宽
uint32_t newWidth = bitmapInfo.height;
uint32_t newHeight = bitmapInfo.width;
有了新的 Bitmap 对象,又有了原有的 Bitmap 像素指针,接下来就是创建新的像素指针,并填充像素内容,然后把这个像素内容再填充到 Bitmap 上。
// 创建一个新的数组指针,把这个新的数组指针填充像素值
uint32_t *newBitmapPixels = new uint32_t[newWidth * newHeight];
int whereToGet = 0;
for (int y = 0; y < newHeight; ++y) {
    for (int x = newWidth - 1; x >= 0; x--) {
        uint32_t pixel = ((uint32_t *) bitmapPixels)[whereToGet++];
        newBitmapPixels[newWidth * y + x] = pixel;
    }
}
在这两个 for循环里面就是从原来的像素指针中取出像素值,然后把它按照特定的排列顺序填充到新的像素指针中对应位置的值,这里也就是前面强调的像素指针是按照行进行排列的,起点是 Bitmap 的左上角。
void *resultBitmapPixels;
if ((ret = AndroidBitmap_lockPixels(env, newBitmap, &resultBitmapPixels)) < 0) {
    LOGE("AndroidBitmap_lockPixels() failed ! error=%d", ret);
    return NULL;
}
int pixelsCount = newWidth * newHeight;
memcpy((uint32_t *) resultBitmapPixels, newBitmapPixels, sizeof(uint32_t) * pixelsCount);
AndroidBitmap_unlockPixels(env, newBitmap);
再次创建一个 resultBitmapPixels 指针,并调用 AndroidBitmap_lockPixels 方法获取新的 Bitmap 的像素指针缓存,然后调用 memcpy 方法,将待填充的像素指针填充到 resultBitmapPixels 上,这样就完成了像素的赋值,最后调用 AndroidBitmap_unlockPixels 方法释放像素指针缓存,完成整个赋值过程。
就这样通过读取原有 Bitmap 的像素内容然后进行操作后再赋值给新的 Bitmap 对象就完成了 JNI 操作 Bitmap 。
通过 JNI 将 Bitmap 上下翻转和左右镜像
将 Bitmap 进行上下翻转以及左右镜像和旋转操作类似了,只是针对像素指针的操作方式不同。
上下翻转的操作:
int whereToGet = 0;
for (int y = 0; y < newHeight; ++y) {
    for (int x = 0; x < newWidth; x++) {
        uint32_t pixel = ((uint32_t *) bitmapPixels)[whereToGet++];
        newBitmapPixels[newWidth * (newHeight - 1 - y) + x] = pixel;
    }
}
左右镜像的操作:
int whereToGet = 0;
for (int y = 0; y < newHeight; ++y) {
    for (int x = newWidth - 1; x >= 0; x--) {
        uint32_t pixel = ((uint32_t *) bitmapPixels)[whereToGet++];
        newBitmapPixels[newWidth * y + x] = pixel;
    }
}
在JNI层使用 choreographer
在 choreographer.h 头文件中有如下定义:
struct AChoreographer;
typedef struct AChoreographer AChoreographer;

/**
 * Prototype of the function that is called when a new frame is being rendered.
 * It's passed the time that the frame is being rendered as nanoseconds in the
 * CLOCK_MONOTONIC time base, as well as the data pointer provided by the
 * application that registered a callback. All callbacks that run as part of
 * rendering a frame will observe the same frame time, so it should be used
 * whenever events need to be synchronized (e.g. animations).
 */
typedef void (*AChoreographer_frameCallback)(long frameTimeNanos, void* data);

#if __ANDROID_API__ >= 24
/**
 * Get the AChoreographer instance for the current thread. This must be called
 * on an ALooper thread.
 */
AChoreographer* AChoreographer_getInstance() __INTRODUCED_IN(24);
/**
 * Post a callback to be run on the next frame. The data pointer provided will
 * be passed to the callback function when it's called.
 */
void AChoreographer_postFrameCallback(AChoreographer* choreographer,
                AChoreographer_frameCallback callback, void* data) __INTRODUCED_IN(24);
/**
 * Post a callback to be run on the frame following the specified delay. The
 * data pointer provided will be passed to the callback function when it's
 * called.
 */
void AChoreographer_postFrameCallbackDelayed(AChoreographer* choreographer,
                AChoreographer_frameCallback callback, void* data,
                long delayMillis) __INTRODUCED_IN(24);
#endif /* __ANDROID_API__ >= 24 */
可以看到,直到API 24之后,才能够从JNI访问choreographer。其他时候只能从Java层获取。
// Indicate API mode to achieve 30 FPS.
enum APIMode {
  kAPINativeChoreographer,
  kAPIJavaChoreographer,
};

struct android_app;

// Declaration for native chreographer API.
struct AChoreographer;

typedef void (*AChoreographer_frameCallback)(long frameTimeNanos, void* data);

typedef AChoreographer* (*func_AChoreographer_getInstance)();

typedef void (*func_AChoreographer_postFrameCallback)(
    AChoreographer* choreographer, AChoreographer_frameCallback callback,
    void* data);

func_AChoreographer_getInstance AChoreographer_getInstance_;
func_AChoreographer_postFrameCallback AChoreographer_postFrameCallback_;

auto apilevel = AConfiguration_getSdkVersion(app_->config);

if (apilevel >= 24) {
    // Native Choreographer API is supported in API level 24~.
    void* lib = dlopen("libandroid.so", RTLD_NOW | RTLD_LOCAL);
    if (lib != nullptr) {
      LOGI("Run with Choreographer Native API.");
      api_mode_ = kAPINativeChoreographer;

      // Retrieve function pointers from shared object.
      AChoreographer_getInstance_ =
          reinterpret_cast<func_AChoreographer_getInstance>(
              dlsym(lib, "AChoreographer_getInstance"));
      AChoreographer_postFrameCallback_ =
          reinterpret_cast<func_AChoreographer_postFrameCallback>(
              dlsym(lib, "AChoreographer_postFrameCallback"));
} else if (apilevel >= 16) {
    // Choreographer Java API is supported API level 16~.
    LOGI("Run with Chreographer Java API.");
    api_mode_ = kAPIJavaChoreographer;
}

if (api_mode_ == kAPINativeChoreographer) {
    // Initiate choreographer callback.
    StartChoreographer();
} else if (api_mode_ == kAPIJavaChoreographer) {
    // Initiate Java choreographer callback.
    StartJavaChoreographer();
}

// Native Chreographer API support.
void Engine::StartChoreographer() {
  // Initiate choreographer callbacks.
  if (api_mode_ == kAPINativeChoreographer) {
    auto choreographer = AChoreographer_getInstance_();
    AChoreographer_postFrameCallback_(choreographer, choreographer_callback,
                                      this);
  }
}

// Native Choreographer callback.
void Engine::choreographer_callback(long frameTimeNanos, void* data) {
  auto engine = reinterpret_cast<Engine*>(data);

  // Post next callback for self.
  if (engine->has_focus_) {
    engine->StartChoreographer();
  }

  // Swap buffer if the timing meets the 30fps time interval condition.
  // The callback is in the same thread context, so that we can just invoke
  // eglSwapBuffers().
  if (COULD_RENDER(frameTimeNanos, engine->prevFrameTimeNanos_)) {
    engine->should_render_ = true;
    engine->Swap();
    // Wake up main looper so that it will continue rendering.
    ALooper_wake(engine->app_->looper);
    engine->prevFrameTimeNanos_ = frameTimeNanos;
  }
}

// Java choreographer API support.
// With Java API, we uses synch primitive to synchronize Java thread and render
// thread.
void Engine::StartJavaChoreographer() {
  JNIEnv* jni;
  app_->activity->vm->AttachCurrentThread(&jni, NULL);
  // Intiate Java Chreographer API.
  jclass clazz = jni->GetObjectClass(app_->activity->clazz);
  jmethodID methodID = jni->GetMethodID(clazz, "startChoreographer", "()V");
  jni->CallVoidMethod(app_->activity->clazz, methodID);
  app_->activity->vm->DetachCurrentThread();
  return;
}

void Engine::StopJavaChoreographer() {
  JNIEnv* jni;
  app_->activity->vm->AttachCurrentThread(&jni, NULL);
  // Intiate Java Chreographer API.
  jclass clazz = jni->GetObjectClass(app_->activity->clazz);
  jmethodID methodID = jni->GetMethodID(clazz, "stopChoreographer", "()V");
  jni->CallVoidMethod(app_->activity->clazz, methodID);
  app_->activity->vm->DetachCurrentThread();
  // Make sure the render thread is not blocked.
  cv_.notify_one();
  return;
}
在JNI层使用 configuration.h
configuration.h 头文件中主要定义了一些手机的属性。使用时通过 AConfiguration_xxx 获取。
在JNI层使用 hardware_buffer_jni.h
头文件中主要定义了两个函数:
/**
 * Return the AHardwareBuffer associated with a Java HardwareBuffer object,
 * for interacting with it through native code. This method does not acquire any
 * additional reference to the AHardwareBuffer that is returned. To keep the
 * AHardwareBuffer live after the Java HardwareBuffer object got garbage
 * collected, be sure to use AHardwareBuffer_acquire() to acquire an additional
 * reference.
 */
AHardwareBuffer* AHardwareBuffer_fromHardwareBuffer(JNIEnv* env,
        jobject hardwareBufferObj);
/**
 * Return a new Java HardwareBuffer object that wraps the passed native
 * AHardwareBuffer object.
 */
jobject AHardwareBuffer_toHardwareBuffer(JNIEnv* env,
        AHardwareBuffer* hardwareBuffer);
在JNI层使用 input.h
在JNI层使用 keycodes.h
在JNI层使用 looper.h
如果我们在子线程调用了一个native方法,在C++的代码中,我们想要切换到主线程调用某个方法时,该如何切换线程呢?
final String s = mEditTest.getText().toString();
for (int i = 0 ; i < 3 ; i++){
    new Thread(new Runnable() {
        @Override
        public void run() {
            nativeToast(s);
        }
    }).start();
}
public native void init();
public native void nativeToast(String text);

public static void toast(String text){
    Toast.makeText(MyAppImpl.getAppContext(), text, Toast.LENGTH_SHORT).show();
}
在上面的代码中,native层的nativeToast其实就是调用了Java层的toast方法。只是在调用之前,做了线程的转换,在C++层的主线程调用了toast。
native-lib.cpp
#include <jni.h>
#include <string>
#include "main_looper.h"
#include "jvm_helper.h"

extern "C"
{

JNIEXPORT void JNICALL
Java_com_example_oceanlong_ndkmaintest_MainActivity_init(JNIEnv *env, jobject instance) {

    JniHelper::setJVM(env);
    MainLooper::GetInstance()->init();
    LOGD("init env : %p", env);
}

JNIEXPORT void JNICALL
Java_com_example_oceanlong_ndkmaintest_MainActivity_nativeToast(JNIEnv *env, jobject instance,jstring text_) {

    const char* ctext = JniHelper::jstr2char(env, text_);
    LOGD("nativeToast  : %s", ctext);
    MainLooper::GetInstance()->send(ctext);
    env->ReleaseStringUTFChars(text_, ctext);
}
}
初始化的代码中,其实只做了两件事情:
- 缓存一个全局的JNIEnv *
- 初始化native的looper
初始化必须在主线程中执行!
main_looper.h & main_looper.cpp
#include <android/looper.h>
#include <string>
#include "logger.h"

class MainLooper
{
public:
    static MainLooper *GetInstance();
    ~MainLooper();
    void init();
    void send(const char* msg);

private:
    static MainLooper *g_MainLooper;
    MainLooper();
    ALooper* mainlooper;
    int readpipe;
    int writepipe;
    pthread_mutex_t looper_mutex_;
    static int handle_message(int fd, int events, void *data);
};
#include <fcntl.h>
#include "main_looper.h"
#include <stdint.h>
#include "string.h"
#include <stdlib.h>
#include <unistd.h>
#include "toast_helper.h"

#define LOOPER_MSG_LENGTH 81

MainLooper *MainLooper::g_MainLooper = NULL;


MainLooper *MainLooper::GetInstance()
{
    if (!g_MainLooper)
    {
        g_MainLooper = new MainLooper();
    }
    return g_MainLooper;
}

MainLooper::MainLooper(){
    pthread_mutex_init(&looper_mutex_, NULL);
}

MainLooper::~MainLooper() {
    if (mainlooper && readpipe != -1)
    {
        ALooper_removeFd(mainlooper, readpipe);
    }
    if (readpipe != -1)
    {
        close(readpipe);
    }
    if (writepipe != -1)
    {
        close(writepipe);
    }
    pthread_mutex_destroy(&looper_mutex_);
}

void MainLooper::init() {

    int msgpipe[2];
    pipe(msgpipe);
    readpipe = msgpipe[0];
    writepipe = msgpipe[1];

    mainlooper = ALooper_prepare(0);
    int ret = ALooper_addFd(mainlooper, readpipe, 1, ALOOPER_EVENT_INPUT, MainLooper::handle_message, NULL);
}

int MainLooper::handle_message(int fd, int events, void *data) {

    char buffer[LOOPER_MSG_LENGTH];
    memset(buffer, 0, LOOPER_MSG_LENGTH);
    read(fd, buffer, sizeof(buffer));
    LOGD("receive msg %s" , buffer);
    Toast::GetInstance()->toast(buffer);
    return 1;
}
初始化中,最关键的两句话是:
mainlooper = ALooper_prepare(0);
int ret = ALooper_addFd(mainlooper, readpipe, 1, ALOOPER_EVENT_INPUT, MainLooper::handle_message, NULL);
其中,ALooper_prepare 方法的定义:
/**
 * Prepares a looper associated with the calling thread, and returns it.
 * If the thread already has a looper, it is returned.  Otherwise, a new
 * one is created, associated with the thread, and returned.
 *
 * The opts may be ALOOPER_PREPARE_ALLOW_NON_CALLBACKS or 0.
 */
ALooper* ALooper_prepare(int opts);
ALooper_prepare会返回被调用线程的looper。由于我们是在主线程对MainLooper进行的初始化,返回的也是主线程的looper。
接下来再来看一下ALooper_addFd方法:
/**
 * Adds a new file descriptor to be polled by the looper.
 * If the same file descriptor was previously added, it is replaced.
 *
 * "fd" is the file descriptor to be added.
 * "ident" is an identifier for this event, which is returned from ALooper_pollOnce().
 * The identifier must be >= 0, or ALOOPER_POLL_CALLBACK if providing a non-NULL callback.
 * "events" are the poll events to wake up on.  Typically this is ALOOPER_EVENT_INPUT.
 * "callback" is the function to call when there is an event on the file descriptor.
 * "data" is a private data pointer to supply to the callback.
 *
 * There are two main uses of this function:
 *
 * (1) If "callback" is non-NULL, then this function will be called when there is
 * data on the file descriptor.  It should execute any events it has pending,
 * appropriately reading from the file descriptor.  The 'ident' is ignored in this case.
 *
 * (2) If "callback" is NULL, the 'ident' will be returned by ALooper_pollOnce
 * when its file descriptor has data available, requiring the caller to take
 * care of processing it.
 *
 * Returns 1 if the file descriptor was added or -1 if an error occurred.
 *
 * This method can be called on any thread.
 * This method may block briefly if it needs to wake the poll.
 */
int ALooper_addFd(ALooper* looper, int fd, int ident, int events,
        ALooper_callbackFunc callback, void* data);
我们需要的用法简而言之就是,fd监测到变化时,会在looper所在的线程中,调用callback方法。
通过初始中的这样两个方法,我们就构建了一条通往主线程的通道。
发往主线程
在初始化的方法中,我们构筑了一条消息通道。接下来,我们就需要将消息发送至主线程。
void MainLooper::init() {

    int msgpipe[2];
    pipe(msgpipe);
    readpipe = msgpipe[0];
    writepipe = msgpipe[1];

    mainlooper = ALooper_prepare(0);
    int ret = ALooper_addFd(mainlooper, readpipe, 1, ALOOPER_EVENT_INPUT, MainLooper::handle_message, NULL);
}

int MainLooper::handle_message(int fd, int events, void *data) {

    char buffer[LOOPER_MSG_LENGTH];
    memset(buffer, 0, LOOPER_MSG_LENGTH);
    read(fd, buffer, sizeof(buffer));
    LOGD("receive msg %s" , buffer);
    Toast::GetInstance()->toast(buffer);
    return 1;
}

void MainLooper::send(const char *msg) {

    pthread_mutex_lock(&looper_mutex_);
    LOGD("send msg %s" , msg);
    write(writepipe, msg, strlen(msg));
    pthread_mutex_unlock(&looper_mutex_);
}
首先我们可以看到,在init方法中,我们创建了通道msgpipe。将readpipe加入了ALooper_addFd中。
所以,我们接下来只需要对writepipe进行写入,即可将消息发送至主线程。
调用toast & toast_helper.cpp & jvm_helper.cpp
#include "toast_helper.h"
#include "jvm_helper.h"
#include "logger.h"

Toast *Toast::g_Toast = NULL;

Toast *Toast::GetInstance() {
    if (!g_Toast){
        g_Toast = new Toast();
    }
    return g_Toast;
}

void Toast::toast(std::string text) {
    JNIEnv *env = JniHelper::getJVM();
    LOGD("toast env : %p", env);

    jstring jtext = JniHelper::char2jstr(text.c_str());

    jclass javaclass = JniHelper::findClass(env,"com/example/oceanlong/ndkmaintest/MainActivity");
    jmethodID jfuncId = env->GetStaticMethodID(javaclass, "toast", "(Ljava/lang/String;)V");
    env->CallStaticVoidMethod(javaclass, jfuncId, jtext);
    env->DeleteLocalRef(jtext);
}
jstring JniHelper::char2jstr(const char* pat) {
    JNIEnv *env = getJVM();
    LOGD("char2jstr %p", env);
    // 定义java String类 strClass
    jclass strClass = (env)->FindClass("java/lang/String");
    //获取String(byte[],String)的构造器,用于将本地byte[]数组转换为一个新String
    jmethodID ctorID = (env)->GetMethodID(strClass, "<init>", "([BLjava/lang/String;)V");
    //建立byte数组
    jbyteArray bytes = (env)->NewByteArray(strlen(pat));
    //将char* 转换为byte数组
    (env)->SetByteArrayRegion(bytes, 0, strlen(pat), (jbyte*) pat);
    // 设置String, 保存语言类型,用于byte数组转换至String时的参数
    jstring encoding = (env)->NewStringUTF("UTF-8");
    //将byte数组转换为java String,并输出
    return (jstring) (env)->NewObject(strClass, ctorID, bytes, encoding);


}

jclass JniHelper::findClass(JNIEnv *env, const char* name) {
    jclass result = nullptr;
    if (env)
    {
        //这句会出错,所以要处理错误
        result = env->FindClass(name);
        jthrowable exception = env->ExceptionOccurred();
        if (exception)
        {
            env->ExceptionClear();
            return static_cast<jclass>(env->CallObjectMethod(gClassLoader, gFindClassMethod, env->NewStringUTF(name)));
        }
    }
    return result;
}
findClass失败
通常,我们在native层想调用Java方法时,我们首先要获取Java中的方法所在的类。我们一般的方法是:
result = env->FindClass(name);
但如果在子线程中获取时,就会出现找不到类的情况。
当我们在自己创建的子线程想要通过JVM获取Class时,Android会为我们启动系统的ClassLoader而不是我们App的ClassLoader。
通过缓存一个静态的全局ClassLoader对象,当env->findClass失败时,通过缓存的ClassLoader获取需要的类。
void JniHelper::setJVM(JNIEnv *env) {
    jvmEnv = env;
    jclass randomClass = env->FindClass("com/example/oceanlong/ndkmaintest/MainActivity");
    jclass classClass = env->GetObjectClass(randomClass);
    jclass classLoaderClass = env->FindClass("java/lang/ClassLoader");
    jmethodID getClassLoaderMethod = env->GetMethodID(classClass, "getClassLoader",
                                                      "()Ljava/lang/ClassLoader;");
    jobject localClassLoader = env->CallObjectMethod(randomClass, getClassLoaderMethod);
    gClassLoader = env->NewGlobalRef(localClassLoader);
    //我在Android中用findClass不行,改成loadClass才可以找到class
    gFindClassMethod = env->GetMethodID(classLoaderClass, "findClass",
                                        "(Ljava/lang/String;)Ljava/lang/Class;");
}

jclass JniHelper::findClass(JNIEnv *env, const char* name) {
    jclass result = nullptr;
    if (env)
    {
        result = env->FindClass(name);
        jthrowable exception = env->ExceptionOccurred();
        if (exception)
        {
            env->ExceptionClear();
            return static_cast<jclass>(env->CallObjectMethod(gClassLoader, gFindClassMethod, env->NewStringUTF(name)));
        }
    }
    return result;
}
ALooper_addFd的"粘包现象"
当我并发给main_looper发送消息时,发现ALooper_addFd没有解决并发问题。
mBtnTest.setOnClickListener(new View.OnClickListener() {
    @Override
    public void onClick(View v) {

        final String s = mEditTest.getText().toString();
        for (int i = 0 ; i < 5 ; i++){
            new Thread(new Runnable() {
                @Override
                public void run() {
                    nativeToast(s);
                }
            }).start();
        }
    }
});
5个线程几乎同时发送消息。最终的日志是:
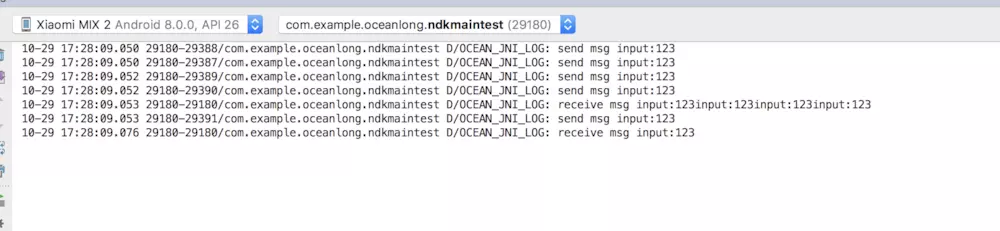
总共发送了5次,但handle_message只调用了两次。
在JNI层使用 multinetwork.h
在JNI层使用 native_activity.h
在JNI层使用 native_window_jni.h
在JNI层使用 obb.h
在JNI层使用 sensor.h
在JNI层使用 sharedmem.h
在JNI层使用 sharedmem_jni.h
在JNI层使用 storage_manager.h
在JNI层使用 surface_texture.h
在JNI层使用 surface_texture_jni.h
在JNI层使用 trace.h
Native层在Android 6.0 (API level 23)及以上版本支持添加trace.
- 为ATrace函数定义函数指针,如下面的代码片段所示:
#include <android/trace.h>
#include <dlfcn.h>

void *(*ATrace_beginSection) (const char* sectionName);
void *(*ATrace_endSection) (void);

typedef void *(*fp_ATrace_beginSection) (const char* sectionName);
typedef void *(*fp_ATrace_endSection) (void);
- 加载ATrace_xxx符号,如下面的代码片段所示:
// Retrieve a handle to libandroid.
void *lib = dlopen("libandroid.so", RTLD_NOW || RTLD_LOCAL);

// Access the native tracing functions.
if (lib != NULL) {
    // Use dlsym() to prevent crashes on devices running Android 5.1
    // (API level 22) or lower.
    ATrace_beginSection = reinterpret_cast<fp_ATrace_beginSection>(
        dlsym(lib, "ATrace_beginSection"));
    ATrace_endSEction = reinterpret_cast<fp_ATrace_endSection>(
        dlsym(lib, "ATrace_endSection"));
}
注:出于安全考虑,dlopen操作只在debug时使用,另外如果要在Android 4.3 (API级别18)使用trace功能,可以通过JNI调用如上接口。
- 在需要分析的函数开始和结束处分别调用ATrace_beginSection()和ATrace_endSection():
#include <android/trace.h>

char *customEventName = new char[32];
sprintf(customEventName, "User tapped %s button", buttonName);

ATrace_beginSection(customEventName);
// Your app or game's response to the button being pressed.
ATrace_endSection();
