

本文使用的是JUnit4.12 Spring test5.0.7.RELEASE源码
前因
前不久遇到一个问题,一个Spring Boot项目的普通单元测试能够正常使用Spring test的特性,例如依赖注入、事务管理等,一旦使用JUnit4提供的@RunWith(Parameterized.class)参数化测试后,Spring test的特性便不再适用。查遍网上的中文资料,都没有给出完美的解决方案,更多的是简单调用TestContextManager.prepareTestInstance()来实现Spring的初始化,没有解决事务管理等Spring test特性不可用的问题。基于原因,我决定好好研究一下JUnit4与Spring test的源码,理解它们的实现原理、拓展机制,找到方法彻底解决这类问题。
以上问题可以拆分成四个子问题,分别是:
- JUnit4内部是如何工作的
- Spring test如何在JUnit4上拓展
- Parameterized、Suite和BlockJUnit4ClassRunner有何异同
- 如何让参数化测试与Spring test完美结合
1. JUnit4内部是如何工作的
(1) 关键类的介绍
Runner 描述一个测试案例总体上该如何执行,其核心是run(RunNotifier)方法,其中RunNotifier用于发布通知
ParentRunner 继承自Runner,源码中的注释是这样的
Provides most of the functionality specific to a Runner that implements a "parent node" in the test tree, with children defined by objects of some data type T. (For BlockJUnit4ClassRunner, T is Method . For Suite, T is Class.)
大意就是把测试案例构造成类似Tree的结构,child是泛型T,对于BlockJUnit4ClassRunner来说T是Method, 而Suite的T是Class
BlockJUnit4ClassRunner JUnit4的默认Runner,继承自ParentRunner
Statement 描述一个JUnit4单元测试具体要做的事情,是JUnit4拓展的核心,它只有一个方法evaluate()
RunnerBuilder 描述如何构建一组Runner
JUnitCore JUnit4最开始启动的地方
(2) 一个单元测试的运行过程
通常在IDE手动运行单元测试查看案例缺陷率,代码覆盖率都是由Eclipse/Intellij IDEA等IDE作为主入口,然后调起run(Request)获取该测试案例的Runner
public Result run(Request request) {
    return run(request.getRunner());
}
随后默认会以IgnoredBuilder, AnnotatedBuilder, SuiteMethodBuilder, Junit3Builder, Junit4Builder的先后顺序寻找适合的RunnerBuilder
@Override
public Runner runnerForClass(Class<?> testClass) throws Throwable {
    List<RunnerBuilder> builders = Arrays.asList(
        ignoredBuilder(),
        annotatedBuilder(),
        suiteMethodBuilder(),
        junit3Builder(),
        junit4Builder());

    for (RunnerBuilder each : builders) {
        Runner runner = each.safeRunnerForClass(testClass);
        if (runner != null) {
            return runner;
        }
    }
    return null;
}
IgnoredBuilder的优先级最高,寻找测试类是否有@Ignore注解,创建IgnoredClassRunner,该测试案例会被忽略
AnnotatedBuilder的优先级次高,我们大多数测试案例都属于这种情况.它寻找测试类是否有@RunWith注解,反射调用(Class)构造方法,如果找不到则调用(Class,RunnerBuilder)构造方法
@Override
public Runner runnerForClass(Class<?> testClass) throws Exception {
    for (Class<?> currentTestClass = testClass; currentTestClass != null;
        currentTestClass = getEnclosingClassForNonStaticMemberClass(currentTestClass)) {
        RunWith annotation = currentTestClass.getAnnotation(RunWith.class);
        if (annotation != null) {
            return buildRunner(annotation.value(), testClass);
        }
    }
    return null;
}
public Runner buildRunner(Class<? extends Runner> runnerClass,
        Class<?> testClass) throws Exception {
    try {
        return runnerClass.getConstructor(Class.class).newInstance(testClass);
    } catch (NoSuchMethodException e) {
        try {
            return runnerClass.getConstructor(Class.class,
                RunnerBuilder.class).newInstance(testClass, suiteBuilder);
        } catch (NoSuchMethodException e2) {
            String simpleName = runnerClass.getSimpleName();
            throw new InitializationError(String.format(
                CONSTRUCTOR_ERROR_FORMAT, simpleName, simpleName));
        }
    }
}
再到SuiteMethodBuilder,寻找命名为suite的method
Junit3Builder会判断测试类是否TestCase的子类,这是为了兼容JUnit3
如果以上条件都不符合,就会使用Junit4Builder,默认使用BlockJUnit4ClassRunner,因此如果我们的测试案例没有额外的注解,都是使用BlockJUnit4ClassRunner运行
确定了Runner后,JUnitCore就执行run(Runner),调用Runner.run(Notifier)
public Result run(Runner runner) {
    Result result = new Result();
    RunListener listener = result.createListener();
    notifier.addFirstListener(listener);
    try {
        notifier.fireTestRunStarted(runner.getDescription());
        runner.run(notifier);
        notifier.fireTestRunFinished(result);
    } finally {
        removeListener(listener);
    }
    return result;
}
不同的Runner实现方式不同,下面以默认的BlockJUnit4ClassRunner为例分析
BlockJUnit4ClassRunner没有重写run()方法,因此调用了父类ParentRunner.run()。 方法逻辑很简单, classBlock()构建一个statement,然后执行statement的evaluate()
@Override
public void run(final RunNotifier notifier) {
    EachTestNotifier testNotifier = new EachTestNotifier(notifier,
        getDescription());
    try {
        Statement statement = classBlock(notifier);
        statement.evaluate();
    } catch (AssumptionViolatedException e) {
        testNotifier.addFailedAssumption(e);
    } catch (StoppedByUserException e) {
        throw e;
    } catch (Throwable e) {
        testNotifier.addFailure(e);
    }
}
我们看一下classBlock
protected Statement classBlock(final RunNotifier notifier) {
    Statement statement = childrenInvoker(notifier);
    if (!areAllChildrenIgnored()) {
        statement = withBeforeClasses(statement);
        statement = withAfterClasses(statement);
        statement = withClassRules(statement);
    }
    return statement;
}
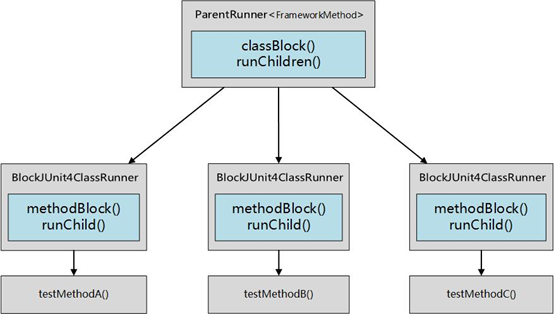
childrenInvoker()构造了一个statement,执行runChildren()方法,因为是ParentRunner,所以对它来说主要是runChildren(),至于withBeforeClasses(),withAfterClasses()的作用,我们稍后再分析
private void runChildren(final RunNotifier notifier) {
    final RunnerScheduler currentScheduler = scheduler;
    try {
        for (final T each : getFilteredChildren()) {
            currentScheduler.schedule(new Runnable() {
                public void run() {
                    ParentRunner.this.runChild(each, notifier);
                }
            });
        }
    } finally {
        currentScheduler.finished();
    }
}
其逻辑也十分简单,根据getChildren()获取Children列表,然后逐个调用runChild()。getChildren()和runChild()在ParentRunner中都没有实现,我们来看一下子类BlockJUnit4ClassRunner的实现
@Override
protected void runChild(final FrameworkMethod method, RunNotifier notifier) {
    Description description = describeChild(method);
    if (isIgnored(method)) {
        notifier.fireTestIgnored(description);
    } else {
        runLeaf(methodBlock(method), description, notifier);
    }
}
getChildren()寻找测试类中被@Test注解的方法
runChild()则是对每个child(在BlockJUnit4ClassRunner中就是method)调用methodBlock()封装,然后调用statement.evaluate(),执行整个测试方法
BlockJUnit4ClassRunner的运行过程如下所示
protected Statement methodBlock(FrameworkMethod method) {
    Object test;
    try {
        test = new ReflectiveCallable() {
            @Override
            protected Object runReflectiveCall() throws Throwable {
                return createTest();
            }
        }.run();
    } catch (Throwable e) {
        return new Fail(e);
    }

    Statement statement = methodInvoker(method, test);
    statement = possiblyExpectingExceptions(method, test, statement);
    statement = withPotentialTimeout(method, test, statement);
    statement = withBefores(method, test, statement);
    statement = withAfters(method, test, statement);
    statement = withRules(method, test, statement);
    return statement;
}
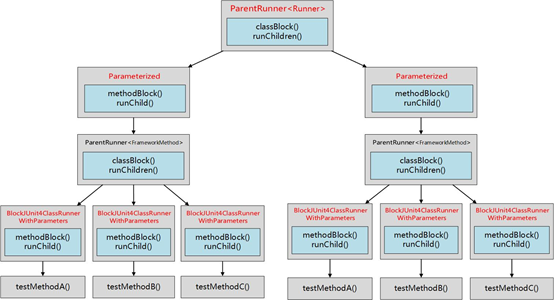
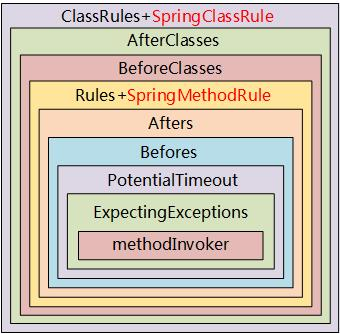
我们可以看到classBlock()和methodBlock()不停对statement进行包装,上一个方法返回的statement作为下一个方法的参数.这种设计模式与责任链,Struts2的拦截器十分相似,每一次包装都会把参数statement作为next,然后调用自身的逻辑 假设有一个测试类TestClass,他有两个测试方法,分别是testMethodA()和testMethodB(),那么这个测试类的运行图如下所示
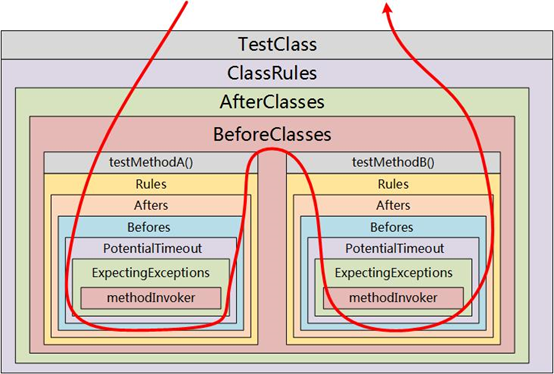
- ClassRules对应@ClassRule注解
- AfterClasses对应@AfterClass注解
- BeforeClasses对应@BeforeClass注解
- Rules对应@Rule注解
- Afters对应@ClassRule注解
- Beofres对应@ClassRule注解
- PotentialTimeout对应@Test注解的timeout属性
- ExpectingExceptions对应@Test注解的expected属性
- methodInvoker对应反射调起的测试方法
这便完全与我们使用JUnit4的注解对应上了,至此,我们已经了解JUnit4内部的工作原理
2. Spring test如何在JUnit4上拓展
那么Spring作为Java开发的核心框架,他是如何把自身的test特性拓展在JUnit4上?
关键在于TestContextManager和SpringJUnit4ClassRunner(或者叫做SpringRunner),后者继承BlockJUnit4ClassRunner并重写了部分方法
@Override
protected Statement methodBlock(FrameworkMethod frameworkMethod) {
   Object testInstance;
   try {
      testInstance = new ReflectiveCallable() {
        @Override
        protected Object runReflectiveCall() throws Throwable {
            return createTest();
        }
      }.run();
   }
   catch (Throwable ex) {
      return new Fail(ex);
   }
   Statement statement = methodInvoker(frameworkMethod, testInstance);
   statement = withBeforeTestExecutionCallbacks(frameworkMethod, testInstance, statement);
   statement = withAfterTestExecutionCallbacks(frameworkMethod, testInstance, statement);
   statement = possiblyExpectingExceptions(frameworkMethod, testInstance, statement);
   statement = withBefores(frameworkMethod, testInstance, statement);
   statement = withAfters(frameworkMethod, testInstance, statement);
   statement = withRulesReflectively(frameworkMethod, testInstance, statement);
   statement = withPotentialRepeat(frameworkMethod, testInstance, statement);
   statement = withPotentialTimeout(frameworkMethod, testInstance, statement);
   return statement;
}
我们可以看到他与BlockJUnit4ClassRunner.methodBlock()大致相同,区别在于他额外添加了BeforeTestExecution, AfterTestExecution和PotentialRepeat,前两者是Spring test自身添加的包装点,不在JUnit4默认提供的包装点中,后者是对@Repeat注解的支持
除此之外,Spring test还提供了TestExecutionListener监听器,7个接口方法对应测试案例的7个包装点
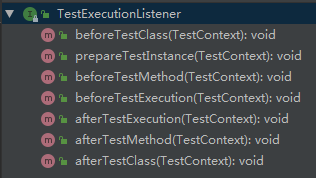
- prepareTestInstance()对应实例初始化时的准备
- beforeTestClass()处于@BeforeClass执行点之后
- beforeTestMethod()处于@Before执行点之后, 如开启事务等
- beforeTestExecution()处于最接近测试方法执行前
- afterTestExecution()处于ExpectException执行点之后,最接近测试方法执行后,
- afterTestMethod()处于@After执行点之后, 如提交或回滚事务
- afterTestClass()处于@AfterClass执行点之后
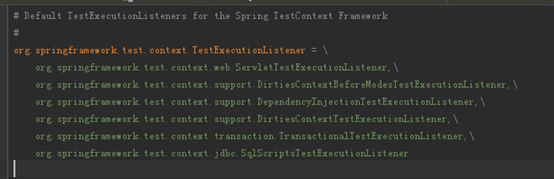
还有一点必须要提到的是,在SpringJUnit4ClassRunner被JUnitCore初始化的时候,会创建Spring的TestContextManager,他会找到classpath下META-INF/spring.factories中定义好的TestExecutionListener,Spring Boot项目通常会找到12个,分别在spring-test,spring-boot-test和spring-boot-test-autoconfigure三个jar包下,因此如果要根据项目需求自定义TestExecutionListener,只需要按照上述方式设计便可注入到测试案例的生命周期中
@Override
public void beforeTestMethod(final TestContext testContext) throws Exception {
   Method testMethod = testContext.getTestMethod();
   Class<?> testClass = testContext.getTestClass();
   // 省略部分代码
      tm = getTransactionManager(testContext, transactionAttribute.getQualifier());
      Assert.state(tm != null,
            () -> "Failed to retrieve PlatformTransactionManager for @Transactional test: " + testContext);
   }
   // 开启事务
   if (tm != null) {
      txContext = new TransactionContext(testContext, tm, transactionAttribute, isRollback(testContext));
      runBeforeTransactionMethods(testContext);
      txContext.startTransaction();
      TransactionContextHolder.setCurrentTransactionContext(txContext);
   }
}
他实现了beforeTestMethod()和afterTestMethod(),在这两个方法中开启/提交/回滚事务
综上, SpringJUnit4ClassRunner的一个statement有这么多运行过程(我也很佩服我自己竟然画了出来)

3. Parameterized、Suite和BlockJUnit4ClassRunner有何异同
在JUnit4里,@RunWith里经常搭配BlockJUnit4ClassRunner或Parameterized参数, BlockJUnit4ClassRunner在上文已经详细介绍了,下面介绍一下Parameterized
Parameterized继承自Suite,Suite用于多个测试类合在一起跑,而Parameterized是一个测试类对多组参数执行多次,与Suite本质上很类似,也就理解为何Parameterized会继承Suite了
Suite继承自ParentRunner,注意不同于BlockJUnit4ClassRunner继承自ParentRunner,说明Suite的children是Runner,比BlockJUnit4ClassRunner更高一级.因此Suite的getChildren()就是返回runners ,而runChild()就是对runner调用run()
@Override
protected List<Runner> getChildren() {
    return runners;
}
@Override
protected void runChild(Runner runner, final RunNotifier notifier) {
    runner.run(notifier);
}
Parameterized与Suite的差异在于,Suite的Children是测试类集合对应的Runner集合.
Parameterized根据有多少组参数化数组,就构建多少组BlockJUnit4ClassRunnerWithParameters,然后将每一组参数化数组注入到每一个Runner中,之后就可以像Suite一样runChild()
4. 如何让参数化测试与Spring test完美结合
结合上文描述的Spring test 和Parameterized可知,参数化测试默认使用的Runner是BlockJUnit4ClassRunnerWithParameters,它继承了BlockJUnit4ClassRunner实现了注入参数的功能,没有Spring test的特性
在Parameterized的源码注释中有一段话给了我们提示
By default the Parameterized runner creates a slightly modified BlockJUnit4ClassRunner for each set of parameters. You can build an own Parameterized runner that creates another runner for each set of parameters. Therefore you have to build a ParametersRunnerFactory that creates a runner for each TestWithParameters. (TestWithParameters are bundling the parameters and the test name.) The factory must have a public zero-arg constructor. Use the Parameterized.UseParametersRunnerFactory to tell the Parameterized runner that it should use your factory.
大意就是如果想自定义Parameterized的Runner,请重新实现ParametersRunnerFactory并构建一个可以注入参数的Runner,然后用@ UseParametersRunnerFactory注解来指定自定义的工厂.
所以我们只需要设计一个类SpringJUnit4ClassRunnerWithParametersFactory继承SpringJUnit4ClassRunner,确保支持Spring test的特性,然后重新加入注入参数的功能就好了,这部分功能可以参考BlockJUnit4ClassRunnerWithParameters来实现.
在实现的过程中我们发现SpringJUnit4ClassRunner和BlockJUnit4ClassRunnerWithParameters都重写了createTest()方法,那我们只需把两个方法融合在一起就好了 最后效果如下
@Override
public Object createTest() throws Exception {
    Object testInstance;
    if (fieldsAreAnnotated()) {
        testInstance = createTestUsingFieldInjection();
    } else {
        testInstance = createTestUsingConstructorInjection();
    }
    getTestContextManager().prepareTestInstance(testInstance);
    return testInstance;
}
当然这不是唯一的解决方法,Spring test提供了另外一种更通用的解决方法,就是在原本BlockJUnit4ClassRunner的Rules和ClassRules处添加上Spring test的功能
    @ClassRule
    public static final SpringClassRule springClassRule = new SpringClassRule();
    @Rule
    public final SpringMethodRule springMethodRule = new SpringMethodRule();
但这种方法有个弊端,由于TestExecutionListener接口定义了3套注入点,JUnit4只提供了2个注入的地方,对于before/afterTestExecution是无法注入的,要千万注意!
下面也是官方源码中提醒我们注意(吐槽JUnit4的缺点)
WARNING: Due to the shortcomings of JUnit rules, the SpringMethodRule does not support the beforeTestExecution() and afterTestExecution() callbacks of the TestExecutionListener API.
所幸的是,Spring test提供的12个TestExecutionListener都没有使用before/afterTestExecution,所以那12个TestExecutionListener在这种方式下仍能正常运行
杂七杂八说点什么
JUnit4和Spring test的源码还是比较容易理解的,不得不说,调试+堆栈+注释真是理解源码的三大法宝。当然了JUnit4和Spring test的内容不仅仅是这些,本文只是将关键设计抽出来分析,技术就是一个越挖越深的巨坑啊
在阅读源码的时候还发现了一些有趣的地方, SpringJUnit4ClassRunner在加载的时候,会找出JUnit4的withRules方法,用反射改成public,仿佛在吐槽JUnit4不把这个方法开放,但Spring偏要扩展这个方法
static {
   Assert.state(ClassUtils.isPresent("org.junit.internal.Throwables", SpringJUnit4ClassRunner.class.getClassLoader()),
         "SpringJUnit4ClassRunner requires JUnit 4.12 or higher.");
   Method method = ReflectionUtils.findMethod(SpringJUnit4ClassRunner.class, "withRules",
         FrameworkMethod.class, Object.class, Statement.class);
   Assert.state(method != null, "SpringJUnit4ClassRunner requires JUnit 4.12 or higher");
   ReflectionUtils.makeAccessible(method);
   withRulesMethod = method;
}
至于为什么会分析JUnit4,因为Spring-boot-starter-test默认就引入了JUnit4,我也不知道为什么不引入JUnit5.如果有小伙伴知道原因麻烦私信留言告诉我.基于JUnit5的新特性,后续可能会使用它,如果到时候有新的发现会再写一篇文章
感谢小伙伴耐心看完了整篇文章,如果觉得对你有一点帮助,不妨关注一下
