

kubernetes来源于希腊语,意为舵手或领航员,从k8s的logo也能看出这个船舵图标与其名称对应。而我们常说的k8s中的8代表的就是ubernete这个八个字符。这里引用k8s中文社区文档对k8s的描述:Kubernetes是一个开源的,用于管理云平台中多个主机上的容器化的应用,Kubernetes的目标是让部署容器化的应用简单并且高效(powerful),Kubernetes提供了应用部署,规划,更新,维护的一种机制。
环境、主从节点规划
各个节点规划
| IP地址 | 角色 | 服务器系统 |
|---|---|---|
| 172.31.76.16 | k8s从节点 | CentOS 7.6 |
| 172.31.76.17 | k8s从节点 | CentOS 7.6 |
| 172.31.76.18 | k8s主节点 | CentOS 7.6 |
每个节点软件版本
| 软件名称 | 版本 | 作用 |
|---|---|---|
| Docker | 18.09.6 | 容器 |
| Kubernetes | 1.14.2 | 管理容器 |
Kubernetes安装组件介绍
| 组件名称 | 版本 | 作用 |
|---|---|---|
| kubeadm | 1.14.2-0 | 初始化k8s集群工具 |
| kubectl | 1.14.2-0 | k8s命令行工具,命令控制部署管理应用,CRUD各种资源 |
| kubelet | 1.14.2-0 | 运行于所有节点上,负责启动容器和 Pod |
准备工作
每台节点服务器设置主机名
# 主节点主机名对应 172.31.76.18
hostnamectl --static set-hostname  k8s-master
# 从节点主机名对应 172.31.76.16 172.31.76.17
hostnamectl --static set-hostname  k8s-node-1
hostnamectl --static set-hostname  k8s-node-2
- 使用 hostnamectl命令可以查看是否设置成功
# 使用hostnamectl命令 显示信息
Static hostname: k8s-node-1
Transient hostname: docker_76_16
         Icon name: computer-vm
           Chassis: vm
        Machine ID: 8919fc90446b48fcbeb2c6cf267caba2
           Boot ID: a684023646094b999b7ace62aed3cd2e
    Virtualization: vmware
  Operating System: CentOS Linux 7 (Core)
       CPE OS Name: cpe:/o:centos:centos:7
            Kernel: Linux 3.10.0-327.el7.x86_64
      Architecture: x86-64
- 每个节点的主机加入host 解析
# 编辑每台机器的 /etc/hosts文件,写入下面内容

172.31.76.16 k8s-node-1
172.31.76.17 k8s-node-2
172.31.76.18 k8s-master
- 关闭每个节点的防火墙
# 注意以下命令是下次生效
systemctl disable firewalld.service
systemctl stop firewalld.service

# 关闭防火墙立即生效
iptables -F

# 防火墙关闭后可以使用以下命令查看防火墙状态
systemctl status firewalld
- 临时禁用SELINUX(它是一个 Linux 内核模块,也是 Linux 的一个安全子系统),我的机器默认是关闭的
setenforce 0                  ##设置SELinux 成为permissive模式 (不用重启机器)

# 修改配置文件 (重启机器生效)
vim /etc/selinux/config
SELINUX=disabled
- 每个节点关闭 swap
swapoff -a
各个节点组件安装
- 经过前面的准备工作,接下来我们开始安装组件,注意一下组件每个节点都需要安装
Docker安装
- 请看我写的关于Docker的文章
安装 kubeadm、kubectl、kubelet
- 安装这几个组件前先准备repo
cat <<EOF > /etc/yum.repos.d/kubernetes.repo
[kubernetes]
name=Kubernetes
baseurl=https://mirrors.aliyun.com/kubernetes/yum/repos/kubernetes-el7-x86_64/
enabled=1
gpgcheck=1
repo_gpgcheck=1
gpgkey=https://mirrors.aliyun.com/kubernetes/yum/doc/yum-key.gpg
       https://mirrors.aliyun.com/kubernetes/yum/doc/rpm-package-key.gpg
EOF
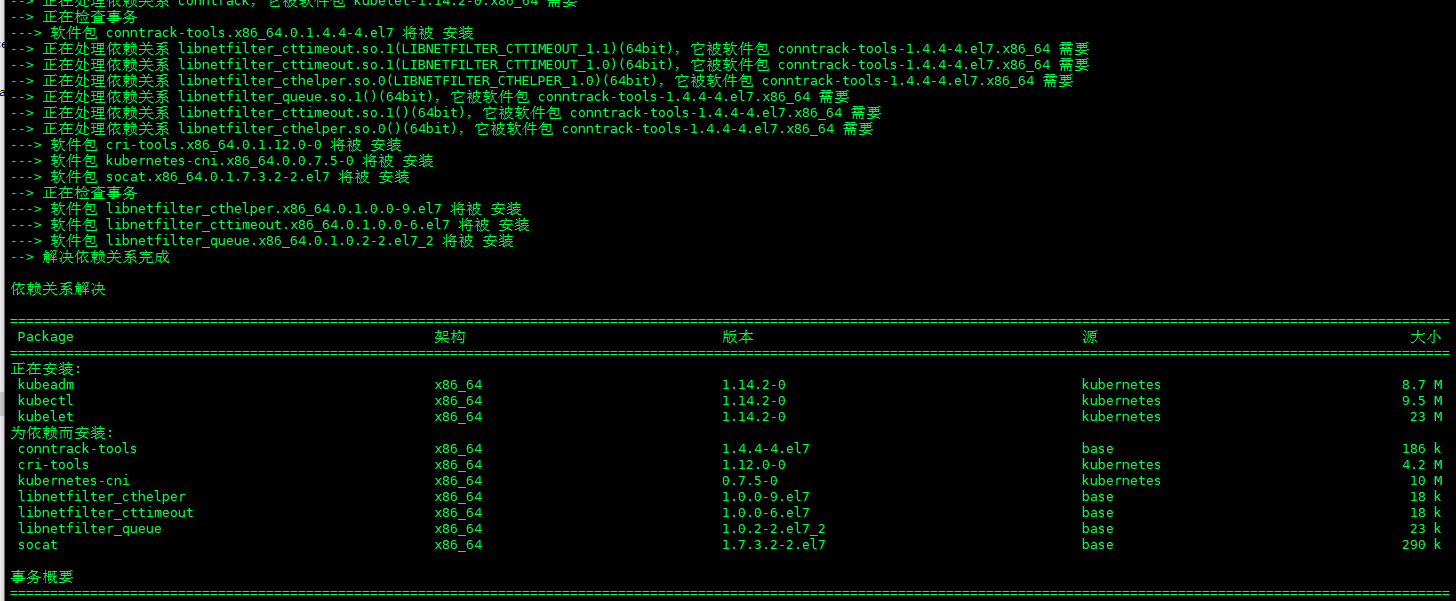
- 接着直接安装 kubeadm、kubectl、kubelet这个三个组件
yum install -y kubelet kubeadm kubectl
- kubeadm、kubectl、kubelet组件下载安装成功
- 启动刚刚安装的kubelet
systemctl enable kubelet && systemctl start kubelet
k8s Master 节点配置
准备镜像文件
- 国内环境由于网络不通畅问题,我们只能手动下载好镜像,再打上对应tag来制作本地镜像
- Master 节点获取镜像文件
docker pull mirrorgooglecontainers/kube-apiserver:v1.14.2
docker pull mirrorgooglecontainers/kube-controller-manager:v1.14.2
docker pull mirrorgooglecontainers/kube-scheduler:v1.14.2
docker pull mirrorgooglecontainers/kube-proxy:v1.14.2
docker pull mirrorgooglecontainers/pause:3.1
docker pull mirrorgooglecontainers/etcd:3.3.10
docker pull coredns/coredns:1.3.1
docker pull registry.cn-shenzhen.aliyuncs.com/cp_m/flannel:v0.10.0-amd64
- 给拉取的镜像文件打tag
docker tag mirrorgooglecontainers/kube-apiserver:v1.14.2 k8s.gcr.io/kube-apiserver:v1.14.2
docker tag mirrorgooglecontainers/kube-controller-manager:v1.14.2 k8s.gcr.io/kube-controller-manager:v1.14.2
docker tag mirrorgooglecontainers/kube-scheduler:v1.14.2 k8s.gcr.io/kube-scheduler:v1.14.2
docker tag mirrorgooglecontainers/kube-proxy:v1.14.2 k8s.gcr.io/kube-proxy:v1.14.2
docker tag mirrorgooglecontainers/pause:3.1 k8s.gcr.io/pause:3.1
docker tag mirrorgooglecontainers/etcd:3.3.10 k8s.gcr.io/etcd:3.3.10
docker tag coredns/coredns:1.3.1 k8s.gcr.io/coredns:1.3.1
docker tag registry.cn-shenzhen.aliyuncs.com/cp_m/flannel:v0.10.0-amd64 quay.io/coreos/flannel:v0.10.0-amd64
- 删除拉取的初始镜像,留下我们加了tag的镜像
docker rmi mirrorgooglecontainers/kube-apiserver:v1.14.2
docker rmi mirrorgooglecontainers/kube-controller-manager:v1.14.2
docker rmi mirrorgooglecontainers/kube-scheduler:v1.14.2
docker rmi mirrorgooglecontainers/kube-proxy:v1.14.2
docker rmi mirrorgooglecontainers/pause:3.1
docker rmi mirrorgooglecontainers/etcd:3.3.10
docker rmi coredns/coredns:1.3.1
docker rmi registry.cn-shenzhen.aliyuncs.com/cp_m/flannel:v0.10.0-amd64

docker rmi k8s.gcr.io/kube-apiserver:v1.14.2
docker rmi k8s.gcr.io/kube-controller-manager:v1.14.2
docker rmi k8s.gcr.io/kube-scheduler:v1.14.2
docker rmi k8s.gcr.io/kube-proxy:v1.14.2
docker rmi k8s.gcr.io/pause:3.1
docker rmi k8s.gcr.io/etcd:3.3.10
docker rmi k8s.gcr.io/coredns:1.3.1
docker rmi quay.io/coreos/flannel:v0.10.0-amd64

开始安装kubernetes
- 输入以下命令开始安装kubernetes
# --kubernetes-version=v1.14.2 指定安装的k8s版本
# --apiserver-advertise-address 用于指定使用k8s-master的哪个network 端口进行通信
# --pod-network-cidr 用于指定Pod的网络范围,下面采用的是flannel方案(https://github.com/coreos/flannel/blob/master/Documentation/kubernetes.md)
kubeadm init --kubernetes-version=v1.14.2 --apiserver-advertise-address 172.31.76.18 --pod-network-cidr=10.244.0.0/16
- 如下为kubernetes初始化日志打印
[init] Using Kubernetes version: v1.14.2
[preflight] Running pre-flight checks
[WARNING Service-Docker]: docker service is not enabled, please run 'systemctl enable docker.service'
[WARNING IsDockerSystemdCheck]: detected "cgroupfs" as the Docker cgroup driver. The recommended driver is "systemd". Please follow the guide at https://kubernetes.io/docs/setup/cri/
[preflight] Pulling images required for setting up a Kubernetes cluster
[preflight] This might take a minute or two, depending on the speed of your internet connection
[preflight] You can also perform this action in beforehand using 'kubeadm config images pull'
[kubelet-start] Writing kubelet environment file with flags to file "/var/lib/kubelet/kubeadm-flags.env"
[kubelet-start] Writing kubelet configuration to file "/var/lib/kubelet/config.yaml"
[kubelet-start] Activating the kubelet service
[certs] Using certificateDir folder "/etc/kubernetes/pki"
[certs] Generating "etcd/ca" certificate and key
[certs] Generating "etcd/peer" certificate and key
[certs] etcd/peer serving cert is signed for DNS names [k8s-master localhost] and IPs [172.31.76.18 127.0.0.1 ::1]
[certs] Generating "etcd/healthcheck-client" certificate and key
[certs] Generating "apiserver-etcd-client" certificate and key
[certs] Generating "etcd/server" certificate and key
[certs] etcd/server serving cert is signed for DNS names [k8s-master localhost] and IPs [172.31.76.18 127.0.0.1 ::1]
[certs] Generating "ca" certificate and key
[certs] Generating "apiserver-kubelet-client" certificate and key
[certs] Generating "apiserver" certificate and key
[certs] apiserver serving cert is signed for DNS names [k8s-master kubernetes kubernetes.default kubernetes.default.svc kubernetes.default.svc.cluster.local] and IPs [10.96.0.1 172.31.76.18]
[certs] Generating "front-proxy-ca" certificate and key
[certs] Generating "front-proxy-client" certificate and key
[certs] Generating "sa" key and public key
[kubeconfig] Using kubeconfig folder "/etc/kubernetes"
[kubeconfig] Writing "admin.conf" kubeconfig file
[kubeconfig] Writing "kubelet.conf" kubeconfig file
[kubeconfig] Writing "controller-manager.conf" kubeconfig file
[kubeconfig] Writing "scheduler.conf" kubeconfig file
[control-plane] Using manifest folder "/etc/kubernetes/manifests"
[control-plane] Creating static Pod manifest for "kube-apiserver"
[control-plane] Creating static Pod manifest for "kube-controller-manager"
[control-plane] Creating static Pod manifest for "kube-scheduler"
[etcd] Creating static Pod manifest for local etcd in "/etc/kubernetes/manifests"
[wait-control-plane] Waiting for the kubelet to boot up the control plane as static Pods from directory "/etc/kubernetes/manifests". This can take up to 4m0s
[apiclient] All control plane components are healthy after 16.501690 seconds
[upload-config] storing the configuration used in ConfigMap "kubeadm-config" in the "kube-system" Namespace
[kubelet] Creating a ConfigMap "kubelet-config-1.14" in namespace kube-system with the configuration for the kubelets in the cluster
[upload-certs] Skipping phase. Please see --experimental-upload-certs
[mark-control-plane] Marking the node k8s-master as control-plane by adding the label "node-role.kubernetes.io/master=''"
[mark-control-plane] Marking the node k8s-master as control-plane by adding the taints [node-role.kubernetes.io/master:NoSchedule]
[bootstrap-token] Using token: y6awgp.6bvxt8l3rie2du5s
[bootstrap-token] Configuring bootstrap tokens, cluster-info ConfigMap, RBAC Roles
[bootstrap-token] configured RBAC rules to allow Node Bootstrap tokens to post CSRs in order for nodes to get long term certificate credentials
[bootstrap-token] configured RBAC rules to allow the csrapprover controller automatically approve CSRs from a Node Bootstrap Token
[bootstrap-token] configured RBAC rules to allow certificate rotation for all node client certificates in the cluster
[bootstrap-token] creating the "cluster-info" ConfigMap in the "kube-public" namespace
[addons] Applied essential addon: CoreDNS
[addons] Applied essential addon: kube-proxy
Your Kubernetes control-plane has initialized successfully!
To start using your cluster, you need to run the following as a regular user:
mkdir -p $HOME/.kube
sudo cp -i /etc/kubernetes/admin.conf $HOME/.kube/config
sudo chown $(id -u):$(id -g) $HOME/.kube/config
You should now deploy a pod network to the cluster.
Run "kubectl apply -f [podnetwork].yaml" with one of the options listed at:
https://kubernetes.io/docs/concepts/cluster-administration/addons/
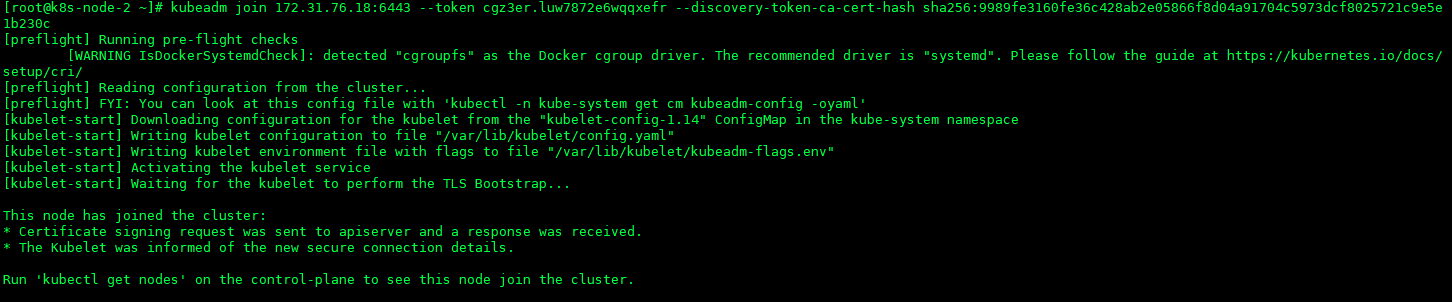
Then you can join any number of worker nodes by running the following on each as root:
kubeadm join 172.31.76.18:6443 --token y6awgp.6bvxt8l3rie2du5s \
--discovery-token-ca-cert-hash sha256:9989fe3160fe36c428ab2e05866f8d04a91704c5973dcf8025721c9e5e1b230c
- 注意: 看到上面Kubernetes初始化信息,我们需要注意最后一句话,等会我们子节点加入Kubernetes集群就是使用这一句话
kubeadm join 172.31.76.18:6443 --token y6awgp.6bvxt8l3rie2du5s \
    --discovery-token-ca-cert-hash sha256:9989fe3160fe36c428ab2e05866f8d04a91704c5973dcf8025721c9e5e1b230c
配置kubectl
# root 模式下导入环境变量
export KUBECONFIG=/etc/kubernetes/admin.conf

# 重启 kubelet
systemctl restart kubelet
安装Pod的网络(flannel方案)
sysctl net.bridge.bridge-nf-call-iptables=1
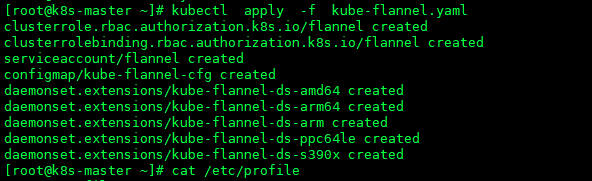
- 然后在k8s-master节点上执行kube-flannel.yaml配置,也可根据官方文档来操作下载kube-flannel.yaml文件,下文也给出kube-flannel.yaml文件内容
kubectl apply -f kube-flannel.yaml
- kube-flannel.yaml 文件
---
kind: ClusterRole
apiVersion: rbac.authorization.k8s.io/v1beta1
metadata:
  name: flannel
rules:
  - apiGroups:
      - ""
    resources:
      - pods
    verbs:
      - get
  - apiGroups:
      - ""
    resources:
      - nodes
    verbs:
      - list
      - watch
  - apiGroups:
      - ""
    resources:
      - nodes/status
    verbs:
      - patch
---
kind: ClusterRoleBinding
apiVersion: rbac.authorization.k8s.io/v1beta1
metadata:
  name: flannel
roleRef:
  apiGroup: rbac.authorization.k8s.io
  kind: ClusterRole
  name: flannel
subjects:
- kind: ServiceAccount
  name: flannel
  namespace: kube-system
---
apiVersion: v1
kind: ServiceAccount
metadata:
  name: flannel
  namespace: kube-system
---
kind: ConfigMap
apiVersion: v1
metadata:
  name: kube-flannel-cfg
  namespace: kube-system
  labels:
    tier: node
    app: flannel
data:
  cni-conf.json: |
    {
      "name": "cbr0",
      "plugins": [
        {
          "type": "flannel",
          "delegate": {
            "hairpinMode": true,
            "isDefaultGateway": true
          }
        },
        {
          "type": "portmap",
          "capabilities": {
            "portMappings": true
          }
        }
      ]
    }
  net-conf.json: |
    {
      "Network": "10.244.0.0/16",
      "Backend": {
        "Type": "vxlan"
      }
    }
---
apiVersion: extensions/v1beta1
kind: DaemonSet
metadata:
  name: kube-flannel-ds-amd64
  namespace: kube-system
  labels:
    tier: node
    app: flannel
spec:
  template:
    metadata:
      labels:
        tier: node
        app: flannel
    spec:
      hostNetwork: true
      nodeSelector:
        beta.kubernetes.io/arch: amd64
      tolerations:
      - operator: Exists
        effect: NoSchedule
      serviceAccountName: flannel
      initContainers:
      - name: install-cni
        image: quay.io/coreos/flannel:v0.10.0-amd64
        command:
        - cp
        args:
        - -f
        - /etc/kube-flannel/cni-conf.json
        - /etc/cni/net.d/10-flannel.conflist
        volumeMounts:
        - name: cni
          mountPath: /etc/cni/net.d
        - name: flannel-cfg
          mountPath: /etc/kube-flannel/
      containers:
      - name: kube-flannel
        image: quay.io/coreos/flannel:v0.10.0-amd64
        command:
        - /opt/bin/flanneld
        args:
        - --ip-masq
        - --kube-subnet-mgr
        resources:
          requests:
            cpu: "100m"
            memory: "50Mi"
          limits:
            cpu: "100m"
            memory: "50Mi"
        securityContext:
          privileged: true
        env:
        - name: POD_NAME
          valueFrom:
            fieldRef:
              fieldPath: metadata.name
        - name: POD_NAMESPACE
          valueFrom:
            fieldRef:
              fieldPath: metadata.namespace
        volumeMounts:
        - name: run
          mountPath: /run
        - name: flannel-cfg
          mountPath: /etc/kube-flannel/
      volumes:
        - name: run
          hostPath:
            path: /run
        - name: cni
          hostPath:
            path: /etc/cni/net.d
        - name: flannel-cfg
          configMap:
            name: kube-flannel-cfg
---
apiVersion: extensions/v1beta1
kind: DaemonSet
metadata:
  name: kube-flannel-ds-arm64
  namespace: kube-system
  labels:
    tier: node
    app: flannel
spec:
  template:
    metadata:
      labels:
        tier: node
        app: flannel
    spec:
      hostNetwork: true
      nodeSelector:
        beta.kubernetes.io/arch: arm64
      tolerations:
      - operator: Exists
        effect: NoSchedule
      serviceAccountName: flannel
      initContainers:
      - name: install-cni
        image: quay.io/coreos/flannel:v0.10.0-arm64
        command:
        - cp
        args:
        - -f
        - /etc/kube-flannel/cni-conf.json
        - /etc/cni/net.d/10-flannel.conflist
        volumeMounts:
        - name: cni
          mountPath: /etc/cni/net.d
        - name: flannel-cfg
          mountPath: /etc/kube-flannel/
      containers:
      - name: kube-flannel
        image: quay.io/coreos/flannel:v0.10.0-arm64
        command:
        - /opt/bin/flanneld
        args:
        - --ip-masq
        - --kube-subnet-mgr
        resources:
          requests:
            cpu: "100m"
            memory: "50Mi"
          limits:
            cpu: "100m"
            memory: "50Mi"
        securityContext:
          privileged: true
        env:
        - name: POD_NAME
          valueFrom:
            fieldRef:
              fieldPath: metadata.name
        - name: POD_NAMESPACE
          valueFrom:
            fieldRef:
              fieldPath: metadata.namespace
        volumeMounts:
        - name: run
          mountPath: /run
        - name: flannel-cfg
          mountPath: /etc/kube-flannel/
      volumes:
        - name: run
          hostPath:
            path: /run
        - name: cni
          hostPath:
            path: /etc/cni/net.d
        - name: flannel-cfg
          configMap:
            name: kube-flannel-cfg
---
apiVersion: extensions/v1beta1
kind: DaemonSet
metadata:
  name: kube-flannel-ds-arm
  namespace: kube-system
  labels:
    tier: node
    app: flannel
spec:
  template:
    metadata:
      labels:
        tier: node
        app: flannel
    spec:
      hostNetwork: true
      nodeSelector:
        beta.kubernetes.io/arch: arm
      tolerations:
      - operator: Exists
        effect: NoSchedule
      serviceAccountName: flannel
      initContainers:
      - name: install-cni
        image: quay.io/coreos/flannel:v0.10.0-arm
        command:
        - cp
        args:
        - -f
        - /etc/kube-flannel/cni-conf.json
        - /etc/cni/net.d/10-flannel.conflist
        volumeMounts:
        - name: cni
          mountPath: /etc/cni/net.d
        - name: flannel-cfg
          mountPath: /etc/kube-flannel/
      containers:
      - name: kube-flannel
        image: quay.io/coreos/flannel:v0.10.0-arm
        command:
        - /opt/bin/flanneld
        args:
        - --ip-masq
        - --kube-subnet-mgr
        resources:
          requests:
            cpu: "100m"
            memory: "50Mi"
          limits:
            cpu: "100m"
            memory: "50Mi"
        securityContext:
          privileged: true
        env:
        - name: POD_NAME
          valueFrom:
            fieldRef:
              fieldPath: metadata.name
        - name: POD_NAMESPACE
          valueFrom:
            fieldRef:
              fieldPath: metadata.namespace
        volumeMounts:
        - name: run
          mountPath: /run
        - name: flannel-cfg
          mountPath: /etc/kube-flannel/
      volumes:
        - name: run
          hostPath:
            path: /run
        - name: cni
          hostPath:
            path: /etc/cni/net.d
        - name: flannel-cfg
          configMap:
            name: kube-flannel-cfg
---
apiVersion: extensions/v1beta1
kind: DaemonSet
metadata:
  name: kube-flannel-ds-ppc64le
  namespace: kube-system
  labels:
    tier: node
    app: flannel
spec:
  template:
    metadata:
      labels:
        tier: node
        app: flannel
    spec:
      hostNetwork: true
      nodeSelector:
        beta.kubernetes.io/arch: ppc64le
      tolerations:
      - operator: Exists
        effect: NoSchedule
      serviceAccountName: flannel
      initContainers:
      - name: install-cni
        image: quay.io/coreos/flannel:v0.10.0-ppc64le
        command:
        - cp
        args:
        - -f
        - /etc/kube-flannel/cni-conf.json
        - /etc/cni/net.d/10-flannel.conflist
        volumeMounts:
        - name: cni
          mountPath: /etc/cni/net.d
        - name: flannel-cfg
          mountPath: /etc/kube-flannel/
      containers:
      - name: kube-flannel
        image: quay.io/coreos/flannel:v0.10.0-ppc64le
        command:
        - /opt/bin/flanneld
        args:
        - --ip-masq
        - --kube-subnet-mgr
        resources:
          requests:
            cpu: "100m"
            memory: "50Mi"
          limits:
            cpu: "100m"
            memory: "50Mi"
        securityContext:
          privileged: true
        env:
        - name: POD_NAME
          valueFrom:
            fieldRef:
              fieldPath: metadata.name
        - name: POD_NAMESPACE
          valueFrom:
            fieldRef:
              fieldPath: metadata.namespace
        volumeMounts:
        - name: run
          mountPath: /run
        - name: flannel-cfg
          mountPath: /etc/kube-flannel/
      volumes:
        - name: run
          hostPath:
            path: /run
        - name: cni
          hostPath:
            path: /etc/cni/net.d
        - name: flannel-cfg
          configMap:
            name: kube-flannel-cfg
---
apiVersion: extensions/v1beta1
kind: DaemonSet
metadata:
  name: kube-flannel-ds-s390x
  namespace: kube-system
  labels:
    tier: node
    app: flannel
spec:
  template:
    metadata:
      labels:
        tier: node
        app: flannel
    spec:
      hostNetwork: true
      nodeSelector:
        beta.kubernetes.io/arch: s390x
      tolerations:
      - operator: Exists
        effect: NoSchedule
      serviceAccountName: flannel
      initContainers:
      - name: install-cni
        image: quay.io/coreos/flannel:v0.10.0-s390x
        command:
        - cp
        args:
        - -f
        - /etc/kube-flannel/cni-conf.json
        - /etc/cni/net.d/10-flannel.conflist
        volumeMounts:
        - name: cni
          mountPath: /etc/cni/net.d
        - name: flannel-cfg
          mountPath: /etc/kube-flannel/
      containers:
      - name: kube-flannel
        image: quay.io/coreos/flannel:v0.10.0-s390x
        command:
        - /opt/bin/flanneld
        args:
        - --ip-masq
        - --kube-subnet-mgr
        resources:
          requests:
            cpu: "100m"
            memory: "50Mi"
          limits:
            cpu: "100m"
            memory: "50Mi"
        securityContext:
          privileged: true
        env:
        - name: POD_NAME
          valueFrom:
            fieldRef:
              fieldPath: metadata.name
        - name: POD_NAMESPACE
          valueFrom:
            fieldRef:
              fieldPath: metadata.namespace
        volumeMounts:
        - name: run
          mountPath: /run
        - name: flannel-cfg
          mountPath: /etc/kube-flannel/
      volumes:
        - name: run
          hostPath:
            path: /run
        - name: cni
          hostPath:
            path: /etc/cni/net.d
        - name: flannel-cfg
          configMap:
            name: kube-flannel-cfg
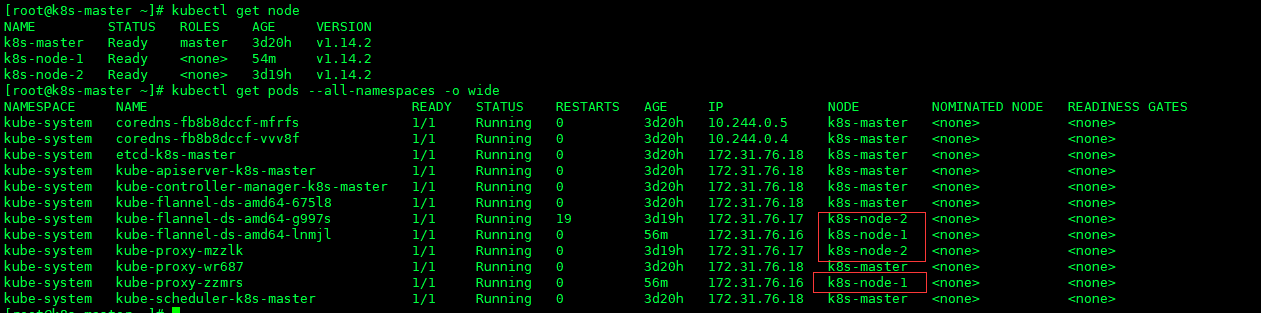
- 查看Kubernetes的Pod 是否正常运行
kubectl get pods --all-namespaces -o wide

- 查看Kubernetes主节点是否已经就绪
kubectl get nodes

- 最后别忘了执行(不执行使用kubectl命令会出现错误1)
mkdir -p $HOME/.kube

cp -i /etc/kubernetes/admin.conf $HOME/.kube/config

chown $(id -u):$(id -g) $HOME/.kube/config
k8s从节点(node)加入集群
- 前面准备工作中我们已经在各个节点中安装了kubelet kubeadm kubectl这三个组件,在搭建k8s master 主节点这一小节也提到过加入集群的操作(忘记了可以往上翻翻)
- 按照配置主节点的内容在docker 中加入镜像
加入集群
# 基础命令示例 kubeadm join --token <token> <master-ip>:<master-port> --discovery-token-ca-cert-hash sha256:<hash>

kubeadm join 172.31.76.18:6443 --token pamsj1.4d5funpottlqofs1 --discovery-token-ca-cert-hash sha256:1152aa95b6a45e88211686b44a3080d643fa95b94ebf98c5041a7f88063f2f4e
-
我们可以在另一台node节点机器再次重复该操作
-
查看刚刚加入集群的子节点
- 至此集群的搭建完成。
子节点加入集群注意事项
- 加入集群前保证子节点服务器已经打开了docker服务
- 注意 token是否过期(默认24小时过期)
- 子节点注意保持镜像文件版本和主节点一致
- 子节点准备工作安装flannel网络
- 子节点如果加入集群不成功出现错误,下次再加入集群钱则使用 kubeadm reset 命令清除子节点加入集群自动生成的配置文件
k8s集群清理解散
- 删除子节点
# 查询k8s集群所以节点
kubectl get nodes

# 删除子节点 ,<node name> 代表子节点名称
kubectl drain <node name> --delete-local-data --force --ignore-daemonsets
kubectl delete node <node name>
- 重置节点
# 不论主节点 还是 子节点该命令都能重置节点
kubeadm reset
k8s集群可视化管理工具Dashboard安装
获取Dashboard镜像
- 官方地址
- 目前官方最新版本为v1.10.1,和前面获取国内镜像文件一样,我们先获取镜像,在把镜像打成对应tag的镜像(注意是每个节点都需要拉取镜像)
# 拉取国内镜像
docker pull mirrorgooglecontainers/kubernetes-dashboard-amd64:v1.10.1

# 重新标 tag
docker tag mirrorgooglecontainers/kubernetes-dashboard-amd64:v1.10.1 k8s.gcr.io/kubernetes-dashboard-amd64:v1.10.1

# 删除国内拉取的镜像
docker rmi mirrorgooglecontainers/kubernetes-dashboard-amd64:v1.10.1
安装Dashboard
# 官方文档的安装操作
kubectl apply -f https://raw.githubusercontent.com/kubernetes/dashboard/v1.10.1/src/deploy/recommended/kubernetes-dashboard.yaml

# 下载kubernetes-dashboard.yaml安装
kubectl create -f kubernetes-dashboard.yaml

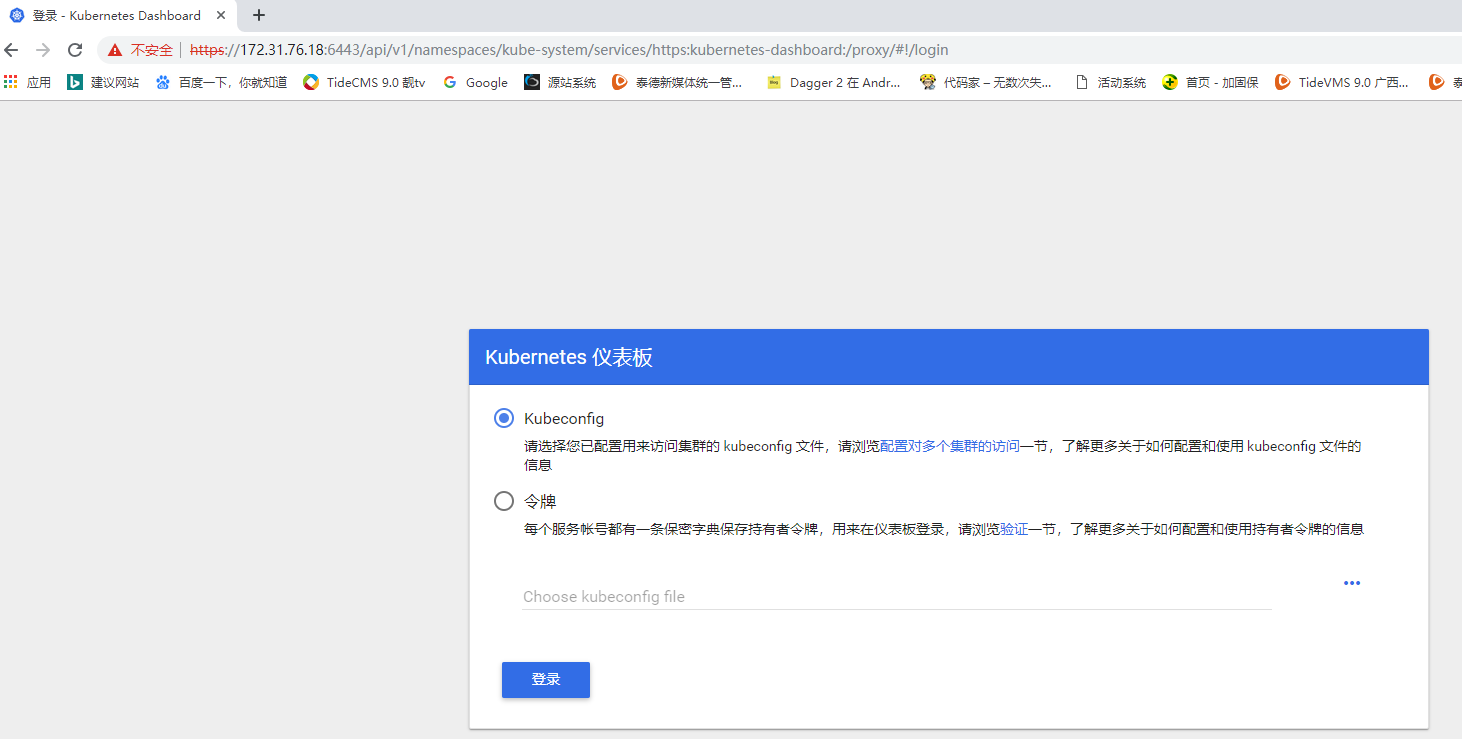
Dashboard访问
- Dashboard访问有四种方式(kubectl proxy、NodePort、API Server、Ingress),官方项目中提示我们用kubectl proxy 命令开启代理,然后直接访问地址http://localhost:8001/api/v1/namespaces/kube-system/services/https:kubernetes-dashboard:/proxy/,如果是桌面电脑有浏览器当然可以,但是我们k8s部署在服务器上,这个方法显然不适合。此外,还有NodePort和Ingress等方式,由于由于API服务器是公开的,可以从外部访问,所以这里使用API Server的方式来访问dashboard,其他方式访问可以参考以下地址Kubernetes Dashboard v1.10.0安装、dashboard v1.10.1安装
API Server的方式访问 Dashboard
- 首先我们查看k8s运行的地址和端口号
#使用如下命令
kubectl cluster-info

# 集群正常会得到以下信息
Kubernetes master is running at https://172.31.76.18:6443
KubeDNS is running at https://172.31.76.18:6443/api/v1/namespaces/kube-system/services/kube-dns:dns/proxy
- 接着我们就可以开始访问Dashboard了
# 使用如下地址格式访问
https://<master-ip>:<apiserver-port>/api/v1/namespaces/kube-system/services/https:kubernetes-dashboard:/proxy/

https://172.31.76.18:6443/api/v1/namespaces/kube-system/services/https:kubernetes-dashboard:/proxy/
- 根据如上格式访问Dashboard会得到拒绝访问的信息,错误的原因是k8s基于安全性的考虑,浏览器必须要安装一个根证书,防止中间人攻击(官方描述),接下来我们来生成证书再操作。
{
    "kind": "Status",
    "apiVersion": "v1",
    "metadata": {},
    "status": "Failure",
    "message": "services \"https:kubernetes-dashboard:\" is forbidden: User \"system:anonymous\" cannot get resource \"services/proxy\" in API group \"\" in the namespace \"kube-system\"",
    "reason": "Forbidden",
    "details": {
        "name": "https:kubernetes-dashboard:",
        "kind": "services"
    },
    "code": 403
}
生成证书(master 节点操作)
- 生成 crt 文件
grep 'client-certificate-data' /etc/kubernetes/admin.conf | head -n 1 | awk '{print $2}' | base64 -d >> kubecfg.crt
- 生成 key 文件
grep 'client-key-data' /etc/kubernetes/admin.conf | head -n 1 | awk '{print $2}' | base64 -d >> kubecfg.key
- 生成 p12 证书文件,需要设置生成证书密码
openssl pkcs12 -export -clcerts -inkey kubecfg.key -in kubecfg.crt -out kubecfg.p12 -name "kubernetes-client"
- 将生产的p12证书导入到谷歌浏览器中,证书导入也需要密码,也就是上面步骤生成p12证书文件设置的密码,证书导入成功之后重启谷歌浏览器(如何导入证书这里就不细说了)
- 再次访问如下地址就会提示我们选择刚刚导入的证书,接下来就会显示如下图所示的认证界面
https://172.31.76.18:6443/api/v1/namespaces/kube-system/services/https:kubernetes-dashboard:/proxy/
- 这里我们使用token认证,使用token认证前先创建dashboard用户,
cat <<EOF | kubectl create -f -
apiVersion: v1
kind: ServiceAccount
metadata:
  name: admin-user
  namespace: kube-system
EOF
- 创建ClusterRoleBinding
cat <<EOF | kubectl create -f -
apiVersion: rbac.authorization.k8s.io/v1
kind: ClusterRoleBinding
metadata:
  name: admin-user
roleRef:
  apiGroup: rbac.authorization.k8s.io
  kind: ClusterRole
  name: cluster-admin
subjects:
- kind: ServiceAccount
  name: admin-user
  namespace: kube-system
EOF
- 然后我们在获取用户的token
kubectl -n kube-system describe secret $(kubectl -n kube-system get secret | grep admin-user | awk '{print $1}')
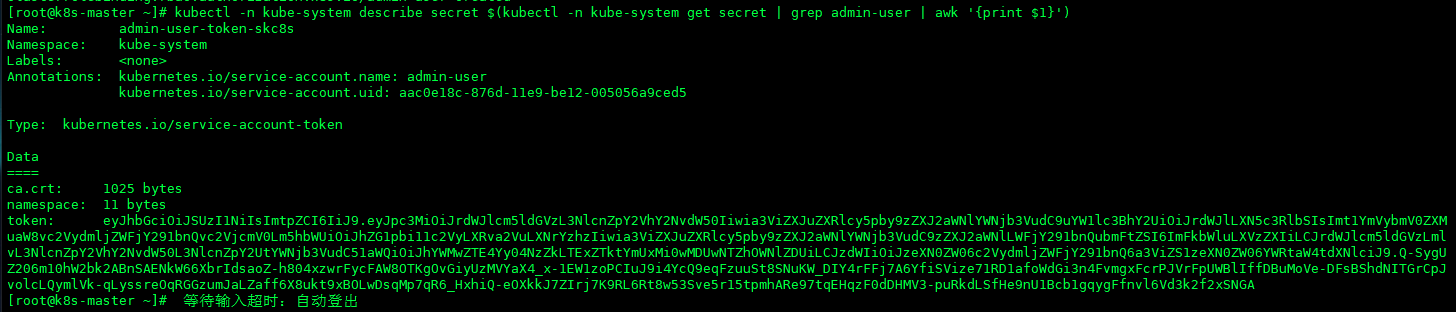
- 然后将token输入即可,至此Dashboard安装完成
删除部署的dashboard
- 如果dashboard部署不对,可以使用如下命令删除dashboard再重新部署
kubectl delete -f kubernetes-dashboard.yaml
搭建过程中出现的错误
错误1: kubectl get nodes 命令出错
错误描述
- The connection to the server localhost:8080 was refused - did you specify the right host or port?
- node 节点使用kubectl get nodes命令不出意外也会出现上述错误描述,则我们应该把master 节点的/etc/kubernetes/admin.conf文件复制到node节点/etc/kubernetes/目录下再执行下面命令即可。
- 解决:(参考地址)
mkdir -p $HOME/.kube

cp -i /etc/kubernetes/admin.conf $HOME/.kube/config

chown $(id -u):$(id -g) $HOME/.kube/config
- 其实以上解决答案在我们初始化master 节点的成功的打印信息中就已经提示我们配置了,不信可以翻看前文master 节点打印信息。
错误2: 子节点加入Kubernetes集群出现错误
错误描述
- FYI: You can look at this config file with 'kubectl -n kube-system get cm kubeadm-config -oyaml' error execution phase preflight: unable to fetch the kubeadm-config ConfigMap: failed to get config map: Unauthorized
- 解决:(参考地址)
- 该错误的原因主要是因为token过期了(token默认有效期为24h),所以我们只要在k8s master节点使用kubeadm命令重新创建新的token就好了
# 创建新token
kubeadm token create
# 获取sha256
openssl x509 -pubkey -in /etc/kubernetes/pki/ca.crt | openssl rsa -pubin -outform der 2>/dev/null |
openssl dgst -sha256 -hex | sed 's/^.* //'

错误3:Kubeadm init 或者 join 出现错误
错误描述
[kubelet-check] It seems like the kubelet isn't running or healthy.
[kubelet-check] The HTTP call equal to 'curl -sSL http://localhost:10248/healthz' failed with error: Get http://localhost:10248/healthz: dial tcp 127.0.0.1:10248: connect: connection refused.
[kubelet-check] It seems like the kubelet isn't running or healthy.
[kubelet-check] The HTTP call equal to 'curl -sSL http://localhost:10248/healthz' failed with error: Get http://localhost:10248/healthz: dial tcp 127.0.0.1:10248: connect: connection refused.
- 解决:(参考地址)
sudo swapoff -a
sudo sed -i '/ swap / s/^/#/' /etc/fstab
- 重启机器 reboot the machine,机器重启之后如果docker 不是开机启动的记得启动docker服务
## 启动 docker 服务
systemctl enable docker.service
## 启动docker
systemctl start docker
- 重启服务器
# 重启命令
reboot
错误4:子节点加入集群node节点DNS 服务 CrashLoopBackOff
错误描述

- 解决:
查看有问题服务的日志
kubectl --namespace kube-system logs kube-flannel-ds-amd64-g997s

错误日志:Error from server: Get https://172.31.76.17:10250/containerLogs/kube-system/kube-flannel-ds-amd64-g997s/kube-flannel: dial tcp 172.31.76.17:10250: connect: no route to host
- 从错误日志中可以看出是默认网关的问题,加入网卡默认网关即可,默认网关添加具体需要看自己服务器而定。
错误5:子节点加入集群node节点出现错误
错误描述(路由异常问题)
error execution phase preflight: [preflight] Some fatal errors occurred:
	[ERROR FileContent--proc-sys-net-bridge-bridge-nf-call-iptables]: /proc/sys/net/bridge/bridge-nf-call-iptables contents are not set to 1
- 解决: (参考地址)
# 执行以下命令
echo "1" >/proc/sys/net/bridge/bridge-nf-call-iptables

#再次执行 kubeadm join .......命令
文章中如果有错误,请大家给我提出来,大家一起学习进步,如果觉得我的文章给予你帮助,也请给我一个喜欢和关注,同时也欢迎访问我的个人博客。
