


作者:嵇智
ParserCore
编译的核心管理者,掌握着不同类型的 token 生成的流程。它内部管理了 ParserBlock、ParserInline、linkify、replacements 等 rule 函数。也就是说,用户传入一个字符串,经历了这些 rule 函数处理之后,得到了一个由许多 token 组成的 tokens 数组,最后再交由 renderer 处理之后,吐出 HTML 字符串。
先看下 MarkdownIt 的执行逻辑。
var md = require('markdown-it')({
  html: true,
  linkify: true,
  typographer: true
})
md.render('# markdown-it rulezz!')

MarkdownIt.prototype.render = function (src, env) {
  env = env || {};

  return this.renderer.render(this.parse(src, env), this.options, env);
};

MarkdownIt.prototype.parse = function (src, env) {
  if (typeof src !== 'string') {
    throw new Error('Input data should be a String');
  }

  var state = new this.core.State(src, this, env);

  this.core.process(state);

  return state.tokens;
};
- render 接收一个字符串。内部调用 parse 方法得到 tokens。
- parse 内部先实例化一个属于 core 的 state,并且调用 parserCore.process 方法。state 是一个拥有当前 parserCore 的编译状态的实例。
- this.renderer.render 接收 tokens,最后输出 HTML 字符串。
我们重点关注一下 ParserCore 这个类。它位于 lib/parser_core.js。
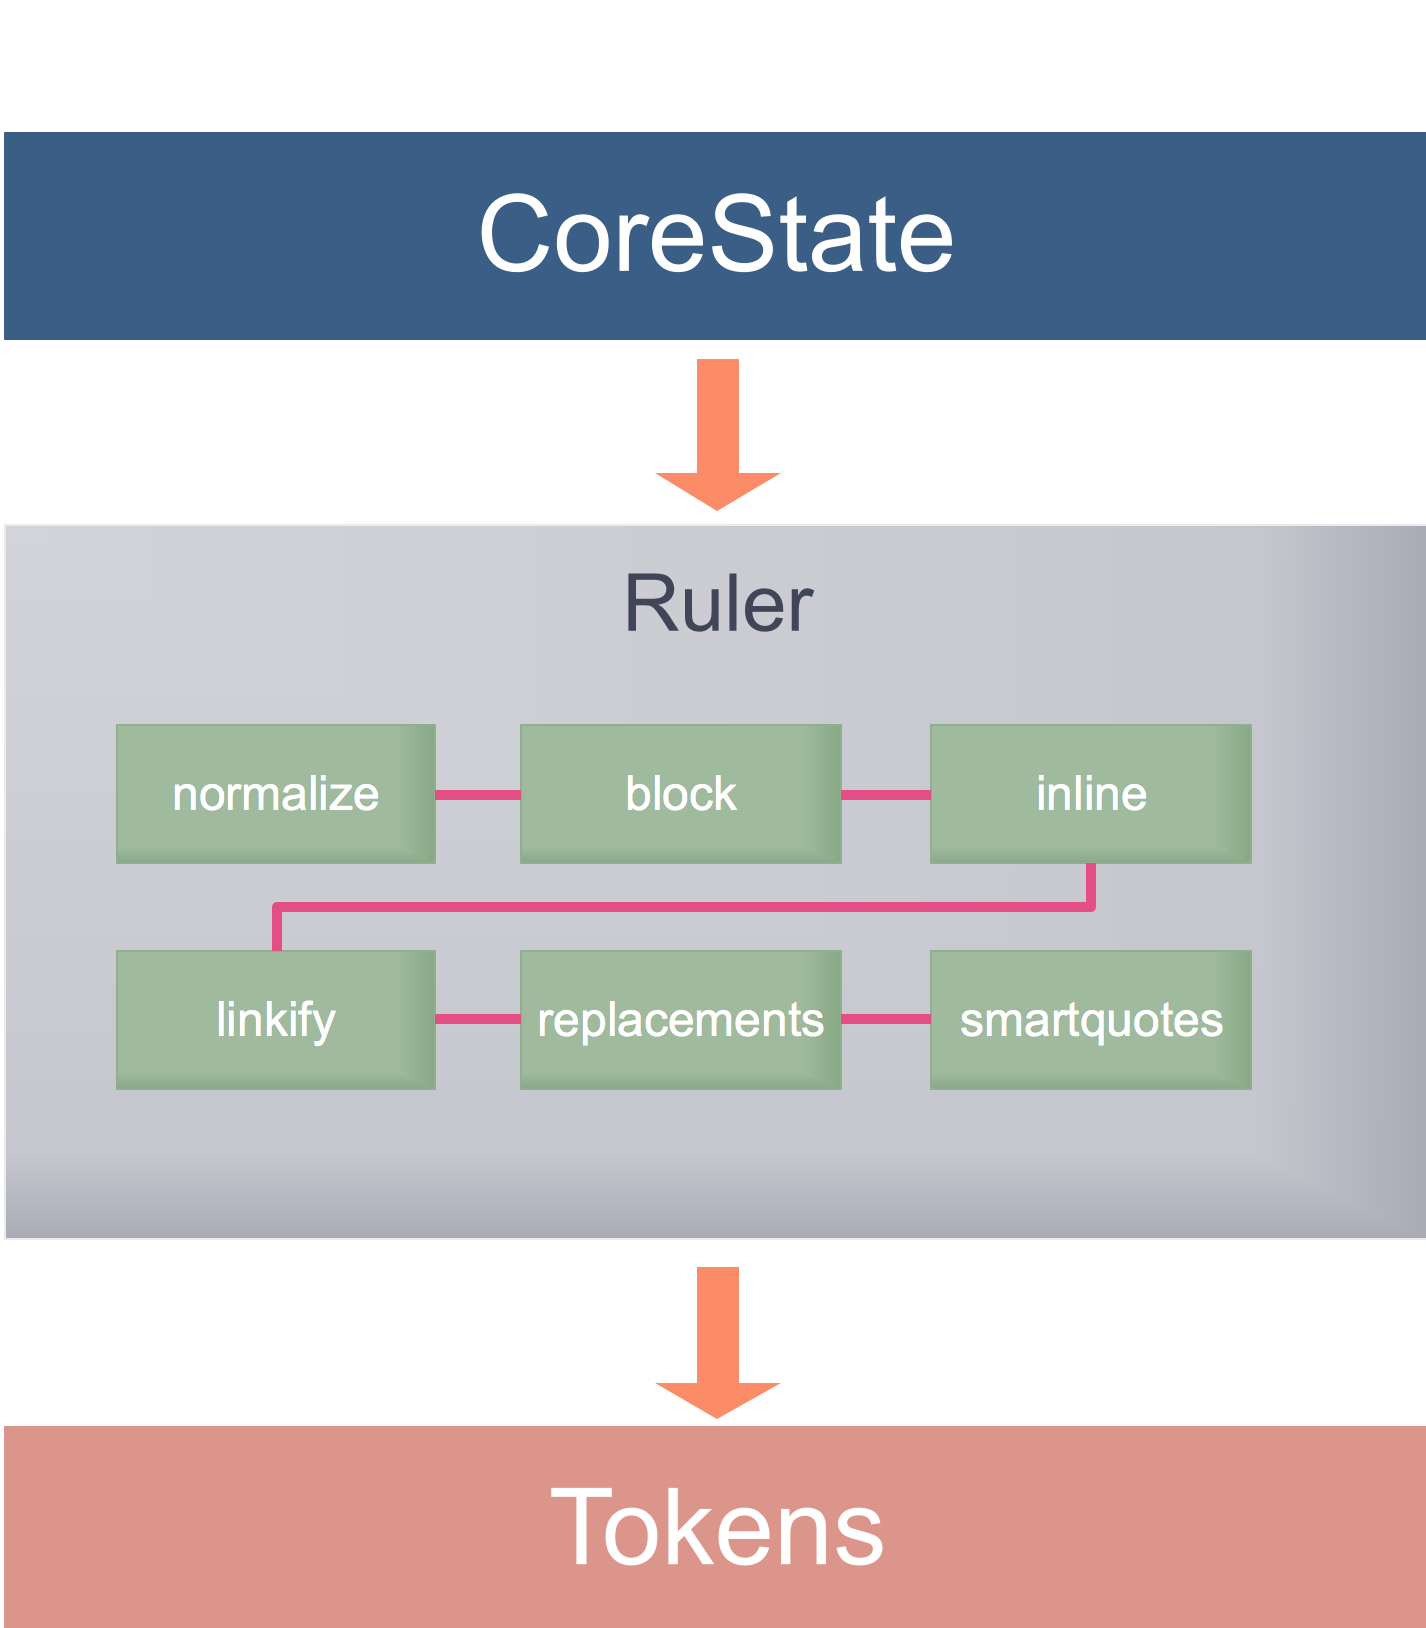
var _rules = [
  [ 'normalize',      require('./rules_core/normalize')      ],
  [ 'block',          require('./rules_core/block')          ],
  [ 'inline',         require('./rules_core/inline')         ],
  [ 'linkify',        require('./rules_core/linkify')        ],
  [ 'replacements',   require('./rules_core/replacements')   ],
  [ 'smartquotes',    require('./rules_core/smartquotes')    ]
];

function Core() {
  this.ruler = new Ruler();

  for (var i = 0; i < _rules.length; i++) {
    this.ruler.push(_rules[i][0], _rules[i][1]);
  }
}

Core.prototype.process = function (state) {
  var i, l, rules;

  rules = this.ruler.getRules('');

  for (i = 0, l = rules.length; i < l; i++) {
    rules[i](state);
  }
};

Core.prototype.State = require('./rules_core/state_core');
parserCore 实例上仅有一个 ruler 属性,这个是用来管理内部所有的 rule 函数,并且原型上。只有一个 process 方法。
当调用 process 的时候,首先会拿到职责链名为空字符串('')的 rule 组成的数组,将 state 作为入参传入至每一个 rule 函数,得到 tokens 之后挂载到 state 上去。类似的伪代码如下:
const rules = [function normalize, function block, function inline, function ...]

for (const rule of rules) {
  rule(state) // rule 内部生成一个个 token,并且存放在 state.tokens 数组里。
}
// 最后在 md.parse 函数体内部返回 state.tokens
因此我们的关注点就在于这些属于 parserCore 的 rule 到底是做了什么工作?state 又是什么呢?先来看下属于 parserCore 的 state。它位于 lib/rules_core/state_core.js
function StateCore(src, md, env) {
  this.src = src;
  this.env = env;
  this.tokens = [];
  this.inlineMode = false;
  this.md = md; // link to parser instance
}

StateCore.prototype.Token = Token;
src 用来放用户输入的字符串,tokens 存放编译出来的 token。inlineMode 表示 parse 的时候是否编译成 type 为 inline 的 token。md 就是当前 MarkdownIt 的实例。
而属于 ParserCore 的 rules 的职能是什么?我们先粗略了解一下。它们都在 lib/rules_core 文件夹。
- normalize.js
module.exports = function inline(state) {
  var str;

  // Normalize newlines
  str = state.src.replace(NEWLINES_RE, '\n');

  // Replace NULL characters
  str = str.replace(NULL_RE, '\uFFFD');

  state.src = str;
};
作用很简单,就是兼容一下 linux 和 windows 换行符的问题。
- block.js
module.exports = function block(state) {
  var token;

  if (state.inlineMode) {
    token          = new state.Token('inline', '', 0);
    token.content  = state.src;
    token.map      = [ 0, 1 ];
    token.children = [];
    state.tokens.push(token);
  } else {
    state.md.block.parse(state.src, state.md, state.env, state.tokens);
  }
};
内部逻辑很清晰,先判断是否开启 inline 模式的 parse。否则通过 md 调用 ParserBlock 的 parse 方法。这一步是将换行分隔符(\n) 作为 src 的划分界限,生成很多 block 为 true 的 token。我们在接下来的一篇关于 ParserBlock 分析的文章里面详细阐述。
- inline.js
module.exports = function inline(state) {
  var tokens = state.tokens, tok, i, l;

  // Parse inlines
  for (i = 0, l = tokens.length; i < l; i++) {
    tok = tokens[i];
    if (tok.type === 'inline') {
      state.md.inline.parse(tok.content, state.md, state.env, tok.children);
    }
  }
};
这一步是在 ParserBlock 之后的,因为 ParserBlock 处理之后会生成 type 为 inline 的token。这种 token 属于未完全解析的 token,需要 ParserInline 进一步处理,生成新的token。这些新生成的 token 会存放在 children 属性上。举个栗子来说:
const src = '__ad__'
md.render(src)

// 1.经过 ParserBlock 处理之后是这样的 token:

{
  type: "inline",
  tag: "",
  attrs: null,
  block: true,
  children: []
  content: "__ad__",
  hidden: false,
  ...
  type:"inline"
}
// 从 content 可以看出 '__' 并未生成 token,这个符号代表强调的意思,应该替换成 strong 标签

// 2.再经过 ParserInline 处理之后,会发现 children 多了 5 个 token。代码如下
{
  ...,
  children: [
    {
      type: "text", tag: "", attrs: null, ...
    },
    {
      type: "strong_open", tag: "strong", attrs: null, …
    },
    {
      type: "text", tag: "", attrs: null, …
    },
    {
      type: "strong_close", tag: "strong", attrs: null, …
    },
    {
      type: "text", tag: "", attrs: null, …
    }
  ]
}

// 最后传给 md.renderer.render 之后,就能生成加粗的文字了。
ParserInline 的揭秘,会在另外一片文章详细分析。
- linkify.js
module.exports = function linkify(state) {
  var i, j, l, tokens, token, currentToken, nodes, ln, text, pos, lastPos,
      level, htmlLinkLevel, url, fullUrl, urlText,
      blockTokens = state.tokens,
      links;

  if (!state.md.options.linkify) { return; }

  for (j = 0, l = blockTokens.length; j < l; j++) {
    if (blockTokens[j].type !== 'inline' ||
        !state.md.linkify.pretest(blockTokens[j].content)) {
      continue;
    }

    tokens = blockTokens[j].children;

    htmlLinkLevel = 0;

    for (i = tokens.length - 1; i >= 0; i--) {
      currentToken = tokens[i];

      if (currentToken.type === 'link_close') {
        i--;
        while (tokens[i].level !== currentToken.level && tokens[i].type !== 'link_open') {
          i--;
        }
        continue;
      }

      if (currentToken.type === 'html_inline') {
        if (isLinkOpen(currentToken.content) && htmlLinkLevel > 0) {
          htmlLinkLevel--;
        }
        if (isLinkClose(currentToken.content)) {
          htmlLinkLevel++;
        }
      }
      if (htmlLinkLevel > 0) { continue; }

      if (currentToken.type === 'text' && state.md.linkify.test(currentToken.content)) {

        text = currentToken.content;
        links = state.md.linkify.match(text);

        // Now split string to nodes
        nodes = [];
        level = currentToken.level;
        lastPos = 0;

        for (ln = 0; ln < links.length; ln++) {

          url = links[ln].url;
          fullUrl = state.md.normalizeLink(url);
          if (!state.md.validateLink(fullUrl)) { continue; }

          urlText = links[ln].text;

          if (!links[ln].schema) {
            urlText = state.md.normalizeLinkText('http://' + urlText).replace(/^http:\/\//, '');
          } else if (links[ln].schema === 'mailto:' && !/^mailto:/i.test(urlText)) {
            urlText = state.md.normalizeLinkText('mailto:' + urlText).replace(/^mailto:/, '');
          } else {
            urlText = state.md.normalizeLinkText(urlText);
          }

          pos = links[ln].index;

          if (pos > lastPos) {
            token         = new state.Token('text', '', 0);
            token.content = text.slice(lastPos, pos);
            token.level   = level;
            nodes.push(token);
          }

          token         = new state.Token('link_open', 'a', 1);
          token.attrs   = [ [ 'href', fullUrl ] ];
          token.level   = level++;
          token.markup  = 'linkify';
          token.info    = 'auto';
          nodes.push(token);

          token         = new state.Token('text', '', 0);
          token.content = urlText;
          token.level   = level;
          nodes.push(token);

          token         = new state.Token('link_close', 'a', -1);
          token.level   = --level;
          token.markup  = 'linkify';
          token.info    = 'auto';
          nodes.push(token);

          lastPos = links[ln].lastIndex;
        }
        if (lastPos < text.length) {
          token         = new state.Token('text', '', 0);
          token.content = text.slice(lastPos);
          token.level   = level;
          nodes.push(token);
        }

        blockTokens[j].children = tokens = arrayReplaceAt(tokens, i, nodes);
      }
    }
  }
};
这个 rule 的作用就是将 URL-like 的字符串转化成超链接。rule 是否执行,是取决于你实例化 md 传入的 options.linkify。内部检测 URL-like 的字符串用的库是 linkify-it。里面对很多种 url 格式做了检验,有兴趣的可以详细研究一下。
- replacements.js
module.exports = function replace(state) {
  var blkIdx;

  if (!state.md.options.typographer) { return; }

  for (blkIdx = state.tokens.length - 1; blkIdx >= 0; blkIdx--) {

    if (state.tokens[blkIdx].type !== 'inline') { continue; }

    if (SCOPED_ABBR_TEST_RE.test(state.tokens[blkIdx].content)) {
      replace_scoped(state.tokens[blkIdx].children);
    }

    if (RARE_RE.test(state.tokens[blkIdx].content)) {
      replace_rare(state.tokens[blkIdx].children);
    }

  }
};
初始化 md 的时候传入的 options.typographer 为 true 的时候,开启该 rule。这个 rule 的作用,就是替换一些印刷字体,比如类似于下面的:
// (c) (C) → ©
// (tm) (TM) → ™
// (r) (R) → ®
// +- → ±
// (p) (P) -> §
- smartquotes.js
初始化 md 的时候传入的 options.typographer 为 true 的时候,开启该 rule。rule 的作用就是为了处理一些不同国家语言的引号问题。官网给出的解释如下
// Double + single quotes replacement pairs, when typographer enabled,
// and smartquotes on. Could be either a String or an Array.
//
// For example, you can use '«»„“' for Russian, '„“‚‘' for German,
// and ['«\xA0', '\xA0»', '‹\xA0', '\xA0›'] for French (including nbsp).
小结
如此一来,我们从宏观的角度全面分析了 MarkdownIt 的 parse、tokenize、render 的全流程。代码的整体设计思路非常的清晰,内部的源码注释也是非常的丰富到位,用一张图来简单阐述下流程。
但是如果有细心的同学,会发现如下的一段代码,很有意思。
Core.prototype.process = function (state) {
  var i, l, rules;

  rules = this.ruler.getRules('');

  for (i = 0, l = rules.length; i < l; i++) {
    rules[i](state);
  }
};
在调用 process 的函数体内部,每次调用一个 rule,会将 state 传入。state 的 tokens 属性存储了所有的 token。因此我们发现,所有 rule 函数内部必须维持对 state.tokens 和 state 的引用不变,因此不能做类似于以下的赋值操作。
function rule (state) {
  state = xxx // wrong
  state.tokens = [token1, token2] // wrong
  state.tokens.push(token1) // true
}
// 第一个语句错误的原因,是因为你改了 state 的指向,切断了与老 state 的联系。
// 第二个语句错误的原因,是改了 tokens 的指向。这样接下的 rule 函数拿到的 state.tokens 就丢失了之前 rule 生成的 tokens。
这种函数在函数式编程里面叫做拥有副作用的函数,因为输入的 state 在函数内部发生了变化,导致外层 state 也被改变。这也是 javascript 里面基础类型与引用类型的区别。但是 MarkdownIt 的整体架构设计就是基于这种引用类型的机制,否则必须在 rule 里面返回每次新生成的 tokens,并且统一管理。
总结
分析完了 ParserCore,让我们从整体上对 MarkdownIt 的原理有了一定的了解。下两篇文章 ParserBlock&ParserInline,我们分别详细分析 ParserBlock 和 ParserInline,这两部分篇幅会比较长,因为这属于核心的 parse 逻辑。
