配置静态IP
此处使用VMware 模拟服务器环境,为防止IP在启动时动态分配,需要手动配置静态IP,如果是物理服务器可直接跳过
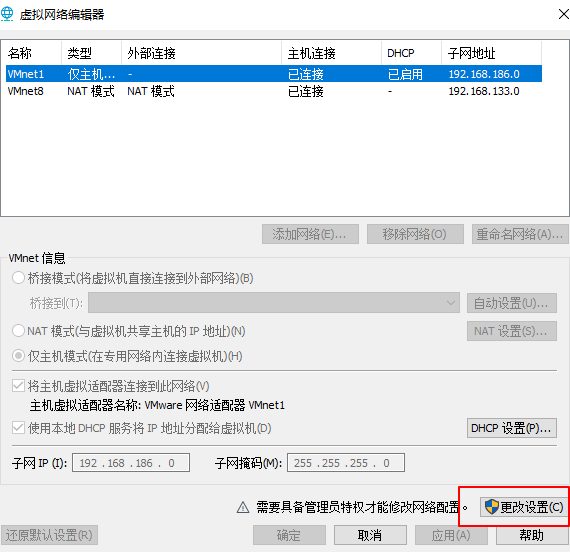
编辑虚拟机网络
编辑 -> 虚拟网络编辑器

更改
取消勾选此项
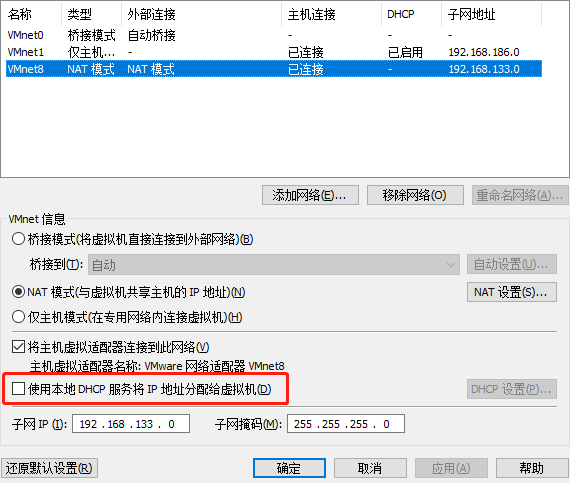
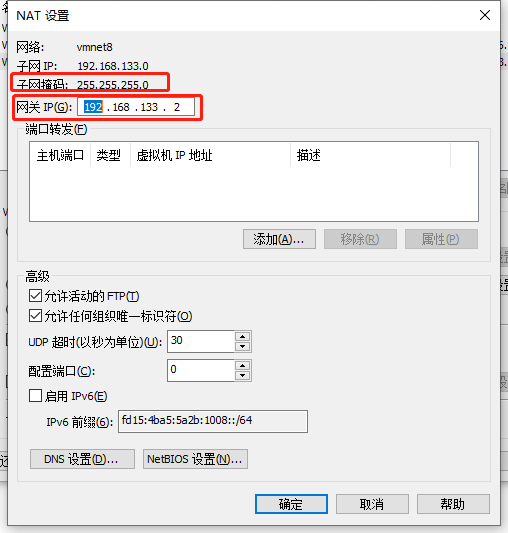
进入NAT设置记录默认网关和子网掩码
进入虚拟机
设置虚拟机IP
查看虚拟机网卡,lo为本地回环口,实际网卡为ens33
$ ip addr
1: lo: <LOOPBACK,UP,LOWER_UP> mtu 65536 qdisc noqueue state UNKNOWN group default qlen 1000
    link/loopback 00:00:00:00:00:00 brd 00:00:00:00:00:00
    inet 127.0.0.1/8 scope host lo
       valid_lft forever preferred_lft forever
    inet6 ::1/128 scope host
       valid_lft forever preferred_lft forever
2: ens33: <BROADCAST,MULTICAST,UP,LOWER_UP> mtu 1500 qdisc pfifo_fast state UP group default qlen 1000
    link/ether 00:0c:29:02:fe:c5 brd ff:ff:ff:ff:ff:ff
...
编辑网卡配置
$ vi /etc/sysconfig/network-scripts/ifcfg-ens33
加入静态配置
TYPE=Ethernet
PROXY_METHOD=none
BROWSER_ONLY=no
BOOTPROTO=static
DEFROUTE=yes
IPV4_FAILURE_FATAL=no
IPV6INIT=yes
IPV6_AUTOCONF=yes
IPV6_DEFROUTE=yes
IPV6_FAILURE_FATAL=no
IPV6_ADDR_GEN_MODE=stable-privacy
NAME=ens33
UUID=a63224f4-f210-4d84-933d-c4f0ccd68f7a
DEVICE=ens33
ONBOOT=yes
IPADDR=192.168.133.128
NETMASK=255.255.255.0
GATEWAY=192.168.133.2
ZONE=public
解释
ONBOOT:开机启动
BOOTPROTO:网络分配方式,静态
IPPADDR:手动指定ip地址
NETMASK:子网掩码
GATEWAY:网关ip
DNS配置
$ vi /etc/resolv.conf
加入DNS配置
nameserver=192.168.133.2
nameserver 8.8.8.8
nameserver 114.114.114.114
search localdomain
此处仅加入第一个也可以正常使用,但无法ping通域名
修改主机名
没有需求此步骤可以跳过
$ vi /etc/sysconfig/network
加入配置
# Created by anaconda
NETWORKING=yes
HOSTNAME=localhost
重启网卡
$ systemctl restart network
查看网络信息
$ ip addr
1: lo: <LOOPBACK,UP,LOWER_UP> mtu 65536 qdisc noqueue state UNKNOWN group default qlen 1000
    link/loopback 00:00:00:00:00:00 brd 00:00:00:00:00:00
    inet 127.0.0.1/8 scope host lo
       valid_lft forever preferred_lft forever
    inet6 ::1/128 scope host
       valid_lft forever preferred_lft forever
2: ens33: <BROADCAST,MULTICAST,UP,LOWER_UP> mtu 1500 qdisc pfifo_fast state UP group default qlen 1000
    link/ether 00:0c:29:02:fe:c5 brd ff:ff:ff:ff:ff:ff
    inet 192.168.133.128/24 brd 192.168.133.255 scope global ens33
       valid_lft forever preferred_lft forever
    inet6 fe80::20c:29ff:fe02:fec5/64 scope link noprefixroute
       valid_lft forever preferred_lft forever
静态IP配置完成
安装KVM
此处部分参考GitHub的安装指引,官方wiki也有相关的指南,不过更加复杂
检测是否支持KVM
$ cat /proc/cpuinfo | egrep 'vmx|svm'
flags           : fpu vme de pse tsc msr pae mce cx8 apic sep mtrr pge mca cmov pat pse36 clflush mmx fxsr sse sse2 ss ht syscall nx pdpe1gb rdtscp lm constant_tsc arch_perfmon nopl xtopology tsc_reliable nonstop_tsc eagerfpu pni pclmulqdq vmx ssse3 fma cx16 pcid sse4_1 sse4_2 x2apic movbe popcnt tsc_deadline_timer aes xsave avx f16c rdrand hypervisor lahf_lm abm 3dnowprefetch ssbd ibrs ibpb stibp tpr_shadow vnmi ept vpid fsgsbase tsc_adjust bmi1 avx2 smep bmi2 invpcid mpx rdseed adx smap clflushopt xsaveopt xsavec arat spec_ctrl intel_stibp flush_l1d arch_capabilities
关闭SELinux,将 /etc/sysconfig/selinux 中的 SELinux=enforcing 修改为 SELinux=disabled
$ vi /etc/sysconfig/selinux
安装 KVM 环境
通过 yum 安装 kvm 基础包和管理工具
kvm相关安装包及其作用:
qemu-kvm主要的KVM程序包python-virtinst创建虚拟机所需要的命令行工具和程序库virt-managerGUI虚拟机管理工具virt-top虚拟机统计命令virt-viewerGUI连接程序,连接到已配置好的虚拟机libvirtC语言工具包,提供libvirt服务libvirt-client为虚拟客户机提供的C语言工具包virt-install基于libvirt服务的虚拟机创建命令bridge-utils创建和管理桥接设备的工具
$ yum -y install qemu-kvm python-virtinst libvirt libvirt-python virt-manager libguestfs-tools bridge-utils virt-install
重启宿主机,以便加载 kvm 模块
$ reboot
查看KVM模块是否被正确加载
$ lsmod | grep kvm
kvm_intel             183621  0
kvm                   586948  1 kvm_intel
irqbypass              13503  1 kvm
配置libvirt以启用TCP服务
LIBVIRTD_CONFIG=/etc/libvirt/libvirtd.conf
LIBVIRTD_ARGS="--listen"
同时修改/etc/libvirt/libvirtd.conf配置
...
listen_tls = 0
listen_tcp = 1
tcp_port = "16509"
listen_addr = "0.0.0.0"
auth_tcp = "none"
...
开启kvm服务,并且设置其开机自动启动
$ systemctl start libvirtd
$ systemctl enable libvirtd
查看状态操作结果,如Active: active (running),说明运行情况良好
$ systemctl status libvirtd
● libvirtd.service - Virtualization daemon
   Loaded: loaded (/usr/lib/systemd/system/libvirtd.service; enabled; vendor preset: enabled)
   Active: active (running) since 日 2019-08-11 16:09:20 CST; 30min ago
     Docs: man:libvirtd(8)
           https://libvirt.org
 Main PID: 107953 (libvirtd)
    Tasks: 19 (limit: 32768)
   CGroup: /system.slice/libvirtd.service
           ├─105030 /usr/sbin/dnsmasq --conf-file=/var/lib/libvirt/dnsmasq/default.conf --leasefile-ro --dhcp-script=/usr/libexec/libvirt_leaseshelper
           ├─105031 /usr/sbin/dnsmasq --conf-file=/var/lib/libvirt/dnsmasq/default.conf --leasefile-ro --dhcp-script=/usr/libexec/libvirt_leaseshelper
           └─107953 /usr/sbin/libvirtd --listen
$ systemctl is-enabled libvirtd
enabled
安装WebVirtMgr管理面板
更新源
$ yum install -y epel-release
$ yum -y install http://dl.fedoraproject.org/pub/epel/7/x86_64/e/epel-release-7-5.noarch.rpm
安装依赖
$ yum -y install git python-pip libvirt-python libxml2-python python-websockify supervisor nginx
$ yum -y install gcc python-devel
$ pip install numpy
拉取源码安装
拉取源码和安装环境
$ git clone git://github.com/retspen/webvirtmgr.git
$ cd webvirtmgr
$ sudo pip install -r requirements.txt
执行安装文件并按照提示设置管理员账号密码
$ ./manage.py syncdb
WARNING:root:No local_settings file found.
Creating tables ...
Creating table auth_permission
Creating table auth_group_permissions
Creating table auth_group
Creating table auth_user_groups
Creating table auth_user_user_permissions
Creating table auth_user
Creating table django_content_type
Creating table django_session
Creating table django_site
Creating table servers_compute
Creating table instance_instance
Creating table create_flavor

You just installed Django's auth system, which means you don't have any superusers defined.
Would you like to create one now? (yes/no): yes
Please enter either "yes" or "no": yes
Username (leave blank to use 'root'): root
Email address: 123@abc.com
Password:
Password (again):
Superuser created successfully.
Installing custom SQL ...
Installing indexes ...
Installed 6 object(s) from 1 fixture(s)
发布到Nginx
拷贝文件到nginx web目录
$ cd .. && cp -r webvirtmgr/ /var/www/webvirtmgr/
创建配置文件
$ vi /etc/nginx/conf.d/webvirtmgr.conf
内容为
server {
    listen 80 default_server;

    server_name $hostname;
    #access_log /var/log/nginx/webvirtmgr_access_log;

    location /static/ {
        root /var/www/webvirtmgr/webvirtmgr; # or /srv instead of /var
        expires max;
    }

    location / {
        proxy_pass http://127.0.0.1:8000;
        proxy_set_header X-Real-IP $remote_addr;
        proxy_set_header X-Forwarded-for $proxy_add_x_forwarded_for;
        proxy_set_header Host $host:$server_port;
        proxy_set_header X-Forwarded-Proto $scheme;
        proxy_connect_timeout 600;
        proxy_read_timeout 600;
        proxy_send_timeout 600;
        client_max_body_size 1024M; # Set higher depending on your needs
    }
}
拷贝一份副本并配置nginx.conf
$ mv /etc/nginx/nginx.conf /etc/nginx/nginx.conf.bak
写入配置
#user  nobody;
worker_processes  1;

#error_log  logs/error.log;
#error_log  logs/error.log  notice;
#error_log  logs/error.log  info;

#pid        logs/nginx.pid;


events {
    worker_connections  1024;
}


http {
    include       mime.types;
    default_type  application/octet-stream;
    include /etc/nginx/conf.d/*.conf;

    sendfile        on;

    keepalive_timeout  65;

    server {
        listen       80;
        server_name  localhost;

        location / {
            root   html;
            index  index.html index.htm;
        }

        error_page   500 502 503 504  /50x.html;
        location = /50x.html {
            root   html;
        }
    }
}
重启nginx
$ systemctl restart nginx.service
配置用户组和权限
$ chown -R nginx:nginx /var/www/webvirtmgr
可能出现的报错——Address already in use
重启nginx服务出现错误,查看状态如下
$ systemctl status nginx.service
● nginx.service - The nginx HTTP and reverse proxy server
   Loaded: loaded (/usr/lib/systemd/system/nginx.service; disabled; vendor preset: disabled)
   Active: failed (Result: exit-code) since 日 2019-08-11 12:52:42 CST; 2s ago
  Process: 26188 ExecStart=/usr/sbin/nginx (code=exited, status=1/FAILURE)
  Process: 26185 ExecStartPre=/usr/sbin/nginx -t (code=exited, status=0/SUCCESS)
  Process: 26183 ExecStartPre=/usr/bin/rm -f /run/nginx.pid (code=exited, status=0/SUCCESS)

8月 11 12:52:40 localhost.localdomain nginx[26188]: nginx: [emerg] bind() to 0.0.0.0:80 failed (98: Address already in use)
8月 11 12:52:40 localhost.localdomain nginx[26188]: nginx: [emerg] bind() to 0.0.0.0:80 failed (98: Address already in use)
8月 11 12:52:41 localhost.localdomain nginx[26188]: nginx: [emerg] bind() to 0.0.0.0:80 failed (98: Address already in use)
8月 11 12:52:41 localhost.localdomain nginx[26188]: nginx: [emerg] bind() to 0.0.0.0:80 failed (98: Address already in use)
8月 11 12:52:42 localhost.localdomain nginx[26188]: nginx: [emerg] bind() to 0.0.0.0:80 failed (98: Address already in use)
8月 11 12:52:42 localhost.localdomain nginx[26188]: nginx: [emerg] still could not bind()
8月 11 12:52:42 localhost.localdomain systemd[1]: nginx.service: control process exited, code=exited status=1
8月 11 12:52:42 localhost.localdomain systemd[1]: Failed to start The nginx HTTP and reverse proxy server.
8月 11 12:52:42 localhost.localdomain systemd[1]: Unit nginx.service entered failed state.
8月 11 12:52:42 localhost.localdomain systemd[1]: nginx.service failed.
解决方法:杀掉占用80端口的进程(不管是不是nginx占用的)
推荐使用fuser命令快速杀掉占用端口的进程,CentOS可通过以下命令安装
$ yum install -y psmisc
杀掉占用端口的进程
$ fuser -k 80/tcp
80/tcp:              18869 18870 18871 18872 18873
再次重启即可
$ service nginx restart
Redirecting to /bin/systemctl restart nginx.service
更新SELinux策略
$ /usr/sbin/setsebool httpd_can_network_connect true
$ chkconfig supervisord on
注意:正在将请求转发到“systemctl enable supervisord.service”。
Created symlink from /etc/systemd/system/multi-user.target.wants/supervisord.service to /usr/lib/systemd/system/supervisord.service.
配置Supervisor
创建文件/etc/supervisord.d/webvirtmgr.ini
$ /etc/supervisord.d/webvirtmgr.ini
加入配置
[program:webvirtmgr]
command=/usr/bin/python /var/www/webvirtmgr/manage.py run_gunicorn -c /var/www/webvirtmgr/conf/gunicorn.conf.py
directory=/var/www/webvirtmgr
autostart=true
autorestart=true
logfile=/var/log/supervisor/webvirtmgr.log
log_stderr=true
user=nginx

[program:webvirtmgr-console]
command=/usr/bin/python /var/www/webvirtmgr/console/webvirtmgr-console
directory=/var/www/webvirtmgr
autostart=true
autorestart=true
stdout_logfile=/var/log/supervisor/webvirtmgr-console.log
redirect_stderr=true
user=nginx
启动supervisor守护线程
$ systemctl start supervisord.service
配置开启启动
$ systemctl enable supervisord.service
检查
查看端口占用,若80、8000、6080已经监听则正常
$ netstat -lnpt
Active Internet connections (only servers)
Proto Recv-Q Send-Q Local Address           Foreign Address         State       PID/Program name
tcp        0      0 0.0.0.0:111             0.0.0.0:*               LISTEN      1/systemd
tcp        0      0 0.0.0.0:80              0.0.0.0:*               LISTEN      102045/nginx: maste
tcp        0      0 0.0.0.0:22              0.0.0.0:*               LISTEN      9243/sshd
tcp        0      0 127.0.0.1:25            0.0.0.0:*               LISTEN      9543/master
tcp        0      0 127.0.0.1:6010          0.0.0.0:*               LISTEN      16011/sshd: root@pt
tcp        0      0 127.0.0.1:8000          0.0.0.0:*               LISTEN      102430/python
tcp        0      0 0.0.0.0:6080            0.0.0.0:*               LISTEN      102429/python
tcp6       0      0 :::111                  :::*                    LISTEN      1/systemd
tcp6       0      0 :::22                   :::*                    LISTEN      9243/sshd
tcp6       0      0 ::1:25                  :::*                    LISTEN      9543/master
tcp6       0      0 ::1:6010                :::*                    LISTEN      16011/sshd: root@pt
开放防火墙
$ firewall-cmd --zone=public --add-port=80/tcp --permanent
$ firewall-cmd --reload
访问web界面
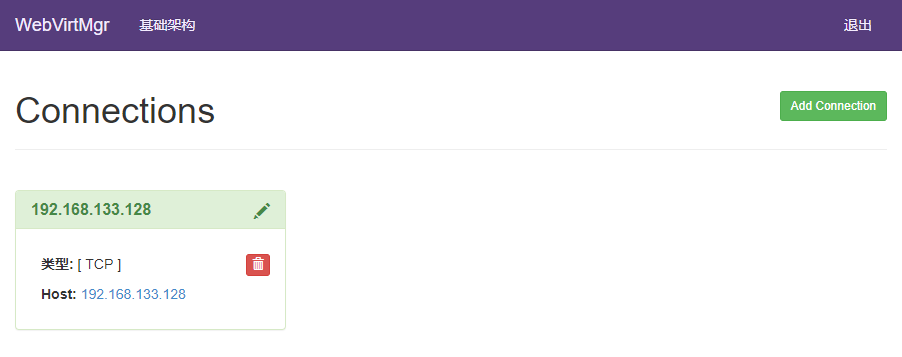
访问虚拟机地址http://192.168.133.128/login/ 可见启动成功

TCP方式连接宿主机

连接成功