前言
之前学Vue的时候经常会用到Element-ui,抱着学习的心态也去看过源码。antd框架用的不是很多,在搭建自己博客的时候准备上手试用一波。在用到BackTop组件的时候觉得Element-ui没有这个组件,遂好奇去查看了下它的源码。
BackTop 整体结构
- 打开文件路径为
node_modules/antd/es/back-top查看文件,它的整体结构如下
  var BackTop = function (_React$Component) {
    // 此处的 BackTop 函数是自执行的函数体内的 BackTop
    _inherits(BackTop, _React$Component);
    function BackTop(props){
      // ...省略
    }
    _createClass(BackTop, [])
    return BackTop;
  }(React.Component)
  export { BackTop as default };
  BackTop.defaultProps = {
    visibilityHeight: 400
  };
上面代码可以看出,是一个自执行的函数,并且最终暴露出去一个函数组件
分析步骤
- 有了整体的了解后,决定分步骤去分析这个组件,搞清楚了下面三个步骤,这个组件自然就清楚了。
- _inherits函数做了什么
- BackTop函数做了什么
- _createClass函数做了什么
_inherits函数
_inherits(BackTop, _React$Component)接受BackTop 函数和React.Component作为参数
    function _inherits(subClass, superClass) {
        if (typeof superClass !== 'function' && superClass !== null) {
            throw new TypeError(
                'Super expression must either be null or a function'
            );
        }
        subClass.prototype = Object.create(superClass && superClass.prototype, {
            constructor: { value: subClass, writable: true, configurable: true }
        });
        if (superClass) _setPrototypeOf(subClass, superClass);
    }
- 类继承:
subClass.prototype = Object.create(superClass && superClass.prototype)将React.Component的原型对象赋值给BackTop,Object.create方法的第二个参数是要添加到新创建对象的可枚举属性 - 设置原型链 __proto__: _setPrototypeOf方法就是通过 Object.setPrototypeOf将React.Component设置到 BackTop到原型链 __proto__上
BackTop函数
- 首先看 BackTop 内部结构如下,定义一个内部到_this,并且将一些方法都挂载到这个对象上,最终返回这个对象。
function BackTop(props) {
    var _this;
    _this = _possibleConstructorReturn(
                this,
                _getPrototypeOf(BackTop).call(this, props)
            );
    _this.getCurrentScrollTop = function(){}
    _this.scrollToTop = function(){}
    _this.handleScroll = function(){}
    _this.renderBackTop = function(){}
    _this.state = {
                visible: false
            };
    return _this;
}
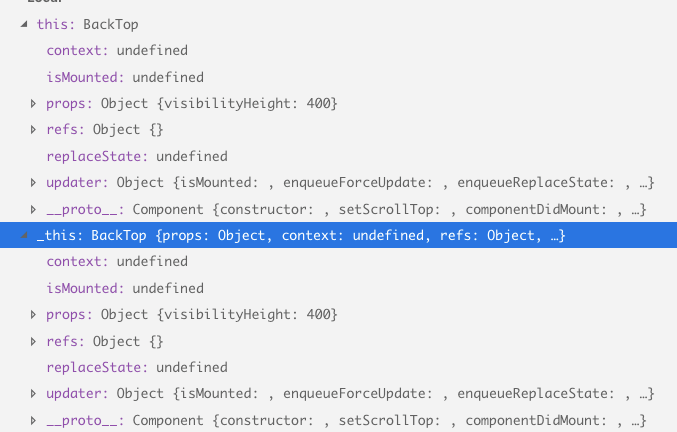
- _getPrototypeOf就是获取 BackTop的原型,说实话我也没看懂为什么用用 _possibleConstructorReturn函数,最终获取到的 _this和this值是相同的都指向BackTop 函数组件。

-
接下来分析下下面挂载到_this上的四个函数的作用。
- getCurrentScrollTop:
获取当前 target(dom元素) 的滚动高度 未设置 target 则获取 window 的滚动高度
_this.getCurrentScrollTop = function() { var getTarget = _this.props.target || getDefaultTarget; var targetNode = getTarget(); if (targetNode === window) { return ( window.pageYOffset || document.body.scrollTop || document.documentElement.scrollTop ); } return targetNode.scrollTop; };- scrollToTop 循环 通过刚刚定义的
getCurrentScrollTop函数去获取当前滚动高度,然后通过setScrollTop函数将scrollTop设置 target 上,关于setScrollTop会在下一个函数中分析。- 这里用到easeInOutCubic是一个曲线函数根据(当前时间,滚动高度,目标值,所需时间)生成的移动距离。
var easeInOutCubic = function easeInOutCubic(t, b, c, d) { var cc = c - b; t /= d / 2; if (t < 1) { return (cc / 2) * t * t * t + b; } else { return (cc / 2) * ((t -= 2) * t * t + 2) + b; } };- raf是一个库,作用类似 requestAnimationFrame
- 采用b包原理,在外层函数记录了startTime和scrollTop,内层函数按照 easeInOutCubic的规则去更新当前的滚动高度实现滚动效果。
_this.scrollToTop = function(e) { var scrollTop = _this.getCurrentScrollTop(); var startTime = Date.now(); var frameFunc = function frameFunc() { var timestamp = Date.now(); var time = timestamp - startTime; _this.setScrollTop(easeInOutCubic(time, scrollTop, 0, 450)); if (time < 450) { raf(frameFunc); } else { _this.setScrollTop(0); } }; raf(frameFunc); (_this.props.onClick || noop)(e); };- setScrollTop 设置滚动高度
- this.props.target是传入获取dom的函数,getDefaultTarget 默认返回window
function getDefaultTarget() { return window; } - 通过 document.documentElement.scrollTop (chrome有效)设置滚动高度,据说两种方式只会生效一个,没测试过。
- this.props.target是传入获取dom的函数,getDefaultTarget 默认返回window
function setScrollTop(value) { var getTarget = this.props.target || getDefaultTarget; var targetNode = getTarget(); if (targetNode === window) { document.body.scrollTop = value; document.documentElement.scrollTop = value; } else { targetNode.scrollTop = value; } }- handleScroll 通过当前的滚动高度来判断是否显示 属性值为:visible
- _this.props 都是用户传入的配置项,如target,visibilityHeight
- void 0 作用相当于 undefined,因为undefined不是保留字会被覆盖,可能这样写比较nb吧。
function() { var _this$props = _this.props, visibilityHeight = _this$props.visibilityHeight, _this$props$target = _this$props.target, target = _this$props$target === void 0 ? getDefaultTarget : _this$props$target; var scrollTop = getScroll(target(), true); _this.setState({ visible: scrollTop > visibilityHeight }); };- renderBackTop 实时监听滚动事件,如果 visible 为true则渲染组件,代码比较长,只贴了核心部分
- 判断_this.props中是否有 visible 如果有则用传入的值。
也就是说我们可以传入 visible 来让 BackTop 组件一直显示,这里官方文档并没有提供这个props的说明,觉得本身需求也是滚动一段记录才有回滚的必要吧,也没毛病。 - 通过 return React.createElement()来替代jsx返回dom结构
- 判断_this.props中是否有 visible 如果有则用传入的值。
var visible =
         'visible' in _this.props
             ? _this.props.visible
             : _this.state.visible;

     var backTopBtn = visible
         ? React.createElement(
               'div',
               _extends({}, divProps, {
                   className: classString,
                   onClick: _this.scrollToTop
               }),
               children || defaultElement
           )
         : null;
_createClass 函数
- _createClass函数接受 BackTop 函数组件,和一个[{key,value}]结构的数组为参数
_createClass(BackTop, [
         {
             key: 'setScrollTop',
             value: function setScrollTop(value) {
                 var getTarget = this.props.target || getDefaultTarget;
                 var targetNode = getTarget();

                 if (targetNode === window) {
                     document.body.scrollTop = value;
                     document.documentElement.scrollTop = value;
                 } else {
                     targetNode.scrollTop = value;
                 }
             }
         },
         // ...省略后面三个数组项
     ]);
来看下_createClass函数: 这里只传入了两个参数,所以我们只需要看第一句if判断即可。
function _createClass(Constructor, protoProps, staticProps) { if (protoProps) _defineProperties(Constructor.prototype, protoProps); if (staticProps) _defineProperties(Constructor, staticProps); return Constructor; }- _defineProperties函数,在 BackTop.proptotype 上定义了一些属性
function _defineProperties(target, props) { for (var i = 0; i < props.length; i++) { var descriptor = props[i]; descriptor.enumerable = descriptor.enumerable || false; descriptor.configurable = true; if ('value' in descriptor) descriptor.writable = true; Object.defineProperty(target, descriptor.key, descriptor); } }- 那数组第一项举例,效果如下,所以BackTop函数组件中可以通过
this.setScrollTop去获取到setScrollTop定义的函数。
Object.defineProperty(BackTop.prototype,'setScrollTop',{ enumerable:false, configurable:true, key: 'setScrollTop', value: function setScrollTop(value) { var getTarget = this.props.target || getDefaultTarget; var targetNode = getTarget(); if (targetNode === window) { document.body.scrollTop = value; document.documentElement.scrollTop = value; } else { targetNode.scrollTop = value; } } }) - getCurrentScrollTop:
总结
也是第一次看antd的源码,我的步骤就是从整体结构中去分析antd做了哪些事。然后各个步骤的细节是怎么实现的。还好 BackTop源码比较独立,没有太多文件的互相引用,看起来没有那么杂乱,其中也涉及了几个有意思的第三方库raf,omit有兴趣可以自己打开源码去看吧。