基于nodejs的服务端开发已经有express、koa2等成熟框架。熟练使用这些框架并不难,但背后的原理是怎样的,很多同学并没有做到知其所以然。
本nodejs系列教程先抛开框架,原生搭建nodejs后服务,在掌握原理后,再去学习express、koa2框架。
通过开发一个ToDoList小项目,掌握常用的nodejs开发。大致分为以下几个阶段:
【第一阶段】不借助框架开发nodejs后端服务,包括数据的接收、处理、返回,路由,MySQL、Redis对接,登录验证,简单的安全防范等(分较多期进行讲解)。
【第二阶段】使用express重构项目
【第三阶段】使用koa2重构项目
第一阶段将花费大量篇幅讲解,当我们深入了解原理后再去学习express、koa2就会理解得更加透彻。
重要的事情说三遍:懂原理!懂原理!懂原理!
1 初始化项目
1.1 创建项目目录
找个喜欢的地方,新建并初始化项目,执行以下命令:
mkdir node-server
cd node-server
npm init -y
1.2 编写服务脚本
在项目根目录下创建bin/www.js。
+  |- /bin
+     |- www.js
   |- package.json
启动web服务需要使用nodejs的http模块,打开 bin/www.js 编写代码:
const http = require('http')

// 设置服务器端口
const PORT = 8000

// 创建服务器
const server = http.createServer((req, res) => {
   // 返回的内容
   res.end('hello nodejs')
});

// 设置服务器端口
server.listen(PORT)

console.log('node-server started at port http://localhost:' + PORT)
配置入口文件,修改package.json
    "name": "node-server",
      "version": "1.0.0",
      "description": "",
M     "main": "./bin/www.js",
      "scripts": {
        "test": "echo \"Error: no test specified\" && exit 1",
+       "dev": "node ./bin/www.js"
      },
【关于main字段】
官方说明的原文是这样的:
The main field is a module ID that is the primary entry point to your program. That is, if your package is named foo, and a user installs it, and then does require("foo"), then your main module’s exports object will be returned.
This should be a module ID relative to the root of your package folder.
For most modules, it makes the most sense to have a main script and often not much else.
main字段是一个模块ID,是指向你程序的主入口。也就是说,如果你的package名叫foo,那么一个用户安装了你这个package,并且执行require("foo"),你的main模块的exports对象将会被返回。
这个模块ID应该相对于你的package根目录。
对于大多数的模块来说,设置main还是非常有意义的,除此之外也没有其他鸟用了。
【关于script字段】
官方说明的原文是这样的:
The “scripts” property is a dictionary containing script commands that are run at various times in the lifecycle of your package. The key is the lifecycle event, and the value is the command to run at that point.
scripts是一个包含了脚本命令的dictionary,可以在package不同的生命周期中被执行。key是生命周期事件,value是要运行的命令。
英语比较好的同学可以参看官方原文:docs.npmjs.com/files/packa…
回到我们的项目来,项目的主入口文件是./bin/www.js。
现在,在项目根目录下执行npm run dev,就等同于执行node ./bin/www.js。 执行后,在控制台可以看到输出,说明服务已经正常启动:
node-server started at port http://localhost:8000
浏览器打开http://localhost:8000,出现“hello nodejs”。
2 设置服务自动热启动
每次修改代码都要重启服务器才能生效很麻烦,使用nodemon来实现自动监测代码变化并重启。
另外,安装cross-env可以方便的跨平台设置环境变量(例如,windows用%ENV_VAR%,其他系统可能使用$ENV_VAR,不统一)
npm install nodemon cross-env --save-dev
修改package.json:
    "scripts": {
        "test": "echo \"Error: no test specified\" && exit 1",
M       "dev": "cross-env NODE_ENV=dev nodemon ./bin/www.js"
    },
再次执行npm run dev的时候,如果代码有改动,web服务会自动重启,这样就方便多啦。
3 处理GET请求
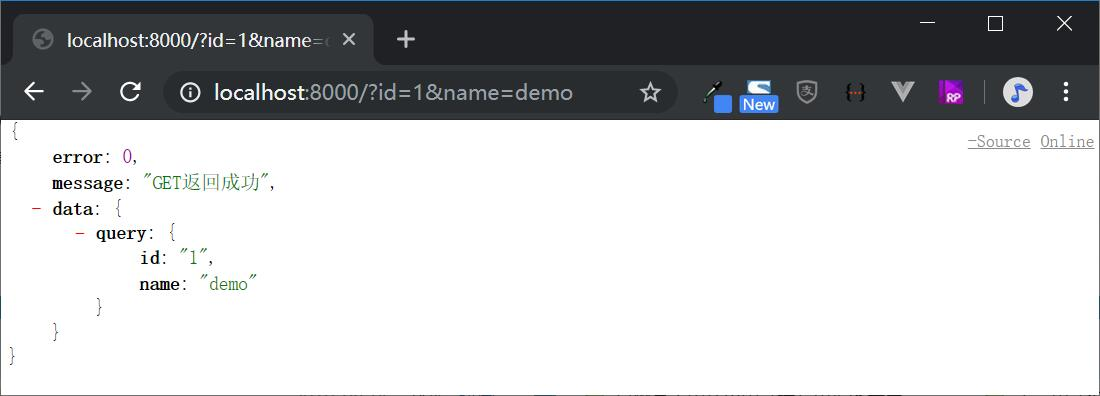
浏览器访问http://localhost:8000?id=1&name=demo,相当于我们发送了一个GET请求,并且传递了两个变量和值。
接下来我们实现:接收GET请求,并把GET请求传递的数据再返回给浏览器。
修改bin/www.js:
    const http = require('http')
+   const querystring = require('querystring')

+   // 设置服务器端口
    const PORT = 8000

    // 创建服务器
    const server = http.createServer((req, res) => {
+       // 获取请求的url
+       const url = req.url
+       // 获取请求的method
+       const method = req.method
+       // 解析URL,把url中?后面的参数转换为对象
+       const query = querystring.parse(url.split('?')[1])

+       // 设置返回数据的Content-type为JSON
+       res.setHeader('Content-type', 'application/json')

+       if (method === 'GET') {
+           // 返回的数据
+           let resData = {
+               error: 0,
+               message: 'GET返回成功',
+               data: {
+                   query: query
+               }
+           }
+           // 将对象转换为json字符串
+           res.end(JSON.stringify(resData));
+           return
+       }
+       // 如果没有匹配,则返回404页面
+       res.writeHead(200, {'content-type': 'text/plain'});
+       res.write('404 Not Found\n')
+       res.end()

-       // 返回的内容            <--删除
-       res.end('hello nodejs')  <--删除
    });

    // 设置服务器端口
    server.listen(PORT)

    console.log('node-server started at port http://localhost:' + PORT)
浏览器访问http://localhost:8000?id=1&name=demo,可以看到返回的数据了。
【原理讲解】
接收GET请求数据还是很简单的,关键点就是使用const query = querystring.parse(url.split('?')[1])把url中?后面的参数直接解析好了。
4 下载安装postman
因为POST请求不能像GET请求一样通过浏览器的URL直接发起请求,所以在讲解处理POST请求之前,我们先postman这个工具软件。
postman是一款可以模拟各种请求的工具,方便我们进行POST调试,否则我们还要去做一个静态页。通过ajax等方式去请求。
官方建议下载桌面端APP,www.getpostman.com/downloads/
5 处理POST请求
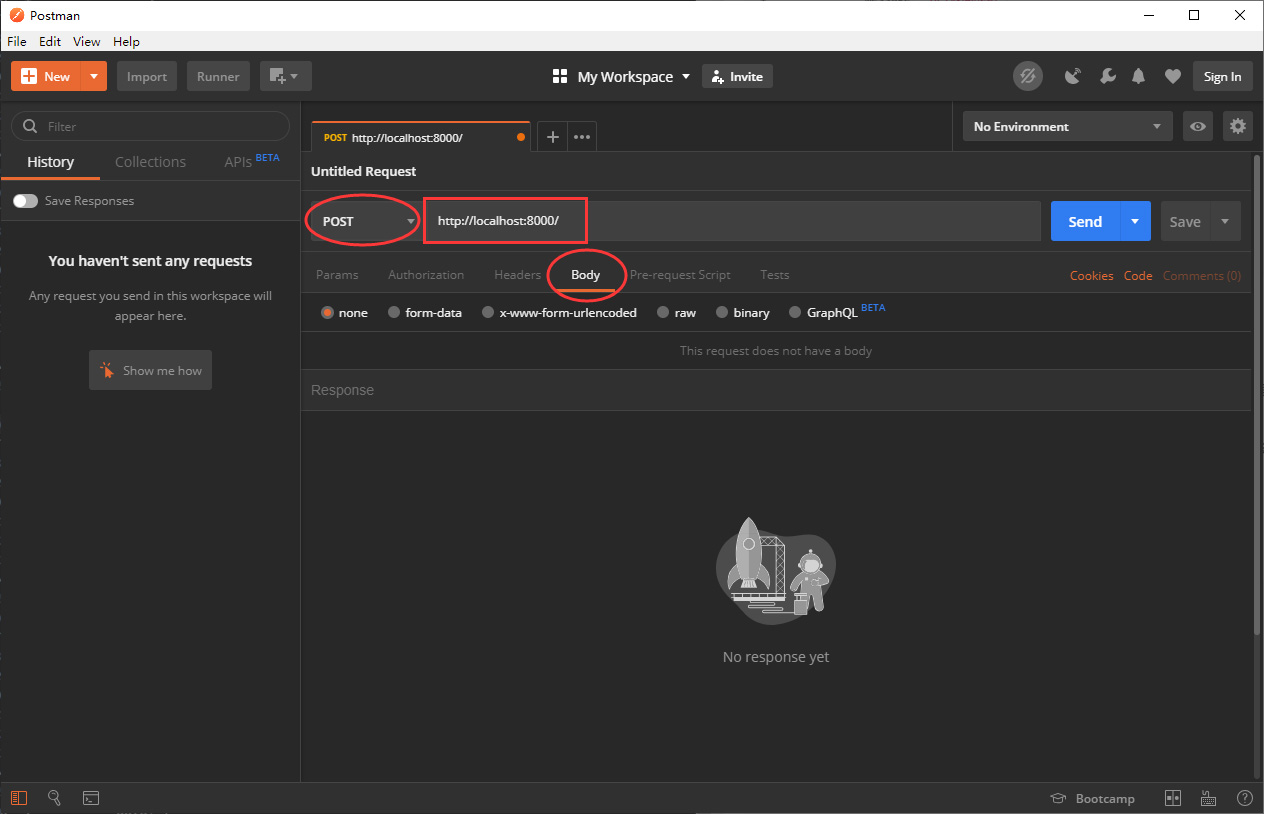
启动postman,我们把请求方式改为POST,输入请求地址http://localhost:8000/。
点击下方的Body标签,可以看到发起POST请求的content-type有好多种。
这里我们以application/json和form-data为例,分别讲解如何接收POST数据。
5.1 接收application/json数据
首先我们要知道的是,POST数据是以二进制流的方式进行传输,所以要不断的接收数据,直到数据流结束。
修改bin/www.js:
    ...(略)
    const server = http.createServer((req, res) => {
        const url = req.url
        const method = req.method
        const query = querystring.parse(url.split('?')[1])
+       const contentType = req.headers['content-type']

        // 设置返回数据的Content-type为JSON
        res.setHeader('Content-type', 'application/json')

        if (method === 'GET') {...}

+       if (method === 'POST') {
+           if (contentType === 'application/json') {
+               let postData = '';
+               req.on('data', chunk => {
+                   // chunk是原始二进制数据,需要转化成字符串
+                   postData += chunk.toString()
+               })
+               req.on('end', () => {
+                   res.end(postData)
+               })
+               return
+           }
+       }
       ...(略)
【原理讲解】
- 通过
req.headers['content-type']获取请求的数据格式,如果是applicatin/json则进入下面的逻辑。 - 创建postData变量,用来存储post数据。
- 在接收数据流的时候,会不断触发request的data事件,postData持续累积数据。
- 当数据流接收完毕,会触发request的end事件,返回给客户端最终结果。
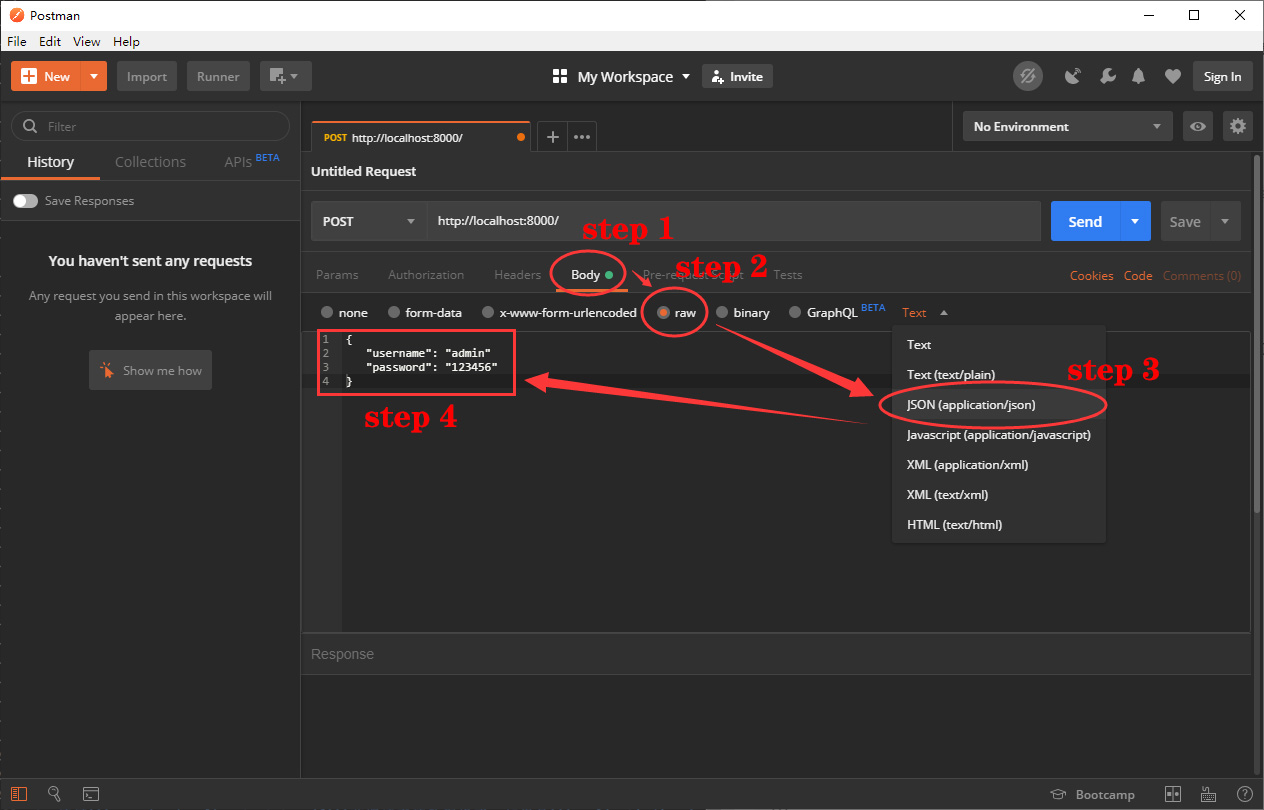
按照下图设置postman:
点击Send后,可在下方看到返回的JSON数据。
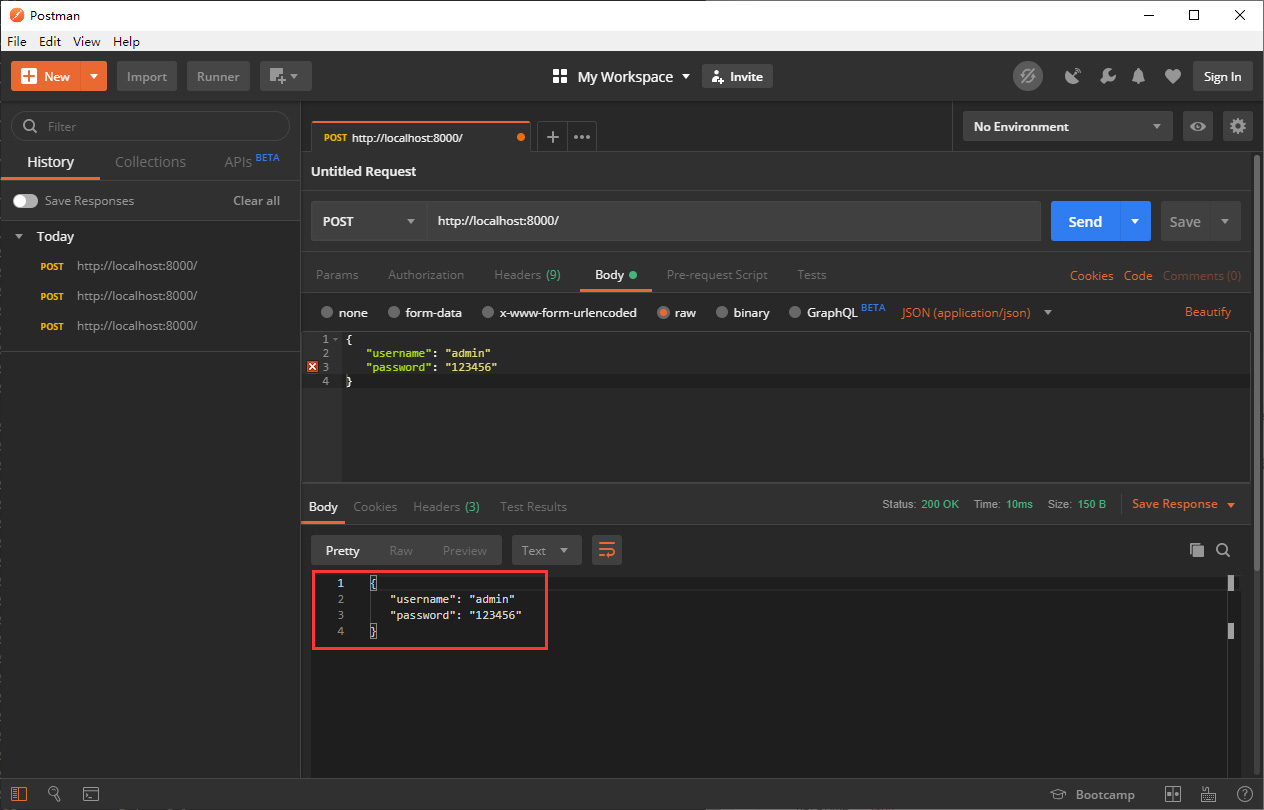
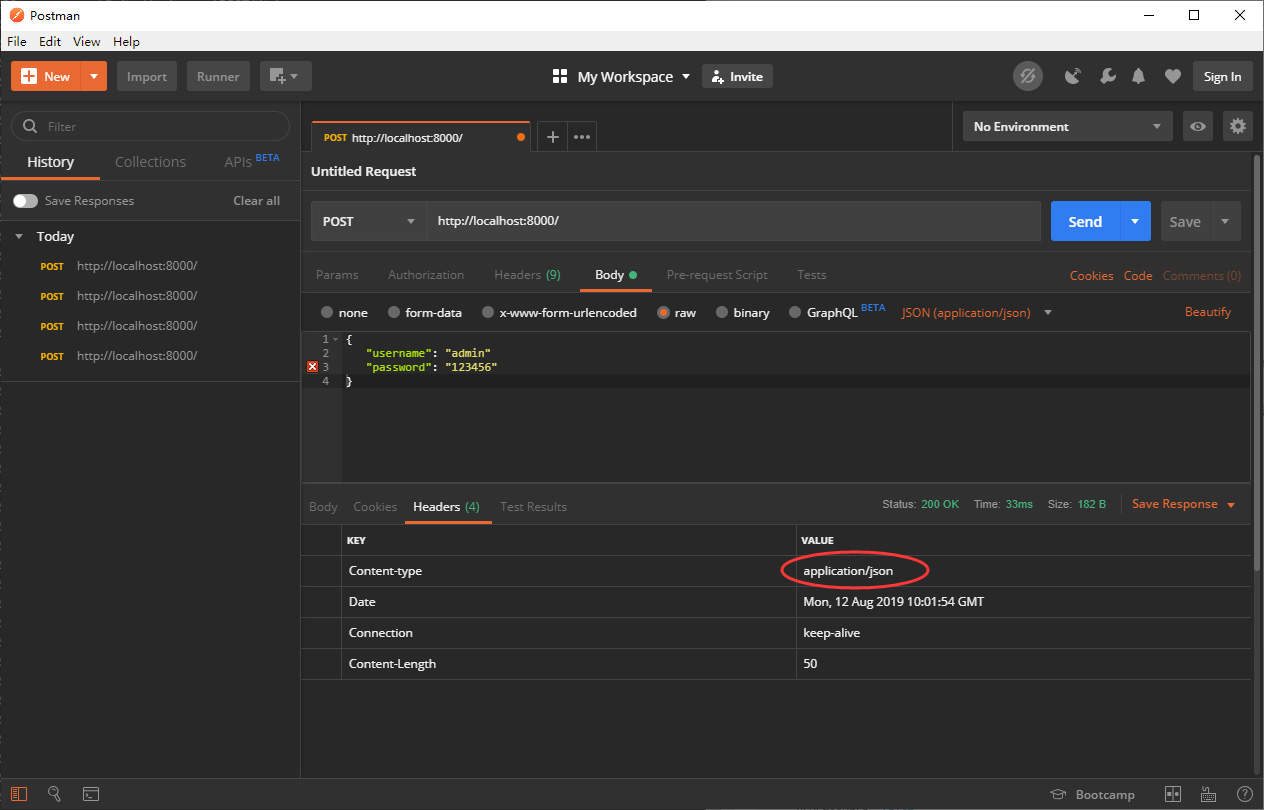
切换到Header标签,可以看到返回数据的content-type为application/json。
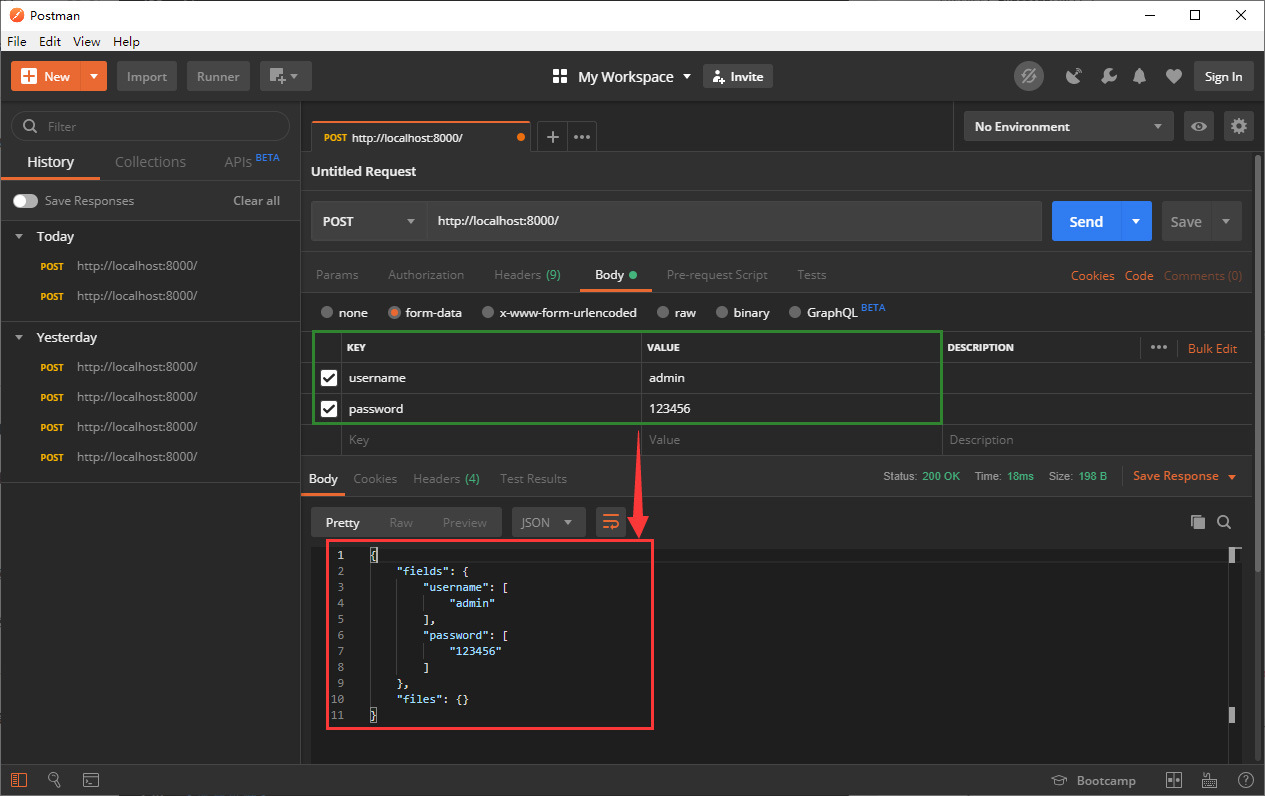
5.2 接收form-data数据
在项目开发时,特别是jQuery项目,我们经常使用formData提交数据,例如:
var formData = new FormData();
formData.append('username', 'admin')
formData.append('password', 123456)
$.ajax({
    type: 'POST',
    url: 'api/',
    data: formData,
    dataType: 'json',
    processData: false,
    contentType: false,
    success: function(obj) {
        console.log(obj)
    }
})
如果用5.1章节的方式,接收到的数据是这样的:
------WebKitFormBoundaryQrEkLmfuhHhIu5vy
Content-Disposition: form-data; name="username"

admin
------WebKitFormBoundaryQrEkLmfuhHhIu5vy
Content-Disposition: form-data; name="password"

123456
------WebKitFormBoundaryQrEkLmfuhHhIu5vy--
需要我们自行解析,比较麻烦。这里推荐安装multiparty插件。
npm install multiparty --save
修改bin/www.js:
    const http = require('http')
    const querystring = require('querystring')
+   const multiparty = require('multiparty')

    const PORT = 8000

    const server = http.createServer((req, res) => {
        ...(略)
        if (method === 'GET') {...}

        if (method === 'POST') {
            if (contentType === 'application/json') { ... }
+           else if (contentType.indexOf('multipart/form-data') !== -1) {
+               let form = new multiparty.Form()
+               form.parse(req, function(err, fields, files) {
+                   res.end(JSON.stringify({fields: fields, files: files}));
+               });
+               return
            }
        }
        ...(略)
【原理讲解】
1.为何使用contentType.indexOf('multipart/form-data') !== -1来判断是不是multipart/form-data类型?
因为通过form-data提交的数据content-type的值是类似
multipart/form-data;boundary=----WebKitFormBoundaryMxVY9JCuXKMvmRuL
的形式,因此使用indexOf()。
2.let form = new multiparty.Form()可方便的解析form-data数据。fields里可以获取提交的数据变量及值,files里获取提交的文件数据。
3.使用JSON.stringify()将对象转化为JSON字符串返回给客户端。
点击Send之后,可以看到数据已经正常返回了。
以上就是本期分享,对GET和POST请求的处理方式进行了讲解。这是基于Node.js开发后端服务最最基本的功能了。
下期我们将讲解如何更加科学合理的设置目录结构以及拆分代码文件,更侧重于架构方面,敬请期待~
欢迎关注我的个人微信公众号,随时获取最新文章^_^