

基本介绍
效果演示
- 简单介绍:本人实现了一个常见问题列表,点击列表项进入详情页,目标是在页面切换的时候加过渡效果,提升用户体验。
- 没加过渡效果的,进入详情页时很突兀:

- 加了过渡效果的,看起来好一点了吧:

- 下面来看具体怎么实现吧。
react-transition-group 基本知识
官方文档 👉react-transition-group 文档
-
在 react 项目中可使用官网提供的动画过渡库 react-transition-group 来实现切换页面(路由切换)时的过渡效果。
-
react-transition-group 中,暴露了三个组件,分别是:
TransitionCSSTransitionTransitionGroup
-
其中最重要的是
CSSTransition,而TransitionGroup用于列表项的过渡动画。项目中我也是使用了这两个组件。 -
TransitionGroup不提供任何形式的动画,具体的动画取决与我们包裹的Transition||CSSTransition的动画,所以我们可以在列表里面做出不同类型的动画。 -
CSSTransition组件中较为重要的 api 有:-
in:boolean,控制组件显示与隐藏,
true显示,false隐藏。 -
timeout:number,延迟,涉及到动画状态的持续时间。也可传入一个对象,如
{ exit:300, enter:500 }来分别设置进入和离开的延时。 -
classNames:string,动画进行时给元素添加的类名。一般利用这个属性来设计动画。这里要特别注意是 classNames 而不是className。
-
unmountOnExit:boolean,为
true时组件将移除处于隐藏状态的元素,为false时组件保持动画结束时的状态而不移除元素。一般要设成true。 -
appear:boolean,为
false时当CSSTransition控件加载完毕后不执行动画,为true时控件加载完毕则立即执行动画。如果要组件初次渲染就有动画,则需要设成true。 -
key:string,这个属性是配合
TransitionGroup组件来使用的,可以通过key来判断是否需要触发动画。这个属性十分重要!
-
-
classNames属性的作用是:当组件被应用动画时,不同的动画状态(enter,exits,done)将作为className属性的后缀来拼接为新的className,如为
CSSTransition组件设置了以下属性:
        <CSSTransition
          classNames={'fade'}
          appear={true}
          key={location.pathname}
          timeout={300}
          unmountOnExit={true}
        >
          /* 省略... */
        </CSSTransition>
- 将会生成
fade-enter、fade-enter-active、fade-enter-done、fade-exit、fade-exite-active、fade-exit-done、fade-appear以及fade-appear-active多个className。每一个独立的className都对应着单独的状态。
react-router 冷知识
-
关于 react-router 的基本知识可具体查看官方文档 👉react-router文档,这里就不再重复进行介绍。
-
这里介绍大家平时没注意的关于
Switch组件的冷知识,也是实现路由切换动画的关键! -
Switch有一个很重要的属性:location。一般我们不会给该组件设置 location 属性。有无该属性的区别:- 不设置location属性:
Switch组件的子组件(一般是 Route 或 Redirect)会根据当前浏览器的 location 作为匹配依据來进行路由匹配。 - 设置location属性:
Switch组件的子组件会根据定义的 location 作为匹配依据。
- 不设置location属性:
-
看完基本介绍,下面就看看如何在项目中使用 react-transition-group 实现页面切换过渡效果吧。
完整流程
- 首先,根据之前博客已经介绍的 👉 react + typescript 项目的定制化过程 搭建好项目后,在进行组件开发之前,即可在项目中引入 react-transition-group。同时,由于项目中我还使用了typescript,所以还要安装 @types/react-transition-group。安装命令如下:
yarn add react-transition-group
yarn add @types/react-transition-group --dev
- 在入口文件 App.tsx 中使用:
import { createHashHistory } from 'history';
import React from 'react';
import { Router } from 'react-router';
import { Route, Switch, withRouter } from 'react-router-dom';
import { TransitionGroup, CSSTransition } from 'react-transition-group';
import routeData from './common/route'; // 路由配置
import NotFound from './views/Exception';

const history = createHashHistory();

const Routes = withRouter(({ location }) => (
  <TransitionGroup className={'router-wrapper'}>
    <CSSTransition timeout={300} classNames={'fade'} key={location.pathname} unmountOnExit={true}>
      <Switch>
        {routeData.map(({ path, component, exact }: IRouterItem) => (
          <Route key={path} path={path} component={component} exact={exact} />
        ))}
        <Route component={NotFound} />
      </Switch>
    </CSSTransition>
  </TransitionGroup>
));

const App: React.FC = () => {
  return (
    <Router history={history}>
      <Routes />
    </Router>
  );
};

export default App;
- withRouter的作用:可以包装任何自定义组件,可以把不是通过路由切换过来的组件中,将react-router 的 history、location 和 match 三个方法传入 props 对象上。
默认情况下必须是经过路由匹配渲染的组件才存在 this.props,才拥有路由参数,才能使用编程式导航的写法。然而不是所有组件都直接与路由相连(通过路由跳转到此组件)的,当这些组件需要路由参数时,使用 withRouter 就可以给此组件传入路由参数,此时就可以使用 this.props。
-
比如 App.js 这个组件,一般是首页,不是通过路由跳转过来的,而是直接从浏览器中输入地址打开的,如果不使用 withRouter,此组件的 this.props 为空,没法执行 props 中的 history、location 和 match 等方法。
-
为了让入口文件 App.tsx 看起来更加简洁,我将使用了 react-transition-group 的路由切换相关代码封装成
Routes组件。 -
修改后的入口文件 App.tsx 内容如下:
import { createHashHistory } from 'history';
import React from 'react';
import { Router } from 'react-router';
import Routes from './components/Routes';

const history = createHashHistory();

const App: React.FC = () => {
  return (
    <Router history={history}>
      <Routes />
    </Router>
  );
};

export default App;
Routes组件内容如下:
import React from 'react';
import { Route, Switch, withRouter } from 'react-router-dom';
import { TransitionGroup, CSSTransition } from 'react-transition-group';
import routeData from '../../common/route';
import NotFound from '../../views/Exception';

interface IRouterItem {
  component?: React.ComponentType;
  path?: string;
  exact?: boolean;
}

class Routes extends React.Component<any> {
  render () {
    const { location } = this.props;
    return (
      <TransitionGroup className={'router-wrapper'}>
        <CSSTransition
          classNames={'fade'}
          appear={true}
          key={location.pathname}
          timeout={300}
          unmountOnExit={true}
        >
          <Switch location={location}>
            {routeData.map(({ path, component, exact }: IRouterItem) => (
              <Route key={path} path={path} component={component} exact={exact} />
            ))}
            <Route component={NotFound} />
          </Switch>
        </CSSTransition>
      </TransitionGroup>
    );
  }
}

export default withRouter(Routes);
- 决定是否有动画效果的关键步骤来了,就是完成动画的相关样式 !由于动画效果是作用的全局,所以应该写在全局样式里面。
- 关于模块化的 less 和全局的 less 的相关介绍可具体查看前一篇博客 👉 react + typescript 项目的定制化过程进行了解。
- 我们要做的就是在src目录下新建一个index.less文件,内容如下:
/* 动画相关样式 */
.fade-enter, .fade-appear {
  opacity: 0;
}

.fade-enter.fade-enter-active, .fade-appear.fade-appear-active {
  opacity: 1;
  transition: opacity 300ms ease-in;
}

.fade-exit {
  opacity: 1;
}

.fade-exit.fade-exit-active {
  opacity: 0;
}
- 然后在入口文件index.tsx进行引入即可:
import './index.less';
- 以上则可以实现在切换路由时呈现页面过渡效果,且无bug(首次加载无动画、接口请求两次)。
⚠ ️如果只是想实现过渡效果,按照上面介绍的内容即可实现
⚠ ️如果想了解出现以上两种bug的原因,则可以继续看下面的内容。
踩坑实践
- 说没踩坑是不可能的,刚开始的代码也不是这样的。下面来解释为何会出现首次加载无动画、接口请求两次这两种bug。
首次加载无动画
- 之前写过的文章提到过,我在项目中使用了一个叫
react-loadable的第三方库来进行代码拆分,实现组件按需加载。(相关介绍可具体查看前一篇博客 👉 react + typescript 项目的定制化过程进行了解) - 然而,发现当使用
react-loadable后首次加载时页面切换没有过渡效果,具体看下面的效果:
- 可以看到,当刷新页面时,列表页(第一个页面)并没有过渡效果,进入详情页也是没有过渡效果,很突兀,点击后退到列表页(有动画),之后进入详情页和切出来都有过渡效果,这就是我遇到的首次加载时页面切换没有过渡效果问题。
- 由于本次实现的功能比较简单,为了解决这个问题,只能暂时在项目中舍弃使用
react-loadable进行组件按需加载了😭。 - 修改后的路由配置文件 route.tsx 内容大致如下:
// path:src/common/route.tsx
import * as React from 'react';
import DetailPage from '../views/DetailPage';
import Exception from '../views/Exception';
import HomePage from '../views/HomePage';

const routeConfig: any = [
  {
    path: '/',
    component: HomePage,
  },
  {
    path: '/detail/:id',
    component: DetailPage,
  },
  /**
   * Exception 页面
   */
  {
    path: '/exception/404',
    component: Exception,
  },
];

function generateRouteConfig (route: IRouteConfig[]) {
  return route.map(item => {
    return {
      key: item.path,
      exact: typeof item.exact === 'undefined' ? true : item.exact,
      ...item,
      component: item.component,
    };
  });
}

export default generateRouteConfig(routeConfig);
- 至于两者结合会出现这样的bug原因还在观察中,如果有大佬知道可以留言告知,或者之后知道原因了再进行更新。
接口请求两次
- 我们都知道,一般是在 react 生命周期的
componentDidMount方法中调接口(请求相关数据)。componentDidMount方法会在render()之后立即执行,拉取数据后使用setState()方法触发重新渲染(re-render)。 - 一开始路由切换相关代码封装的
Routes组件内容如下:
import React from 'react';
import { Route, Switch, withRouter } from 'react-router-dom';
import { TransitionGroup, CSSTransition } from 'react-transition-group';
import routeData from '../../common/route';
import NotFound from '../../views/Exception';

interface IRouterItem {
  component?: React.ComponentType;
  path?: string;
  exact?: boolean;
}

class Routes extends React.Component<any> {
  render () {
    const { location } = this.props;
    return (
      <TransitionGroup className={'router-wrapper'}>
        <CSSTransition
          classNames={'fade'}
          appear={true}
          key={location.pathname}
          timeout={300}
          unmountOnExit={true}
        >
          <Switch>
            {routeData.map(({ path, component, exact }: IRouterItem) => (
              <Route key={path} path={path} component={component} exact={exact} />
            ))}
            <Route component={NotFound} />
          </Switch>
        </CSSTransition>
      </TransitionGroup>
    );
  }
}

export default withRouter(Routes);
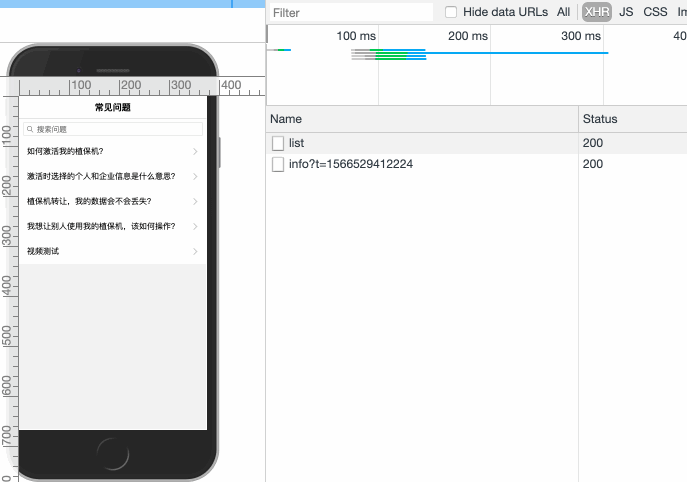
- 与没bug的代码差别就是,之前没有给
Switch组件设置location属性。导致首次加载后进入详情页,切出来都会请求两次接口,具体看看下面的演示:
- 为什么?前面提到:
Switch有一个很重要的属性:location。一般我们不会给该组件设置 location 属性。有无该属性的区别:
- 不设置location属性:
Switch组件的子组件(一般是 Route 或 Redirect)会根据当前浏览器的 location 作为匹配依据來进行路由匹配。- 设置location属性:
Switch组件的子组件会根据定义的 location 作为匹配依据。
- 关键代码块截图:
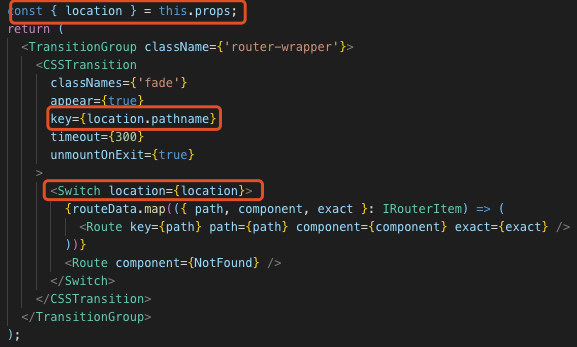
- 结合代码👆看解释👇:
CSSTransition这个组件中的 key 属性是配合TransitionGroup组件使用的,可以通过 key 来判断是否需要触发动画。- 在切换路由时,旧的路由内容会在一定时间内过渡消失,新的路由内容过渡显示,过渡期间会同时存在两个节点,旧节点显示旧的路由内容,新的节点则显示新的路由内容。
CSSTransition组件中的 key 属性决定该节点是否显示,而Router组件中的 location 属性会在路由发生变化时进行更新,恰好 location 的 pathname 可以作为CSSTransition组件中的 key 属性。当路由切换的时候, location 对象就会发生改变,新的 key key会使得页面重新渲染时出现两个CSSTransition。- 如果只是给
CSSTransition组件配置 key 属性,会发现旧节点会去匹配新的路由内容,这是因为Route组件默认根据当前浏览器的 location 进行匹配,为了让旧节点根据旧的 location 进行匹配,则需要设置Switch组件的 location 属性。
- 组件重复渲染就会导致接口的重复请求,赶紧给
Switch组件加个 location 属性吧。 - 本文的内容就介绍到这里啦,欢迎留言,喜欢的麻烦点个赞👍,谢谢❤️。
