

序言
本篇文章是代码撸彩妆的第二篇, 主要介绍在Android上怎么进行图片的局部变形,并实现抖音上比较火的大眼,瘦脸,大长腿特效.
在开始之前我们先来回顾上一篇的主要内容.
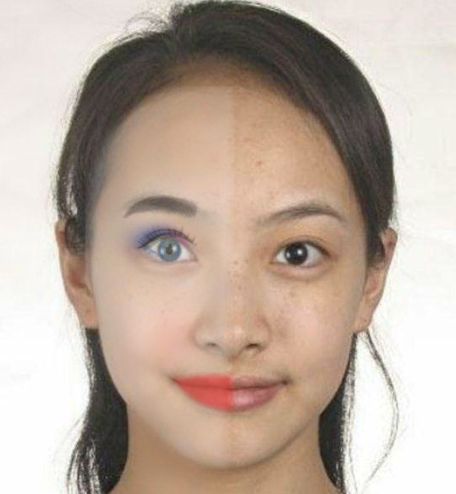
使用代码画一半的效果如下
public enum Region {

    FOUNDATION("粉底"),
    BLUSH("腮红"),
    LIP("唇彩"),
    BROW("眉毛"),

    EYE_LASH("睫毛"),
    EYE_CONTACT("美瞳"),
    EYE_DOUBLE("双眼皮"),
    EYE_LINE("眼线"),
    EYE_SHADOW("眼影");

    private String name;
    Region(String name) {
        this.name = name;
    }
}
使用代码画出各种效果. 上一篇的文章地址 Android:让你的“女神”逆袭,代码撸彩妆(画妆)
上一篇和本篇的代码所在地址一致,都已经托管到github,如果你喜欢,欢迎给一个star,谢谢 github.com/DingProg/Ma…
现在开始我们今天的主题,人体(图像)的局部变形,如果要直接看效果的话,可以点击目录快速滑到效果区域.
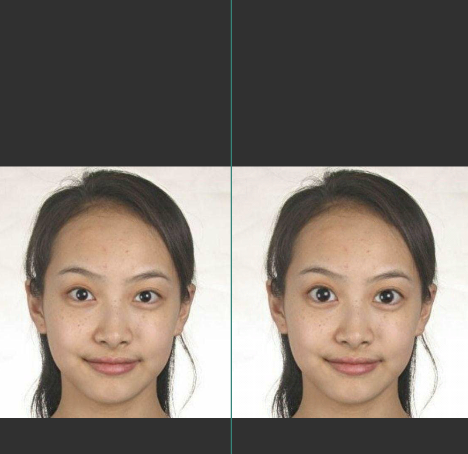
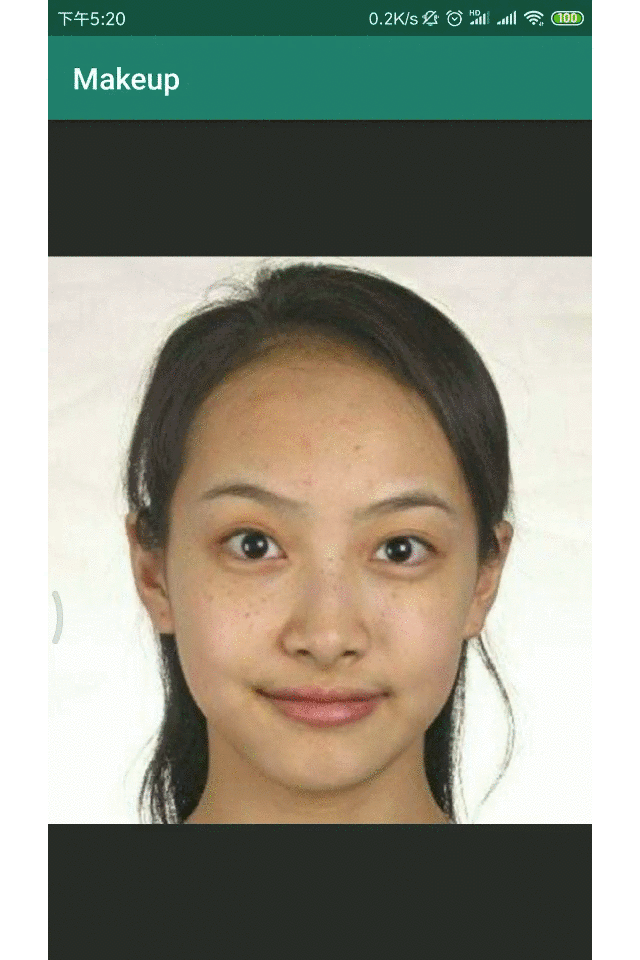
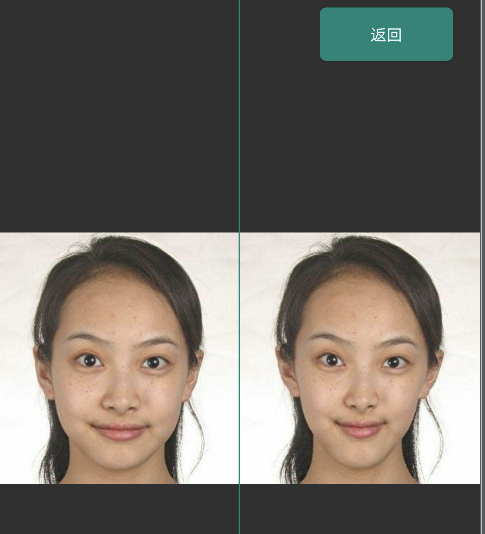
大眼
效果
实现
图片局部缩放原理
我们知道,图片的放大缩小,是比较容易的事,相应的库已经封装好了,可以直接使用(我们并不需要关注图形放大缩小的插值处理等). 但是图片的局部放大缩小,并没有直接封装好,比如Android里面的bitmap,并没有直接局部处理放大缩小的API.
那我们先来看一下什么是图形的局部缩放?
局部的缩放,我们可以想象成中心点被缩放的比例比较小,而边缘的地方被缩放的比例很小,或者边界区域几乎没有变化,这样就可以达到一种平滑的效果。如果直接只对选中的圆形区域,变化的话,那边缘就变成了断裂式的缩放.
借用1993年的一篇博士论文 Interactive Image Warping 对局部图片进行缩放
代码实现
既然要让眼睛放大,那么我们就把对应的近圆心的点的值️赋给远心点。 按照论文里所提到的思路,进行部分修改,实现如下.
  /**
     *  眼睛放大算法
     * @param bitmap      原来的bitmap
     * @param centerPoint 放大中心点
     * @param radius      放大半径
     * @param sizeLevel    放大力度  [0,4]
     * @return 放大眼睛后的图片
     */
    public static Bitmap magnifyEye(Bitmap bitmap, Point centerPoint, int radius, float sizeLevel) {
        TimeAopUtils.start();
        Bitmap dstBitmap = bitmap.copy(Bitmap.Config.RGB_565, true);
        int left = centerPoint.x - radius < 0 ? 0 : centerPoint.x - radius;
        int top = centerPoint.y - radius < 0 ? 0 : centerPoint.y - radius;
        int right = centerPoint.x + radius > bitmap.getWidth() ? bitmap.getWidth() - 1 : centerPoint.x + radius;
        int bottom = centerPoint.y + radius > bitmap.getHeight() ? bitmap.getHeight() - 1 : centerPoint.y + radius;
        int powRadius = radius * radius;

        int offsetX, offsetY, powDistance, powOffsetX, powOffsetY;

        int disX, disY;

        //当为负数时,为缩小
        float strength = (5 + sizeLevel * 2) / 10;

        for (int i = top; i <= bottom; i++) {
            offsetY = i - centerPoint.y;
            for (int j = left; j <= right; j++) {
                offsetX = j - centerPoint.x;
                powOffsetX = offsetX * offsetX;
                powOffsetY = offsetY * offsetY;
                powDistance = powOffsetX + powOffsetY;

                if (powDistance <= powRadius) {
                    double distance = Math.sqrt(powDistance);
                    double sinA = offsetX / distance;
                    double cosA = offsetY / distance;

                    double scaleFactor = distance / radius - 1;
                    scaleFactor = (1 - scaleFactor * scaleFactor * (distance / radius) * strength);

                    distance = distance * scaleFactor;
                    disY = (int) (distance * cosA + centerPoint.y + 0.5);
                    disY = checkY(disY, bitmap);
                    disX = (int) (distance * sinA + centerPoint.x + 0.5);
                    disX = checkX(disX, bitmap);
                    //中心点不做处理
                    if (!(j == centerPoint.x && i == centerPoint.y)) {
                        dstBitmap.setPixel(j, i, bitmap.getPixel(disX, disY));
                    }
                }
            }
        }
        TimeAopUtils.end("eye","magnifyEye");
        return dstBitmap;
    }

    private static int checkY(int disY, Bitmap bitmap) {
        if (disY < 0) {
            disY = 0;
        } else if (disY >= bitmap.getHeight()) {
            disY = bitmap.getHeight() - 1;
        }
        return disY;
    }

    private static int checkX(int disX, Bitmap bitmap) {
        if (disX < 0) {
            disX = 0;
        } else if (disX >= bitmap.getWidth()) {
            disX = bitmap.getWidth() - 1;
        }
        return disX;
    }
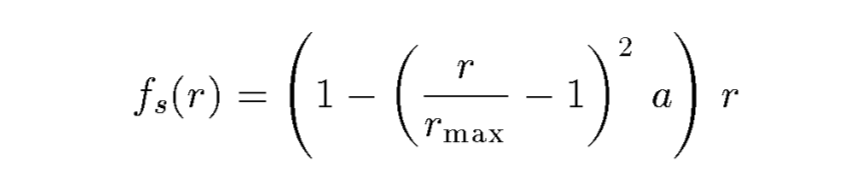
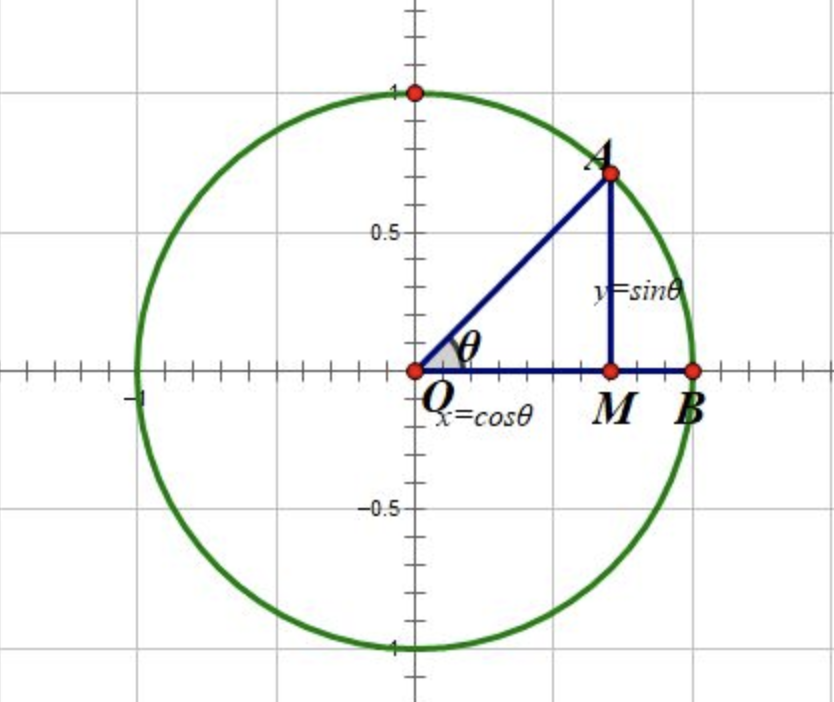
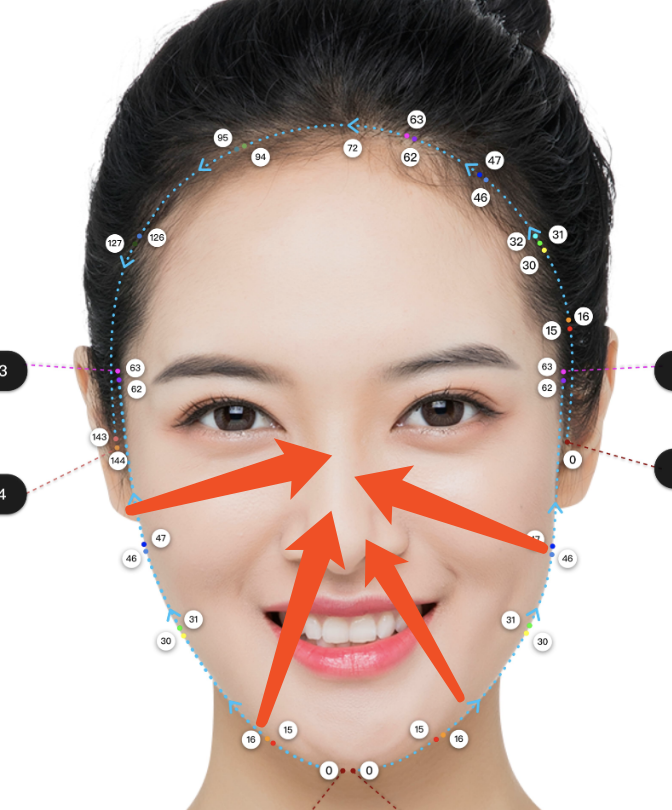
其中里面计算缩放前后后的点,使用的是如下图所示的计算规则计算.
有了这个方法,我们借助人脸识别的结果,把眼睛中心部分传入进去就可以实现自动大眼的效果了.
    Bitmap magnifyEye = MagnifyEyeUtils.magnifyEye(bitmap,
    Objects.requireNonNull(FacePoint.getLeftEyeCenter(faceJson)),
    FacePoint.getLeftEyeRadius(faceJson) * 3, 3);
略有不足
- 代码所示部分没有使用插值 (代码直接使用了值替代,而不是使用 两个点,三个点,进行插值计算),如果放大的比例很大,可能会出现模糊的效果
- Android Bitmap直接获取像素,效率低,正确的方式应该是一次全部获取对应的像素,然后在数组上进行操作(考虑内容,就直接采用了每次去读取/设置),操作完之后,在设置回去。
瘦脸
效果
手动模式
自动模式
实现
大眼效果,使用了bitmap直接去操作像素点,效率有点低,所以在实现瘦脸和打长腿时,采用了另外的实现方式实现.
Cavans的drawBitmapMesh方法
// Canvas
  /**
     * Draw the bitmap through the mesh, where mesh vertices are evenly distributed across the
     * bitmap. There are meshWidth+1 vertices across, and meshHeight+1 vertices down. The verts
     * array is accessed in row-major order, so that the first meshWidth+1 vertices are distributed
     * across the top of the bitmap from left to right. A more general version of this method is
     * drawVertices().
     *
     * Prior to API level {@value Build.VERSION_CODES#P} vertOffset and colorOffset were ignored,
     * effectively treating them as zeros. In API level {@value Build.VERSION_CODES#P} and above
     * these parameters will be respected.
     *
     * @param bitmap The bitmap to draw using the mesh
     * @param meshWidth The number of columns in the mesh. Nothing is drawn if this is 0
     * @param meshHeight The number of rows in the mesh. Nothing is drawn if this is 0
     * @param verts Array of x,y pairs, specifying where the mesh should be drawn. There must be at
     *            least (meshWidth+1) * (meshHeight+1) * 2 + vertOffset values in the array
     * @param vertOffset Number of verts elements to skip before drawing
     * @param colors May be null. Specifies a color at each vertex, which is interpolated across the
     *            cell, and whose values are multiplied by the corresponding bitmap colors. If not
     *            null, there must be at least (meshWidth+1) * (meshHeight+1) + colorOffset values
     *            in the array.
     * @param colorOffset Number of color elements to skip before drawing
     * @param paint May be null. The paint used to draw the bitmap
     */
    public void drawBitmapMesh(@NonNull Bitmap bitmap, int meshWidth, int meshHeight,
            @NonNull float[] verts, int vertOffset, @Nullable int[] colors, int colorOffset,
            @Nullable Paint paint) {
        super.drawBitmapMesh(bitmap, meshWidth, meshHeight, verts, vertOffset, colors, colorOffset,
                paint);
    }
这个方法,大概说的是,将图片使用网格的方式先进行分割,然后操作这些网格,就可以让图片达到扭曲的效果.
代码实现
Gif中拖动就可以进行自动瘦脸功能,这是一个自定义的View,在View上通过手势操作,去改变那个网格,然后在调用重绘.
第一步,初始化图片,把图片放在View的中心
   private void zoomBitmap(Bitmap bitmap, int width, int height) {
        if(bitmap == null) return;
        int dw = bitmap.getWidth();
        int dh = bitmap.getHeight();

        float scale = 1.0f;

        // 图片的宽度大于控件的宽度,图片的高度小于空间的高度,我们将其缩小
        if (dw > width && dh < height) {
            scale = width * 1.0f / dw;
        }

        // 图片的宽度小于控件的宽度,图片的高度大于空间的高度,我们将其缩小
        if (dh > height && dw < width) {
            scale = height * 1.0f / dh;
        }

        // 缩小值
        if (dw > width && dh > height) {
            scale = Math.min(width * 1.0f / dw, height * 1.0f / dh);
        }

        // 放大值
        if (dw < width && dh < height) {
            scale = Math.min(width * 1.0f / dw, height * 1.0f / dh);
        }

        //缩小
        if (dw == width && dh > height) {
            scale = height * 1.0f / dh;
        }
        dx = width / 2 - (int) (dw * scale + 0.5f) / 2;
        dy = height / 2 - (int) (dh * scale + 0.5f) / 2;

        mScale = scale;
        restoreVerts();
    }
接着初始化网格
    //将图像分成多少格
    private int WIDTH = 200;
    private int HEIGHT = 200;

    //交点坐标的个数
    private int COUNT = (WIDTH + 1) * (HEIGHT + 1);

    //用于保存COUNT的坐标
    //x0, y0, x1, y1......
    private float[] verts = new float[COUNT * 2];

    //用于保存原始的坐标
    private float[] orig = new float[COUNT * 2];
   private void restoreVerts() {
        int index = 0;
        float bmWidth = mBitmap.getWidth();
        float bmHeight = mBitmap.getHeight();
        for (int i = 0; i < HEIGHT + 1; i++) {
            float fy = bmHeight * i / HEIGHT;
            for (int j = 0; j < WIDTH + 1; j++) {
                float fx = bmWidth * j / WIDTH;
                //X轴坐标 放在偶数位
                verts[index * 2] = fx;
                orig[index * 2] = verts[index * 2];
                //Y轴坐标 放在奇数位
                verts[index * 2 + 1] = fy;
                orig[index * 2 + 1] = verts[index * 2 + 1];
                index += 1;
            }
        }
        showCircle = false;
        showDirection = false;
    }
那最后一步把这个图片画上去
   @Override
    protected void onDraw(Canvas canvas) {
        super.onDraw(canvas);
        if(mBitmap == null) return;
        canvas.save();
        canvas.translate(dx, dy);
        canvas.scale(mScale, mScale);
        if (isShowOrigin) {
            canvas.drawBitmapMesh(mBitmap, WIDTH, HEIGHT, orig, 0, null, 0, null);
        } else {
            canvas.drawBitmapMesh(mBitmap, WIDTH, HEIGHT, verts, 0, null, 0, null);
        }

        canvas.restore();
        if (showCircle && isEnableOperate) {
            canvas.drawCircle(startX, startY, radius, circlePaint);
            canvas.drawCircle(startX, startY, 5, directionPaint);
        }
        if (showDirection && isEnableOperate) {
            canvas.drawLine(startX, startY, moveX, moveY, directionPaint);
        }
    }
那么接下来,就来操作网格,然后产生一些变形的效果了. 添加事件监听
  @Override
    public boolean onTouchEvent(MotionEvent event) {
        if (!isEnableOperate) return true;
        switch (event.getAction()) {
            case MotionEvent.ACTION_DOWN:
                //绘制变形区域
                startX = event.getX();
                startY = event.getY();
                showCircle = true;
                invalidate();
                break;
            case MotionEvent.ACTION_MOVE:
                //绘制变形方向
                moveX = event.getX();
                moveY = event.getY();
                showDirection = true;
                invalidate();
                break;
            case MotionEvent.ACTION_UP:
                showCircle = false;
                showDirection = false;

                //调用warp方法根据触摸屏事件的坐标点来扭曲verts数组
                if(mBitmap != null && verts!= null && !mBitmap.isRecycled()) {
                    warp(startX, startY, event.getX(), event.getY());
                }

                if (onStepChangeListener != null) {
                    onStepChangeListener.onStepChange(false);
                }
                break;
        }
        return true;
    }
这里重点,看我们的wrap方法,来操作网格的变形.先简述一下思路,我们刚才看到眼睛的放大,就是中心部分,操作幅度大,离的远的地方基本不操作.
来看一下代码
    private void warp(float startX, float startY, float endX, float endY) {
        startX = toX(startX);
        startY = toY(startY);
        endX = toX(endX);
        endY = toY(endY);

        //计算拖动距离
        float ddPull = (endX - startX) * (endX - startX) + (endY - startY) * (endY - startY);
        float dPull = (float) Math.sqrt(ddPull);
        //dPull = screenWidth - dPull >= 0.0001f ? screenWidth - dPull : 0.0001f;
        if (dPull < 2 * r) {
            if (isSmllBody) {
                dPull = 1.8f * r;
            } else {
                dPull = 2.5f * r;
            }
        }

        int powR = r * r;
        int index = 0;
        int offset = 1;
        for (int i = 0; i < HEIGHT + 1; i++) {
            for (int j = 0; j < WIDTH + 1; j++) {
                //边界区域不处理
                if(i < offset || i > HEIGHT - offset || j < offset || j > WIDTH - offset){
                    index = index + 1;
                    continue;
                }
                //计算每个坐标点与触摸点之间的距离
                float dx = verts[index * 2] - startX;
                float dy = verts[index * 2 + 1] - startY;
                float dd = dx * dx + dy * dy;

                if (dd < powR) {
                    //变形系数,扭曲度
                    double e = (powR - dd) * (powR - dd) / ((powR - dd + dPull * dPull) * (powR - dd + dPull * dPull));
                    double pullX = e * (endX - startX);
                    double pullY = e * (endY - startY);
                    verts[index * 2] = (float) (verts[index * 2] + pullX);
                    verts[index * 2 + 1] = (float) (verts[index * 2 + 1] + pullY);

                   // check
                    if(verts[index * 2] < 0){
                        verts[index * 2] = 0;
                    }
                    if(verts[index * 2] > mBitmap.getWidth()){
                        verts[index * 2] =  mBitmap.getWidth();
                    }

                    if(verts[index * 2 + 1] < 0){
                        verts[index * 2 +1] = 0;
                    }
                    if(verts[index * 2 + 1] > mBitmap.getHeight()){
                        verts[index * 2 + 1] = mBitmap.getHeight();
                    }
                }
                index = index + 1;
            }
        }
        invalidate();
    }
只要在操作半径内,对X和Y进行不同的变形即可.
自动瘦脸实现
其实有了上面的拖动,要实现自动瘦脸就容易得多,我们对几个关键点进行模拟拖动即可。
实现代码如下
    /**
     * 瘦脸算法
     *
     * @param bitmap      原来的bitmap
     * @return 之后的图片
     */
    public static Bitmap smallFaceMesh(Bitmap bitmap, List<Point> leftFacePoint,List<Point> rightFacePoint,Point centerPoint, int level) {
        //交点坐标的个数
        int COUNT = (WIDTH + 1) * (HEIGHT + 1);
        //用于保存COUNT的坐标
        float[] verts = new float[COUNT * 2];
        float bmWidth = bitmap.getWidth();
        float bmHeight = bitmap.getHeight();

        int index = 0;
        for (int i = 0; i < HEIGHT + 1; i++) {
            float fy = bmHeight * i / HEIGHT;
            for (int j = 0; j < WIDTH + 1; j++) {
                float fx = bmWidth * j / WIDTH;
                //X轴坐标 放在偶数位
                verts[index * 2] = fx;
                //Y轴坐标 放在奇数位
                verts[index * 2 + 1] = fy;
                index += 1;
            }
        }
        int r = 180 + 15 * level;
        warp(COUNT,verts,leftFacePoint.get(16).x,leftFacePoint.get(16).y,centerPoint.x,centerPoint.y,r);
        warp(COUNT,verts,leftFacePoint.get(46).x,leftFacePoint.get(46).y,centerPoint.x,centerPoint.y,r);

        warp(COUNT,verts,rightFacePoint.get(16).x,rightFacePoint.get(16).y,centerPoint.x,centerPoint.y,r);
        warp(COUNT,verts,rightFacePoint.get(46).x,rightFacePoint.get(46).y,centerPoint.x,centerPoint.y,r);

        Bitmap resultBitmap = Bitmap.createBitmap(bitmap.getWidth(),bitmap.getHeight(), Bitmap.Config.ARGB_8888);
        Canvas canvas = new Canvas(resultBitmap);
        Paint paint = new Paint();
        canvas.drawBitmapMesh(bitmap,WIDTH, HEIGHT,verts,0,null,0,null);
        return resultBitmap;
    }
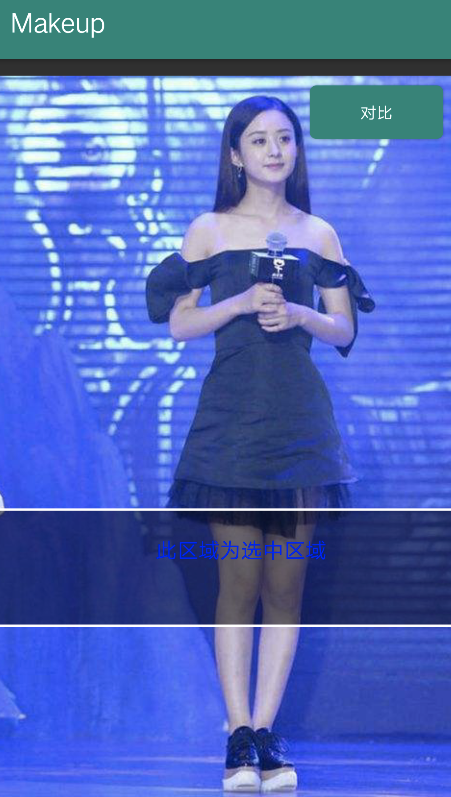
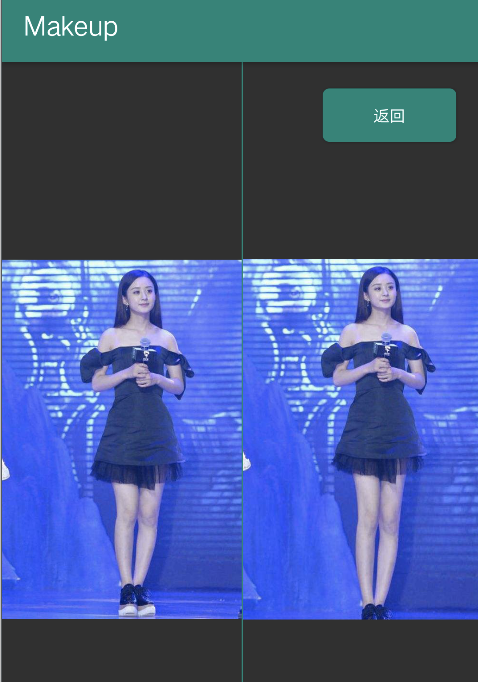
大长腿
看代码有些累吧,下面来看一个明星 美女,有人知道这是谁吗?问了两三个程序员朋友,要么不知道,要么说这是杨幂吗?哎,感叹程序员认识的明星就那么多吗?
效果
实现
上面的瘦脸操作需要对x和y两个地方进行操作,那大长腿就绘变得容易一些,仅仅操作Y方向即可.
第一张图,上面的覆盖层为一个自定义View,下层直接使用了瘦脸功能的那个View,把图片放在中心,只是不允许手势操作图片.
smallFaceView.setEnableOperate(false);
上层View核心代码
//AdjustLegView  绘制部分

  @Override
    protected void onDraw(Canvas canvas) {
        super.onDraw(canvas);
        //line
        canvas.drawRect(0, topLine, getWidth(), topLine + LINEHIGHT, paint);
        //line
        canvas.drawRect(0, bottomLine, getWidth(), bottomLine + LINEHIGHT, paint);

        if (selectPos != -1) {
            swap();
            rect.set(0, topLine + LINEHIGHT, getWidth(), bottomLine);
            canvas.drawRect(rect, bgPaint);
            if(tipStr != null){
                @SuppressLint("DrawAllocation") Rect textRect = new Rect();
                textPaint.getTextBounds(tipStr,0,tipStr.length()-1,textRect);
                canvas.drawText(tipStr,rect.left + (rect.width()/ 2 -textRect.width()/2),
                        rect.top + (rect.height()/ 2 -textRect.height()/2),textPaint);
            }
        }
    }
手势交互部分
//AdjustLegView
 @Override
    public boolean onTouchEvent(MotionEvent event) {
        float y = event.getY();
        switch (event.getAction()) {
            case MotionEvent.ACTION_DOWN:
                selectPos = checkSelect(y);
                lastY = y;
                if(selectPos != -1 && listener != null){
                    listener.down();
                }
                break;
            case MotionEvent.ACTION_MOVE:
                if (selectPos == 1) {
                    // 最小 20 的偏移量
                    topLine += checkLimit(y - lastY);
                    invalidate();
                }
                if (selectPos == 2) {
                    bottomLine += checkLimit(y - lastY);
                    invalidate();
                }
                lastY = y;
                break;
            case MotionEvent.ACTION_UP:
            case MotionEvent.ACTION_CANCEL:
                selectPos = -1;
                invalidate();
                if( listener != null){
                    listener.up(rect);
                }
                break;
        }
        return true;
    }

    private float checkLimit(float offset) {
        if (selectPos == 1) {
            if(topLine + offset > minLine && topLine + offset < maxLine){
                return offset;
            }
        }
        if (selectPos == 2) {
            if(bottomLine + offset > minLine && bottomLine + offset < maxLine){
                return offset;
            }
        }
        return 0;
    }

    private int checkSelect(float y) {
        selectPos = -1;
        RectF rect = new RectF(0, y - OFFSETY, 0, y + OFFSETY);
        float min = -1;
        if (topLine >= rect.top && topLine <= rect.bottom) {
            selectPos = 1;
            min = rect.bottom - topLine;
        }

        if (bottomLine >= rect.top && bottomLine <= rect.bottom) {
            if (min > bottomLine - rect.top || min == -1) {
                selectPos = 2;
            }
        }
        return selectPos;
    }
大长腿
那么怎么把腿部拉长呢?直接看一下算法部分
    private static void warpLeg(int COUNT, float verts[], float centerY,int totalHeight,float region,float strength) {
        float  r = region / 2; //缩放区域力度

        for (int i = 0; i < COUNT * 2; i += 2) {
            //计算每个坐标点与触摸点之间的距离
            float dy = verts[i + 1] - centerY;
            double e = (totalHeight - Math.abs(dy)) / totalHeight;
            if(Math.abs(dy) < r){
                //拉长比率
                double pullY = e * dy * strength;
                verts[i + 1] = (float) (verts[i + 1] + pullY);
            }else if(Math.abs(dy) < 2 * r || dy > 0){
                double pullY = e * e * dy * strength;
                verts[i + 1] = (float) (verts[i + 1] + pullY);
            }else if(Math.abs(dy) < 3 * r){
                double pullY = e * e * dy * strength /2;
                verts[i + 1] = (float) (verts[i + 1] + pullY);
            }else {
                double pullY = e * e * dy * strength /4;
                verts[i + 1] = (float) (verts[i + 1] + pullY);
            }
        }
    }

    Canvas canvas = new Canvas(resultBitmap);
    canvas.drawBitmapMesh(bitmap, WIDTH, HEIGHT, verts, 0, null, 0, null);
        return resultBitmap;
依然使用的是drawBitmapMesh,算法部分,只对Y进行了操作,X部分不操作,并且距离越远,操作幅度越小. 尽量只拉长腿部,其他部分保持原有不动.
总结
本篇主要是介绍了,在Android上,使用原生API,怎么去实现一些酷炫的效果. 文中的所有代码都托管在github上,如果有需要,欢迎star, Github Makeup ,非常感谢,后续更新都会在此库中进行.
本文大眼算法,廋脸算法仅来源网络,如有侵权,请联系作者立刻删除.大长腿算法,作者自己实践得出,可自行取用.
推荐阅读
Android:让你的“女神”逆袭,代码撸彩妆(画妆)
Flutter PIP(画中画)效果的实现
Android 绘制原理浅析【干货】
