

title: CentOS 7.2搭建FastDFS 分布式文件系统,实现高可用集群
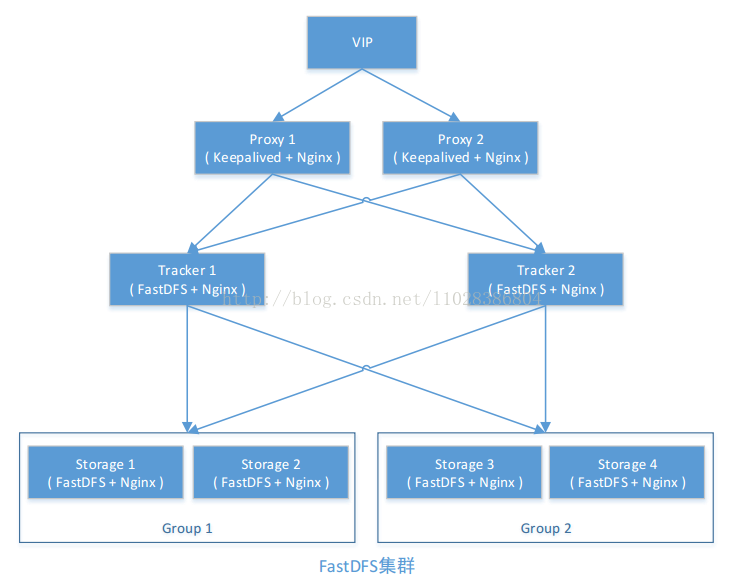
分布式集群搭建结构
- 双Tracker
- 2组Group
- 轮询存储策略
- Keepalived+Nginx高可用
- Nginx缓存
- 4个存储节点
一、 集群规划清单
1.安装清单
| 软件名称 | 版本 | 百度云盘存放名称 |
|---|---|---|
| FastDFS | 5.11 | fastdfs-5.11.zip |
| FastDFS-Nginx-module | 无 | fastdfs-nginx-module-master.zip |
| LibFastCommon | 1.0.36 | libfastcommon-1.0.36.zip |
| nginx | 1.10.3 | nginx-1.10.3.tar.gz |
| nginx-pure-cache | 2.3 | ngx_cache_purge-2.3.tar.gz |
安装所需文件均上传到百度云盘,位置:FastDFS百度云盘
2.集群规划
| 虚拟机 | IP | 说明 |
|---|---|---|
| Keepalived+Nginx1[Master] | 192.168.43.101 | Nginx Server 01 |
| Keeepalived+Nginx[Backup] | 192.168.43.102 | Nginx Server 02 |
| VIP | 192.168.43.150 | 虚拟漂移IP |
| Tracker01 | 192.168.43.70 | Tracker01服务器 |
| Tracker02 | 192.168.43.71 | Tracker02服务器 |
| Storage01 | 192.168.43.72 | Storage01服务器【group1】 |
| Storage02 | 192.168.43.73 | Storage02服务器【group1】 |
| Storage03 | 192.168.43.74 | Storage03服务器【group2】 |
| Storage04 | 192.168.43.75 | Storage04服务器【group2】 |
整体架构图如下图所示:
二、集群安装
以下操作均在关闭所有节点防火墙进行的,请根据个人情况开启相关端口或关闭防火墙
1.安装LibFastCommon/FastDFS模块
执行节点 Tracker01、Tracker02、Storage01、Storage03、Storage04
[root@localhost fastDFS]# unzip libfastcommon-1.0.36.zip
解压后目录如下:
[root@localhost fastdfs-5.11]# ll
[root@localhost libfastcommon-1.0.36]# ll
总用量 32
drwxr-xr-x. 2 root root  117 4月   5 2017 doc
-rw-r--r--. 1 root root 8005 4月   5 2017 HISTORY
-rw-r--r--. 1 root root  566 4月   5 2017 INSTALL
-rw-r--r--. 1 root root 1606 4月   5 2017 libfastcommon.spec
-rwxr-xr-x. 1 root root 3099 4月   5 2017 make.sh
drwxr-xr-x. 2 root root  191 4月   5 2017 php-fastcommon
-rw-r--r--. 1 root root 2763 4月   5 2017 README
drwxr-xr-x. 3 root root 4096 1月  17 11:21 src
安装C编译工具 gcc
[root@localhost fastdfs-5.11]# yum -y install gcc-c++
- 安装装LibFastCommon
编译libfastcommon软件并安装
[root@localhost fastdfs-5.11]# ./make.sh && ./make.sh install
为libcommon 创建软链接到/usr/local/lib目录下
[root@localhost fastdfs-5.11]# ln -s /usr/lib64/libfastcommon.so /usr/local/lib/libfastcommon.so
[root@localhost fastdfs-5.11]# ln -s /usr/lib64/libfastcommon.so /usr/lib/libfastcommon.so
[root@localhost fastdfs-5.11]# ln -s /usr/lib64/libfdfsclient.so /usr/local/lib/libfdfsclient.so
[root@localhost fastdfs-5.11]# ln -s /usr/lib64/libfdfsclient.so /usr/lib/libfdfsclient.so
- 安装FastDFS 解压安装包
[root@localhost fastDFS]# unzip fastdfs-5.11.zip
进入解压目录并进行编译和安装
[root@localhost fastDFS]# cd fastdfs-5.11/
[root@localhost fastdfs-5.11]# ./make.sh  && ./make.sh install
安装成功后,FastDFS会安装在/etc/fdfs目录下:
[root@localhost fastdfs-5.11]# ll /etc/fdfs/
总用量 76
-rw-r--r--. 1 root root   316 1月  17 11:47 client.conf
-rw-r--r--. 1 root root  1461 1月  17 11:25 client.conf.sample
-rw-r--r--. 1 root root   955 1月  17 13:20 http.conf
-rw-r--r--. 1 root root 31172 1月  17 13:21 mime.types
-rw-r--r--. 1 root root  3716 1月  17 12:57 mod_fastdfs.conf
-rw-r--r--. 1 root root  1278 1月  17 11:40 storage.conf
-rw-r--r--. 1 root root  7927 1月  17 11:25 storage.conf.sample
-rw-r--r--. 1 root root   105 1月  17 11:25 storage_ids.conf.sample
-rw-r--r--. 1 root root  1356 1月  17 11:34 tracker.conf
-rw-r--r--. 1 root root  7389 1月  17 11:25 tracker.conf.sample
我们需要把这三个示例文件复制一份,去掉.sample
[root@localhost fdfs]# cp client.conf.sample client.conf
[root@localhost fdfs]# cp storage.conf.sample storage.conf
[root@localhost fdfs]# cp tracker.conf.sample tracker.conf
FastDFS安装结束
2.安装Tracker并实现节点信息配置
执行节点 Tracker01、Tracker02
- 创建tracker工作目录
此目录用于保存tracker 的data和log
[root@localhost fdfs]# mkdir /opt/fastdfs_tracker
- 配置tracker
配置 /etc/fdfs目录下tracker.conf 主要实现以下5个配置内容:
1.disabled=false
2.port=22122 #默认端口号
3.base_path=/opt/fastdfs_tracker #我刚刚创建的目录
4.http.server_port=8080 #默认端口是8080
5.store_lookup=0  #采用轮询策略进行存储,0 轮询 1:始终定向到某个group 2:负载进行存储文件
完整tracker.conf 文件信息如下:
disabled=false

bind_addr= 0.0.0.0

port=22122

connect_timeout=30

network_timeout=60

base_path=/opt/fastdfs_tracker

max_connections=512

accept_threads=1

work_threads=4

min_buff_size = 8KB

max_buff_size = 128KB

store_lookup=0

store_group=group2

store_server=0

store_path=0

download_server=0

reserved_storage_space = 10%

log_level=info

run_by_group=

run_by_user=

allow_hosts=*

sync_log_buff_interval = 10

check_active_interval = 120

thread_stack_size = 64KB

storage_ip_changed_auto_adjust = true

storage_sync_file_max_delay = 86400

storage_sync_file_max_time = 300

use_trunk_file = false

slot_min_size = 256

slot_max_size = 16MB

trunk_file_size = 64MB

trunk_create_file_advance = false

trunk_create_file_time_base = 02:00

trunk_create_file_interval = 86400

trunk_create_file_space_threshold = 20G

trunk_init_check_occupying = false

trunk_init_reload_from_binlog = false

trunk_compress_binlog_min_interval = 0

use_storage_id = false

storage_ids_filename = storage_ids.conf

id_type_in_filename = ip

store_slave_file_use_link = false

rotate_error_log = false

error_log_rotate_time=00:00

rotate_error_log_size = 0

log_file_keep_days = 0

use_connection_pool = false

connection_pool_max_idle_time = 3600

http.server_port=8080

http.check_alive_interval=30

http.check_alive_type=tcp

http.check_alive_uri=/status.html
修改保存后创建软引用
[root@localhost fdfs]# ln -s /usr/bin/fdfs_storaged /usr/local/bin
- 启动tracker,并加入开机启动项
[root@localhost fdfs]# service fdfs_trackerd start
将tracker加入开机启动项
[root@localhost fdfs]# echo "service fdfs_trackerd start" |tee -a /etc/rc.d/rc.local
3.安装Storage模块并实现配置
执行节点 Storage01、Storage02、Storage03、Storage04
- 建立存储目录
在存储各节点建了两个目录fastdfs_storage_data,fastdfs_storage
[root@localhost opt]# mkdir fastdfs_storage
[root@localhost opt]# mkdir fastdfs_storage_data
[root@localhost opt]# ll
总用量 0
drwxr-xr-x. 4 root root 30 1月  17 11:45 fastdfs_storage
drwxr-xr-x. 3 root root 18 1月  17 11:45 fastdfs_storage_data
drwxr-xr-x. 4 root root 30 1月  17 11:35 fastdfs_tracker
- 修改存储节点目录下/etc/fdfs/storage.conf配置信息,具体如下:
disabled=false #启用配置文件
group_name=group1 #组名(第一组为 group1, 第二组为 group2)
port=23000 #storage 的端口号,同一个组的 storage 端口号必须相同
base_path=/opt/fastdfs_storage #设置storage数据文件和日志目录
store_path0=/opt/fastdfs_storage_data #实际文件存储路径
store_path_count=1 #存储路径个数,需要和 store_path 个数匹配
tracker_server=192.168.43.70:22122 #tracker 服务器的 IP 地址和端口
tracker_server=192.168.43.70:22122 #多个 tracker 直接添加多条配置
http.server_port=8888 #设置 http 端口号
完整配置信息如下:
disabled=false
group_name=group1
bind_addr=
client_bind=true
port=23000
connect_timeout=30
network_timeout=60
heart_beat_interval=30
stat_report_interval=60
base_path=/opt/fastdfs_storage
max_connections=256
buff_size = 256KB
accept_threads=1
work_threads=4
disk_rw_separated = true
disk_reader_threads = 1
disk_writer_threads = 1
sync_wait_msec=50
sync_interval=0
sync_start_time=00:00
sync_end_time=23:59
write_mark_file_freq=500
store_path_count=1
store_path0=/opt/fastdfs_storage_data
subdir_count_per_path=256
tracker_server=192.168.43.70:22122
tracker_server=192.168.43.71:22122
log_level=info
run_by_group=
run_by_user=
allow_hosts=*
file_distribute_path_mode=0
file_distribute_rotate_count=100
fsync_after_written_bytes=0
sync_log_buff_interval=10
sync_binlog_buff_interval=10
sync_stat_file_interval=300
thread_stack_size=512KB
upload_priority=10
if_alias_prefix=
check_file_duplicate=0
file_signature_method=hash
key_namespace=FastDFS
keep_alive=0
use_access_log = false
rotate_access_log = false
access_log_rotate_time=00:00
rotate_error_log = false
error_log_rotate_time=00:00
rotate_access_log_size = 0
rotate_error_log_size = 0
log_file_keep_days = 0
file_sync_skip_invalid_record=false
use_connection_pool = false
connection_pool_max_idle_time = 3600
http.domain_name=
http.server_port=8888
- 启动Storage 各节点配置好信息好之后,启动Storage
[root@localhost fdfs]# service fdfs_storaged start
启动后查看日志情况
[root@localhost fdfs]# fdfs_monitor /etc/fdfs/storage.conf
[2018-01-20 16:56:48] DEBUG - base_path=/opt/fastdfs_storage, connect_timeout=30, network_timeout=60, tracker_server_count=2, anti_steal_token=0, anti_steal_secret_key length=0, use_connection_pool=0, g_connection_pool_max_idle_time=3600s, use_storage_id=0, storage server id count: 0

server_count=2, server_index=0

tracker server is 192.168.43.70:22122

group count: 2

Group 1:
group name = group1
disk total space = 47073 MB
disk free space = 35162 MB
trunk free space = 0 MB
storage server count = 2
active server count = 2
storage server port = 23000
storage HTTP port = 8888
store path count = 1
subdir count per path = 256
current write server index = 0
current trunk file id = 0

	Storage 1:
		id = 192.168.43.72
		ip_addr = 192.168.43.72 (localhost.localdomain)  ACTIVE
		http domain =
		version = 5.11
		join time = 2018-01-19 13:59:30
		up time = 2018-01-20 12:37:18
		total storage = 47073 MB
		free storage = 35162 MB
		upload priority = 10
		store_path_count = 1
		subdir_count_per_path = 256
		storage_port = 23000
		storage_http_port = 8888
		current_write_path = 0
		source storage id =
		if_trunk_server = 0
		connection.alloc_count = 256
		connection.current_count = 1
		connection.max_count = 1
		total_upload_count = 3
		success_upload_count = 3
		total_append_count = 0
		success_append_count = 0
		total_modify_count = 0
		success_modify_count = 0
		total_truncate_count = 0
		success_truncate_count = 0
		total_set_meta_count = 0
		success_set_meta_count = 0
		total_delete_count = 0
		success_delete_count = 0
		total_download_count = 0
		success_download_count = 0
		total_get_meta_count = 0
		success_get_meta_count = 0
		total_create_link_count = 0
		success_create_link_count = 0
		total_delete_link_count = 0
		success_delete_link_count = 0
		total_upload_bytes = 791904
		success_upload_bytes = 791904
		total_append_bytes = 0
		success_append_bytes = 0
		total_modify_bytes = 0
		success_modify_bytes = 0
		stotal_download_bytes = 0
		success_download_bytes = 0
		total_sync_in_bytes = 775234
		success_sync_in_bytes = 775234
		total_sync_out_bytes = 0
		success_sync_out_bytes = 0
		total_file_open_count = 4
		success_file_open_count = 4
		total_file_read_count = 0
		success_file_read_count = 0
		total_file_write_count = 8
		success_file_write_count = 8
		last_heart_beat_time = 2018-01-20 16:56:18
		last_source_update = 2018-01-19 19:34:55
		last_sync_update = 2018-01-19 15:28:56
		last_synced_timestamp = 2018-01-19 15:28:48 (0s delay)
	Storage 2:
		id = 192.168.43.73
		ip_addr = 192.168.43.73  ACTIVE
		http domain =
		version = 5.11
		join time = 2018-01-19 14:00:21
		up time = 2018-01-20 12:37:42
		total storage = 47073 MB
		free storage = 35166 MB
		upload priority = 10
		store_path_count = 1
		subdir_count_per_path = 256
		storage_port = 23000
		storage_http_port = 8888
		current_write_path = 0
		source storage id = 192.168.43.72
		if_trunk_server = 0
		connection.alloc_count = 256
		connection.current_count = 1
		connection.max_count = 1
		total_upload_count = 1
		success_upload_count = 1
		total_append_count = 0
		success_append_count = 0
		total_modify_count = 0
		success_modify_count = 0
		total_truncate_count = 0
		success_truncate_count = 0
		total_set_meta_count = 0
		success_set_meta_count = 0
		total_delete_count = 0
		success_delete_count = 0
		total_download_count = 0
		success_download_count = 0
		total_get_meta_count = 0
		success_get_meta_count = 0
		total_create_link_count = 0
		success_create_link_count = 0
		total_delete_link_count = 0
		success_delete_link_count = 0
		total_upload_bytes = 775234
		success_upload_bytes = 775234
		total_append_bytes = 0
		success_append_bytes = 0
		total_modify_bytes = 0
		success_modify_bytes = 0
		stotal_download_bytes = 0
		success_download_bytes = 0
		total_sync_in_bytes = 791904
		success_sync_in_bytes = 791904
		total_sync_out_bytes = 0
		success_sync_out_bytes = 0
		total_file_open_count = 4
		success_file_open_count = 4
		total_file_read_count = 0
		success_file_read_count = 0
		total_file_write_count = 8
		success_file_write_count = 8
		last_heart_beat_time = 2018-01-20 16:56:42
		last_source_update = 2018-01-19 15:28:48
		last_sync_update = 2018-01-19 19:34:59
		last_synced_timestamp = 2018-01-19 19:34:55 (0s delay)

Group 2:
group name = group2
disk total space = 47073 MB
disk free space = 35165 MB
trunk free space = 0 MB
storage server count = 2
active server count = 2
storage server port = 23000
storage HTTP port = 8888
store path count = 1
subdir count per path = 256
current write server index = 0
current trunk file id = 0

	Storage 1:
		id = 192.168.43.74
		ip_addr = 192.168.43.74  ACTIVE
		http domain =
		version = 5.11
		join time = 2018-01-19 14:01:05
		up time = 2018-01-20 12:38:00
		total storage = 47073 MB
		free storage = 35165 MB
		upload priority = 10
		store_path_count = 1
		subdir_count_per_path = 256
		storage_port = 23000
		storage_http_port = 8888
		current_write_path = 0
		source storage id =
		if_trunk_server = 0
		connection.alloc_count = 256
		connection.current_count = 1
		connection.max_count = 1
		total_upload_count = 4
		success_upload_count = 4
		total_append_count = 0
		success_append_count = 0
		total_modify_count = 0
		success_modify_count = 0
		total_truncate_count = 0
		success_truncate_count = 0
		total_set_meta_count = 0
		success_set_meta_count = 0
		total_delete_count = 0
		success_delete_count = 0
		total_download_count = 0
		success_download_count = 0
		total_get_meta_count = 0
		success_get_meta_count = 0
		total_create_link_count = 0
		success_create_link_count = 0
		total_delete_link_count = 0
		success_delete_link_count = 0
		total_upload_bytes = 2107770
		success_upload_bytes = 2107770
		total_append_bytes = 0
		success_append_bytes = 0
		total_modify_bytes = 0
		success_modify_bytes = 0
		stotal_download_bytes = 0
		success_download_bytes = 0
		total_sync_in_bytes = 1550468
		success_sync_in_bytes = 1550468
		total_sync_out_bytes = 0
		success_sync_out_bytes = 0
		total_file_open_count = 6
		success_file_open_count = 6
		total_file_read_count = 0
		success_file_read_count = 0
		total_file_write_count = 15
		success_file_write_count = 15
		last_heart_beat_time = 2018-01-20 16:56:38
		last_source_update = 2018-01-19 19:35:40
		last_sync_update = 2018-01-19 15:28:53
		last_synced_timestamp = 2018-01-19 15:28:50 (-1s delay)
	Storage 2:
		id = 192.168.43.75
		ip_addr = 192.168.43.75  ACTIVE
		http domain =
		version = 5.11
		join time = 2018-01-19 14:01:27
		up time = 2018-01-20 12:38:20
		total storage = 47073 MB
		free storage = 35165 MB
		upload priority = 10
		store_path_count = 1
		subdir_count_per_path = 256
		storage_port = 23000
		storage_http_port = 8888
		current_write_path = 0
		source storage id = 192.168.43.74
		if_trunk_server = 0
		connection.alloc_count = 256
		connection.current_count = 1
		connection.max_count = 1
		total_upload_count = 2
		success_upload_count = 2
		total_append_count = 0
		success_append_count = 0
		total_modify_count = 0
		success_modify_count = 0
		total_truncate_count = 0
		success_truncate_count = 0
		total_set_meta_count = 0
		success_set_meta_count = 0
		total_delete_count = 0
		success_delete_count = 0
		total_download_count = 0
		success_download_count = 0
		total_get_meta_count = 0
		success_get_meta_count = 0
		total_create_link_count = 0
		success_create_link_count = 0
		total_delete_link_count = 0
		success_delete_link_count = 0
		total_upload_bytes = 1550468
		success_upload_bytes = 1550468
		total_append_bytes = 0
		success_append_bytes = 0
		total_modify_bytes = 0
		success_modify_bytes = 0
		stotal_download_bytes = 0
		success_download_bytes = 0
		total_sync_in_bytes = 2107770
		success_sync_in_bytes = 2107770
		total_sync_out_bytes = 0
		success_sync_out_bytes = 0
		total_file_open_count = 6
		success_file_open_count = 6
		total_file_read_count = 0
		success_file_read_count = 0
		total_file_write_count = 15
		success_file_write_count = 15
		last_heart_beat_time = 2018-01-20 16:56:23
		last_source_update = 2018-01-19 15:28:49
		last_sync_update = 2018-01-19 19:35:46
		last_synced_timestamp = 2018-01-19 19:35:40 (0s delay)
如果看到有2组Storage信息,则表示配置信息配置成功,并注册到Tracker中,查看日志启动情况
[root@localhost fdfs]# tail -f /opt/fastdfs_storage/logs/storaged.log

[2018-01-20 12:37:18] INFO - FastDFS v5.11, base_path=/opt/fastdfs_storage, store_path_count=1, subdir_count_per_path=256, group_name=group1, run_by_group=, run_by_user=, connect_timeout=30s, network_timeout=60s, port=23000, bind_addr=, client_bind=1, max_connections=256, accept_threads=1, work_threads=4, disk_rw_separated=1, disk_reader_threads=1, disk_writer_threads=1, buff_size=256KB, heart_beat_interval=30s, stat_report_interval=60s, tracker_server_count=2, sync_wait_msec=50ms, sync_interval=0ms, sync_start_time=00:00, sync_end_time=23:59, write_mark_file_freq=500, allow_ip_count=-1, file_distribute_path_mode=0, file_distribute_rotate_count=100, fsync_after_written_bytes=0, sync_log_buff_interval=10s, sync_binlog_buff_interval=10s, sync_stat_file_interval=300s, thread_stack_size=512 KB, upload_priority=10, if_alias_prefix=, check_file_duplicate=0, file_signature_method=hash, FDHT group count=0, FDHT server count=0, FDHT key_namespace=, FDHT keep_alive=0, HTTP server port=8888, domain name=, use_access_log=0, rotate_access_log=0, access_log_rotate_time=00:00, rotate_error_log=0, error_log_rotate_time=00:00, rotate_access_log_size=0, rotate_error_log_size=0, log_file_keep_days=0, file_sync_skip_invalid_record=0, use_connection_pool=0, g_connection_pool_max_idle_time=3600s
[2018-01-20 12:37:18] INFO - file: storage_param_getter.c, line: 191, use_storage_id=0, id_type_in_filename=ip, storage_ip_changed_auto_adjust=1, store_path=0, reserved_storage_space=10.00%, use_trunk_file=0, slot_min_size=256, slot_max_size=16 MB, trunk_file_size=64 MB, trunk_create_file_advance=0, trunk_create_file_time_base=02:00, trunk_create_file_interval=86400, trunk_create_file_space_threshold=20 GB, trunk_init_check_occupying=0, trunk_init_reload_from_binlog=0, trunk_compress_binlog_min_interval=0, store_slave_file_use_link=0
[2018-01-20 12:37:18] INFO - file: storage_func.c, line: 257, tracker_client_ip: 192.168.43.72, my_server_id_str: 192.168.43.72, g_server_id_in_filename: 1210820800
[2018-01-20 12:37:18] INFO - file: tracker_client_thread.c, line: 310, successfully connect to tracker server 192.168.43.71:22122, as a tracker client, my ip is 192.168.43.72
[2018-01-20 12:37:18] INFO - file: tracker_client_thread.c, line: 1947, tracker server: #0. 192.168.43.70:22122, my_report_status: -1
[2018-01-20 12:37:18] INFO - file: tracker_client_thread.c, line: 310, successfully connect to tracker server 192.168.43.70:22122, as a tracker client, my ip is 192.168.43.72
[2018-01-20 12:37:18] INFO - file: tracker_client_thread.c, line: 1947, tracker server: #0. 192.168.43.70:22122, my_report_status: -1
[2018-01-20 12:37:48] INFO - file: tracker_client_thread.c, line: 1263, tracker server 192.168.43.71:22122, set tracker leader: 192.168.43.71:22122
[2018-01-20 12:37:48] INFO - file: storage_sync.c, line: 2732, successfully connect to storage server 192.168.43.73:23000
发现此时192.168.43.71作为Tracker的Leader。
- 设置Storage开机自启动
[root@localhost fdfs]# echo "service fdfs_storaged start" |tee -a /etc/rc.d/rc.local
- 安装fastdfs-nginx-module、Nginx模块
安装Nginx模块所需的依赖环境
[root@localhost fdfs]# yum -y install pcre pcre-devel
[root@localhost fdfs]# yum -y install zlib zlib-devel
[root@localhost fdfs]# yum -y install openssl openssl-devel
解压nginx和fastdfs-nginx-module
[root@localhost fdfs]# tar -zxvf nginx-1.10.3.tar.gz
[root@localhost fdfs]# unzip fastdfs-nginx-module-master.zip
进入Nginx解压目录进行编译安装
[root@localhost nginx-1.10.3]# ./configure --prefix=/usr/local/nginx --add-module=/home/zhangyongliang/apps/fastdfs-nginx-module-master/src #解压后fastdfs-nginx-module所在的位置
安装成功后,nginx会安装在/usr/local/nginx,安装后查看
[root@localhost src]# ll /usr/local/nginx/
总用量 8
drwx------. 2 nobody root    6 1月  17 13:23 client_body_temp
drwxr-xr-x. 2 root   root 4096 1月  17 13:17 conf
drwx------. 2 nobody root    6 1月  17 13:23 fastcgi_temp
drwxr-xr-x. 2 root   root   40 1月  17 13:17 html
drwxr-xr-x. 2 root   root   58 1月  17 13:49 logs
-rw-r--r--. 1 root   root 1156 1月  17 13:29 nginx.conf
drwx------. 2 nobody root    6 1月  17 13:23 proxy_temp
drwxr-xr-x. 2 root   root   19 1月  17 13:17 sbin
drwx------. 2 nobody root    6 1月  17 13:23 scgi_temp
drwx------. 2 nobody root    6 1月  17 13:23 uwsgi_temp
安装成功后,nginx尚未运行时,nginx文件夹没有临时文件夹,例如fastcgi_temp这些文件。
复制 fastdfs-nginx-module 源码中的配置文件到/etc/fdfs 目录, 并修改
[root@localhost src]# cp /usr/local/src/fastdfs-nginx-module/src/mod_fastdfs.conf /etc/fdfs/
[root@localhost src]# vi /etc/fdfs/mod_fastdfs.conf
(1)第1组 Storage 的 mod_fastdfs.conf 配置如下:
connect_timeout=10
base_path=/opt/fastdfs_storage
tracker_server=192.168.1.131:22122
tracker_server=192.168.1.132:22122
storage_server_port=23000
group_name=group1
url_have_group_name = true
store_path0=/opt/fastdfs_storage_data
group_count = 2
[group1]
group_name=group1
storage_server_port=23000
store_path_count=1
store_path0=/opt/fastdfs_storage_data
[group2]
group_name=group2
storage_server_port=23000
store_path_count=1
store_path0=/opt/fastdfs_storage_data
(2)第2组 Storage 的 mod_fastdfs.conf 配置与第一组配置只有 group_name 不同:
group_name=group2
完整信息如下:
# connect timeout in seconds
# default value is 30s
connect_timeout=2

# network recv and send timeout in seconds
# default value is 30s
network_timeout=30

# the base path to store log files
base_path=/opt/fastdfs_storage

# if load FastDFS parameters from tracker server
# since V1.12
# default value is false
load_fdfs_parameters_from_tracker=true

# storage sync file max delay seconds
# same as tracker.conf
# valid only when load_fdfs_parameters_from_tracker is false
# since V1.12
# default value is 86400 seconds (one day)
storage_sync_file_max_delay = 86400

# if use storage ID instead of IP address
# same as tracker.conf
# valid only when load_fdfs_parameters_from_tracker is false
# default value is false
# since V1.13
use_storage_id = false

# specify storage ids filename, can use relative or absolute path
# same as tracker.conf
# valid only when load_fdfs_parameters_from_tracker is false
# since V1.13
storage_ids_filename = storage_ids.conf

# FastDFS tracker_server can ocur more than once, and tracker_server format is
#  "host:port", host can be hostname or ip address
# valid only when load_fdfs_parameters_from_tracker is true
tracker_server=192.168.43.70:22122
tracker_server=192.168.43.71:22122

# the port of the local storage server
# the default value is 23000
storage_server_port=23000

# the group name of the local storage server
group_name=group1

# if the url / uri including the group name
# set to false when uri like /M00/00/00/xxx
# set to true when uri like ${group_name}/M00/00/00/xxx, such as group1/M00/xxx
# default value is false
url_have_group_name = true

# path(disk or mount point) count, default value is 1
# must same as storage.conf
store_path_count=1

# store_path#, based 0, if store_path0 not exists, it's value is base_path
# the paths must be exist
# must same as storage.conf
store_path0=/opt/fastdfs_storage_data
#store_path1=/home/yuqing/fastdfs1

# standard log level as syslog, case insensitive, value list:
### emerg for emergency
### alert
### crit for critical
### error
### warn for warning
### notice
### info
### debug
log_level=info

# set the log filename, such as /usr/local/apache2/logs/mod_fastdfs.log
# empty for output to stderr (apache and nginx error_log file)
log_filename=

# response mode when the file not exist in the local file system
## proxy: get the content from other storage server, then send to client
## redirect: redirect to the original storage server (HTTP Header is Location)
response_mode=proxy

# the NIC alias prefix, such as eth in Linux, you can see it by ifconfig -a
# multi aliases split by comma. empty value means auto set by OS type
# this paramter used to get all ip address of the local host
# default values is empty
if_alias_prefix=

# use "#include" directive to include HTTP config file
# NOTE: #include is an include directive, do NOT remove the # before include
#include http.conf


# if support flv
# default value is false
# since v1.15
flv_support = true

# flv file extension name
# default value is flv
# since v1.15
flv_extension = flv


# set the group count
# set to none zero to support multi-group on this storage server
# set to 0  for single group only
# groups settings section as [group1], [group2], ..., [groupN]
# default value is 0
# since v1.14
group_count = 2

# group settings for group #1
# since v1.14
# when support multi-group on this storage server, uncomment following section
[group1]
group_name=group1
storage_server_port=23000
store_path_count=1
store_path0=/opt/fastdfs_storage_data
[group2]
group_name=group2
storage_server_port=23000
store_path_count=1
store_path0=/opt/fastdfs_storage_data
# group settings for group #2
# since v1.14
# when support multi-group, uncomment following section as neccessary
#[group2]
#group_name=group2
#storage_server_port=23000
#store_path_count=1
#store_path0=/home/yuqing/fastdfs
复制 FastDFS 安装目录的部分配置文件到/etc/fdfs 目录
[root@localhost conf]# pwd
/home/zhangyongliang/apps/fastdfs-5.11/conf
[root@localhost conf]# cp http.conf  mime.types  /etc/fdfs/
创建M00至storage存储目录的符号连接:
ln -s /opt/fastdfs_storage_data/data/ /opt/fastdfs_storage_data/data/M00
配置 Nginx, 简洁版 nginx 配置样例
# vi /usr/local/nginx/conf/nginx.conf
user root;
worker_processes 1;
events {
    worker_connections 1024;
}
http {
    include mime.types;
    default_type application/octet-stream;
    sendfile on;
    keepalive_timeout 65;
    server {
        listen 8888;
        server_name localhost;
        location ~/group([0-9])/M00 {
            #alias /fastdfs/storage/data;
            ngx_fastdfs_module;
        }
        error_page 500 502 503 504 /50x.html;
        location = /50x.html {
            root html;
        }
    }
}
注意、 说明:
8888 端口值是要与/etc/fdfs/storage.conf 中的 http.server_port=8888 相对应,因为 http.server_port 默认为 8888,如果想改成 80,则要对应修改过来。
重新启动各节点的Nginx服务
[root@localhost conf]#/usr/local/nginx/sbin/nginx -s reload
4.文件上传测试
执行节点Tracker01、Tracker02
修改 Tracker 服务器中的客户端配置文件
# vi /etc/fdfs/client.conf
base_path=/fastdfs/tracker
tracker_server=192.168.43.70:22122
tracker_server=192.168.43.71:22122
执行如下文件上传命令
[root@localhost zhangyongliang]# fdfs_upload_file /etc/fdfs/client.conf P71022-205803.jpg
group1/M00/00/00/wKgrSFpjC26AH1g2AAvUQrxXbkA557.jpg
[root@localhost zhangyongliang]# fdfs_upload_file /etc/fdfs/client.conf P71022-205803.jpg
group2/M00/00/00/wKgrSlpjC3aAARrXAAvUQrxXbkA048.jpg
进行2次上传后,发现文件被均衡分到2个group。
5.Tracker安装Nginx、 ngx_cache_purge 模块
- 安装编译 Nginx 所需的依赖包
[root@localhost zhangyongliang]# yum install gcc gcc-c++ make automake autoconf libtool pcre pcre-devel zlib zlib-devel openssl openssl-devel
解压Nginx和ngx_cache_pure模块
[root@localhost apps]# tar ngx_cache_purge-2.3.tar.gz
[root@localhost apps]# tar nginx-1.10.3.tar.gz
编译安装 Nginx(添加 ngx_cache_purge 模块)
[root@localhost apps]# cd nginx-1.13.0
[root@localhost nginx-1.13.0# ./configure --prefix=/usr/local/nginx --add-module=/usr/local/src/ngx_cache_purge-2.3
[root@localhost nginx-1.13.0]# make && make install
配置 Nginx, 设置负载均衡以及缓存
# vi /usr/local/nginx/conf/nginx.conf

#user  nobody;
worker_processes  1;

#error_log  logs/error.log;
#error_log  logs/error.log  notice;
#error_log  logs/error.log  info;

#pid        logs/nginx.pid;


events {
    worker_connections  1024;
}


http {
    include       mime.types;
    default_type  application/octet-stream;

    #log_format  main  '$remote_addr - $remote_user [$time_local] "$request" '
    #                  '$status $body_bytes_sent "$http_referer" '
    #                  '"$http_user_agent" "$http_x_forwarded_for"';

    #access_log  logs/access.log  main;
    sendfile        on;
    tcp_nopush      on;
    #tcp_nopush     on;
    #keepalive_timeout  0;
    keepalive_timeout  65;

    #gzip  on;
	#设置缓存
    server_names_hash_bucket_size 128;
    client_header_buffer_size 32k;
    large_client_header_buffers 4 32k;
    client_max_body_size 300m;

    proxy_redirect off;
    proxy_set_header Host $http_host;
    proxy_set_header X-Real-IP $remote_addr;
    proxy_set_header X-Forwarded-For $proxy_add_x_forwarded_for;
    proxy_connect_timeout 90;
    proxy_send_timeout 90;
    proxy_read_timeout 90;
    proxy_buffer_size 16k;
    proxy_buffers 4 64k;
    proxy_busy_buffers_size 128k;
    proxy_temp_file_write_size 128k;
	#设置缓存存储路径,存储方式,分别内存大小,磁盘最大空间,缓存期限
    proxy_cache_path /opt/fastdfs_tracker/proxy_cache levels=1:2
	keys_zone=http-cache:200m max_size=1g inactive=30d;
    proxy_temp_path /opt/fastdfs_tracker/tmp;
    #group1的服务设置
    upstream fdfs_group1 {
         server 192.168.43.72:8888 weight=1 max_fails=2 fail_timeout=30s;
         server 192.168.43.73:8888 weight=1 max_fails=2 fail_timeout=30s;
    }
    #group2的服务设置
    upstream fdfs_group2 {
         server 192.168.43.74:8888 weight=1 max_fails=2 fail_timeout=30s;
         server 192.168.43.75:8888 weight=1 max_fails=2 fail_timeout=30s;
    }

    server {
        listen       8000;
        server_name  localhost;

        #charset koi8-r;

        #access_log  logs/host.access.log  main;
		#group1的负载均衡配置
        location /group1/M00 {
            proxy_next_upstream http_502 http_504 error timeout invalid_header;
            proxy_cache http-cache;
            proxy_cache_valid 200 304 12h;
            proxy_cache_key $uri$is_args$args;
            #对应group1的服务设置
            proxy_pass http://fdfs_group1;
            expires 30d;
        }
        location /group2/M00 {
            proxy_next_upstream http_502 http_504 error timeout invalid_header;
            proxy_cache http-cache;
            proxy_cache_valid 200 304 12h;
            proxy_cache_key $uri$is_args$args;
            #对应group2的服务设置
            proxy_pass http://fdfs_group2;
            expires 30d;
         }
        location ~/purge(/.*) {
            allow 127.0.0.1;
            allow 192.168.43.0/24;
            deny all;
            proxy_cache_purge http-cache $1$is_args$args;
        }
        location / {
            root   html;
            index  index.html index.htm;
        }

        #error_page  404              /404.html;

        # redirect server error pages to the static page /50x.html
        #
        error_page   500 502 503 504  /50x.html;
        location = /50x.html {
            root   html;
        }

        # proxy the PHP scripts to Apache listening on 127.0.0.1:80
        #
        #location ~ \.php$ {
        #    proxy_pass   http://127.0.0.1;
        #}

        # pass the PHP scripts to FastCGI server listening on 127.0.0.1:9000
        #
        #location ~ \.php$ {
        #    root           html;
        #    fastcgi_pass   127.0.0.1:9000;
        #    fastcgi_index  index.php;
        #    fastcgi_param  SCRIPT_FILENAME  /scripts$fastcgi_script_name;
        #    include        fastcgi_params;
        #}

        # deny access to .htaccess files, if Apache's document root
        # concurs with nginx's one
        #
        #location ~ /\.ht {
        #    deny  all;
        #}
    }


    # another virtual host using mix of IP-, name-, and port-based configuration
    #
    #server {
    #    listen       8000;
    #    listen       somename:8080;
    #    server_name  somename  alias  another.alias;

    #    location / {
    #        root   html;
    #        index  index.html index.htm;
    #    }
    #}


    # HTTPS server
    #
    #server {
    #    listen       443 ssl;
    #    server_name  localhost;

    #    ssl_certificate      cert.pem;
    #    ssl_certificate_key  cert.key;

    #    ssl_session_cache    shared:SSL:1m;
    #    ssl_session_timeout  5m;

    #    ssl_ciphers  HIGH:!aNULL:!MD5;
    #    ssl_prefer_server_ciphers  on;

    #    location / {
    #        root   html;
    #        index  index.html index.htm;
    #    }
    #}

}
根据Nginx配置,创建对应目录下的文件夹
[root@localhost fastdfs_tracker]# mkdir proxy_cache tmp
[root@localhost fastdfs_tracker]# ll
总用量 0
drwxr-xr-x. 2 root   root 178 1月  20 12:37 data
drwxr-xr-x. 2 root   root  26 1月  19 12:01 logs
drwxr-xr-x. 7 nobody root  51 1月  19 19:35 proxy_cache
drwxr-xr-x. 2 nobody root   6 1月  19 19:35 tmp
重启Nginx进行访问测试
重启 Nginx
[root@localhost fastdfs_tracker]# /usr/local/nginx/sbin/nginx -s reload
前面直接通过访问 Storage 节点中的 Nginx 的文件
http://192.168.43.72:8888/group1/M00/00/00/wKgrSFpjC26AH1g2AAvUQrxXbkA557.jpg]
http://192.168.43.74:8888/group2/M00/00/00/wKgrSlpjC3aAARrXAAvUQrxXbkA048.jpg
现在可以通过 Tracker 中的 Nginx 来进行访问
(1)通过 Tracker1 中的 Nginx 来访问
http://192.168.43.70:8000/group1/M00/00/00/wKgrSFpjC26AH1g2AAvUQrxXbkA557.jpg
http://192.168.43.70:8000/group2/M00/00/00/wKgrSlpjC3aAARrXAAvUQrxXbkA048.jpg
(2)通过 Tracker2 中的 Nginx 来访问
http://192.168.43.71:8000/group1/M00/00/00/wKgrSFpjC26AH1g2AAvUQrxXbkA557.jpg
http://192.168.50.71:8000/group2/M00/00/00/wKgrSlpjC3aAARrXAAvUQrxXbkA048.jpg
6.构建Keepalive+Nginx 实现虚拟IP的代理
关于使用Keepalive+Nginx进行代理的环境安装,请参考本人简书此文:Keepalived+Nginx+Tomcat 实现高可用Web集群
本文不再做赘述说明
- 启动Keepalvie+nginx Master主节点【192.168.43.101】
- 启动Keepalvie+nginx BackUp备节点【192.168.43.102】
修改2个节点Nginx下目录的nginx.conf的配置文件信息,添加如下内容
主要内容为2个Tracker加入到Keepalive+nginx代理当中
upstream fastdfs_tracker {
   server 192.168.43.70:8000 weight=1 max_fails=2 fail_timeout=30s;
   server 192.168.43.71:8000 weight=1 max_fails=2 fail_timeout=30s;
}
第二处修改是添加了一个location并且匹配规则是路径当中有fastdfs
location /fastdfs {
           root html;
           index index.html index.htm;
           proxy_pass http://fastdfs_tracker/;
           proxy_set_header Host $http_host;
           proxy_set_header Cookie $http_cookie;
           proxy_set_header X-Real-IP $remote_addr;
           proxy_set_header X-Forwarded-For $proxy_add_x_forwarded_for;
           proxy_set_header X-Forwarded-Proto $scheme;
           client_max_body_size 300m;
        }
完整配置代码如下:
#user  nobody;
worker_processes  1;

#error_log  logs/error.log;
#error_log  logs/error.log  notice;
#error_log  logs/error.log  info;

#pid        logs/nginx.pid;


events {
    worker_connections  1024;
}


http {
    include       mime.types;
    default_type  application/octet-stream;

    #log_format  main  '$remote_addr - $remote_user [$time_local] "$request" '
    #                  '$status $body_bytes_sent "$http_referer" '
    #                  '"$http_user_agent" "$http_x_forwarded_for"';

    #access_log  logs/access.log  main;

    sendfile        on;
    #tcp_nopush     on;

    #keepalive_timeout  0;
    keepalive_timeout  65;

    #gzip  on;
	upstream fastdfs_tracker {
	   server 192.168.43.70:8000 weight=1 max_fails=2 fail_timeout=30s;
	   server 192.168.43.71:8000 weight=1 max_fails=2 fail_timeout=30s;
    }
    upstream tomcat{
	 server 192.168.43.103:8080 weight=1;
	 server 192.168.43.104:8080 weight=1;
	}

    server {
        listen       80;
        server_name  localhost;

        #charset koi8-r;

        #access_log  logs/host.access.log  main;

        location / {
		    proxy_pass http://tomcat;
			proxy_set_header X-NGINX "NGINX-1";
            root   html;
            index  index.html index.htm;
        }

        #error_page  404              /404.html;

        # redirect server error pages to the static page /50x.html
        #
        error_page   500 502 503 504  /50x.html;
        location = /50x.html {
            root   html;
        }
		location /fastdfs {
           root html;
           index index.html index.htm;
           proxy_pass http://fastdfs_tracker/;
           proxy_set_header Host $http_host;
           proxy_set_header Cookie $http_cookie;
           proxy_set_header X-Real-IP $remote_addr;
           proxy_set_header X-Forwarded-For $proxy_add_x_forwarded_for;
           proxy_set_header X-Forwarded-Proto $scheme;
           client_max_body_size 300m;
        }

        # proxy the PHP scripts to Apache listening on 127.0.0.1:80
        #
        #location ~ \.php$ {
        #    proxy_pass   http://127.0.0.1;
        #}

        # pass the PHP scripts to FastCGI server listening on 127.0.0.1:9000
        #
        #location ~ \.php$ {
        #    root           html;
        #    fastcgi_pass   127.0.0.1:9000;
        #    fastcgi_index  index.php;
        #    fastcgi_param  SCRIPT_FILENAME  /scripts$fastcgi_script_name;
        #    include        fastcgi_params;
        #}

        # deny access to .htaccess files, if Apache's document root
        # concurs with nginx's one
        #
        #location ~ /\.ht {
        #    deny  all;
        #}
    }


    # another virtual host using mix of IP-, name-, and port-based configuration
    #
    #server {
    #    listen       8000;
    #    listen       somename:8080;
    #    server_name  somename  alias  another.alias;

    #    location / {
    #        root   html;
    #        index  index.html index.htm;
    #    }
    #}


    # HTTPS server
    #
    #server {
    #    listen       443 ssl;
    #    server_name  localhost;

    #    ssl_certificate      cert.pem;
    #    ssl_certificate_key  cert.key;

    #    ssl_session_cache    shared:SSL:1m;
    #    ssl_session_timeout  5m;

    #    ssl_ciphers  HIGH:!aNULL:!MD5;
    #    ssl_prefer_server_ciphers  on;

    #    location / {
    #        root   html;
    #        index  index.html index.htm;
    #    }
    #}

}
修改之后,重新启动Keepalive+Nginx2台主备节点。
[root@nginx1 conf]# /usr/local/nginx/sbin/nginx -s reload
我们现在就用虚拟IP192.168.43.150来访问我们刚才上传的图片,只是注意在地址栏中要记得输入fastdfs(这是我们nginx.conf文件中location /fastdfs{}规则规定的)。如下图所示,发现,我们通过虚拟IP便可以访问我们上传的图片了。这样的好处是,对用户来说,只需要访问这个虚拟IP就可以了,不用关心FastDFS集群内部的转发机制。

补充说明:
如果Tracker 服务、Storage服务、Nginx服务开机后没有自启动,请执行一下操作并进行重启
[root@localhost ~]# chkconfig  --add fdfs_trackerd
[root@localhost ~]# chkconfig  --add fdfs_storaged
编辑目录下的/etc/rc.d/rc.local,内容如下:
#!/bin/bash
# THIS FILE IS ADDED FOR COMPATIBILITY PURPOSES
#
# It is highly advisable to create own systemd services or udev rules
# to run scripts during boot instead of using this file.
#
# In contrast to previous versions due to parallel execution during boot
# this script will NOT be run after all other services.
#
# Please note that you must run 'chmod +x /etc/rc.d/rc.local' to ensure
# that this script will be executed during boot.

touch /var/lock/subsys/local
/usr/local/nginx/sbin/nginx
主要增加了Nginx的启动,之后进行文件生效,重新启动系统
[root@localhost ~]# chmod  +x /etc/rc.d/rc.local
[root@localhost ~]# source /etc/rc.d/rc.local
[root@localhost ~]# reboot
