1 LayoutInflater 获取
LayoutInflater 获取 实例一般有两种方式:
LayoutInflater.from(this);
View.inflate(this,R.layout.abc_activity_chooser_view,null);
2 两种获取方式的比较
LayoutInflater.from(this);
/**
 * Obtains the LayoutInflater from the given context.
 */
public static LayoutInflater from(Context context) {
    LayoutInflater LayoutInflater =
            (LayoutInflater) context.getSystemService(Context.LAYOUT_INFLATER_SERVICE);
    if (LayoutInflater == null) {
        throw new AssertionError("LayoutInflater not found.");
    }
    return LayoutInflater;
}
从Context 中获取的 LayoutInflater 是通过 getSystemService 来获取到的。因为Context 是抽象类,实际实现的Context 的是 ContextImpl。接下来我们再看看ContextImpl如何获取。
View.inflate(this,R.layout.abc_activity_chooser_view,null);
public static View inflate(Context context, int resource, ViewGroup root) {
    LayoutInflater factory = LayoutInflater.from(context);
    return factory.inflate(resource, root);
}
通过View 进行获取的LayoutInflater,实际也是通过Context进行获取。所以只是包装了一份。
3 Context 获取的分析
ContextImpl 中的实现
static {
   ...

    registerService(LAYOUT_INFLATER_SERVICE, new
                    ServiceFetcher() {
                public Object createService(ContextImpl ctx) {return PolicyManager.makeNewLayoutInflater(ctx.getOuterContext());
                }});

    ...
}
我们发现调用了PolicyManager,在PolicyManager中是通过sPolicy进行获取。
    public static LayoutInflater makeNewLayoutInflater(Context context) {
    return sPolicy.makeNewLayoutInflater(context);
}
继续跟踪sPolicy ,sPolicy是通过反射创建的 com.android.internal.policy.impl.Policy的实体类。
   private static final String POLICY_IMPL_CLASS_NAME =
    "com.android.internal.policy.impl.Policy";

private static final IPolicy sPolicy;

static {
    // Pull in the actual implementation of the policy at run-time
    try {
        Class policyClass = Class.forName(POLICY_IMPL_CLASS_NAME);
        sPolicy = (IPolicy)policyClass.newInstance();
    } catch (ClassNotFoundException ex) {
        throw new RuntimeException(
                POLICY_IMPL_CLASS_NAME + " could not be loaded", ex);
    } catch (InstantiationException ex) {
        throw new RuntimeException(
                POLICY_IMPL_CLASS_NAME + " could not be instantiated", ex);
    } catch (IllegalAccessException ex) {
        throw new RuntimeException(
                POLICY_IMPL_CLASS_NAME + " could not be instantiated", ex);
    }
}
public class Policy implements IPolicy {
  ...

    public LayoutInflater makeNewLayoutInflater(Context context) {
        return new PhoneLayoutInflater(context);
    }

  ...
}
实际上最后获取的对象时 PhoneLayoutInflater。
那么我们知道原来 LayoutInflater 的实现是 PhoneLayoutInflater。
4 PhoneLayoutInflater 源码分析
上面我们知道了inflater 的实现就是 PhoneLayoutInflater
public class PhoneLayoutInflater extends LayoutInflater {

   private static final String[] sClassPrefixList = {
        "android.widget.",
        "android.webkit.",
        "android.app."
    };

  public PhoneLayoutInflater(Context context) {
        super(context);
    }

    protected PhoneLayoutInflater(LayoutInflater original, Context newContext) {
        super(original, newContext);
    }

   @Override
  protected View onCreateView(String name, AttributeSet attrs) throws ClassNotFoundException {
        for (String prefix : sClassPrefixList) {
            try {
                View view = createView(name, prefix, attrs);
                if (view != null) {
                    return view;
                }
            } catch (ClassNotFoundException e) {
                // In this case we want to let the base class take a crack
                // at it.
            }
        }

        return super.onCreateView(name, attrs);
    }

    public LayoutInflater cloneInContext(Context newContext) {
        return new PhoneLayoutInflater(this, newContext);
    }
这个代码没有什么特殊的地方,只有onCreateView 这个方法会返回一个View,我们常见的LayoutInflater 的使用方法是
LayoutInflater inflater =  LayoutInflater.from(this);
inflater.inflate(R.layout.abc_activity_chooser_view,null);
5 inflate 方法
inflate 方法最后会调用到 inflate(int resource, ViewGroup root, boolean attachToRoot)
public View inflate(int resource, ViewGroup root, boolean attachToRoot) {
    final Resources res = getContext().getResources();
    if (DEBUG) {
        Log.d(TAG, "INFLATING from resource: \"" + res.getResourceName(resource) + "\" ("
                + Integer.toHexString(resource) + ")");
    }

    final XmlResourceParser parser = res.getLayout(resource);
    try {
        return inflate(parser, root, attachToRoot);
    } finally {
        parser.close();
    }
}
生成一个xml解析器,将这个XML的解析器传递给inflate 的重载方法
public View inflate(XmlPullParser parser, ViewGroup root, boolean attachToRoot) {
    synchronized (mConstructorArgs) {
        Trace.traceBegin(Trace.TRACE_TAG_VIEW, "inflate");

         //xml 属性
        final AttributeSet attrs = Xml.asAttributeSet(parser);

        Context lastContext = (Context)mConstructorArgs[0];
        mConstructorArgs[0] = mContext;

      //解析的root
      View result = root;

        try {
            // Look for the root node.
            int type;

            //一直尝试找根元素
            while ((type = parser.next()) != XmlPullParser.START_TAG &&
                    type != XmlPullParser.END_DOCUMENT) {
                // Empty
            }

            if (type != XmlPullParser.START_TAG) {
                throw new InflateException(parser.getPositionDescription()
                        + ": No start tag found!");
            }

            final String name = parser.getName();

            if (DEBUG) {
                System.out.println("**************************");
                System.out.println("Creating root view: "
                        + name);
                System.out.println("**************************");
            }

             //如果是merge 标签
            if (TAG_MERGE.equals(name)) {
                if (root == null || !attachToRoot) {
                    throw new InflateException("<merge /> can be used only with a valid "
                            + "ViewGroup root and attachToRoot=true");
                }

                rInflate(parser, root, attrs, false, false);
            } else {

                //正常的标签(重点方法)

                final View temp = createViewFromTag(root, name, attrs, false);

                ViewGroup.LayoutParams params = null;

                //如果有根元素
                if (root != null) {
                    if (DEBUG) {
                        System.out.println("Creating params from root: " +
                                root);
                    }
                    // Create layout params that match root, if supplied
                    //生成根元素的LayoutParams
                    params = root.generateLayoutParams(attrs);

                    if (!attachToRoot) {
                        // Set the layout params for temp if we are not
                        // attaching. (If we are, we use addView, below)
                        temp.setLayoutParams(params);
                    }
                }

                if (DEBUG) {
                    System.out.println("-----> start inflating children");
                }
                // Inflate all children under temp
                rInflate(parser, temp, attrs, true, true);
                if (DEBUG) {
                    System.out.println("-----> done inflating children");
                }

                // We are supposed to attach all the views we found (int temp)
                // to root. Do that now.
                if (root != null && attachToRoot) {
                    root.addView(temp, params);
                }

                // Decide whether to return the root that was passed in or the
                // top view found in xml.
                if (root == null || !attachToRoot) {
                    result = temp;
                }
            }

        } catch (XmlPullParserException e) {
            InflateException ex = new InflateException(e.getMessage());
            ex.initCause(e);
            throw ex;
        } catch (IOException e) {
            InflateException ex = new InflateException(
                    parser.getPositionDescription()
                    + ": " + e.getMessage());
            ex.initCause(e);
            throw ex;
        } finally {
            // Don't retain static reference on context.
            mConstructorArgs[0] = lastContext;
            mConstructorArgs[1] = null;
        }

        Trace.traceEnd(Trace.TRACE_TAG_VIEW);

        return result;
    }
}
所以我们知道了在这里真的生成一个View的方法实际是在
final View temp = createViewFromTag(root, name, inflaterContext, attrs);
下面我们看看这个类是怎么实现的
private View createViewFromTag(View parent, String name, Context context, AttributeSet attrs) {
    return createViewFromTag(parent, name, context, attrs, false);
}
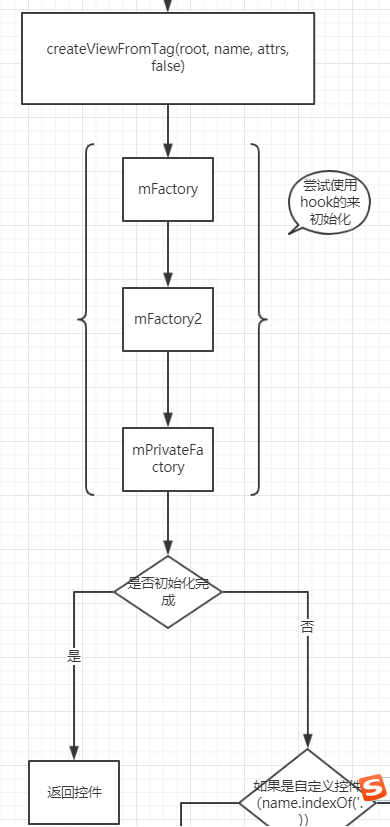
View createViewFromTag(View parent, String name, Context context, AttributeSet attrs,
        boolean ignoreThemeAttr) {

    //如果是一个超类View,获取需要初始化的View的名称
    if (name.equals("view")) {
        name = attrs.getAttributeValue(null, "class");
    }

    // Apply a theme wrapper, if allowed and one is specified.
    if (!ignoreThemeAttr) {
        final TypedArray ta = context.obtainStyledAttributes(attrs, ATTRS_THEME);
        final int themeResId = ta.getResourceId(0, 0);
        if (themeResId != 0) {
            context = new ContextThemeWrapper(context, themeResId);
        }
        ta.recycle();
    }

    //类似闪屏的控件 <blink></blink>
    if (name.equals(TAG_1995)) {
        // Let's party like it's 1995!
        return new BlinkLayout(context, attrs);
    }

    //!重点!
    try {
        View view;

        //如果设置了 mFactory2 -》 调用 mFactory2.onCreateView 生成一个View
        if (mFactory2 != null) {
            view = mFactory2.onCreateView(parent, name, context, attrs);
        }
        //如果设置了mFactory -》调用 mFactory.onCreateView 生成一个View
         else if (mFactory != null) {
            view = mFactory.onCreateView(name, context, attrs);
        }
        //如果没有设置 mFactory2 或 mFactory 说明不需要进行预处理
        else {
            view = null;
        }

        //看看系统是不是有hook生成控件
        if (view == null && mPrivateFactory != null) {
            view = mPrivateFactory.onCreateView(parent, name, context, attrs);
        }

        //如果上述的方法都没有生成方法,说明没有hook方法调用
        if (view == null) {
            final Object lastContext = mConstructorArgs[0];
            mConstructorArgs[0] = context;
            try {
                //系统控件 LinearLayout
                if (-1 == name.indexOf('.')) {
                    view = onCreateView(parent, name, attrs);
                } else {
                //自定义控件 cn.hk.CustomView
                    view = createView(name, null, attrs);
                }
            } finally {
                mConstructorArgs[0] = lastContext;
            }
        }

        return view;
    } catch (InflateException e) {
        throw e;

    } catch (ClassNotFoundException e) {
        final InflateException ie = new InflateException(attrs.getPositionDescription()
                + ": Error inflating class " + name, e);
        ie.setStackTrace(EMPTY_STACK_TRACE);
        throw ie;

    } catch (Exception e) {
        final InflateException ie = new InflateException(attrs.getPositionDescription()
                + ": Error inflating class " + name, e);
        ie.setStackTrace(EMPTY_STACK_TRACE);
        throw ie;
    }
}
/**
 * @hide for use by framework ,hide 方法 系统调用
 */
public void setPrivateFactory(Factory2 factory) {
    if (mPrivateFactory == null) {
        mPrivateFactory = factory;
    } else {
        mPrivateFactory = new FactoryMerger(factory, factory, mPrivateFactory, mPrivateFactory);
    }
}
详细的逻辑如下:

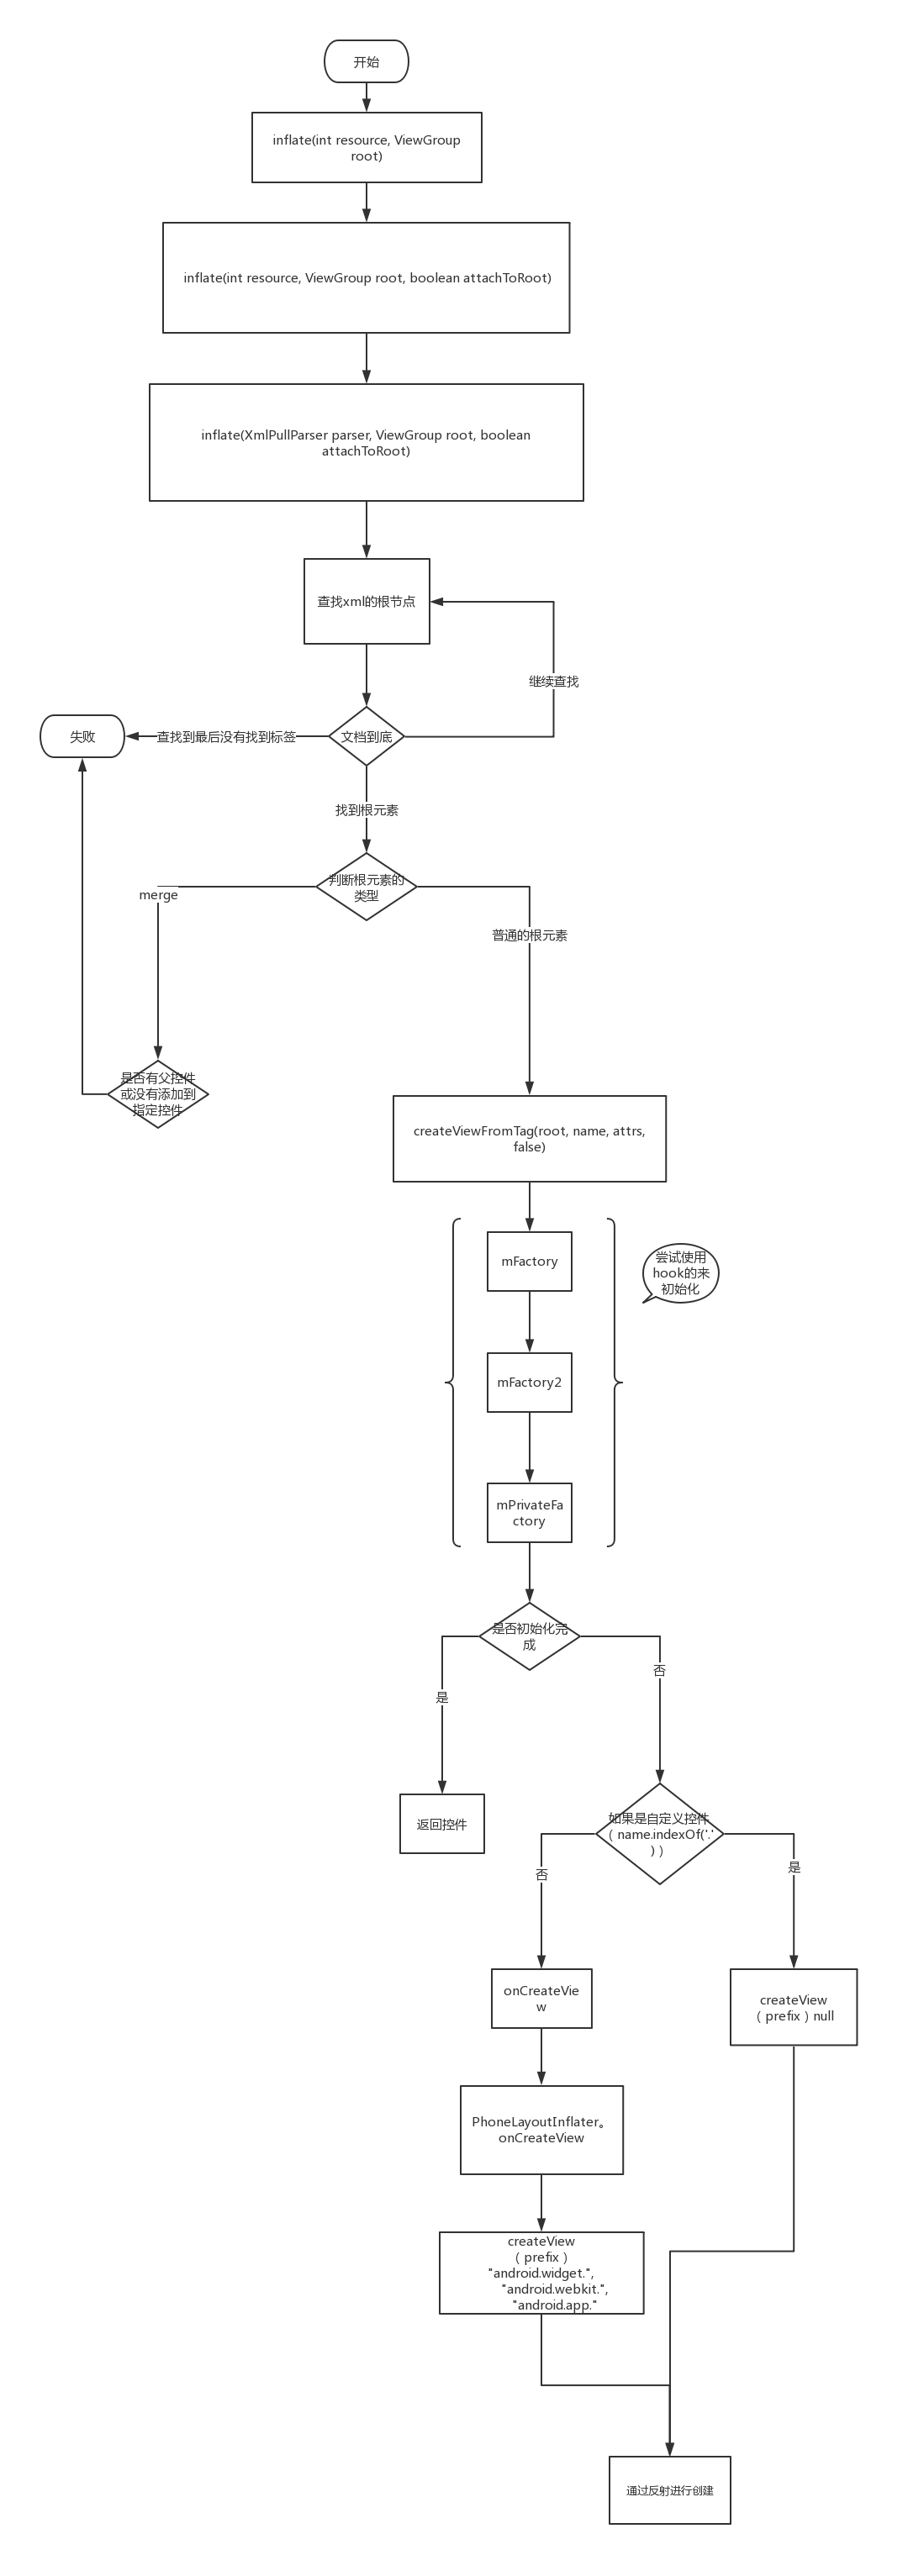
inflate 生成控件的时候,会根据是否是系统控件调用下面两个方法
protected View onCreateView(View parent, String name, AttributeSet attrs)
        throws ClassNotFoundException {
    return onCreateView(name, attrs);
}
public final View createView(String name, String prefix, AttributeSet attrs)
        throws ClassNotFoundException, InflateException {
onCreateView 是抽象方法,实现是在PhoneLayoutInflater 中实现的,
//前缀
private static final String[] sClassPrefixList = {
        "android.widget.",
        "android.webkit.",
        "android.app."
    };


@Override protected View onCreateView(String name, AttributeSet attrs) throws ClassNotFoundException {
        for (String prefix : sClassPrefixList) {
            try {
                View view = createView(name, prefix, attrs);
                if (view != null) {
                    return view;
                }
            } catch (ClassNotFoundException e) {
                // In this case we want to let the base class take a crack
                // at it.
            }
        }

        return super.onCreateView(name, attrs);
    }
在PhoneLayoutInflater 也是通过createView来创建的。所以分析createView即可。唯一的区别 创建系统的控件时
createView(name, prefix, attrs);
createView(name, null, attrs);
区别就是 创建系统控件的时候有将前缀传递进去
public final View createView(String name, String prefix, AttributeSet attrs)
            throws ClassNotFoundException, InflateException {

        //看看控件是不是有缓存
        Constructor<? extends View> constructor = sConstructorMap.get(name);

        //看看classLoader是不是相同,如果相同就使用这个反射的构造器
         if (constructor != null && !verifyClassLoader(constructor)) {
            constructor = null;
            sConstructorMap.remove(name);
        }
        Class<? extends View> clazz = null;

        try {
            Trace.traceBegin(Trace.TRACE_TAG_VIEW, name);

            if (constructor == null) {
                // Class not found in the cache, see if it's real, and try to add it
                clazz = mContext.getClassLoader().loadClass(
                        prefix != null ? (prefix + name) : name).asSubclass(View.class);

                if (mFilter != null && clazz != null) {
                    boolean allowed = mFilter.onLoadClass(clazz);
                    if (!allowed) {
                        failNotAllowed(name, prefix, attrs);
                    }
                }
                //反射构造器
                constructor = clazz.getConstructor(mConstructorSignature);
                constructor.setAccessible(true);
                //缓存
                sConstructorMap.put(name, constructor);
            } else {
                // If we have a filter, apply it to cached constructor
                if (mFilter != null) {
                    // Have we seen this name before?
                    Boolean allowedState = mFilterMap.get(name);
                    if (allowedState == null) {
                        // New class -- remember whether it is allowed
                        clazz = mContext.getClassLoader().loadClass(
                                prefix != null ? (prefix + name) : name).asSubclass(View.class);

                        boolean allowed = clazz != null && mFilter.onLoadClass(clazz);
                        mFilterMap.put(name, allowed);
                        if (!allowed) {
                            failNotAllowed(name, prefix, attrs);
                        }
                    } else if (allowedState.equals(Boolean.FALSE)) {
                        failNotAllowed(name, prefix, attrs);
                    }
                }
            }

            Object lastContext = mConstructorArgs[0];
            if (mConstructorArgs[0] == null) {
                // Fill in the context if not already within inflation.
                mConstructorArgs[0] = mContext;
            }
            Object[] args = mConstructorArgs;
            args[1] = attrs;
            //反射调用 两个参数的构造方法
            // public View (Context context, AttributeSet attrs) {

            final View view = constructor.newInstance(args);

            //如果是一个ViewStub
            if (view instanceof ViewStub) {
                // Use the same context when inflating ViewStub later.
                final ViewStub viewStub = (ViewStub) view;
                viewStub.setLayoutInflater(cloneInContext((Context) args[0]));
            }
            mConstructorArgs[0] = lastContext;
            return view;

        } catch (NoSuchMethodException e) {
            final InflateException ie = new InflateException(attrs.getPositionDescription()
                    + ": Error inflating class " + (prefix != null ? (prefix + name) : name), e);
            ie.setStackTrace(EMPTY_STACK_TRACE);
            throw ie;

        } catch (ClassCastException e) {
            // If loaded class is not a View subclass
            final InflateException ie = new InflateException(attrs.getPositionDescription()
                    + ": Class is not a View " + (prefix != null ? (prefix + name) : name), e);
            ie.setStackTrace(EMPTY_STACK_TRACE);
            throw ie;
        } catch (ClassNotFoundException e) {
            // If loadClass fails, we should propagate the exception.
            throw e;
        } catch (Exception e) {
            final InflateException ie = new InflateException(
                    attrs.getPositionDescription() + ": Error inflating class "
                            + (clazz == null ? "<unknown>" : clazz.getName()), e);
            ie.setStackTrace(EMPTY_STACK_TRACE);
            throw ie;
        } finally {
            Trace.traceEnd(Trace.TRACE_TAG_VIEW);
        }
    }
6 LayoutInflater.Factory
根据源码分析,我们知道了

要经过 mfactory 和 mfactory2 两个过程尝试初始化一个View, 如果初始化完成,就不会走自己的onCreateView和createView方法了。
if (mFactory2 != null) {
    view = mFactory2.onCreateView(parent, name, viewContext, attrs);
} else if (mFactory != null) {
    view = mFactory.onCreateView(name, viewContext, attrs);
} else {
    view = null;
}

if (view == null && mPrivateFactory != null) {
    view = mPrivateFactory.onCreateView(parent, name, viewContext, attrs);
}

if (view == null) {
    final Object lastContext = mConstructorArgs[0];
    mConstructorArgs[0] = viewContext;
    try {
        if (-1 == name.indexOf('.')) {
            view = onCreateView(parent, name, attrs);
        } else {
            view = createView(name, null, attrs);
        }
    } finally {
        mConstructorArgs[0] = lastContext;
    }
}
所以我们可以尝试来拦截一下控件的生成。
动态的修改文字的颜色。
public class DemoActivity extends Activity {
    @Override
    protected void onCreate(@Nullable Bundle savedInstanceState) {
        super.onCreate(savedInstanceState);
        getLayoutInflater().setFactory(new LayoutInflater.Factory() {
            @Override
            public View onCreateView(String name, Context context, AttributeSet attrs) {
                TextView textView = null;
                if(name.equals("TextView")){
                    int n = attrs.getAttributeCount();
                    //打印所有属性标签
                    for (int i = 0; i < n; i++) {
                        Log.i("hked", attrs.getAttributeName(i) + " , " + attrs.getAttributeValue(i));
                    }
                    try {
                        textView = (TextView) getLayoutInflater().createView(name,"android.widget.",attrs);
                    } catch (ClassNotFoundException e) {
                        e.printStackTrace();
                    }
                    if(textView!=null){
                        textView.setTextColor(Color.YELLOW);
                    }

                }

                return textView;
            }
        });
        setContentView(R.layout.activity_demo);
    }
}
7 Factory 和 Factory2 的区别
public interface Factory {
    public View onCreateView(String name, Context context, AttributeSet attrs);
}
public interface Factory2 extends Factory {
       public View onCreateView(View parent, String name, Context context, AttributeSet attrs);
}
实际上 Factory2 是 Factory 的升级版,在api 11(3.0后)上开始提供的,除了提供控件的名称外,还会提供父控件。3.0 以前建议用 Factory ,3.0以上建议用 Factory2。
8 Layoutflater 在 Activity 和 AppCompatActivity 使用的区别
我们知道 AppCompatActivity 是谷歌提供给我们的兼容版本
public class DemoAppcompatActivity extends AppCompatActivity {
    @Override
    protected void onCreate(@Nullable Bundle savedInstanceState) {
        super.onCreate(savedInstanceState);
        getLayoutInflater().setFactory(new LayoutInflater.Factory() {
            @Override
            public View onCreateView(String name, Context context, AttributeSet attrs) {
                TextView textView = null;
                if(name.equals("TextView")){
                    int n = attrs.getAttributeCount();
                    //打印所有属性标签
                    for (int i = 0; i < n; i++) {
                        Log.i("hked", attrs.getAttributeName(i) + " , " + attrs.getAttributeValue(i));
                    }
                    try {
                        textView = (TextView) getLayoutInflater().createView(name,"android.widget.",attrs);
                    } catch (ClassNotFoundException e) {
                        e.printStackTrace();
                    }
                    if(textView!=null){
                        textView.setTextColor(Color.YELLOW);
                    }

                }

                return textView;
            }
        });
        setContentView(R.layout.activity_demo);
    }
Caused by: java.lang.IllegalStateException: A factory has already been set on this LayoutInflater at android.view.LayoutInflater.setFactory(LayoutInflater.java:295) at com.example.huangkai.skin.DemoAppcompatActivity.onCreate(DemoAppcompatActivity.java:29) at android.app.Activity.performCreate(Activity.java:7224) at android.app.Activity.performCreate(Activity.java:7213) at android.app.Instrumentation.callActivityOnCreate(Instrumentation.java:1272)
我们看到在LayoutInflater 的setFactory 和 setFactory2 方法内部
public void setFactory(Factory factory) {
    if (mFactorySet) {
        throw new IllegalStateException("A factory has already been set on this LayoutInflater");
    }
    if (factory == null) {
        throw new NullPointerException("Given factory can not be null");
    }
    mFactorySet = true;
    if (mFactory == null) {
        mFactory = factory;
    } else {
        mFactory = new FactoryMerger(factory, null, mFactory, mFactory2);
    }
}
public void setFactory2(Factory2 factory) {
    if (mFactorySet) {
        throw new IllegalStateException("A factory has already been set on this LayoutInflater");
    }
    if (factory == null) {
        throw new NullPointerException("Given factory can not be null");
    }
    mFactorySet = true;
    if (mFactory == null) {
        mFactory = mFactory2 = factory;
    } else {
        mFactory = mFactory2 = new FactoryMerger(factory, factory, mFactory, mFactory2);
    }
}
//如果设置过Factory,就会抛出这个错误
if (mFactorySet) { throw new IllegalStateException("A factory has already been set on this LayoutInflater"); }
我们修改一下
public class DemoAppcompatActivity extends AppCompatActivity {
    @Override
    protected void onCreate(@Nullable Bundle savedInstanceState) {
        getLayoutInflater().setFactory(new LayoutInflater.Factory() {
            @Override
            public View onCreateView(String name, Context context, AttributeSet attrs) {
                TextView textView = null;
                if(name.equals("TextView")){
                    int n = attrs.getAttributeCount();
                    //打印所有属性标签
                    for (int i = 0; i < n; i++) {
                        Log.i("hked", attrs.getAttributeName(i) + " , " + attrs.getAttributeValue(i));
                    }
                    try {
                        textView = (TextView) getLayoutInflater().createView(name,"android.widget.",attrs);
                    } catch (ClassNotFoundException e) {
                        e.printStackTrace();
                    }
                    if(textView!=null){
                        textView.setTextColor(Color.YELLOW);
                    }

                }

                return textView;
            }
        });
        super.onCreate(savedInstanceState);

        setContentView(R.layout.activity_demo);
    }
}
在 super 前执行就可以了。为什么?我们看看内部执行
protected void onCreate(@Nullable Bundle savedInstanceState) {
    //代理对象
    AppCompatDelegate delegate = this.getDelegate();
    //初始化Factory
    delegate.installViewFactory();
    //调用onCreate
    delegate.onCreate(savedInstanceState);

    if (delegate.applyDayNight() && this.mThemeId != 0) {
        if (VERSION.SDK_INT >= 23) {
            this.onApplyThemeResource(this.getTheme(), this.mThemeId, false);
        } else {
            this.setTheme(this.mThemeId);
        }
    }

    super.onCreate(savedInstanceState);
}
在 Api 28 和 Api 26 的版本实现有不同的区别
@NonNull
public AppCompatDelegate getDelegate() {
    if (mDelegate == null) {
        mDelegate = AppCompatDelegate.create(this, this);
    }
    return mDelegate;
}
api 26 版本
private static AppCompatDelegate create(Context context, Window window,
        AppCompatCallback callback) {
    if (Build.VERSION.SDK_INT >= 24) {
        return new AppCompatDelegateImplN(context, window, callback);
    } else if (Build.VERSION.SDK_INT >= 23) {
        return new AppCompatDelegateImplV23(context, window, callback);
    } else if (Build.VERSION.SDK_INT >= 14) {
        return new AppCompatDelegateImplV14(context, window, callback);
    } else if (Build.VERSION.SDK_INT >= 11) {
        return new AppCompatDelegateImplV11(context, window, callback);
    } else {
        return new AppCompatDelegateImplV9(context, window, callback);
    }
}
api 28 版本
public static AppCompatDelegate create(Activity activity, AppCompatCallback callback) {
    return new AppCompatDelegateImpl(activity, activity.getWindow(), callback);
}
public void installViewFactory() {
    //获取系统的LayoutInflater
    LayoutInflater layoutInflater = LayoutInflater.from(this.mContext);

    if (layoutInflater.getFactory() == null) {
        //没设置Factory,将AppCompatDelegateImpl设置为Factory2
        LayoutInflaterCompat.setFactory2(layoutInflater, this);
    } else if (!(layoutInflater.getFactory2() instanceof AppCompatDelegateImpl)) {
        Log.i("AppCompatDelegate", "The Activity's LayoutInflater already has a Factory installed so we can not install AppCompat's");
    }

}
Factory2 需要实现的方法如下
public final View onCreateView(View parent, String name, Context context, AttributeSet attrs) {
    return this.createView(parent, name, context, attrs);
}

public View onCreateView(String name, Context context, AttributeSet attrs) {
    return this.onCreateView((View)null, name, context, attrs);
}
public View createView(View parent, String name, @NonNull Context context, @NonNull AttributeSet attrs) {
    if (this.mAppCompatViewInflater == null) {
         TypedArray a = this.mContext.obtainStyledAttributes(styleable.AppCompatTheme);

         //实际Inflator的类名
         String viewInflaterClassName = a.getString(styleable.AppCompatTheme_viewInflaterClass);

        //自定义的Inflator
       if (viewInflaterClassName != null && !AppCompatViewInflater.class.getName().equals(viewInflaterClassName)) {
            try {
                Class viewInflaterClass = Class.forName(viewInflaterClassName);
                this.mAppCompatViewInflater = (AppCompatViewInflater)viewInflaterClass.getDeclaredConstructor().newInstance();
            } catch (Throwable var8) {
                Log.i("AppCompatDelegate", "Failed to instantiate custom view inflater " + viewInflaterClassName + ". Falling back to default.", var8);
                this.mAppCompatViewInflater = new AppCompatViewInflater();
            }
        } else {
         //系统提供的Inflator
            this.mAppCompatViewInflater = new AppCompatViewInflater();
        }
    }

    boolean inheritContext = false;
    if (IS_PRE_LOLLIPOP) {
        inheritContext = attrs instanceof XmlPullParser ? ((XmlPullParser)attrs).getDepth() > 1 : this.shouldInheritContext((ViewParent)parent);
    }

    return this.mAppCompatViewInflater.createView(parent, name, context, attrs, inheritContext, IS_PRE_LOLLIPOP, true, VectorEnabledTintResources.shouldBeUsed());
}
整个流程应该是这样的
LayoutInflater->
factory2(AppCompatDelegateImpl) ->
onCreateView->
(AppCompatDelegateImpl) createView->
(AppCompatViewInflater)mAppCompatViewInflater ->
createView
final View createView(View parent, String name, @NonNull Context context, @NonNull AttributeSet attrs, boolean inheritContext, boolean readAndroidTheme, boolean readAppTheme, boolean wrapContext) {
    Context originalContext = context;
    if (inheritContext && parent != null) {
        context = parent.getContext();
    }

    if (readAndroidTheme || readAppTheme) {
        context = themifyContext(context, attrs, readAndroidTheme, readAppTheme);
    }

    if (wrapContext) {
        context = TintContextWrapper.wrap(context);
    }

    View view = null;
    byte var12 = -1;
    switch(name.hashCode()) {
    case -1946472170:
        if (name.equals("RatingBar")) {
            var12 = 11;
        }
        break;
    case -1455429095:
        if (name.equals("CheckedTextView")) {
            var12 = 8;
        }
        break;
    case -1346021293:
        if (name.equals("MultiAutoCompleteTextView")) {
            var12 = 10;
        }
        break;
    case -938935918:
        if (name.equals("TextView")) {
            var12 = 0;
        }
        break;
    case -937446323:
        if (name.equals("ImageButton")) {
            var12 = 5;
        }
        break;
    case -658531749:
        if (name.equals("SeekBar")) {
            var12 = 12;
        }
        break;
    case -339785223:
        if (name.equals("Spinner")) {
            var12 = 4;
        }
        break;
    case 776382189:
        if (name.equals("RadioButton")) {
            var12 = 7;
        }
        break;
    case 1125864064:
        if (name.equals("ImageView")) {
            var12 = 1;
        }
        break;
    case 1413872058:
        if (name.equals("AutoCompleteTextView")) {
            var12 = 9;
        }
        break;
    case 1601505219:
        if (name.equals("CheckBox")) {
            var12 = 6;
        }
        break;
    case 1666676343:
        if (name.equals("EditText")) {
            var12 = 3;
        }
        break;
    case 2001146706:
        if (name.equals("Button")) {
            var12 = 2;
        }
    }

    switch(var12) {
    case 0:
        view = this.createTextView(context, attrs);
        this.verifyNotNull((View)view, name);
        break;
    case 1:
        view = this.createImageView(context, attrs);
        this.verifyNotNull((View)view, name);
        break;
    case 2:
        view = this.createButton(context, attrs);
        this.verifyNotNull((View)view, name);
        break;
    case 3:
        view = this.createEditText(context, attrs);
        this.verifyNotNull((View)view, name);
        break;
    case 4:
        view = this.createSpinner(context, attrs);
        this.verifyNotNull((View)view, name);
        break;
    case 5:
        view = this.createImageButton(context, attrs);
        this.verifyNotNull((View)view, name);
        break;
    case 6:
        view = this.createCheckBox(context, attrs);
        this.verifyNotNull((View)view, name);
        break;
    case 7:
        view = this.createRadioButton(context, attrs);
        this.verifyNotNull((View)view, name);
        break;
    case 8:
        view = this.createCheckedTextView(context, attrs);
        this.verifyNotNull((View)view, name);
        break;
    case 9:
        view = this.createAutoCompleteTextView(context, attrs);
        this.verifyNotNull((View)view, name);
        break;
    case 10:
        view = this.createMultiAutoCompleteTextView(context, attrs);
        this.verifyNotNull((View)view, name);
        break;
    case 11:
        view = this.createRatingBar(context, attrs);
        this.verifyNotNull((View)view, name);
        break;
    case 12:
        view = this.createSeekBar(context, attrs);
        this.verifyNotNull((View)view, name);
        break;
    default:
        view = this.createView(context, name, attrs);
    }

    if (view == null && originalContext != context) {
        view = this.createViewFromTag(context, name, attrs);
    }

    if (view != null) {
        this.checkOnClickListener((View)view, attrs);
    }

    return (View)view;
}
所以我们知道了AppcompatActivity 默默的帮我们做了控件兼容控件的转化工作。这样有什么好处,我们知道各个版本的设置方法不同。AppCompat包帮我们做了兼容。而且是通过factory方式来进行的
所以在super方法后面再次设置Factory会报错。但是如果设置了Factory又会导致我们没法使用系统的兼容的控件,所以我们需要在后面的换肤中既考虑到换肤的处理,有要兼容系统的控件。
public void installViewFactory() {
    LayoutInflater layoutInflater = LayoutInflater.from(this.mContext);
    if (layoutInflater.getFactory() == null) {
        LayoutInflaterCompat.setFactory2(layoutInflater, this);
    } else if (!(layoutInflater.getFactory2() instanceof AppCompatDelegateImpl)) {
        Log.i("AppCompatDelegate", "The Activity's LayoutInflater already has a Factory installed so we can not install AppCompat's");
    }

}
9 换肤的实现
9.1 换肤的核心
换肤的核心就两个点,第一个点就是获取需要换肤的控件,第二个点就是如何加载其他包的资源
9.2 获取需要换肤的控件
通过使用 Factory2来hook 控件的构造
public class SkinInflaterFactory implements LayoutInflater.Factory2 {

    private Map<View,SkinItem> mSkinMap = new HashMap<>();
    private AppCompatActivity activity;

    public SkinInflaterFactory(AppCompatActivity activity){
        this.activity = activity;
    }

    @Override
    public View onCreateView(View parent, String name, Context context, AttributeSet attrs) {
        boolean isNeedSkin  = attrs.getAttributeBooleanValue(SkinConfig.NAME_SPACE,SkinConfig.SKIN_ATTRS_NAME,false);
        //AppCompatActivity 会将textView 等转成 AppcompatTextView 支持以下控件
        //RatingBar//CheckedTextView//MultiAutoCompleteTextView//TextView//ImageButton     //SeekBar//Spinner//RadioButton//ImageView//AutoCompleteTextView//CheckBox//EditText//Button
        //先看看控件是不是需要转Appcompat
        AppCompatDelegate delegate = activity.getDelegate();
        View view = delegate.createView(parent, name, context, attrs);

        if(isNeedSkin){

            if(view == null){
                view =  ViewProducer.createViewFromTag(context,name,attrs);
            }

            //控件解析失败
            if(view == null){
                return null;
            }

            collectSkinView(context,attrs,view);
        }
        return view;
    }

    @Override
    public View onCreateView(String name, Context context, AttributeSet attrs) {
        return null;
    }

    public void applySkin(){

        //如果当前的页面没有需要更换图片的控件
        if(mSkinMap.isEmpty()){
             return;
        }

        for(View view:mSkinMap.keySet()){
            if(view == null){
              continue;
            }
            if(mSkinMap.get(view)!=null){
                mSkinMap.get(view).apply();
            }
        }


    }


    private  void collectSkinView(Context context,AttributeSet attrs,View view){

        List<SkinAttr> par =  new ArrayList<>();
        for(int i =0;i<attrs.getAttributeCount();i++){
            String attrName = attrs.getAttributeName(i);
            String attrValue = attrs.getAttributeValue(i);
            Log.i("hked","attrName = "+attrName+" attrValue = "+attrValue);
            if(AttrFactory.isSupportAttr(attrName)){
                int id = Integer.parseInt(attrValue.substring(1));
                String entryName = context.getResources().getResourceEntryName(id);
                //typeName,eg:color、drawable
                String typeName = context.getResources().getResourceTypeName(id);

                SkinAttr change = AttrFactory.get(attrName,id,entryName,typeName);
                par.add(change);
            }
        }

        if(par.size()==0){
            return;
        }
        SkinItem item =  new SkinItem(view,par);
        mSkinMap.put(view,item);
        //如果已经是换肤模式了,更换图片
        Log.i("hked","SkinManger.getInstance().isExternalSkin() = "+SkinManger.getInstance().isExternalSkin());
        if(SkinManger.getInstance().isExternalSkin()){
            item.apply();
       }
    }
}
9.3 基类处理
public class SkinBaseActivity extends AppCompatActivity implements ISkinObersver {

    private SkinInflaterFactory factory;

    @Override
    protected void onCreate(@Nullable Bundle savedInstanceState) {

        factory = new SkinInflaterFactory(this);
        LayoutInflaterCompat.setFactory2(getLayoutInflater(),factory);
        super.onCreate(savedInstanceState);
    }

    @Override
    protected void onResume() {
        super.onResume();
        SkinManger.getInstance().attach(this);
    }

    @Override
    protected void onDestroy() {
        super.onDestroy();
        SkinManger.getInstance().detach(this);
    }

    @Override
    public void onSkinChange() {
        factory.applySkin();
    }
}
public class SkinBaseApplication extends Application {

    @Override
    public void onCreate() {
        super.onCreate();
        SkinManger.getInstance().init(this);
    }
}
9.4 换肤管理器
public class SkinManger implements ISkinLoader {

    public String Tag = "skin";
    private static SkinManger instance;
    private boolean isDefalutSkin = false;
    private List<ISkinObersver> obersvers;
    private Context context;
    private String skinPackageName;
    private Resources mResource;

    private SkinManger() {

    }

    public static SkinManger getInstance() {
        if (instance == null) {
            synchronized (SkinManger.class) {
                if (instance == null) {
                    instance = new SkinManger();
                }
            }
        }
        return instance;
    }

    public void init(Context context) {
        this.context = context.getApplicationContext();

        if (SkinConfig.isDefaultSkin(context)) {
            isDefalutSkin = true;
            return;
        }

        //加载图片资源包的resouce
        String path = SkinConfig.getCustomSkinPath(context);
        loadSkin(path,null);
    }

    public void showDefalutSkin(){
        isDefalutSkin = false;
        mResource = context.getResources();
        SkinConfig.saveSkinPath(context, SkinConfig.DEFAULT_SKIN);
        notifySkinUpdate();
    }

    @Override

    public void attach(ISkinObersver obersver) {
        if (obersvers == null) {
            obersvers = new ArrayList<>();
        }
        if (!obersvers.contains(obersver)) {
            obersvers.add(obersver);
        }
    }

    @Override
    public void detach(ISkinObersver obersver) {
        if (obersvers != null && obersvers.contains(obersver)) {
            obersvers.remove(obersver);
        }
    }

    @Override
    public void notifySkinUpdate() {
        if (obersvers != null) {
            for (ISkinObersver obersver : obersvers) {
                obersver.onSkinChange();
            }
        }
    }


    @SuppressLint("StaticFieldLeak")
    public void loadSkin(String skinName, final SkinLoaderListener callBack) {
        new AsyncTask<String, Void, Resources>() {

            @Override
            protected void onPreExecute() {
                super.onPreExecute();
                if (callBack != null) {
                    callBack.onStart();
                }
            }

            @Override
            protected Resources doInBackground(String... strings) {
                int permission = ActivityCompat.checkSelfPermission(context,
                        "android.permission.WRITE_EXTERNAL_STORAGE");
                if (permission != PackageManager.PERMISSION_GRANTED) {
                    return null;
                }
                String fileName = strings[0];
                File file = new File(Environment.getExternalStorageDirectory(), fileName);

                PackageManager packageManager = context.getPackageManager();
                PackageInfo mInfo = packageManager.getPackageArchiveInfo(file.getAbsolutePath(), PackageManager.GET_ACTIVITIES);
                skinPackageName = mInfo.packageName;

                AssetManager assetManager = null;
                try {
                    assetManager = AssetManager.class.newInstance();
                    Method addAssetPath = assetManager.getClass().getMethod("addAssetPath", String.class);
                    addAssetPath.invoke(assetManager, file.getAbsolutePath());


                    Resources superRes = context.getResources();
                    Resources skinResource = ResourcesCompat.getResources(assetManager, superRes.getDisplayMetrics(), superRes.getConfiguration());
                    if (skinResource != null) {
                        SkinConfig.saveSkinPath(context, fileName);
                    }
                    return skinResource;
                } catch (Exception e) {
                    e.printStackTrace();
                }

                return null;
            }

            @Override
            protected void onPostExecute(Resources resources) {
                if (resources != null) {
                    mResource = resources;
                    if (callBack != null) {
                        callBack.onSuccess();
                    }
                    isDefalutSkin = false;
                    notifySkinUpdate();
                } else {
                    if (callBack != null) {
                        callBack.onFailed("资源包加载失败");
                    }
                }
            }
        }.execute(skinName);
    }

    public boolean isExternalSkin() {
        return !isDefalutSkin && mResource != null;
    }


    public int getColor(int id){
       int originColor = ContextCompat.getColor(context, id);
        //如果是默认的皮肤
        if (mResource == null || isDefalutSkin) {
            return originColor;
        }
        //查找资源的名称
        String resName = context.getResources().getResourceEntryName(id);
        //尝试在drawable下找图片
        int trueResId = mResource.getIdentifier(resName, "color", skinPackageName);

        if(trueResId == 0 ){
            return originColor;
        }
        if (android.os.Build.VERSION.SDK_INT < 23) {
            return mResource.getColor(trueResId);
        }else{
            return mResource.getColor(trueResId,null);
        }

    }


    public Drawable getDrawable(int id) {
        Drawable originDrawable = ContextCompat.getDrawable(context, id);
        //如果是默认的皮肤
        if (mResource == null || isDefalutSkin) {
            return originDrawable;
        }

        //查找资源的名称
        String resName = context.getResources().getResourceEntryName(id);
        //尝试在drawable下找图片
        int trueResId = mResource.getIdentifier(resName, "drawable", skinPackageName);
        Drawable trueDrawable;
        if (trueResId == 0) {
            //drawable 下找不到。去mipmap
            trueResId = mResource.getIdentifier(resName, "mipmap", skinPackageName);
        }

        if (trueResId == 0) {
            trueDrawable = originDrawable;
        } else {
            if (android.os.Build.VERSION.SDK_INT < 22) {
                trueDrawable = mResource.getDrawable(trueResId);
            } else {
                trueDrawable = mResource.getDrawable(trueResId, null);
            }
        }
        return trueDrawable;
    }
}
9.5 换肤的详细处理类
public abstract class SkinAttr implements Cloneable{

    protected static final String RES_TYPE_NAME_COLOR = "color";
    protected static final String RES_TYPE_NAME_DRAWABLE = "drawable";
    protected static final String RES_TYPE_NAME_MIPMAP = "mipmap";

    /**
     * 属性名称
     */
    public String attrName;

    /**
     * 换肤的值
     */
    public int attrValueRefId;

    /**
     * 换肤的名称
     */
    public String attrValueName;

    /**
     * 换肤的类型
     */
    public String attrValueTypeName;

    public void apply(View view){
      applySkin(view);
    }

     abstract void applySkin(View view);


    public boolean isDrawable(){
        return  RES_TYPE_NAME_DRAWABLE.equals(attrValueTypeName)|| RES_TYPE_NAME_MIPMAP.equals(attrValueTypeName);
    }

    @Override
    public SkinAttr clone()  {
        SkinAttr o = null;
        try {
            o = (SkinAttr) super.clone();
        } catch (CloneNotSupportedException e) {
            e.printStackTrace();
        }
        return o;
    }
}
背景类型的换肤
public class BackGroudAttr extends SkinAttr {
    @Override
    void applySkin(View view) {
      if(isDrawable()){
         Drawable bg = SkinResUtil.loadDrawable(attrValueRefId);
         view.setBackgroundDrawable(bg);
      }else{
         int color = SkinResUtil.loadColor(attrValueRefId);
          view.setBackgroundColor(color);
      }
    }
}
文字颜色的换肤
public class TextColorAttr extends SkinAttr {

    @Override
    void applySkin(View view) {
        TextView textView = (TextView) view;
        int color = SkinResUtil.loadColor(attrValueRefId);
        textView.setTextColor(color);
    }
}
10 常见的换肤开源框架的研究
目前的主要的换肤的开源框架如下:
1 Android-skin-support
原理:通过LayoutInflater 进行转换,自定义了一系列的换肤控件。
优点:兼容性好,完成度高,支持的格式多。
缺点:代码规模大,引进这个库大概会带来1000多个方法
2 Android-Skin-Loader
原理:通过LayoutInflater 进行查找需要换肤的控件
优点:逻辑简单
缺点:停止维护