

前言
这几天做公司内部的App做的脑壳疼,Service不仅要和当前的App要关联还要在App内部控制Service的内部业务逻辑,Service和Binder的形式就够用了,奈何是个新手,总得上网上学习学习binder怎么用,度娘一搜,可是为啥看见的都是把binder和Service代码放在一起的,用binder的内部几行函数来返回Service实例,眼看Activity都能直接访问Service的内部逻辑了,看的浑身难受,还是算了,还是自己试试binder到底应该怎么用?
用到的工具
| IDE | 语言 | 模拟器版本 |
|---|---|---|
| AS 3.5 | kotlin | Android 10 Api 29 |
Binder的官方解释
Base class for a remotable object, the core part of a lightweight remote procedure call mechanism defined by {@link IBinder}.
一个远程对象的基类,轻量级的核心部分由{@link IBinder}定义的远程过程调用机制。
This class is an implementation of IBinder that provides standard local implementation of such an object.
这个类是IBinder提供的一个实现此类对象的本地实现。
其余的注释很多,总结来说就是:
Binder类继承IBinder类。- 很多开发者会使用
aidl来定制他们想要的接口。 Binder是基本的IPC(进程间通信)单元,不会影响应用的生命周期。应该在最高级的应用组件中使用,比如Service,Activity,ContentProvider。- 必须记住当进程被终止时候的状态。
附上官方解释链接:Binder Class。
正文
网上常看到的Binder和Service的写法这里就不贴出来了,只写下我认为比较好的调用写法。
1.Service内OnBind返回的Binder怎么写?
Service在onBinde()时候返回的Binder:
override fun onBind(p0: Intent?): IBinder? {
        /*
        * attachInterface是可以将接口与Binder联系起来的一个简便方法
        * 定义:attachInterface(@Nullable IInterface owner, @Nullable String descriptor)
        */
        binder.attachInterface(object : MyBinderInterface {
            override fun asBinder(): IBinder {
                return binder
            }

            override fun start(s: String) {
                log("catch string $s")
                //do your work
            }
        }, binderInterfaceDescriptor)
        return binder
}
2.与Binder attach的接口怎么写?
在Service内部初始化Binder时候使用了attachInterface()这个简便方法,在Service时候就可以使用queryLocalInterface()来获得与Binder相关的IInterface。
IInterface是Binder使用interfaces时候的基类,源码中是这样写的:
源码:IInterface.java

/**
 * Base class for Binder interfaces.  When defining a new interface,
 * you must derive it from IInterface.
 */
public interface IInterface
{
    /**
     * Retrieve the Binder object associated with this interface.
     * You must use this instead of a plain cast, so that proxy objects
     * can return the correct result.
     */
    public IBinder asBinder();
}
所以我们与Binder相关联的Interface也应当继承IInterface这个类,测试的代码是这样的:
interface MyBinderInterface: IInterface {
    fun start(s:String)
}
3.开启绑定的Activity的ServiceConnection怎么写?
如果你的Service跑在主进程里面queryLocalInterface方法返回的就与Binder使用attachInterface相联系的接口,就可以直接使用myBinderInterface操作Service了。
private val serviceConnection = object : ServiceConnection {
        override fun onServiceConnected(name: ComponentName, service: IBinder) {
            val myBinderInterface =
                service.queryLocalInterface(MyService.binderInterfaceDescriptor) as MyBinderInterface
            myBinderInterface?.start("hello world")
        }

        /**
         * 注:同一个进程中不会调用此方法
         */
        override fun onServiceDisconnected(name: ComponentName) {
        }
    }
可是如果在AndroidManifest.xml中配置了这个Service的android:process=":reomte"属性,queryLocalInterface这个方法返回的就会是null,这时onServiceConnected中service就会变成BinderProxy,这是个final class并且继承IBinder,该类中queryLocalInterface方法如下:
源码:BinderProxy.java
 /**
  * Retrieve a local interface - always null in case of a proxy
  */
public IInterface queryLocalInterface(String descriptor) {
    return null;
}
这就是为什么Service位于独立进程的时候queryLocalInterface会返回null的原因。那么怎样才可以和Binder进行交互呢?
在IBinder.java中quecryLocalInterface注释如下:
源码:IBinder.java
/**
    * Attempt to retrieve a local implementation of an interface
    * for this Binder object.  If null is returned, you will need
    * to instantiate a proxy class to marshall calls through
    * the transact() method.
    */
public @Nullable IInterface quecryLocalInterface(@NonNull String descriptor);
所以我们要用transact()方法与Binder进行交互了。transact()的定义如下:
源码:IBinder.java
/**
     * Perform a generic operation with the object.
     *
     * @param code The action to perform.  This should
     * be a number between {@link #FIRST_CALL_TRANSACTION} and
     * {@link #LAST_CALL_TRANSACTION}.
     * @param data Marshalled data to send to the target.  Must not be null.
     * If you are not sending any data, you must create an empty Parcel
     * that is given here.
     * 这个参数用来发送数据的
     * @param reply Marshalled data to be received from the target.  May be
     * null if you are not interested in the return value.
     * 这个参数用来接收数据的
     * @param flags Additional operation flags.  Either 0 for a normal
     * RPC, or {@link #FLAG_ONEWAY} for a one-way RPC.
     * 单向发送的话就用FLAG_ONEWAY,即使该方法执行成功了reply这个参数也会为null。
     * 双向的话用0就可以了
     *
     * @return Returns the result from {@link Binder#onTransact}.  A successful call
     * generally returns true; false generally means the transaction code was not
     * understood.
     */
    public boolean transact(int code, @NonNull Parcel data, @Nullable Parcel reply, int flags)
        throws RemoteException;
这里我新建了一个MyProxy类并实现Parcelable接口:
class MyProxy(var action: String?, var result: Boolean): Parcelable {
    constructor(parcel: Parcel) : this(
        parcel.readString(),
        parcel.readByte() != 0.toByte()
    )

    override fun writeToParcel(parcel: Parcel, flags: Int) {
        parcel.writeString(action)
        parcel.writeByte(if (result) 1 else 0)
    }

    override fun describeContents(): Int {
        return 0
    }

    companion object CREATOR : Parcelable.Creator<MyProxy> {
        override fun createFromParcel(parcel: Parcel): MyProxy {
            return MyProxy(parcel)
        }

        override fun newArray(size: Int): Array<MyProxy?> {
            return arrayOfNulls(size)
        }
    }
}
所以在ServiceConnection中的onServiceConnected()就可以这么写:
override fun onServiceConnected(name: ComponentName, service: IBinder) {
            val parcelData: Parcel = Parcel.obtain()
            val parcelResult: Parcel = Parcel.obtain()
            MyProxy("action", false).writeToParcel(parcelData, 0)
            MyProxy("action", true).writeToParcel(parcelResult, 0)
            //change as you logic
            val code = 1001
            //maybe throw RemoteException use try catch
            val proxyResult = service.transact(code, parcelData, parcelResult, 0)
            //you can get this parcelResult data with createFromParcel() like
            //val result = MyProxy.createFromParcel(parcelResult)
            parcelData.recycle()
            parcelResult.recycle()
    }
如果你想的够仔细的话,transact方法工作在两个进程之间,不会有延时吗?在IBinder.java的开头有一段注释:
源码:IBinder.java
/* <p>The key IBinder API is {@link #transact transact()} matched by
 * {@link Binder#onTransact Binder.onTransact()}.  These
 * methods allow you to send a call to an IBinder object and receive a
 * call coming in to a Binder object, respectively.  This transaction API
 * is synchronous, such that a call to {@link #transact transact()} does not
 * return until the target has returned from
 * {@link Binder#onTransact Binder.onTransact()}; this is the
 * expected behavior when calling an object that exists in the local
 * process, and the underlying inter-process communication (IPC) mechanism
 * ensures that these same semantics apply when going across processes.
 */
很明确的说明transact()是个同步方法,它的返回会等到Binder.onTransact()方法返回,这里就可以体现出来Kotlin的优势了,使用以下代码来替代上述的同步代码:
var result: MyProxy= MyProxy("example",false)

GlobalScope.launch {
    //你可以将下列代码抽出为suspend修饰的函数
    withContext(Dispatchers.IO) {
        val parcelData: Parcel = Parcel.obtain()
        val parcelResult: Parcel = Parcel.obtain()
        result.writeToParcel(parcelData, 0)
        MyProxy("action", true).writeToParcel(parcelResult, 0)
        //change as you logic
        val code = 1001
        //maybe throw RemoteException use try catch
        val proxyResult = service.transact(code, parcelData, parcelResult, 0)
        //这个就是返回的结果
        result = MyProxy.createFromParcel(parcelResult)
    }
}
4.Binder怎么写?
当然在Service运行在主进程的的时候,Binder类空置即可:
class MyBinder : Binder() {
}
如果Service运行在单独进程的时候要怎么办?在上面我们知道transact方法会由Binder.onTransact()方法处理并且返回,所以我们重写这个方法:
class MyBinder : Binder() {
    override fun onTransact(code: Int, data: Parcel, reply: Parcel?, flags: Int): Boolean {
        //这里直接简单写了返回的类,你可以根据code做判断,code是transat()方法传入的
        MyProxy("reply", true).writeToParcel(reply, 0)
        //用 quecryLocalInterface 这个方法可以获取到接口,就能控制Service了
        //return super.onTransact(code, data, reply, flags)
        //base your logic
        return true
    }
}
5.上面的示例代码结果
Service运行在主进程中结果就不贴了,只贴下运行在单独进程中的截图:
下图是绑定并开始服务的时候,并向Service使用transact方法传递参数,Activity中的Log日志
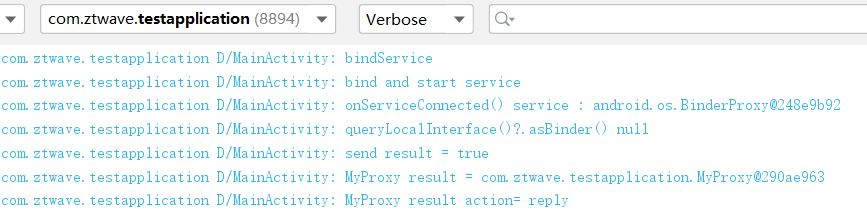
Service和Binder在上述情况下的Log日志
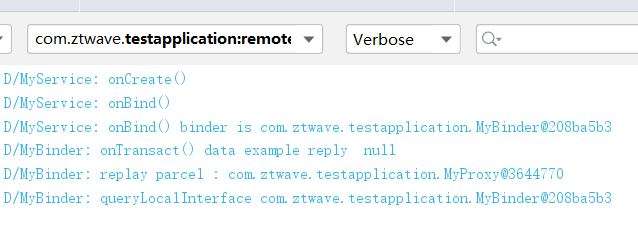
Binder的日志在Service的进程日志中打了出来,是因为我在Service中的OnBinde时返回的Binder是自己在Service中实例化的。
总结
- 上述的写法在使用
Service为单独进程时候非常好用,但很麻烦 - 相比自定义
AIDL这个方法没啥难度 - 附上
Android Developers中对Service一篇详解:链接
这文章断断续续写了两周了,网上啥都没有,主要还是靠自己一点点查证、调试,如果有错误的话,麻烦一定要告诉啊,我还是个Android萌新。谢谢读完我的文章!
