

在日常开发中,我经常使用LayoutInflater将一个xml布局初始化为一个View对象,但是对它内部原理的了解却是少之又少。今天,我们就来看看LayoutInflater。
本文主要内容:
LayoutInflater创建流程。我们通过Activity或者LayoutInflater的from方法来创建一个对象,我们去看看这俩方法有啥区别。- View 创建流程。主要介绍
LayoutInflater将一个xml解析成为一个View经历的过程。setContentView方法解析。分析了View的创建流程,我们再来看看是怎么初始化Activity的ContentView。
本文参考文章:
1. LayoutInflater的创建流程
熟悉LayoutInflater的同学应该都知道,创建LayoutInflater对象有两种方式:
- 通过
Activity的getLayoutInflater方法。- 通过
LayoutInflater的from方法。
可是这俩方法有啥区别呢?这是本节需要解答的地方。
(1).Context结构图
不过在此之前,我们先来了解Context的继承类图。
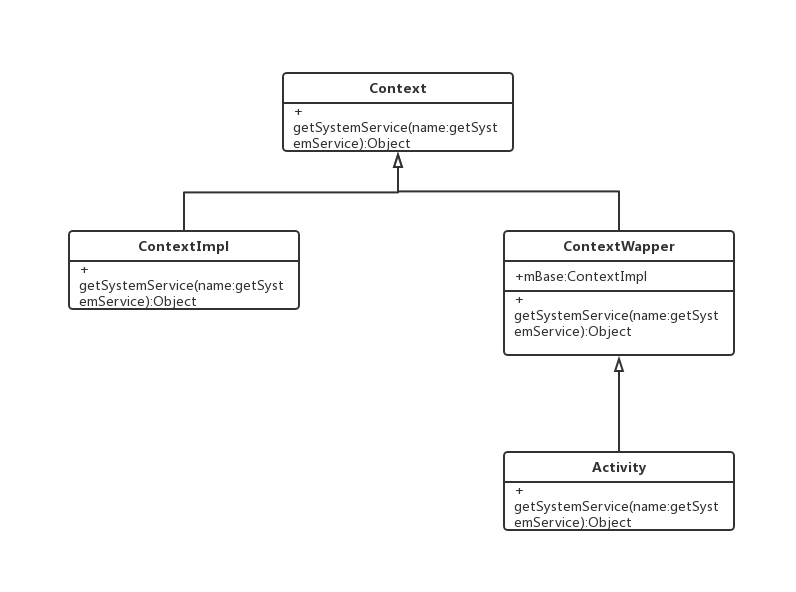
可能有人会问,我们分析LayoutInflater,为什么还要去了解Context的结构呢?这是因为LayoutInflater本身就是系统的一个服务,是通过Context的getSystemService方法来获取的。
根据源码我们知道,所有的系统服务都是在SystemServiceRegistry类里面进行注册,然后统一在ContextImpl进行获取,当然也包括LayoutInflater。
(2). 两种方法的区别
我们通过Activity的getLayoutInflater方法获取的实际上是Window里面的LayoutInflater对象,而Window的LayoutInflater对象是在构造方法里面初始初始化的:
    public PhoneWindow(Context context) {
        super(context);
        mLayoutInflater = LayoutInflater.from(context);
    }
此时这个Context就是Activity的对象。所以从本质上来看,Activity的getLayoutInflater方法和LayoutInflater的from方法没有很大的区别,唯一区别的在于这个Context对象的不同。我们来看一看from方法:
    public static LayoutInflater from(Context context) {
        LayoutInflater LayoutInflater =
                (LayoutInflater) context.getSystemService(Context.LAYOUT_INFLATER_SERVICE);
        if (LayoutInflater == null) {
            throw new AssertionError("LayoutInflater not found.");
        }
        return LayoutInflater;
    }
在from方法里面调用的是Context的getSystemService方法,现在我们必须得了解整个Context的继承体系。
假设这里的Context是Activity,那么这里调用的就是Context的getSystemService方法
    @Override
    public Object getSystemService(String name) {
        return mBase.getSystemService(name);
    }
那这里的mBase又是什么呢?从上面的类图我们知道是ContextImpl的对象,怎么来证明呢?
    private Activity performLaunchActivity(ActivityClientRecord r, Intent customIntent) {
        // ······
        // 1. 创建ContextImpl的对象
        ContextImpl appContext = createBaseContextForActivity(r);
        // ······
        // 2. 调用Activity的attach方法
                activity.attach(appContext, this, getInstrumentation(), r.token,
                        r.ident, app, r.intent, r.activityInfo, title, r.parent,
                        r.embeddedID, r.lastNonConfigurationInstances, config,
                        r.referrer, r.voiceInteractor, window, r.configCallback);
        // ······
    }
    //---------------Activity--------------------------
    final void attach(Context context, ActivityThread aThread,
            Instrumentation instr, IBinder token, int ident,
            Application application, Intent intent, ActivityInfo info,
            CharSequence title, Activity parent, String id,
            NonConfigurationInstances lastNonConfigurationInstances,
            Configuration config, String referrer, IVoiceInteractor voiceInteractor,
            Window window, ActivityConfigCallback activityConfigCallback) {
         // 将ContextImpl传递给父类
        attachBaseContext(context);
        // ·······
    }
    //---------------ContextWapper---------------------
    protected void attachBaseContext(Context base) {
        if (mBase != null) {
            throw new IllegalStateException("Base context already set");
        }
        mBase = base;
    }
整个调用链非常的清晰,分别是:ActivityThread#performLaunchActivity -> Activity#attach -> ContextWapper#attachBaseContext。
然后,我们再去看看ContextImpl的getSystemService方法:
    @Override
    public Object getSystemService(String name) {
        return SystemServiceRegistry.getSystemService(this, name);
    }
最终的对象是从SystemServiceRegistry里面获取的。
2. View的创建流程
LayoutInflater是通过inflate方法将一个xml布局解析成为一个View。我们都知道inflate方法通常有三个参数,分别是:resource、root、attachToRoot,表示的含义如下:
- resource:xml布局的id。
- root:解析成之后的View的父View,此参数只在
attachToRoot为true才生效。- attachToRoot:决定解析出来的View是否添加到
root上。
有人可能会好奇,为什么需要第三个参数,这是因为我们将xml解析成View不一定立即需要添加到一个ViewGroup中去,这是为什么呢?想一想RecyclerView,RecyclerView在初始化ItemView时,不是立即将ItemView添加进去,而是当ItemView 进入屏幕可见区域时才会添加,因为RecyclerView有预加载机制,会加载一部分屏幕外的ItemView。
我们先看一下inflate方法:
    public View inflate(XmlPullParser parser, @Nullable ViewGroup root, boolean attachToRoot) {
        synchronized (mConstructorArgs) {
            try {
                // ······
                // 1. 如果是merge标签,直接绕过merge标签,
                // 解析merge标签下面的View。
                if (TAG_MERGE.equals(name)) {
                    // ······
                    rInflate(parser, root, inflaterContext, attrs, false);
                } else {
                    // 2.创建View
                    final View temp = createViewFromTag(root, name, inflaterContext, attrs);
                    // ······
                    // 3.递归解析children
                    rInflateChildren(parser, temp, attrs, true);
                    if (root != null && attachToRoot) {
                        root.addView(temp, params);
                    }
                    if (root == null || !attachToRoot) {
                        result = temp;
                    }
                }
            } catch (XmlPullParserException e) {
                final InflateException ie = new InflateException(e.getMessage(), e);
                ie.setStackTrace(EMPTY_STACK_TRACE);
                throw ie;
            } catch (Exception e) {
                final InflateException ie = new InflateException(parser.getPositionDescription()
                        + ": " + e.getMessage(), e);
                ie.setStackTrace(EMPTY_STACK_TRACE);
                throw ie;
            }
            return result;
        }
    }
inflate方法里面一种做了2件事:
- 如果根View是merge,直接递归解析它的子View。
- 如果根View不是merge,先解析根View,然后在递归解析它所有的child。
我们分为两步来看,先看一下解析根标签。
(1). 根View的解析
根View的解析与child的解析不一样,是通过createViewFromTag方法来完成的:
    View createViewFromTag(View parent, String name, Context context, AttributeSet attrs,
            boolean ignoreThemeAttr) {
            // ······
            View view;
            // 1. 如果mFactory2不为空,优先让mFactory2处理
            if (mFactory2 != null) {
                view = mFactory2.onCreateView(parent, name, context, attrs);
            } else if (mFactory != null) {
                view = mFactory.onCreateView(name, context, attrs);
            } else {
                view = null;
            }
            // 2. 如果上面解析为空,再使用mPrivateFactory常识这解析
            if (view == null && mPrivateFactory != null) {
                view = mPrivateFactory.onCreateView(parent, name, context, attrs);
            }

            if (view == null) {
                final Object lastContext = mConstructorArgs[0];
                mConstructorArgs[0] = context;
                try {
                    // 如果是系统widget包下的控件
                    if (-1 == name.indexOf('.')) {
                        view = onCreateView(parent, name, attrs);
                    } else { // 如果是第三方包或者自定义的控件
                        view = createView(name, null, attrs);
                    }
                } finally {
                    mConstructorArgs[0] = lastContext;
                }
            }
            return view;
             // ······
    }
inflate方法里面主要做了三件事:
- 首先使用
mFactory2和mFactory来尝试着创建View对象。mFactory2和mFactory二者有且只能有一个有值,所以只需要调用其中一个就行了。- 如果第一步中的两个工厂都无法创建View对象,再尝试着使用
mPrivateFactory对象创建。不过通常来说,这个对象都是为空的。- 最后一步就是走兜底逻辑。这里的兜底有一点的特殊:如果View是
widget的控件,会先在前面加一个android.wiget.的前缀,再行创建View;其次,如果是其他包下的控件,比如说,androidX和自定义的控件,就直接创建View对象。
关于第一点,我还想介绍一下,Google爸爸之所以要设计两个工厂类,主要有3个方面的考虑:
- 兼容性,后面发布的版本可以兼容之前的版本,比如说,
AppCompatActivity是新推出来的组件,所以在新版本上使用的mFactory2,旧版本就走原来的原来逻辑,也就是默认的onCreateView方法。- 扩展性,如果开发者需要自定义一种全局的样式或者手动创建解析View,可以直接给
LayoutInflayer设置Factory,用来达到自己的目的。- 提升性能,这一点可以从可以从
AppCompatActivity里面看出。AppCompatActivity的内部给LayoutInflayer设置了一个Factory2,也就是AppCompatDelegateImpl对象。AppCompatDelegateImpl在解析xml时,会先判断当前View是否基础控件,比如说,Button、TextView或者ImageView等,如果是的话,可以通过new 的方式创建对应的AppCompatXXX对象。之所以说它提升性能,是因为它在解析基础控件时,不再通过反射,而是通过new的方式创建的。
上面的第三点可能有点复杂,我们可以直接看一下AppCompatDelegateImpl的createView方法。由于createView内部调用了AppCompatViewInflater的createView方法,所以这里我们直接看AppCompatViewInflater的createView方法:
    final View createView(View parent, final String name, @NonNull Context context,
            @NonNull AttributeSet attrs, boolean inheritContext,
            boolean readAndroidTheme, boolean readAppTheme, boolean wrapContext) {
        final Context originalContext = context;
        // ······
        switch (name) {
            case "TextView":
                view = createTextView(context, attrs);
                verifyNotNull(view, name);
                break;
            case "ImageView":
                view = createImageView(context, attrs);
                verifyNotNull(view, name);
                break;
            case "Button":
                view = createButton(context, attrs);
                verifyNotNull(view, name);
                break;
            case "EditText":
                view = createEditText(context, attrs);
                verifyNotNull(view, name);
                break;
            case "Spinner":
                view = createSpinner(context, attrs);
                verifyNotNull(view, name);
                break;
            case "ImageButton":
                view = createImageButton(context, attrs);
                verifyNotNull(view, name);
                break;
            case "CheckBox":
                view = createCheckBox(context, attrs);
                verifyNotNull(view, name);
                break;
            case "RadioButton":
                view = createRadioButton(context, attrs);
                verifyNotNull(view, name);
                break;
            case "CheckedTextView":
                view = createCheckedTextView(context, attrs);
                verifyNotNull(view, name);
                break;
            case "AutoCompleteTextView":
                view = createAutoCompleteTextView(context, attrs);
                verifyNotNull(view, name);
                break;
            case "MultiAutoCompleteTextView":
                view = createMultiAutoCompleteTextView(context, attrs);
                verifyNotNull(view, name);
                break;
            case "RatingBar":
                view = createRatingBar(context, attrs);
                verifyNotNull(view, name);
                break;
            case "SeekBar":
                view = createSeekBar(context, attrs);
                verifyNotNull(view, name);
                break;
            default:
                view = createView(context, name, attrs);
        }
        // ······
        return view;
    }
在默认的情况下,创建View对象的真正操作在createView方法里面,我们可以来看看:
    public final View createView(String name, String prefix, AttributeSet attrs)
            throws ClassNotFoundException, InflateException {
            // ······
            // 如果缓存中没有View的构造方法对象,
            // 那么就创建一个,并且放入缓存中去。
            if (constructor == null) {
                clazz = mContext.getClassLoader().loadClass(
                        prefix != null ? (prefix + name) : name).asSubclass(View.class);

                if (mFilter != null && clazz != null) {
                    boolean allowed = mFilter.onLoadClass(clazz);
                    if (!allowed) {
                        failNotAllowed(name, prefix, attrs);
                    }
                }
                constructor = clazz.getConstructor(mConstructorSignature);
                constructor.setAccessible(true);
                sConstructorMap.put(name, constructor);
            } else {
                if (mFilter != null) {
                    Boolean allowedState = mFilterMap.get(name);
                    if (allowedState == null) {
                        // New class -- remember whether it is allowed
                        clazz = mContext.getClassLoader().loadClass(
                                prefix != null ? (prefix + name) : name).asSubclass(View.class);

                        boolean allowed = clazz != null && mFilter.onLoadClass(clazz);
                        mFilterMap.put(name, allowed);
                        if (!allowed) {
                            failNotAllowed(name, prefix, attrs);
                        }
                    } else if (allowedState.equals(Boolean.FALSE)) {
                        failNotAllowed(name, prefix, attrs);
                    }
                }
            }

            Object lastContext = mConstructorArgs[0];
            if (mConstructorArgs[0] == null) {
                mConstructorArgs[0] = mContext;
            }
            Object[] args = mConstructorArgs;
            args[1] = attrs;

            final View view = constructor.newInstance(args);
            if (view instanceof ViewStub) {
                final ViewStub viewStub = (ViewStub) view;
                viewStub.setLayoutInflater(cloneInContext((Context) args[0]));
            }
            mConstructorArgs[0] = lastContext;
            return view;
            // ······
    }
从这里,我们就可以知道,LayoutInflater创建View的本质就是Java反射,所以在我们日常开发过程中,尽量不要套太深的布局,毕竟反射的性能是有目共睹的。
(2). children的解析
children的解析实际上是在rInflate方法里面进行的,我们直接来看源码:
    void rInflate(XmlPullParser parser, View parent, Context context,
            AttributeSet attrs, boolean finishInflate) throws XmlPullParserException, IOException {
        // ······
        while (((type = parser.next()) != XmlPullParser.END_TAG ||
                parser.getDepth() > depth) && type != XmlPullParser.END_DOCUMENT) {
            if (type != XmlPullParser.START_TAG) {
                continue;
            }
            final String name = parser.getName();
            // requestFocus标签
            if (TAG_REQUEST_FOCUS.equals(name)) {
                pendingRequestFocus = true;
                consumeChildElements(parser);
            } else if (TAG_TAG.equals(name)) { // tag标签
                parseViewTag(parser, parent, attrs);
            } else if (TAG_INCLUDE.equals(name)) { // include标签
                if (parser.getDepth() == 0) {
                    throw new InflateException("<include /> cannot be the root element");
                }
                parseInclude(parser, context, parent, attrs);
            } else if (TAG_MERGE.equals(name)) { // merge标签
                throw new InflateException("<merge /> must be the root element");
            } else { // 正常View或者ViewGroup
                final View view = createViewFromTag(parent, name, context, attrs);
                final ViewGroup viewGroup = (ViewGroup) parent;
                final ViewGroup.LayoutParams params = viewGroup.generateLayoutParams(attrs);
                rInflateChildren(parser, view, attrs, true);
                viewGroup.addView(view, params);
            }
        }
        // ······
    }
children的遍历就像是一个树的遍历,就是一种广搜的思想,这里就不过多的讨论了。
3. AppCompatActivity的setContentView方法解析
说完了上面的原理,最后我们在来看看AppCompatActivity的setContentView方法。在LayoutInflater方面,AppCompatActivity相比于Activity,给LayoutInflater设置了一个Factory2,也就是上面讨论的东西。
这里我们不再讨论之前谈论过的东西,而是看一个有趣的东西,我也不知道Google爸爸是怎么想的。
AppCompatActivity的onCreate方法内部会给LayoutInflater设置一个Factory2对象,整个调用链是:AppCompatActivity#onCreate -> AppCompatDelegateImpl#installViewFactory -> LayoutInflaterCompat#setFactory2 -> LayoutInflaterCompat#forceSetFactory2。我们直接来看setFactory2方法:
    private static void forceSetFactory2(LayoutInflater inflater, LayoutInflater.Factory2 factory) {
        if (!sCheckedField) {
            try {
                sLayoutInflaterFactory2Field = LayoutInflater.class.getDeclaredField("mFactory2");
                sLayoutInflaterFactory2Field.setAccessible(true);
            } catch (NoSuchFieldException e) {
                Log.e(TAG, "forceSetFactory2 Could not find field 'mFactory2' on class "
                        + LayoutInflater.class.getName()
                        + "; inflation may have unexpected results.", e);
            }
            sCheckedField = true;
        }
        if (sLayoutInflaterFactory2Field != null) {
            try {
                sLayoutInflaterFactory2Field.set(inflater, factory);
            } catch (IllegalAccessException e) {
                Log.e(TAG, "forceSetFactory2 could not set the Factory2 on LayoutInflater "
                        + inflater + "; inflation may have unexpected results.", e);
            }
        }
    }
看到这个神奇操作没?万万没想到Google是通过反射的方式来给mFactory2方法。爸爸为啥要这样做呢?我猜测是setFactory2方法的坑,我们来看看:
    public void setFactory2(Factory2 factory) {
        if (mFactorySet) {
            throw new IllegalStateException("A factory has already been set on this LayoutInflater");
        }
        if (factory == null) {
            throw new NullPointerException("Given factory can not be null");
        }
        mFactorySet = true;
        if (mFactory == null) {
            mFactory = mFactory2 = factory;
        } else {
            mFactory = mFactory2 = new FactoryMerger(factory, factory, mFactory, mFactory2);
        }
    }
只要Factory被设置过,不论是Factory还是Factory2,都不允许被再次设置。所以,我猜测是,爸爸为了成功给mFactory2设置上值,通过反射来绕开这种限制,这也是在是无奈。
设置了Factory2工厂类之后,就是调用setContentView方法来给Activity设置ContentView。我们这里直接来看一下AppCompatDelegateImpl的setContentView方法:
    @Override
    public void setContentView(int resId) {
        ensureSubDecor();
        ViewGroup contentParent = (ViewGroup) mSubDecor.findViewById(android.R.id.content);
        contentParent.removeAllViews();
        LayoutInflater.from(mContext).inflate(resId, contentParent);
        mOriginalWindowCallback.onContentChanged();
    }
从这里我们可以看出来,contentView是通过LayoutInflater加载出来的。具体的细节就不再讨论了,上面已经详细的分析过了。
4. 总结
到此为止,本文算是为止。总的来说,本文还是简单的(隐约的感觉到,本文有点水),在这里,我们对本文的内容做一个简单的总结。
Activity的getLayoutInflater方法和LayoutInflater在本质没有任何的区别,最终都会调用到ContextImpl的getSystemService方法里面去。LayoutInflater初始化View分为三步:1.调用mFactory2或者mFactory方法来解析xml;2. 通过mPrivateFactory来解析xml;3. 通过onCreateView或者createView方法来解析xml。除了在AppCompatDelegateImpl在解析基础控件时使用的是new方式,其余几乎都是反射方式来创建View,所以在布局中尽可能的少写View或者尽量不要书写层次很深的布局。
