

本文转载自:微信公众号 方凳雅集
写在前面的话
setState是React很重要的模块, 社区中也有很多分析文章,大多强调setState是异步更新,但有些文章分析又说某些情况下是同步更新,那到底是同步还是异步呢,这篇文章还是基于15.x进行的分析,16.x的分析等后面用机会再分享。
我们看一下React官网对setState的说明:
官网也没说setState到底是同步还是异步,只是说React不保证setState之后能够立即拿到改变后的结果。
Demo
// demo.js
class Demo extends PureComponent {
  state={
    count: 0,
  }
  componentDidMount() {
    console.log('pre state', this.state.count);
    this.setState({
      count: this.state.count + 1
    });
    console.log('next state', this.state.count);

    //测试setTimeout
    setTimeout(() => {
      console.log('setTimeout pre state', this.state.count);
      this.setState({
        count: this.state.count + 1
      });
      console.log('setTimeout next state', this.state.count);
    }, 0);
  }

  onClick = (event) => {
    // 测试合成函数中setState
    console.log(`${event.type} pre state`, this.state.count);
    this.setState({
      count: this.state.count + 1
    });
    console.log(`${event.type} next state`, this.state.count);
  }

  render() {
    return <button onClick={this.onClick}>count+1</button>
  }
}
这里有三种方法调用setState:
- 在componentDidMount中直接调用setState;
- 在componentDidMount的setTimeout方法里调用setState;
- 在dom中绑定onClick(React的合成函数:抹平不同浏览器和端的差异)直接调用setState;

从控制台打印出来的结果看,方法1和3直接调用setState是异步的,而方法2中setTimeout调用setState证明了同步,到底为什么呢?这两种调用方式有什么区别嘛?接下来我们从源码进行分析。
源码分析
setState入口函数
//ReactComponent.js
ReactComponent.prototype.setState = function (partialState, callback) {
  !(typeof partialState === 'object' || typeof partialState === 'function' || partialState == null) ? "development" !== 'production' ? invariant(false, 'setState(...): takes an object of state variables to update or a ' + 'function which returns an object of state variables.') : invariant(false) : undefined;
  if ("development" !== 'production') {
    "development" !== 'production' ? warning(partialState != null, 'setState(...): You passed an undefined or null state object; ' + 'instead, use forceUpdate().') : undefined;
  }

  this.updater.enqueueSetState(this, partialState);
  if (callback) {
    this.updater.enqueueCallback(this, callback);
  }
};

//ReactUpdateQueue.js
enqueueSetState: function(publicInstance, partialState) {
  // 根据 this.setState 中的 this 拿到内部实例, 也就是组件实例
  var internalInstance = getInternalInstanceReadyForUpdate(
    publicInstance,
    'setState'
  );

  if (!internalInstance) {
    return;
  }

  //取得组件实例的_pendingStateQueue
  var queue =
    internalInstance._pendingStateQueue ||
    (internalInstance._pendingStateQueue = []);
  //将partial state存到_pendingStateQueue
  queue.push(partialState);
  //唤起enqueueUpdate
  enqueueUpdate(internalInstance);
};
...

function enqueueUpdate(internalInstance) {
  ReactUpdates.enqueueUpdate(internalInstance);
}
在setState函数中调用enqueueSetState, 拿到内部组件实例, 然后把要更新的partial state存到其_pendingStateQueue中,至此,setState调用方法执行结束,接下来是setState调用之后的动作。
调用 setState 后发生了什么?
setState调用之后执行方法enqueueUpdate
//ReactUpdates.js
function enqueueUpdate(component) {
  //注入默认策略,开启ReactReconcileTransaction事务
  ensureInjected();

  // 如果没有开启batch(或当前batch已结束)就开启一次batch再执行, 这通常发生在异步回调中调用 setState
  //batchingStrategy:批量更新策略,通过事务的方式实现state的批量更新
  if (!batchingStrategy.isBatchingUpdates) {
    batchingStrategy.batchedUpdates(enqueueUpdate, component);
    return;
  }
  // 如果batch已经开启,则将该组件保存在 dirtyComponents 中存储更新
  dirtyComponents.push(component);
}
上面demo对setState三次调用结果之所以不同,应该是这里的判断逻辑导致的:
- 1和3的调用走的是isBatchingUpdates === true分支,没有执行更新操作;
- 2的setTimeout走的是isBatchingUpdates === false分支,执行更新;
isBatchingUpdates是事务batchingStrategy的一个标记,如果为true,把当前调用setState的组件放入dirtyComponents数组中,做存储处理,不会立即更新,如果为false,将enqueueUpdate作为参数传入batchedUpdates方法中,在batchedUpdates中执行更新操作。
可是事务batchingStrategy到底是做什么的呢?batchedUpdates又做了什么处理?我们看一下它的源码
//ReactDefaultBatchingStrategy.js
var transaction = new ReactDefaultBatchingStrategyTransaction();// 实例化事务

var ReactDefaultBatchingStrategy = {
  isBatchingUpdates: false,

  batchedUpdates: function(callback, a, b, c, d, e) {
    var alreadyBatchingUpdates = ReactDefaultBatchingStrategy.isBatchingUpdates;
    // 开启一次batch
    ReactDefaultBatchingStrategy.isBatchingUpdates = true;

    if (alreadyBatchingUpdates) {
      callback(a, b, c, d, e);
    } else {
      // 启动事务, 将callback放进事务里执行
      transaction.perform(callback, null, a, b, c, d, e);
    }
  },
};
//说明:这里使用到了事务transaction,简单来说,transaction就是将需要执行的方法使用 wrapper 封装起来,
//再通过事务提供的 perform 方法执行。而在 perform 之前,先执行所有 wrapper 中的 initialize 方法,
//执行完 perform 之后(即执行method 方法后)再执行所有的 close 方法。
//一组 initialize 及 close 方法称为一个 wrapper。事务支持多个 wrapper 叠加,嵌套,
//如果当前事务中引入了另一个事务B,则会在事务B完成之后再回到当前事务中执行close方法。(上面涉及到了事务,事务的具体分析有兴趣可以看文章最后)
ReactDefaultBatchingStrategy就是一个批量更新策略事务, isBatchingUpdates默认是false,而batchedUpdates方法被调用时才会将属性isBatchingUpdates设置为true,表明目前处于批量更新流中;可是上面demo中1和3执行到判断逻辑之前源码分析中没见到有batchedUpdates方法调用,那batchedUpdates什么时候被调用的呢?
全局搜索React中调用batchedUpdates的地方很多,分析后发现与更新流程相关的只有两个地方:
// ReactMount.js
  _renderNewRootComponent: function(nextElement,container,shouldReuseMarkup,context) {
    ...
    // 实例化组件
    var componentInstance = instantiateReactComponent(nextElement, null);
    //初始渲染是同步的,但在渲染期间发生的任何更新,在componentWillMount或componentDidMount中,将根据当前的批处理策略进行批处理
    ReactUpdates.batchedUpdates(
      batchedMountComponentIntoNode,
      componentInstance,
      container,
      shouldReuseMarkup,
      context
    );
   ...
  },
// ReactEventListener.js
dispatchEvent: function (topLevelType, nativeEvent) {
    ...
    try {
      // 处理事件
      ReactUpdates.batchedUpdates(handleTopLevelImpl, bookKeeping);
    } finally {
      TopLevelCallbackBookKeeping.release(bookKeeping);
    }
}- 第一种情况,是在首次渲染组件时调用batchedUpdates,开启一次batch。因为组件在渲染的过程中, 会依顺序调用各种生命周期函数, 开发者很可能在生命周期函数中(如componentWillMount或者componentDidMount)调用setState. 因此, 开启一次batch就是要存储更新(放入dirtyComponents), 然后在事务结束时批量更新. 这样以来, 在初始渲染流程中, 任何setState都会生效, 用户看到的始终是最新的状态
- 第二种情况,如果在组件上绑定了事件,在绑定事件中很有可能触发setState,所以为了存储更新(dirtyComponents),需要开启批量更新策略。在回调函数被调用之前, React事件系统中的dispatchEvent函数负责事件的分发, 在dispatchEvent中启动了事务, 开启了一次batch, 随后调用了回调函数. 这样一来, 在事件的监听函数中调用的setState就会生效.
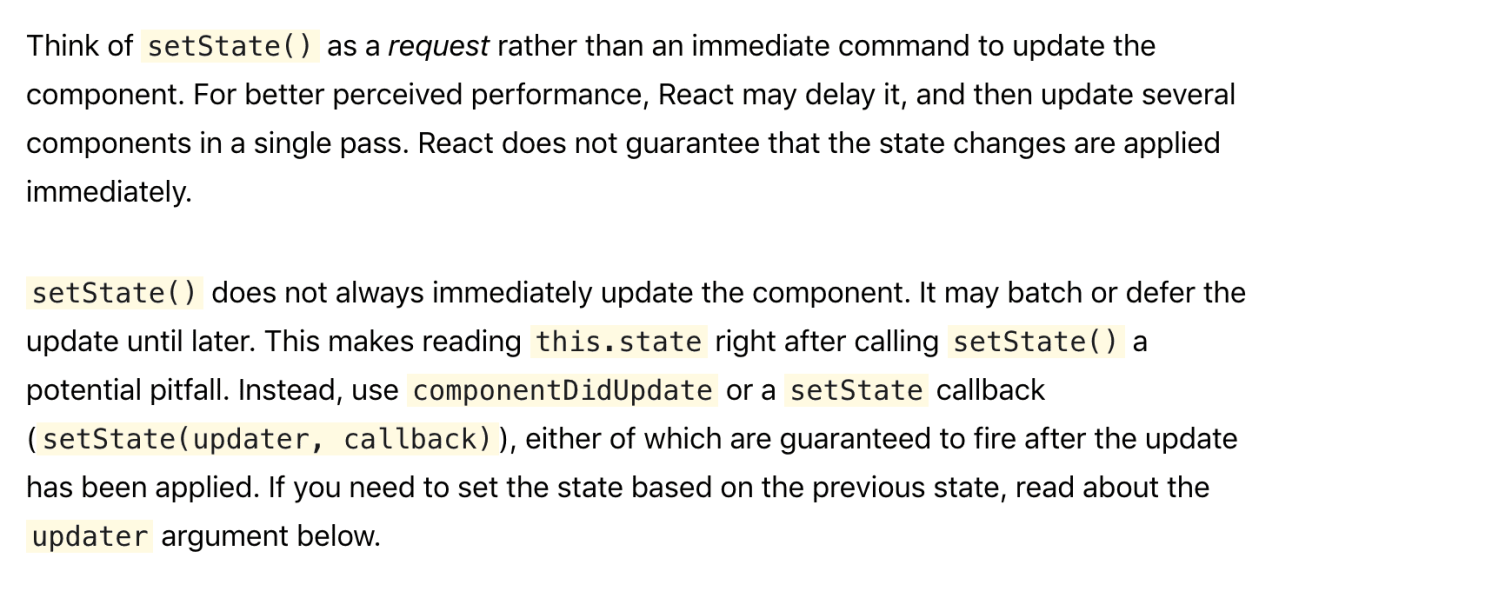
这里借用《深入REACT技术栈》文章里的一个在componentDidMount中setState的调用栈图例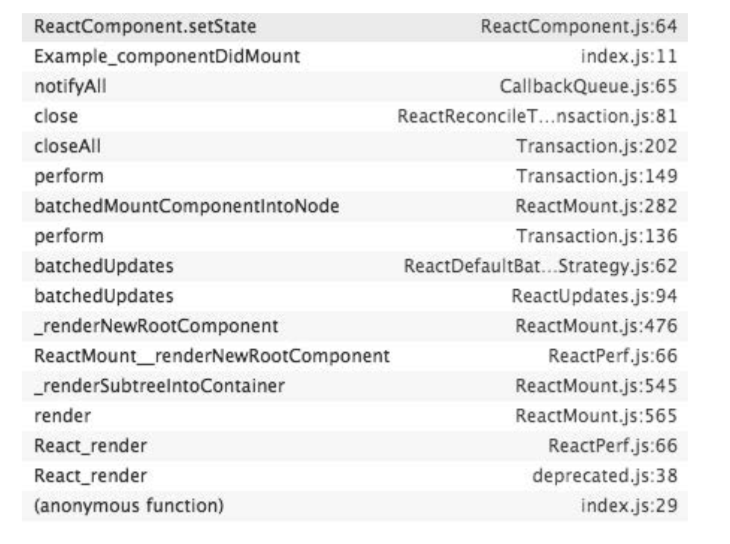
图例中表明,ReactDefaultBatchingStrategy.batchedUpdates在ReactMount.
renderNewRootComponent函数,调用batchedUpdates将isBatchingUpdates设置为了true,所以componentDidMount的执行都是在一个大的事务ReactDefaultBatchingStrategyTransaction中。
这就解释了在componentDidMount中调用setState并不会立即更新state,因为正处于一个这个大的事务中,isBatchingUpdates此时为true,所以只会放入dirtyComponents中等待稍后更新。
state什么时候批量更新呢?
追踪代码后我画了一个组件初次渲染和setState后简单的事务启动和执行的顺序:
从上面的图中可以看到,ReactDefaultBatchingStrategy就是一个批量更新策略事务,控制了批量策略的生命周期。看一下ReactDefaultBatchingStrategy源码分析一下事务中执行了什么:
// ReactDefaultBatchingStrategy.js
var RESET_BATCHED_UPDATES = {
  initialize: emptyFunction,
  close: function() {
    ReactDefaultBatchingStrategy.isBatchingUpdates = false;
  },
};

var FLUSH_BATCHED_UPDATES = {
  initialize: emptyFunction,
  close: ReactUpdates.flushBatchedUpdates.bind(ReactUpdates),
};

var TRANSACTION_WRAPPERS = [FLUSH_BATCHED_UPDATES, RESET_BATCHED_UPDATES];- 在事务的close阶段执行了flushBatchedUpdates函数,flushBatchedUpdates执行完之后再将ReactDefaultBatchingStrategy.isBatchingUpdates重置为false,表示这次batch更新结束。
- flushBatchedUpdates函数启动ReactUpdatesFlushTransaction事务,这个事务开启了批量更新,执行runBatchedUpdates对dirtyComponents循环处理。
怎么批量更新的呢?
批量更新flushBatchedUpdates中,看一下源码
// ReactUpdates.js
var flushBatchedUpdates = function() {
  // 开启批量更新
  while (dirtyComponents.length || asapEnqueued) {
    if (dirtyComponents.length) {
      var transaction = ReactUpdatesFlushTransaction.getPooled();
      transaction.perform(runBatchedUpdates, null, transaction);
      ReactUpdatesFlushTransaction.release(transaction);
    }
    // 批量处理callback
    if (asapEnqueued) {
      asapEnqueued = false;
      var queue = asapCallbackQueue;
      asapCallbackQueue = CallbackQueue.getPooled();
      queue.notifyAll();
      CallbackQueue.release(queue);
    }
  }
};
flushBatchedUpdates开启事务ReactUpdatesFlushTransaction, 执行runBatchedUpdates,
// ReactUpdates.js
function runBatchedUpdates(transaction) {
  var len = transaction.dirtyComponentsLength;
  // 排序保证父组件优于子组件更新
  dirtyComponents.sort(mountOrderComparator);
  // 遍历dirtyComponents
  for (var i = 0; i < len; i++) {
    var component = dirtyComponents[i];
    var callbacks = component._pendingCallbacks;
    component._pendingCallbacks = null;
    // 执行更新操作
    ReactReconciler.performUpdateIfNecessary(
      component,
      transaction.reconcileTransaction
    );
    // 存储callbacks
    if (callbacks) {
      for (var j = 0; j < callbacks.length; j++) {
        transaction.callbackQueue.enqueue(
          callbacks[j],
          component.getPublicInstance()
        );
      }
    }
  }
}接下来就是ReactReconciler调用组件实例的performUpdateIfNecessary方法,这里只分析ReacrCompositeComponent实例,如果接收了props,就会调用receiveComponent方法,在该方法里调用updateComponent方法;如果有新的要更新的状态(_pendingStateQueue不为空)也会直接调用updateComponent来更新
// ReactCompositeComponent.js
performUpdateIfNecessary: function(transaction) {
if (this._pendingElement != null) {
ReactReconciler.receiveComponent(
this,
this._pendingElement || this._currentElement,
transaction,
this._context
);
}
// 待更新state队列不为空或者_pendingForceUpdate为true
if (this._pendingStateQueue !== null || this._pendingForceUpdate) {
this.updateComponent(
transaction,
this._currentElement,
this._currentElement,
this._context,
this._context
);
}
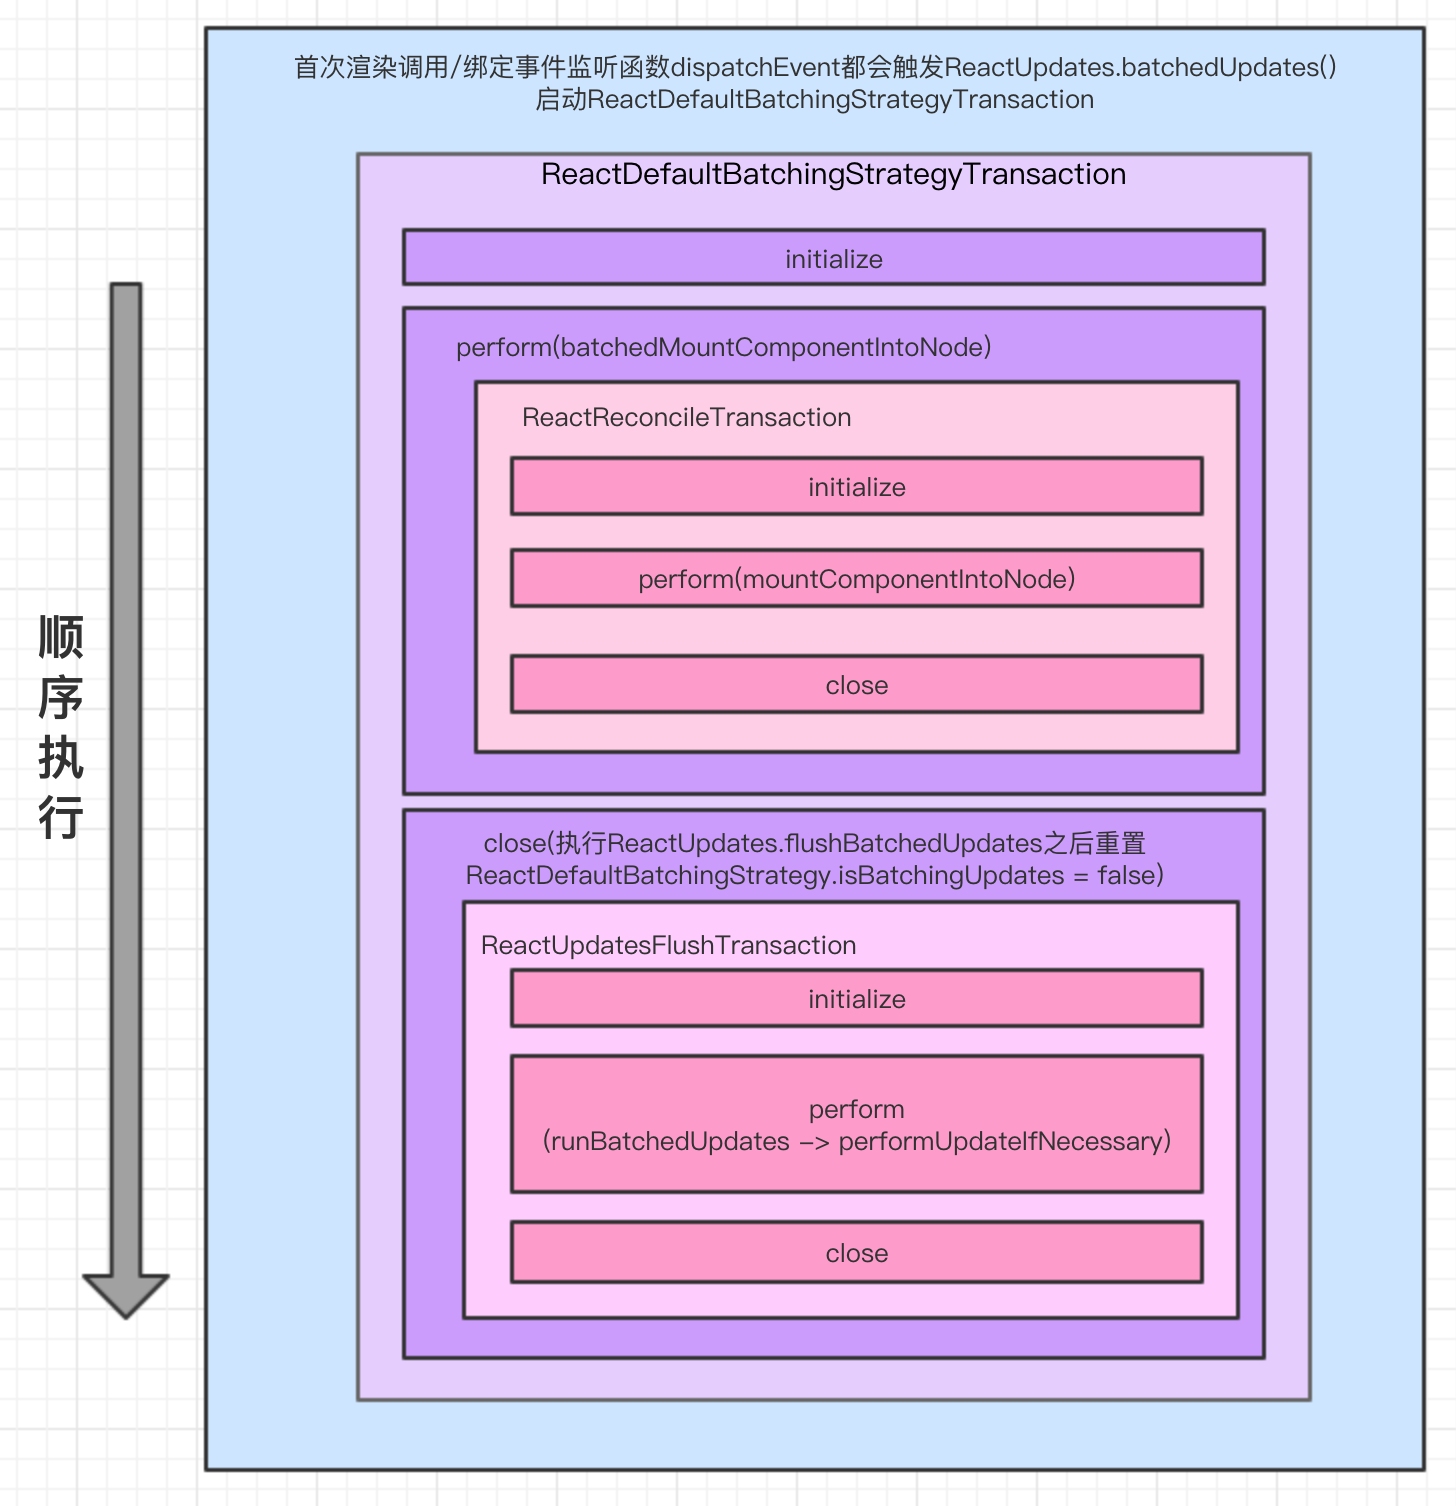
},调用组件实例中的updateComponent,这块代码是组件更新机制的核心,负责管理生命周期中的componentWillReceiveProps、shouldComponentUpdate、componentWillUpdate、render 和 componentDidUpdate;
这段代码比较多,集中在ReactCompositeComponent.js文件中,
如果不想看源码可以直接看后面的代码流程图
//ReactCompositeComponent.js
updateComponent: function(
    transaction,
    prevParentElement,
    nextParentElement,
    prevUnmaskedContext,
    nextUnmaskedContext
  ) {
    var inst = this._instance;

    var nextContext = this._context === nextUnmaskedContext ?
      inst.context :
      this._processContext(nextUnmaskedContext);
    var nextProps;

    // Distinguish between a props update versus a simple state update
    if (prevParentElement === nextParentElement) {
      // Skip checking prop types again -- we don't read inst.props to avoid
      // warning for DOM component props in this upgrade
      nextProps = nextParentElement.props;
    } else {
      nextProps = this._processProps(nextParentElement.props);
      // 如果有接收新的props,执行componentWillReceiveProps 方法,
      if (inst.componentWillReceiveProps) {
        inst.componentWillReceiveProps(nextProps, nextContext);
      }
    }
    // 合并props
    var nextState = this._processPendingState(nextProps, nextContext);
    // 执行shouldComponentUpdate判断是否需要更新
    var shouldUpdate =
      this._pendingForceUpdate ||
      !inst.shouldComponentUpdate ||
      inst.shouldComponentUpdate(nextProps, nextState, nextContext);
    ...
    // 如果需要更新执行_performComponentUpdate,否则只将当前的props和state保存下来,不做更新
    if (shouldUpdate) {
      this._pendingForceUpdate = false;
      // Will set `this.props`, `this.state` and `this.context`.
      this._performComponentUpdate(
        nextParentElement,
        nextProps,
        nextState,
        nextContext,
        transaction,
        nextUnmaskedContext
      );
    } else {
      this._currentElement = nextParentElement;
      this._context = nextUnmaskedContext;
      inst.props = nextProps;
      inst.state = nextState;
      inst.context = nextContext;
    }
  },
  ...
  // 执行componentWillUpdate
  _performComponentUpdate: function(
    nextElement,
    nextProps,
    nextState,
    nextContext,
    transaction,
    unmaskedContext
  ) {
    var inst = this._instance;

    var hasComponentDidUpdate = Boolean(inst.componentDidUpdate);
    var prevProps;
    var prevState;
    var prevContext;
    if (hasComponentDidUpdate) {
      prevProps = inst.props;
      prevState = inst.state;
      prevContext = inst.context;
    }

    if (inst.componentWillUpdate) {
      inst.componentWillUpdate(nextProps, nextState, nextContext);
    }

    this._currentElement = nextElement;
    this._context = unmaskedContext;
    inst.props = nextProps;
    inst.state = nextState;
    inst.context = nextContext;

    this._updateRenderedComponent(transaction, unmaskedContext);

    if (hasComponentDidUpdate) {
      transaction.getReactMountReady().enqueue(
        inst.componentDidUpdate.bind(inst, prevProps, prevState, prevContext),
        inst
      );
    }
  }
// 执行unmountComponent,_instantiateReactComponent, mountComponent、render
_updateRenderedComponent: function(transaction, context) {
    var prevComponentInstance = this._renderedComponent;
    var prevRenderedElement = prevComponentInstance._currentElement;
    var nextRenderedElement = this._renderValidatedComponent();
    // 如果prevRenderedElement, nextRenderedElement相等只执行receiveComponent
    if (shouldUpdateReactComponent(prevRenderedElement, nextRenderedElement)) {
      ReactReconciler.receiveComponent(
        prevComponentInstance,
        nextRenderedElement,
        transaction,
        this._processChildContext(context)
      );
    } else {
      // prevRenderedElement, nextRenderedElement不相等,则执行旧组件的unmountComponent
      var oldNativeNode = ReactReconciler.getNativeNode(prevComponentInstance);
      ReactReconciler.unmountComponent(prevComponentInstance);
      this._renderedNodeType = ReactNodeTypes.getType(nextRenderedElement);
      // 组件实例化_instantiateReactComponent
      this._renderedComponent = this._instantiateReactComponent(
        nextRenderedElement
      );
      // 组件挂载
      var nextMarkup = ReactReconciler.mountComponent(
        this._renderedComponent,
        transaction,
        this._nativeParent,
        this._nativeContainerInfo,
        this._processChildContext(context)
      );
      // 新组件替换旧组件
      this._replaceNodeWithMarkup(oldNativeNode, nextMarkup);
    }
  },
updateComponent流程图
demo扩展
上面分析了一个很经典的demo,下面看一下原生事件和async事件中setState调用后的表现。
绑定原生事件,调用setState
class Button extends PureComponent {
  state={
    count: 0,
    val: 0
  }
  componentDidMount() {
    // 测试原生方法:手动绑定mousedown事件
    console.log('mousedown pre state', this.state.count);
    ReactDOM.findDOMNode(this).addEventListener(
      "mousedown",
      this.onClick.bind(this)
    );
    console.log('mousedown pre state', this.state.count);
  }

 onClick(event) {
    console.log(`${event.type} pre state`, this.state.count);
    this.setState({
      count: this.state.count + 1
    });
    console.log(`${event.type} next state`, this.state.count);
  }

  render() {
    return <button onClick={this.onClick.bind(this)}>count+1</button>
  }
}
控制台

async函数和sleep函数
class Button extends PureComponent {
  state={
    count: 0,
    val: 0
  }
  async componentDidMount() {
    // 测试async函数中setState
    for(let i = 0; i < 1; i++){
      console.log('sleep pre state', this.state.count);
      await sleep(0);
      this.setState({
        count: this.state.count + 1
      });
      console.log('sleep next state', this.state.count);
    }
  }

  asyncClick = () => {
    this.setState({
      count: this.state.count + 1
    });
  }

  async onClick(event) {
    const type = event.type;
    console.log(`${type} pre state`, this.state.count);
    await this.asyncClick();
    console.log(`${type} next state`, this.state.count);
  }

  render() {
    return <button onClick={this.onClick.bind(this)}>count+1</button>
  }
}
控制台

结论
- setState在生命周期函数和合成函数中都是异步更新。
- setState在steTimeout、原生事件和async函数中都是同步更新。
每次更新不代表都会触发render,如果render内容与newState有关联,则会触发,否则即便setState多次也不会render - 如果newState内容与render有依赖关系,就不建议同步更新,因为每次render都会完整的执行一次批量更新流程(只是dirtyComponets长度为1,stateQueue也只有该组件的newState),调用一次diff算法,这样会影响React性能。
- 如果没有必须同步渲染的理由,不建议使用同步,会影响react渲染性能
总结
React整个更新机制处处包含着事务,总的来说,组件的更新机制依靠事务进行批量更新;
- 一次batch(批量)的生命周期就是从ReactDefaultBatchingStrategy事务perform之前(调用ReactUpdates.batchUpdates)到这个事务的最后一个close方法调用后结束;
- 事务启动后, 遇到 setState 则将 partial state 存到组件实例的_pendingStateQueue上, 然后将这个组件存到dirtyComponents 数组中, 等到 ReactDefaultBatchingStrategy事务结束时调用runBatchedUpdates批量更新所有组件;
- 组件的更新是递归的, 三种不同类型的组件都有自己的updateComponent方法来决定自己的组件如何更新, 其中 ReactDOMComponent 会采用diff算法对比子元素中最小的变化, 再批量处理.
- 生命周期函数和合成函数中调用setState表现异步更新,是因为组件初始化和调用合成函数时都会触发ReactDefaultBatchingStrategy事务的batchUpdates方法,将批量更新标记设置为true,所以后面的setState都会存储到dirtyComponents中,执行批量更新之后再将标志设置为false;
- setTimeout、原生事件和async函数中调用setState表现同步更新,是因为遇到这些函数时不会触发
ReactDefaultBatchingStrategy事务的batchUpdates方法,所以批量更新标记依旧时false,所以表现为同步。
补充:transaction事务介绍
React 的事务机制比较简单,包括三个阶段,initialize、perform和close,并且事务之间支持叠加。
事务提供了一个 mixin 方法供其他模块实现自己需要的事务。而要使用事务的模块,除了需要把 mixin 混入自己的事务实现中外,还要额外实现一个抽象的 getTransactionWrappers 接口。这个接口用来获取所有需要封装的前置方法(initialize)和收尾方法(close),
因此它需要返回一个数组的对象,每个对象分别有 key 为 initialize 和 close 的方法。
这里看一个《深入React技术栈》文章中的例子就比较好理解了
var Transaction = require('./Transaction');
// 我们自己定义的事务
var MyTransaction = function() {
// ... };
Object.assign(MyTransaction.prototype, Transaction.Mixin, { getTransactionWrappers: function() {
  return [{
    initialize: function() {
    console.log('before method perform'); },
    close: function() {
    console.log('after method perform');
    }
  }];
 };
});
var transaction = new MyTransaction(); var testMethod = function() {
console.log('test'); }
transaction.perform(testMethod);

// 打印的结果如下:
// before method perform // test
// after method perform