

作为一个程序员,没事的时候就去瞅一瞅源码还是挺有意思的。
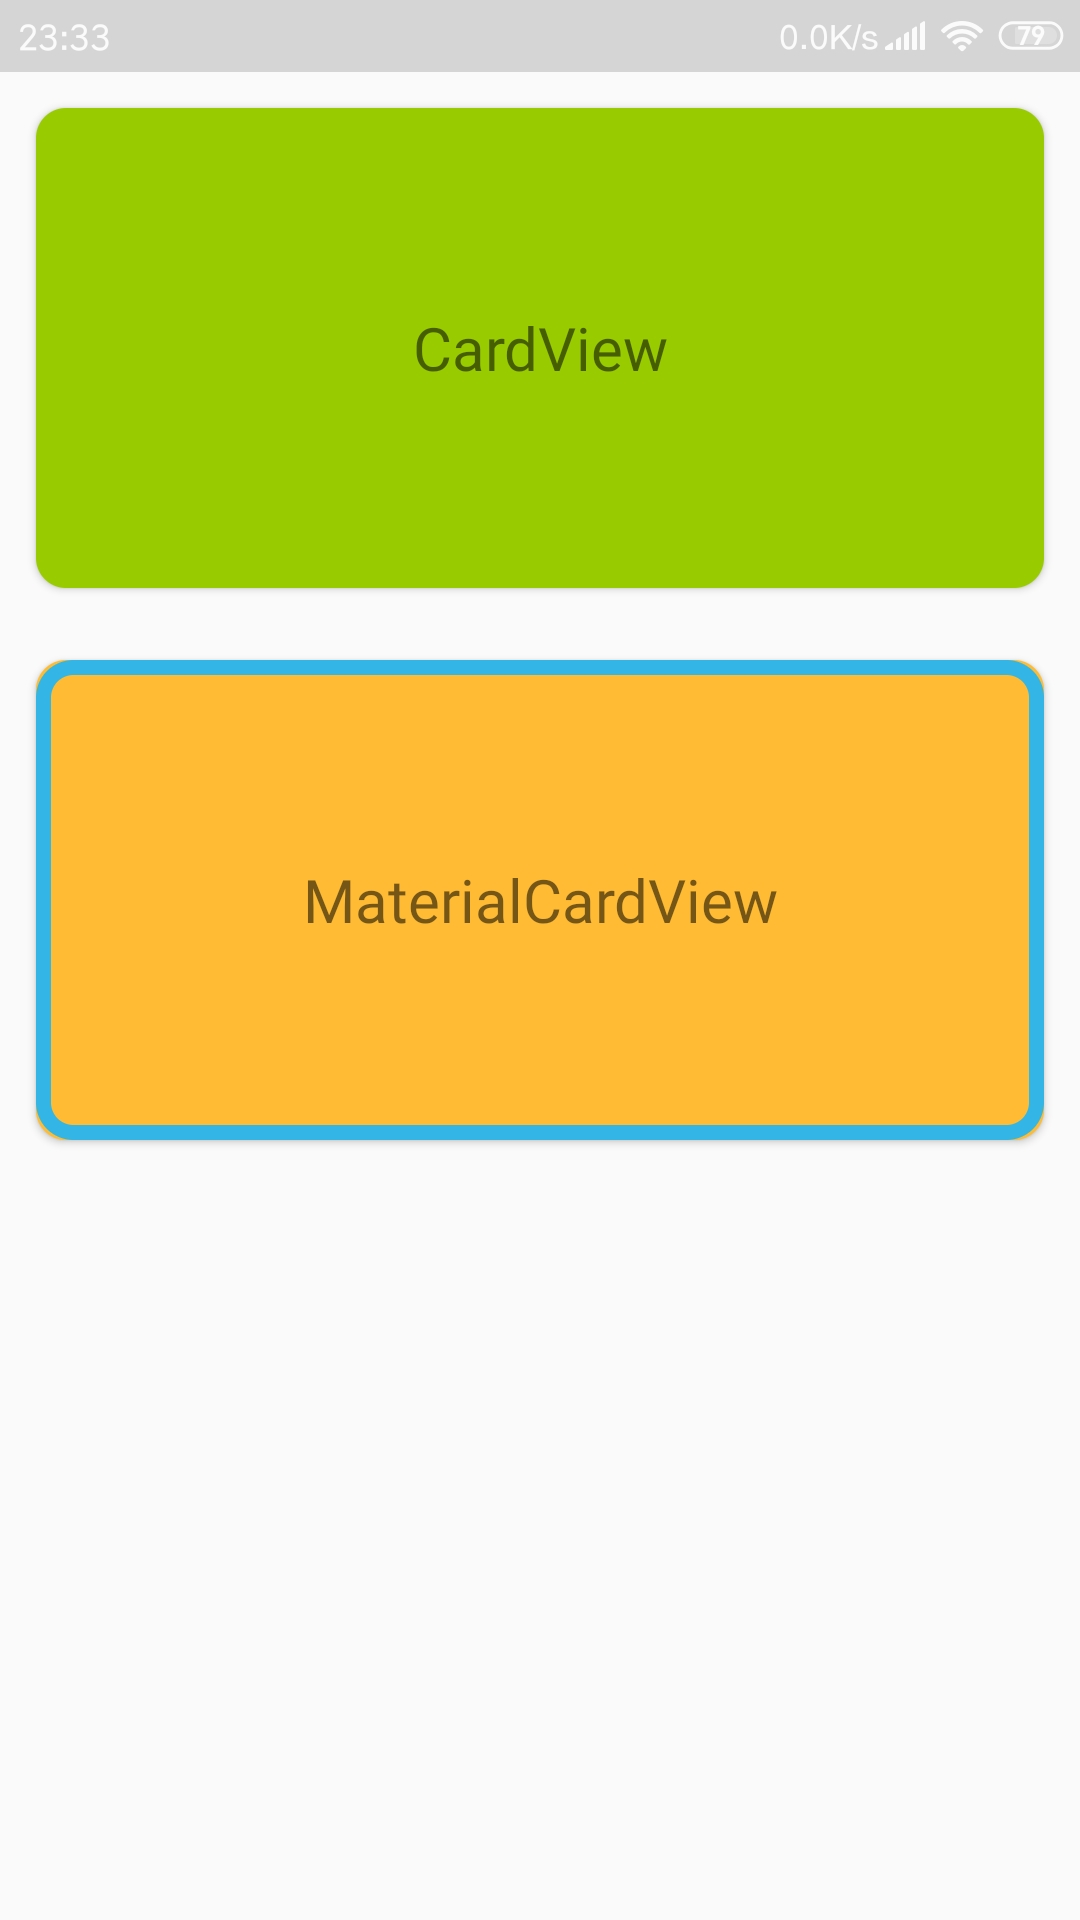
在进入源码之前,先来看张 CardView 和 MaterialCardView 的对比图。
<?xml version="1.0" encoding="utf-8"?>
<LinearLayout xmlns:android="http://schemas.android.com/apk/res/android"
    xmlns:app="http://schemas.android.com/apk/res-auto"
    xmlns:tools="http://schemas.android.com/tools"
    android:layout_width="match_parent"
    android:layout_height="match_parent"
    android:orientation="vertical"
    tools:context=".main.CardTestActivity">

    <androidx.cardview.widget.CardView
        android:layout_width="match_parent"
        android:layout_height="160dp"
        android:layout_margin="12dp"
        app:cardBackgroundColor="@android:color/holo_green_light"
        app:cardCornerRadius="10dp"/>

    <com.google.android.material.card.MaterialCardView
        android:layout_width="match_parent"
        android:layout_height="160dp"
        android:layout_margin="12dp"
        app:cardBackgroundColor="@android:color/holo_orange_light"
        app:cardCornerRadius="10dp"
        app:strokeColor="@android:color/holo_blue_light"
        app:strokeWidth="5dp"/>

</LinearLayout>
MaterialCardView 实际上是 CardView 的拓展,它继承与 CardView,所以 CardView 具备的它都具备,除此之外,它还在 CardView 的基础上增加了可以绘制边框这一特性 (划重点:MaterialCardView 可以绘制边框),因此相对于 CardView,它就多出了 strokeColor 和 strokeWidth 这两个属性,抛开这两个属性,你完全可以把它当成一个 CardView 来使用,但我不推荐这么来使用,因为没必要。
MaterialCardView 的源码其实很简单(若需要看完整源码的请移步最后面),主要需要关注的是有三个参数的构造方法:
    public MaterialCardView(Context context, AttributeSet attrs, int defStyleAttr) {
        super(context, attrs, defStyleAttr);
        TypedArray attributes = ThemeEnforcement.obtainStyledAttributes(context, attrs, styleable.MaterialCardView, defStyleAttr, style.Widget_MaterialComponents_CardView, new int[0]);
        this.cardViewHelper = new MaterialCardViewHelper(this);
        //读取 strokeColor 和 strokeWidth 属性的值,并绘制边框、调整 ContentPadding
        this.cardViewHelper.loadFromAttributes(attributes);
        attributes.recycle();
    }
这里实例化一个 MaterialCardViewHelper 对象,然后通过该对象调用 loadFromAttributes(TypedArray attributes) 方法来读取 strokeColor 和 strokeWidth 属性的值,并绘制边框、调整 ContentPadding。
    /**
     * From MaterialCardViewHelper.class
     * 读取 strokeColor 和 strokeWidth 属性的值,并绘制边框、调整 ContentPadding
     * @param attributes
     */
    public void loadFromAttributes(TypedArray attributes) {
        //读取 strokeColor 和 strokeWidth 属性的值
        this.strokeColor = attributes.getColor(styleable.MaterialCardView_strokeColor, -1);
        this.strokeWidth = attributes.getDimensionPixelSize(styleable.MaterialCardView_strokeWidth, 0);
        //绘制边框
        this.updateForeground();
        //调整 ContentPadding
        this.adjustContentPadding();
    }
绘制边框 通过 updateForeground() 方法,该方法中其实是通过 View 的 setForeground(Drawable foreground) 方法设置一下前景图像,而这个边框图像是通过 createForegroundDrawable() 方法创建的。
    /**
     * From MaterialCardViewHelper.class
     * 绘制边框(该边框是绘制在前景图像上的)
     */
    void updateForeground() {
        this.materialCardView.setForeground(this.createForegroundDrawable());
    }

    /**
     * From MaterialCardViewHelper.class
     * 创建一个指定角半径、宽度和颜色的边框 Drawable
     * @return
     */
    private Drawable createForegroundDrawable() {
        GradientDrawable fgDrawable = new GradientDrawable();
        fgDrawable.setCornerRadius(this.materialCardView.getRadius());
        if (this.strokeColor != -1) {
            fgDrawable.setStroke(this.strokeWidth, this.strokeColor);
        }
        return fgDrawable;
    }
最后因为绘制了边框,所以需要对 MaterialCardView 内部放置内容的空间进行调整,它是通过 adjustContentPadding() 方法来完成的,其实就是四周在 ContentPadding 的基础上加上边框宽度作为新的 ContentPadding。
    /**
     * From MaterialCardViewHelper.class
     * 调整 ContentPadding(四周在 ContentPadding 的基础上加上边框宽度)
     */
    private void adjustContentPadding() {
        int contentPaddingLeft = this.materialCardView.getContentPaddingLeft() + this.strokeWidth;
        int contentPaddingTop = this.materialCardView.getContentPaddingTop() + this.strokeWidth;
        int contentPaddingRight = this.materialCardView.getContentPaddingRight() + this.strokeWidth;
        int contentPaddingBottom = this.materialCardView.getContentPaddingBottom() + this.strokeWidth;
        this.materialCardView.setContentPadding(contentPaddingLeft, contentPaddingTop, contentPaddingRight, contentPaddingBottom);
    }
特别提醒:
- 对于 MaterialCardView,如果你使用了 app:cardUseCompatPadding="true",然后边框宽度设置得比较小,你会发现看不到这个边框(它并不是不存在,只是看不到而已,你可以增大边框宽度,但怎么感觉上效果没有想象中那么好呢,所以最好还是把这个 cardUseCompatPadding 去掉吧!!!)。
- 因为 MaterialCardView 的边框是绘制在前景图像上的,所以 android:foreground 就没什么用了,当然,在代码中 MaterialCardView 的 setForeground(Drawable foreground) 还是可以用的,只是会把边框给覆盖掉。
MaterialCardView 源码:
public class MaterialCardView extends CardView {

    /**
     * MaterialCardViewHelper 是 MaterialCardView 的一个辅助类,绘制边框的所有操作都在它里面进行
     */
    private final MaterialCardViewHelper cardViewHelper;

    public MaterialCardView(Context context) {
        this(context, (AttributeSet)null);
    }

    public MaterialCardView(Context context, AttributeSet attrs) {
        this(context, attrs, attr.materialCardViewStyle);
    }

    public MaterialCardView(Context context, AttributeSet attrs, int defStyleAttr) {
        super(context, attrs, defStyleAttr);
        TypedArray attributes = ThemeEnforcement.obtainStyledAttributes(context, attrs, styleable.MaterialCardView, defStyleAttr, style.Widget_MaterialComponents_CardView, new int[0]);
        this.cardViewHelper = new MaterialCardViewHelper(this);
        //读取 strokeColor 和 strokeWidth 属性的值,并绘制边框、调整 ContentPadding
        this.cardViewHelper.loadFromAttributes(attributes);
        attributes.recycle();
    }

    /**
     * 设置边框颜色
     * @param strokeColor
     */
    public void setStrokeColor(@ColorInt int strokeColor) {
        this.cardViewHelper.setStrokeColor(strokeColor);
    }

    /**
     * 获取边框颜色
     * @return
     */
    @ColorInt
    public int getStrokeColor() {
        return this.cardViewHelper.getStrokeColor();
    }

    /**
     * 设置边框宽度
     * @param strokeWidth
     */
    public void setStrokeWidth(@Dimension int strokeWidth) {
        this.cardViewHelper.setStrokeWidth(strokeWidth);
    }

    /**
     * 获取边框宽度
     * @return
     */
    @Dimension
    public int getStrokeWidth() {
        return this.cardViewHelper.getStrokeWidth();
    }

    /**
     * 设置角半径
     * @param radius
     */
    public void setRadius(float radius) {
        super.setRadius(radius);
        //设置角半径时,更新一下边框
        this.cardViewHelper.updateForeground();
    }
}
MaterialCardViewHelper 源码:
@RestrictTo({Scope.LIBRARY_GROUP})
class MaterialCardViewHelper {
    private static final int DEFAULT_STROKE_VALUE = -1;
    //MaterialCardView 对象,由实例化 MaterialCardViewHelper 时通过它的构造方法传入
    private final MaterialCardView materialCardView;
    private int strokeColor;
    private int strokeWidth;

    public MaterialCardViewHelper(MaterialCardView card) {
        this.materialCardView = card;
    }

    /**
     * 读取 strokeColor 和 strokeWidth 属性的值,并绘制边框、调整 ContentPadding
     * @param attributes
     */
    public void loadFromAttributes(TypedArray attributes) {
        //读取 strokeColor 和 strokeWidth 属性的值
        this.strokeColor = attributes.getColor(styleable.MaterialCardView_strokeColor, -1);
        this.strokeWidth = attributes.getDimensionPixelSize(styleable.MaterialCardView_strokeWidth, 0);
        //绘制边框
        this.updateForeground();
        //调整 ContentPadding
        this.adjustContentPadding();
    }

    /**
     * 设置边框颜色,并更新边框
     * @param strokeColor
     */
    void setStrokeColor(@ColorInt int strokeColor) {
        this.strokeColor = strokeColor;
        this.updateForeground();
    }

    /**
     * 获取边框颜色
     * @return
     */
    @ColorInt
    int getStrokeColor() {
        return this.strokeColor;
    }

    /**
     * 设置边框宽度,并更新边框、调整 ContentPadding
     * @param strokeWidth
     */
    void setStrokeWidth(@Dimension int strokeWidth) {
        this.strokeWidth = strokeWidth;
        this.updateForeground();
        this.adjustContentPadding();
    }

    /**
     * 获取边框宽度
     * @return
     */
    @Dimension
    int getStrokeWidth() {
        return this.strokeWidth;
    }

    /**
     * 绘制边框(该边框是绘制在前景图像上的)
     */
    void updateForeground() {
        this.materialCardView.setForeground(this.createForegroundDrawable());
    }

    /**
     * 创建一个指定角半径、宽度和颜色的边框 Drawable
     * @return
     */
    private Drawable createForegroundDrawable() {
        GradientDrawable fgDrawable = new GradientDrawable();
        fgDrawable.setCornerRadius(this.materialCardView.getRadius());
        if (this.strokeColor != -1) {
            fgDrawable.setStroke(this.strokeWidth, this.strokeColor);
        }
        return fgDrawable;
    }

    /**
     * 调整 ContentPadding(四周在 ContentPadding 的基础上加上边框宽度)
     */
    private void adjustContentPadding() {
        int contentPaddingLeft = this.materialCardView.getContentPaddingLeft() + this.strokeWidth;
        int contentPaddingTop = this.materialCardView.getContentPaddingTop() + this.strokeWidth;
        int contentPaddingRight = this.materialCardView.getContentPaddingRight() + this.strokeWidth;
        int contentPaddingBottom = this.materialCardView.getContentPaddingBottom() + this.strokeWidth;
        this.materialCardView.setContentPadding(contentPaddingLeft, contentPaddingTop, contentPaddingRight, contentPaddingBottom);
    }
}
