今天小编要分享的还是Android Jetpack库的基本使用方法,本篇介绍的内容是Jetpack Navigation组件,让我们一起学习,为完成年初制定的计划而努力吧!
组件介绍
导航,是指提供用户在应用程序中的不同内容之间进行浏览、退出的交互功能。如我们在Android手机上常常用到的物理/虚拟返回按键、桌面(Home)键、历史记录(Recent)键、ActionBar 返回键等等。
Jetpack库中的Navigation组件由以下三个关键部分组成:
-
导航图:一种XML资源,包含所有与导航有关的信息,如Fragment配置、跳转行为/方向、动画等等;
-
NavHost:一个空容器,用于显示导航图中的目的地,项目中需要包含一个实现NavHost接口的默认NavHostFragment容器;
-
NavController:在NavHost容器内管理应用程序的导航行为。当用户在应用程序中切换界面时,NavController协调容器中的目标内容交换。
优点
使用导航组件有很多好处:
-
能够处理Fragment切换
-
能够正确处理向上、返回的默认行为
-
提供动画和过渡的标准化资源
-
提供深层链接功能
-
包含导航UI模式,例如抽屉导航和底部导航,开发者无需进行额外的处理
-
保护导航之间数据传递的类型安全
-
提供ViewModel支持,多Fragment间可共享ViewModel数据
-
提供AndroidStudio图形化查看/编辑导航功能(>= 3.3版本)
简单使用
下面是一个使用导航组件进行开发的Demo运行效果:
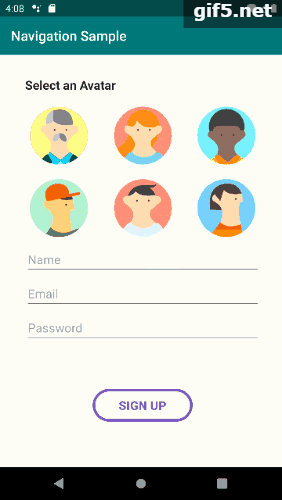
从实现效果上来看,整个应用程序共有8个界面,分别是主界面、注册界面、排行界面、用户匹配、游戏界面、失败界面、成功界面、用户界面。
主要涉及的逻辑有:
-
打开应用进入主界面
-
主界面提供两个功能,一个开始注册;另一个进入排行界面
-
注册界面提供开始匹配功能
-
用户匹配提供开始游戏功能
-
游戏界面操作后会进入成功或失败界面
-
游戏成功界面可进入排行界面或匹配界面继续游戏
-
游戏失败界面可返回到匹配界面重试
-
排行界面可进入用户界面查看信息
好了,整个应用界面之间涉及的主要逻辑都已经理清楚了,开始导入Jetpack导航组件。
环境配置
-
使用AS 3.3及以上版本
-
添加依赖项支持
implementation "androidx.navigation:navigation-runtime-ktx:2.2.0-alpha01"
implementation "androidx.navigation:navigation-fragment-ktx:2.2.0-alpha01"
导航图
导航图的创建是整个应用的核心所在,它描述了所有行为的触发顺序。通过AS Design功能可看到整个应用的界面并且覆盖所有界面可能执行的顺序。
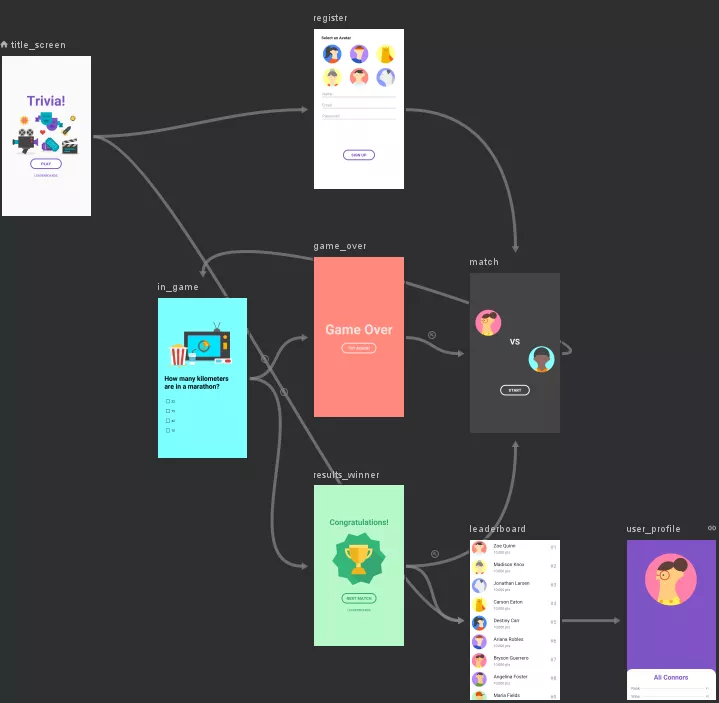
navigation demo导航图
使用AndroidStudio创建导航图时,选择Resource type为navigation,默认会创建res/navigation目录,并将资源文件放置于此目录下。
以title_screen主界面配置为例,来看一下xml的构成:
<navigation ...
            //指定了启动当前导航时显示的界面
            app:startDestination="@+id/title_screen">
  <fragment
      android:id="@+id/title_screen"
      android:name="com.example.android.navigationsample.TitleScreen"
      android:label="fragment_title_screen"
      tools:layout="@layout/fragment_title_screen">
      //每一个action都代表了界面上提供跳转到其他界面的行为
      <action
              android:id="@+id/action_title_screen_to_register"
              app:destination="@id/register"
              app:popEnterAnim="@anim/slide_in_left"
              app:popExitAnim="@anim/slide_out_right"
              app:enterAnim="@anim/slide_in_right"
              app:exitAnim="@anim/slide_out_left"/>
      //设置了动画和过渡效果
      <action
              android:id="@+id/action_title_screen_to_leaderboard"
              app:destination="@id/leaderboard"
              app:popEnterAnim="@anim/slide_in_left"
              app:popExitAnim="@anim/slide_out_right"
              app:enterAnim="@anim/slide_in_right"
              app:exitAnim="@anim/slide_out_left"/>
  </fragment>
.../>
在导航图配置时,有四个需要注意的属性:
-
popUpTo
-
popUpToInclusive
-
launchSingleTop
-
deepLink
//launchSingleTop代表启动当前fragment后,会栈顶复用
<action
      android:id="@+id/action_register_to_match"
      app:destination="@id/match"
      app:enterAnim="@anim/slide_in_right"
      app:exitAnim="@anim/slide_out_left"
      app:launchSingleTop="true"
      app:popEnterAnim="@anim/slide_in_left"
      app:popExitAnim="@anim/slide_out_right" />
//deepLink及深度链接,应用可通过Uri方式启动当前Fragment:
//holder.item.findNavController().navigate(Uri.parse("https://www.example.com/user/Flo"))
//此种方法为静态配置,动态配置方法请参考官方说明文档
<fragment
        android:id="@+id/user_profile"
        android:name="com.example.android.navigationsample.UserProfile"
        android:label="fragment_user_profile"
        tools:layout="@layout/fragment_user_profile">
    <argument android:name="userName"
              android:defaultValue="name"/>
    <deepLink app:uri="www.example.com/user/{userName}" />
</fragment>
<action
    android:id="@+id/action_in_game_to_resultsWinner"
    app:destination="@id/results_winner"
    app:popUpTo="@+id/match"
    app:popUpToInclusive="false"
    app:popEnterAnim="@anim/slide_in_left"
    app:popExitAnim="@anim/slide_out_right"
    app:enterAnim="@anim/fade_in"
    app:exitAnim="@anim/fade_out"/>
//popUpTo属性表示堆栈返回到某个界面,其后的栈数据清空
//popUpToInclusive属性为true表示回到指定界面时,界面栈中是否还包括当前界面
//(如果栈中已经包含了指定要跳转的界面,那么只会保留一个,不指定则栈中会出现两个
//界面相同的Fragment数据)
AndroidManifest与布局文件配置
如果要使用导航组件的深度链接功能,则需要在AndroidManifest中声明导航图,以便深度链接功能正常使用。
<activity...
<nav-graph android:value="@navigation/navigation" />
...
</activity>
导航功能的使用需要在NavHostFragment容器中实现,因此需要指定布局显示时使用的容器,设置默认NavHost,设置导航图。
<layout>...
<fragment
    android:id="@+id/my_nav_host_fragment"
    android:name="androidx.navigation.fragment.NavHostFragment"
    android:layout_width="match_parent"
    android:layout_height="match_parent"
    app:defaultNavHost="true"
    app:layout_constraintBottom_toBottomOf="parent"
    app:layout_constraintEnd_toEndOf="parent"
    app:layout_constraintStart_toStartOf="parent"
    app:layout_constraintTop_toTopOf="parent"
    app:navGraph="@navigation/navigation"/>
.../>
代码实现
整个Demo使用单Activity,多Fragment架构,MainActivity启动时,加载NavHostFragment容器,解析navigation容器图,通过startDestination属性找到首界面进行显示(本例首界面为TitleScreen)。
如下为TitleScreen的代码实现:
class TitleScreen : Fragment() {
    override fun onCreateView(
        inflater: LayoutInflater, container: ViewGroup?, savedInstanceState: Bundle?
    ): View? {
        val view = inflater.inflate(R.layout.fragment_title_screen, container, false)

        view.findViewById<Button>(R.id.play_btn).setOnClickListener {
            Navigation.findNavController(view).navigate(R.id.action_title_screen_to_register)
        }...
        return view
    }
}
到此,使用导航组件进行应用程序开发的基本流程已经结束,当然导航组件提供的功能远不止如此,它还有如页面间数据类型的安全保护,手势导航,导航嵌套、条件导航,自定义动画过渡效果,使用NavigationUI更新界面等高级使用方法。具体使用可参考Google官方文档说明。
欢迎关注公众号,留言讨论更多技术问题