

1.架构介绍
php在异步编程上的短板是周所周知的,为了保持语言的简单、处理逻辑的清晰,php使用了进程阻塞模型。尽管异步难以实现,需求中还是经常会用到异步任务处理机制,比如比较耗时的邮件发送,订单生成;还有一些需要延时处理的任务;为了加快响应速度,将主干逻辑与其他不相干逻辑解耦等等。Laravel/Lumen框架已经实现了异步机制,我们结合源码学习一下Lumen是怎样实现异步任务处理的。笔者简单总结了一下lumen实现异步队列任务的架构图:
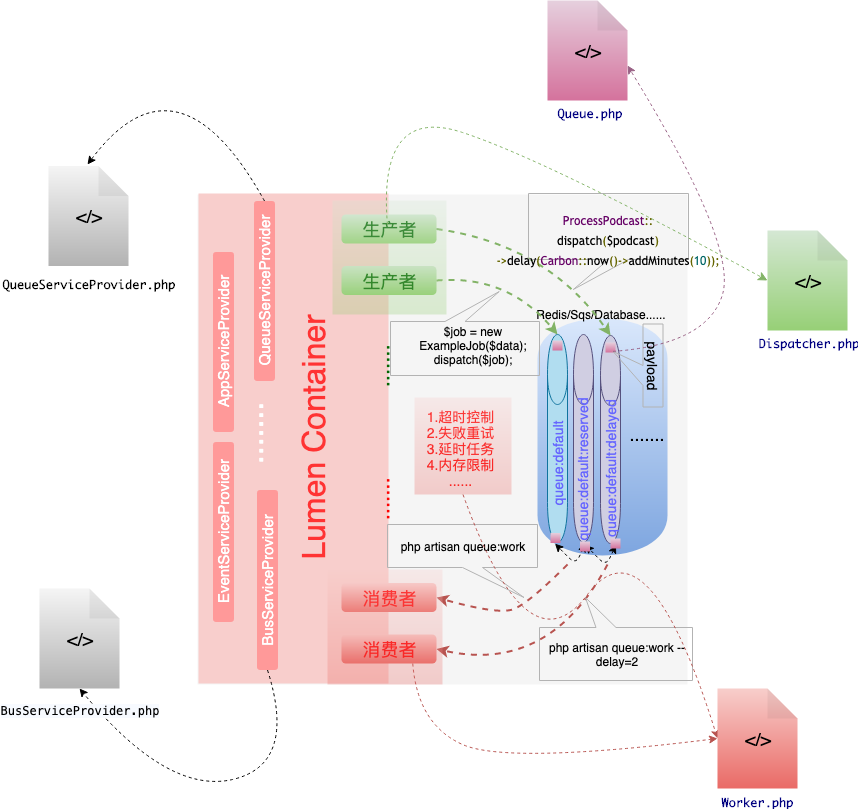
Lumen实现异步任务是在两个进程中进行的,一个是产生任务的生产者,另外一个是单独处理任务的消费者。通常,生产者一般是我们处理业务逻辑所在的fast-cgi进程,它将任务封装成payload,push到队列,消费者则是另外单独编写的守护进程,不停的取出队列中的任务,解析payload,消费执行。队列是Lumen实现异步处理不可缺少的中间媒介,Lumen本身就支持Redis/Sqs/Database/Beanstalkd多种队列中间件,其中Redis使用最广泛,我们就以Redis为例,学习Lumen使用Redis的zset、list数据结构实现失败任务重试和延时任务处理。不管是生产者还是消费者,都使用了Lumen框架容器所提供的众多服务:任务的分发处理(BusServiceProvider)、事件的订阅/发布(EventServiceProvider)、任务队列化的实现(QueueServiceProvider)等等。
2.庖丁解牛,源码解析
我们将结合架构图从Lumen框架的队列服务注册与启动、Bus服务注册与启动、 生产者分发任务到队列、守护进程消费任务四个阶段来解读源码,帮助读者清晰了解Lumen框架实现异步队列任务每个阶段的工作原理。
2.1 队列服务注册与启动
Lumen框架服务容器启动以后,通过服务提供者向容器中注册服务(服务提供者继承ServiceProvider抽象类,需要自行实现register方法)。队列的服务提供者是QueueServiceProvider类(vendor/illuminate/queue/QueueServiceProvider.php),它注册了队列用到的很多服务:
class QueueServiceProvider extends ServiceProvider implements DeferrableProvider
{
    /**
     * Register the service provider.
     *
     * @return void
     */
    public function register()
    {
        $this->registerManager();
        $this->registerConnection();
        $this->registerWorker();
        $this->registerListener();
        $this->registerFailedJobServices();
        $this->registerOpisSecurityKey();
    }
    ......
}
其中registerManager注册了队列管理的门面(Facade),QueueManager类底层使用了队列的连接,其中可以注册['Null', 'Sync', 'Database', 'Redis', 'Beanstalkd', 'Sqs']任意的队列中间件连接类,我们以Redis为例子:
    protected function registerManager()
    {
        $this->app->singleton('queue', function ($app) {
            return tap(new QueueManager($app), function ($manager) {
                $this->registerConnectors($manager);
            });
        });
    }
    ......
    public function registerConnectors($manager)
    {
        foreach (['Null', 'Sync', 'Database', 'Redis', 'Beanstalkd', 'Sqs'] as $connector) {
            $this->{"register{$connector}Connector"}($manager);
        }
    }
    ......
    protected function registerRedisConnector($manager)
    {
        $manager->addConnector('redis', function () {
            return new RedisConnector($this->app['redis']);
        });
    }
QueueManager 是队列服务的总门面,提供一切与队列相关的操作接口(可以使用Queue:: + 方法名来调用队列的方法)。QueueManager 中有一个成员变量 $connectors,存储着各种驱动的 connector,例如 RedisConnector、SqsConnector、DatabaseConnector、BeanstalkdConnector。 registerConnection 底层队列连接服务:
protected function registerConnection()
    {
        $this->app->singleton('queue.connection', function ($app) {
            return $app['queue']->connection();
        });
    }
队列连接的时候会读取默认的配置信息,我们查看QueueManager($app['queue']就是从容器中取出服务)类(/vendor/illuminate/queue/QueueManager.php)中的相关代码:
    public function connection($name = null)
    {
        $name = $name ?: $this->getDefaultDriver();

        if (! isset($this->connections[$name])) {
            $this->connections[$name] = $this->resolve($name);

            $this->connections[$name]->setContainer($this->app);
        }

        return $this->connections[$name];
    }
    ...
    protected function resolve($name)
    {
        $config = $this->getConfig($name);

        return $this->getConnector($config['driver'])
                        ->connect($config)
                        ->setConnectionName($name);
    }
    ...
    protected function getConnector($driver)
    {
        if (! isset($this->connectors[$driver])) {
            throw new InvalidArgumentException("No connector for [$driver]");
        }

        return call_user_func($this->connectors[$driver]);
    }
    ...
    protected function getConfig($name)
    {
        if (! is_null($name) && $name !== 'null') {
            return $this->app['config']["queue.connections.{$name}"];
        }

        return ['driver' => 'null'];
    }
    ...
    public function getDefaultDriver()
    {
        return $this->app['config']['queue.default'];
    }
由此我们可以,队列首先通过getDefaultDriver方法获得驱动的连接并将其保存到驱动连接池数组中,生产者使用队列的使用可以根据驱动名称选择不同的连接服务,例如使用sqs连接:
ProcessPodcast::dispatch($podcast)->onConnection('sqs');
我们使用的队列驱动是Redis,config/queue.php要做相关配置:
<?php

return [
    'default' => env('QUEUE_DRIVER', 'redis'),
    'connections' => [
        ......
        'redis' => [
            'driver' => 'redis',
            'connection' => env('QUEUE_REDIS_CONNECTION', 'queue'),
            'queue' => 'default',
            'retry_after' => 60,
        ]
    ],

    //失败的队列任务先不配置到队列中
    /*'failed' => [
        'database' => env('DB_CONNECTION', 'mysql'),
        'table' => env('QUEUE_FAILED_TABLE', 'failed_jobs'),
    ],*/
];
registerWorker注册消费者服务,程序会返回Illuminate\Queue\Worker类,我们在第四部分讲解消费者的时候会详细了解它。下边的registerListener、registerFailedJobServices、registerOpisSecurityKey请大家自行阅读,其中registerListener使用到了订阅/发布模式,使用的是Lumen框架的事件Event系统,又是一个比较大的板块,还比较重要,和生产者/消费者类似,可以为队列注册不同的监听者,当队列执行到这个状态时,就会通知监听者,例如可以在AppServiceProvider(/app/Providers/AppServiceProvider.php)启动时注册队列监听者:
class AppServiceProvider extends ServiceProvider
{
    public function boot()
    {
        //任务运行前
        Queue::before(function (JobProcessing $event) {
            // $event->connectionName
            // $event->job
            // $event->job->payload()
        });

        //任务运行后
        Queue::after(function (JobProcessed $event) {
            // $event->connectionName
            // $event->job
            // $event->job->payload()
        });

        //任务循环前
        Queue::looping(function () {

        });

        //任务失败后
        Queue::failing(function (JobFailed $event) {
            // $event->connectionName
            // $event->job
            // $event->job->payload()
        });
    }
这样就可以在任务执行的各个阶段对任务进行监控了;项目中注册监听者很有用,举一个例子,我们想要记录项目api业务逻辑中对DB的所有sql语句并搜集慢查询相关的信息,同样可以在AppServiceProvider中使用:
\DB::listen(function ($query) {
                $sql = str_replace("?", "'%s'", $query->sql);
                $sql = vsprintf($sql, $query->bindings) . " | {$query->time}";
                Log::channel('sql-daily')->info($sql);
                if ($query->time > 100) {
                    Log::warning('SLOOOOOW-SQL: ' . $sql);
                }
            });
registerFailedJobServices在异步任务处理中也是很有必要的,我们常常也会将重试之后失败的任务保存到DB中,方便将来定位问题或再次重试。
2.2 Bus服务注册与启动
Bus服务在Lumen系统中就是任务分发总线,就像公共汽车把乘客载到不同的目的地,dispatch函数就是Bus服务。我们来看一下BusServiceProvider(/vendor/illuminate/bus/BusServiceProvider.php)的注册函数:
class BusServiceProvider extends ServiceProvider implements DeferrableProvider
{
    public function register()
    {
        $this->app->singleton(Dispatcher::class, function ($app) {
            return new Dispatcher($app, function ($connection = null) use ($app) {
                return $app[QueueFactoryContract::class]->connection($connection);
            });
        });

        $this->app->alias(
            Dispatcher::class, DispatcherContract::class
        );

        $this->app->alias(
            Dispatcher::class, QueueingDispatcherContract::class
        );
    }
由此可知Bus服务就是Dispatcher类实现的,我们结合Dispatcher类看一下生产者如何将任务给push到队列上的。
2.3 生产者分发任务到队列
我们在项目逻辑中往往是这样分发任务到队列的:
 $job = (new ExampleJob($joblist));
 dispatch($job);
跟进dispatch是在helper.php中定义的,其中dispatch函数传入的是一个任务实例(这很重要):
if (! function_exists('dispatch')) {
    function dispatch($job)
    {
        return new PendingDispatch($job);
    }
}
我们继续跟进PendingDispatch类实例:
class PendingDispatch
{
    protected $job;

    public function __construct($job)
    {
        $this->job = $job;
    }
    ...
    public function __destruct()
    {
        app(Dispatcher::class)->dispatch($this->job);
    }
在析构函数中我们得知,程序从Lumen服务容器中解析了Dispatcher类,调用了它的dispatch处理任务。我们接下来看Dispatcher类(/vendor/illuminate/bus/Dispatcher.php)是如何实现的:
class Dispatcher implements QueueingDispatcher
{
   ......
    public function __construct(Container $container, Closure $queueResolver = null)
    {
        $this->container = $container;
        $this->queueResolver = $queueResolver;
        $this->pipeline = new Pipeline($container);
    }

    public function dispatch($command)
    {
        if ($this->queueResolver && $this->commandShouldBeQueued($command)) {
            return $this->dispatchToQueue($command);
        }

        return $this->dispatchNow($command);
    }

    public function dispatchNow($command, $handler = null)
    {
        if ($handler || $handler = $this->getCommandHandler($command)) {
            $callback = function ($command) use ($handler) {
                return $handler->handle($command);
            };
        } else {
            $callback = function ($command) {
                return $this->container->call([$command, 'handle']);
            };
        }

        return $this->pipeline->send($command)->through($this->pipes)->then($callback);
    }
    ...
    protected function commandShouldBeQueued($command)
    {
        return $command instanceof ShouldQueue;
    }
这里的$command就是上边提到的job实例类,程序通过判断job有没有继承实现ShouldQueue接口,如果没有实现,则直接通过dispatchNow函数,通过Pipeline的send/Through/then来同步处理相关任务。我们主要来看将任务推送到队列的情况:
public function dispatchToQueue($command)
    {
        $connection = $command->connection ?? null;

        $queue = call_user_func($this->queueResolver, $connection);

        if (! $queue instanceof Queue) {
            throw new RuntimeException('Queue resolver did not return a Queue implementation.');
        }

        if (method_exists($command, 'queue')) {
            return $command->queue($queue, $command);
        }

        return $this->pushCommandToQueue($queue, $command);
    }

    protected function pushCommandToQueue($queue, $command)
    {
        if (isset($command->queue, $command->delay)) {
            return $queue->laterOn($command->queue, $command->delay, $command);
        }

        if (isset($command->queue)) {
            return $queue->pushOn($command->queue, $command);
        }

        if (isset($command->delay)) {
            return $queue->later($command->delay, $command);
        }

        return $queue->push($command);
    }
dispatchToQueue方法会首先判断 command->queue是查看程序是否设置了将任务推送到指定队列,$command->delay是查看程序是否将任务设置为超时任务;不同的设置选项会调用队列驱动的不同方法,走的是不同的逻辑。我们以Redis为例,代码中的queue就是RedisQueue(/vendor/illuminate/queue/RedisQueue.php),我们来进一步查看它的处理逻辑:
class RedisQueue extends Queue implements QueueContract
{
    ......
    public function __construct(Redis $redis, $default = 'default', $connection = null, $retryAfter = 60, $blockFor = null)
    {
        $this->redis = $redis;
        $this->default = $default;
        $this->blockFor = $blockFor;
        $this->connection = $connection;
        $this->retryAfter = $retryAfter;
    }
    ......
    public function later($delay, $job, $data = '', $queue = null)
    {
        return $this->laterRaw($delay, $this->createPayload($job, $this->getQueue($queue), $data), $queue);
    }
    ......
    protected function laterRaw($delay, $payload, $queue = null)
    {
        $this->getConnection()->zadd(
            $this->getQueue($queue).':delayed', $this->availableAt($delay), $payload
        );

        return json_decode($payload, true)['id'] ?? null;
    }
我们这里看到的是延时队列的later方法,调用的是laterRaw方法,在传入参数的时候调用createPayload方法将job给封装成payload,这个过程很重要,因为消费者也是通过获取解析payload实现任务消费的,我们来看一下封装payload的过程:
protected function createPayload($job, $queue, $data = '')
    {
        $payload = json_encode($this->createPayloadArray($job, $queue, $data));

        if (JSON_ERROR_NONE !== json_last_error()) {
            throw new InvalidPayloadException(
                'Unable to JSON encode payload. Error code: '.json_last_error()
            );
        }

        return $payload;
    }

    protected function createPayloadArray($job, $queue, $data = '')
    {
        return is_object($job)
                    ? $this->createObjectPayload($job, $queue)
                    : $this->createStringPayload($job, $queue, $data);
    }

    protected function createObjectPayload($job, $queue)
    {
        $payload = $this->withCreatePayloadHooks($queue, [
            'displayName' => $this->getDisplayName($job),
            'job' => 'Illuminate\Queue\CallQueuedHandler@call',
            'maxTries' => $job->tries ?? null,
            'delay' => $this->getJobRetryDelay($job),
            'timeout' => $job->timeout ?? null,
            'timeoutAt' => $this->getJobExpiration($job),
            'data' => [
                'commandName' => $job,
                'command' => $job,
            ],
        ]);

        return array_merge($payload, [
            'data' => [
                'commandName' => get_class($job),
                'command' => serialize(clone $job),
            ],
        ]);
    }
可以看到,封装的payload信息中包含有很多信息,其中重试次数的控制maxTries、超时的设置timeout都在payload数组中设置,另外payload中的data还将任务的名称和序列化好的任务类serialize(clone $job)一同封装了进去。
另外我们知道laterRaw中将延时任务通过zadd默认添加到了queue:delayed的zset中去了,其中的score添加的是 delay),我们查看其实现:
protected function availableAt($delay = 0)
    {
        $delay = $this->parseDateInterval($delay);

        return $delay instanceof DateTimeInterface
                            ? $delay->getTimestamp()
                            : Carbon::now()->addRealSeconds($delay)->getTimestamp();
    }
发现score设置的正是任务执行时间的时间戳,设置可谓真是巧妙,消费者通过判断queue:delayed中大于当前时间的任务进行执行就可以实现延时任务的执行了;这种时间滑动窗口的设置在应用开发中非常常见。
我们再来看非延时任务的执行就相对简单了很多(/vendor/illuminate/queue/RedisQueue.php):
......
 public function push($job, $data = '', $queue = null)
    {
        return $this->pushRaw($this->createPayload($job, $this->getQueue($queue), $data), $queue);
    }
......
public function pushRaw($payload, $queue = null, array $options = [])
    {
        $this->getConnection()->eval(
            LuaScripts::push(), 2, $this->getQueue($queue),
            $this->getQueue($queue).':notify', $payload
        );

        return json_decode($payload, true)['id'] ?? null;
    }
redis使用lua脚本,通过rpush将任务默认推送到了queue:default队列
    public static function push()
    {
        return <<<'LUA'
-- Push the job onto the queue...
redis.call('rpush', KEYS[1], ARGV[1])
-- Push a notification onto the "notify" queue...
redis.call('rpush', KEYS[2], 1)
LUA;
    }
使用lua脚本是为了保证redis操作命令的原子性,尤其在分布式任务中,很多服务去争抢任务的时候都需要使用lua脚本,在消费者中我们还会看到lua脚本的使用,而且操作比这里还要复杂很多。
2.4 守护进程消费任务
Lumen包含一个队列处理器,当新任务被推到队列中时它能处理这些任务。你可以通过 queue:work 命令来运行处理器。生产环境中我们常常使用supervisor来管理这些消费任务,我们将他们称为守护进程消费者。我们首先来看看消费者可以使用怎样的方式来启动吧:
//处理给定连接的队列
php artisan queue:work redis --queue=emails
//仅对队列中的单一任务处理
php artisan queue:work --once
//如果一个任务失败了,会被放入延时队列中取,--delay 选项可以设置失败任务的延时时间
php artisan queue:work --delay=2
//如果想要限制一个任务的内存,可以使用 --memory
php artisan queue:work --memory=128
//可以指定 Lumen 队列处理器最多执行多长时间后就应该被关闭掉
php artisan queue:work --timeout=60
//可以指定 Lumen 队列处理器失败任务重试的次数
php artisan queue:work --tries=60
我们使用cli程序启动消费者的时候,命令行模式会调用 Illuminate\Queue\Console\WorkCommand,这个类在初始化的时候依赖注入了 Illuminate\Queue\Worker:
class WorkCommand extends Command
{
    protected $signature = 'queue:work
                            {connection? : The name of the queue connection to work}
                            {--queue= : The names of the queues to work}
                            {--daemon : Run the worker in daemon mode (Deprecated)}
                            {--once : Only process the next job on the queue}
                            {--stop-when-empty : Stop when the queue is empty}
                            {--delay=0 : The number of seconds to delay failed jobs}
                            {--force : Force the worker to run even in maintenance mode}
                            {--memory=128 : The memory limit in megabytes}
                            {--sleep=3 : Number of seconds to sleep when no job is available}
                            {--timeout=60 : The number of seconds a child process can run}
                            {--tries=0 : Number of times to attempt a job before logging it failed}';

    protected $description = 'Start processing jobs on the queue as a daemon';

    protected $worker;

    public function __construct(Worker $worker)
    {
        parent::__construct();

        $this->worker = $worker;
    }

    public function handle()
    {
        if ($this->downForMaintenance() && $this->option('once')) {
            return $this->worker->sleep($this->option('sleep'));
        }

        $this->listenForEvents();

        $connection = $this->argument('connection')
                        ?: $this->laravel['config']['queue.default'];

        $queue = $this->getQueue($connection);

        $this->runWorker(
            $connection, $queue
        );
    }

    protected function runWorker($connection, $queue)
    {
        $this->worker->setCache($this->laravel['cache']->driver());

        return $this->worker->{$this->option('once') ? 'runNextJob' : 'daemon'}(
            $connection, $queue, $this->gatherWorkerOptions()
        );
    }

    protected function gatherWorkerOptions()
    {
        return new WorkerOptions(
            $this->option('delay'), $this->option('memory'),
            $this->option('timeout'), $this->option('sleep'),
            $this->option('tries'), $this->option('force'),
            $this->option('stop-when-empty')
        );
    }

    protected function listenForEvents()
    {
        $this->laravel['events']->listen(JobProcessing::class, function ($event) {
            $this->writeOutput($event->job, 'starting');
        });

        $this->laravel['events']->listen(JobProcessed::class, function ($event) {
            $this->writeOutput($event->job, 'success');
        });

        $this->laravel['events']->listen(JobFailed::class, function ($event) {
            $this->writeOutput($event->job, 'failed');

            $this->logFailedJob($event);
        });
    }

    protected function writeOutput(Job $job, $status)
    {
        switch ($status) {
            case 'starting':
                return $this->writeStatus($job, 'Processing', 'comment');
            case 'success':
                return $this->writeStatus($job, 'Processed', 'info');
            case 'failed':
                return $this->writeStatus($job, 'Failed', 'error');
        }
    }

    protected function writeStatus(Job $job, $status, $type)
    {
        $this->output->writeln(sprintf(
            "<{$type}>[%s][%s] %s</{$type}> %s",
            Carbon::now()->format('Y-m-d H:i:s'),
            $job->getJobId(),
            str_pad("{$status}:", 11), $job->resolveName()
        ));
    }

    protected function logFailedJob(JobFailed $event)
    {
        $this->laravel['queue.failer']->log(
            $event->connectionName, $event->job->getQueue(),
            $event->job->getRawBody(), $event->exception
        );
    }

    protected function getQueue($connection)
    {
        return $this->option('queue') ?: $this->laravel['config']->get(
            "queue.connections.{$connection}.queue", 'default'
        );
    }

    protected function downForMaintenance()
    {
        return $this->option('force') ? false : $this->laravel->isDownForMaintenance();
    }
}
任务启动时会运行handle函数,执行任务之前,首先通过listenForEvents注册监听事件,监听任务的完成与失败情况。接下来启动runWorker方法,该函数默认会调用 Illuminate\Queue\Worker 的 daemon 函数,只有在命令中强制 --once 参数的时候,才会执行 runNestJob 函数。我们主要看Worker类daemon函数,上边提到的超时控制、失败重试、内存限制都是在Worker中实现的:
public function daemon($connectionName, $queue, WorkerOptions $options)
    {
        if ($this->supportsAsyncSignals()) {
            $this->listenForSignals();
        }

        $lastRestart = $this->getTimestampOfLastQueueRestart();
        while (true) {
            if (! $this->daemonShouldRun($options, $connectionName, $queue)) {
                $this->pauseWorker($options, $lastRestart);

                continue;
            }

            $job = $this->getNextJob(
                $this->manager->connection($connectionName), $queue
            );

            if ($this->supportsAsyncSignals()) {
                $this->registerTimeoutHandler($job, $options);
            }

            if ($job) {
                $this->runJob($job, $connectionName, $options);
            } else {
                $this->sleep($options->sleep);
            }

            $this->stopIfNecessary($options, $lastRestart, $job);
        }
    }
daemon函数首先通过supportsAsyncSignals判断程序是否支持装载信号,如果支持装载信号:
...
 protected function supportsAsyncSignals()
    {
        return extension_loaded('pcntl');
    }
...
protected function listenForSignals()
    {
        pcntl_async_signals(true);

        pcntl_signal(SIGTERM, function () {
            $this->shouldQuit = true;
        });

        pcntl_signal(SIGUSR2, function () {
            $this->paused = true;
        });

        pcntl_signal(SIGCONT, function () {
            $this->paused = false;
        });
    }
...
信号处理是进程间通信的一种常用方式,这里主要用于接收用户在控制台发送的命令和由 Process Monitor(如 Supervisor)发送并与我们的脚本进行通信的异步通知。假如我们正在执行一个非常重要但是耗时又非常长的任务,这个时候守护进程又收到了程序退出的信号,怎样使程序优雅的退出(执行完任务之后再退出),这里向大家推荐一篇文章供大家探索:supervisor在PHP项目中的使用
在真正运行任务之前,程序从 cache 中取了一次最后一次重启的时间,while(true)启动一个长时间运行的进程,使用daemonShouldRun判断当前脚本是应该处理任务,还是应该暂停,还是应该退出:
......
 protected function getTimestampOfLastQueueRestart()
    {
        if ($this->cache) {
            return $this->cache->get('illuminate:queue:restart');
        }
    }
......
protected function daemonShouldRun(WorkerOptions $options, $connectionName, $queue)
    {
        return ! (($this->manager->isDownForMaintenance() && ! $options->force) ||
            $this->paused ||
            $this->events->until(new Events\Looping($connectionName, $queue)) === false);
    }
......
以下几种情况,循环将不会处理任务:
- 脚本处于 维护模式 并且没有 --force 选项
- 脚本被 supervisor 暂停
- 脚本的 looping 事件监听器返回 false looping 事件监听器在每次循环的时候都会被启动,如果返回 false,那么当前的循环将会被暂停:pauseWorker:
protected function pauseWorker(WorkerOptions $options, $lastRestart)
    {
        $this->sleep($options->sleep > 0 ? $options->sleep : 1);

        $this->stopIfNecessary($options, $lastRestart);
    }
脚本在 sleep 一段时间之后,就要重新判断当前脚本是否需要 stop:
......
protected function stopIfNecessary(WorkerOptions $options, $lastRestart, $job = null)
    {
        if ($this->shouldQuit) {
            $this->stop();
        } elseif ($this->memoryExceeded($options->memory)) {
            $this->stop(12);
        } elseif ($this->queueShouldRestart($lastRestart)) {
            $this->stop();
        } elseif ($options->stopWhenEmpty && is_null($job)) {
            $this->stop();
        }
    }
......
 public function memoryExceeded($memoryLimit)
    {
        return (memory_get_usage(true) / 1024 / 1024) >= $memoryLimit;
    }
......
protected function queueShouldRestart($lastRestart)
    {
        return $this->getTimestampOfLastQueueRestart() != $lastRestart;
    }
......
以下情况脚本将会被 stop:
- 脚本被 supervisor 退出
- 内存超限
- 脚本被重启过
......
public function kill($status = 0)
    {
        $this->events->dispatch(new Events\WorkerStopping($status));

        if (extension_loaded('posix')) {
            posix_kill(getmypid(), SIGKILL);
        }

        exit($status);
    }
......
 public function stop($status = 0)
    {
        $this->events->dispatch(new Events\WorkerStopping($status));

        exit($status);
    }
脚本被重启,当前的进程需要退出并且重新加载。
接下来程序获取下一个任务,命令行可以用 , 连接多个队列的名字,位于前面的队列优先级更高:
protected function getNextJob($connection, $queue)
    {
        try {
            foreach (explode(',', $queue) as $queue) {
                if (! is_null($job = $connection->pop($queue))) {
                    return $job;
                }
            }
        } catch (Exception $e) {
            $this->exceptions->report($e);

            $this->stopWorkerIfLostConnection($e);

            $this->sleep(1);
        } catch (Throwable $e) {
            $this->exceptions->report($e = new FatalThrowableError($e));

            $this->stopWorkerIfLostConnection($e);

            $this->sleep(1);
        }
    }
$connection 是具体的驱动,我们这里是 Illuminate\Queue\RedisQueue:
public function pop($queue = null)
    {
        $this->migrate($prefixed = $this->getQueue($queue));

        if (empty($nextJob = $this->retrieveNextJob($prefixed))) {
            return;
        }

        [$job, $reserved] = $nextJob;

        if ($reserved) {
            return new RedisJob(
                $this->container, $this, $job,
                $reserved, $this->connectionName, $queue ?: $this->default
            );
        }
    }
在从队列中取出任务之前,需要先将 delay 队列和 reserved 队列中已经到时间的任务放到主队列中:
protected function migrate($queue)
    {
        $this->migrateExpiredJobs($queue.':delayed', $queue);

        if (! is_null($this->retryAfter)) {
            $this->migrateExpiredJobs($queue.':reserved', $queue);
        }
    }
public function migrateExpiredJobs($from, $to)
    {
        return $this->getConnection()->eval(
            LuaScripts::migrateExpiredJobs(), 3, $from, $to, $to.':notify', $this->currentTime()
        );
    }
这里同样使用了lua脚本,并且这里的lua脚本更加复杂
public static function migrateExpiredJobs()
    {
        return <<<'LUA'
-- Get all of the jobs with an expired "score"...
local val = redis.call('zrangebyscore', KEYS[1], '-inf', ARGV[1])

-- If we have values in the array, we will remove them from the first queue
-- and add them onto the destination queue in chunks of 100, which moves
-- all of the appropriate jobs onto the destination queue very safely.
if(next(val) ~= nil) then
    redis.call('zremrangebyrank', KEYS[1], 0, #val - 1)

    for i = 1, #val, 100 do
        redis.call('rpush', KEYS[2], unpack(val, i, math.min(i+99, #val)))
        -- Push a notification for every job that was migrated...
        for j = i, math.min(i+99, #val) do
            redis.call('rpush', KEYS[3], 1)
        end
    end
end

return val
LUA;
    }
脚本的大概意思是将delay中的score大于当前事件戳的任务取出,push到主队列中去,然后将任务删除。这里使用lua脚本保证原子性。 接下来,就要从主队列中获取下一个任务,在取出下一个任务之后,还要将任务放入 reserved 队列中,当任务执行失败后,该任务会进行重试。
protected function retrieveNextJob($queue, $block = true)
    {
        $nextJob = $this->getConnection()->eval(
            LuaScripts::pop(), 3, $queue, $queue.':reserved', $queue.':notify',
            $this->availableAt($this->retryAfter)
        );

        if (empty($nextJob)) {
            return [null, null];
        }

        [$job, $reserved] = $nextJob;

        if (! $job && ! is_null($this->blockFor) && $block &&
            $this->getConnection()->blpop([$queue.':notify'], $this->blockFor)) {
            return $this->retrieveNextJob($queue, false);
        }

        return [$job, $reserved];
    }
    ......
    public static function pop()
    {
        return <<<'LUA'
-- Pop the first job off of the queue...
local job = redis.call('lpop', KEYS[1])
local reserved = false

if(job ~= false) then
    -- Increment the attempt count and place job on the reserved queue...
    reserved = cjson.decode(job)
    reserved['attempts'] = reserved['attempts'] + 1
    reserved = cjson.encode(reserved)
    redis.call('zadd', KEYS[2], ARGV[1], reserved)
    redis.call('lpop', KEYS[3])
end

return {job, reserved}
LUA;
    }
......
从 redis 中获取到 job 之后,就会将其包装成 RedisJob 类. 如果一个脚本超时, pcntl_alarm 将会启动并杀死当前的 work 进程。杀死进程后, work 进程将会被守护进程重启,继续进行下一个任务,如果任务注册有fail函数还会执行失败任务处理的相关逻辑。
protected function registerTimeoutHandler($job, WorkerOptions $options)
    {
        pcntl_signal(SIGALRM, function () use ($job, $options) {
            if ($job) {
                $this->markJobAsFailedIfWillExceedMaxAttempts(
                    $job->getConnectionName(), $job, (int) $options->maxTries, $this->maxAttemptsExceededException($job)
                );
            }

            $this->kill(1);
        });

        pcntl_alarm(
            max($this->timeoutForJob($job, $options), 0)
        );
    }
    ......
    protected function markJobAsFailedIfWillExceedMaxAttempts($connectionName, $job, $maxTries, $e)
    {
        $maxTries = ! is_null($job->maxTries()) ? $job->maxTries() : $maxTries;

        if ($job->timeoutAt() && $job->timeoutAt() <= Carbon::now()->getTimestamp()) {
            $this->failJob($job, $e);
        }

        if ($maxTries > 0 && $job->attempts() >= $maxTries) {
            $this->failJob($job, $e);
        }
    }
    ......
     protected function failJob($job, $e)
    {
        return $job->fail($e);
    }
    ......
接下来就是执行任务了,runJob逻辑和之前描述差不多:
protected function runJob($job, $connectionName, WorkerOptions $options)
    {
        try {
            return $this->process($connectionName, $job, $options);
        } catch (Exception $e) {
            $this->exceptions->report($e);

            $this->stopWorkerIfLostConnection($e);
        } catch (Throwable $e) {
            $this->exceptions->report($e = new FatalThrowableError($e));

            $this->stopWorkerIfLostConnection($e);
        }
    }
    ......
    public function process($connectionName, $job, WorkerOptions $options)
    {
        try {
            $this->raiseBeforeJobEvent($connectionName, $job);

            $this->markJobAsFailedIfAlreadyExceedsMaxAttempts(
                $connectionName, $job, (int) $options->maxTries
            );

            if ($job->isDeleted()) {
                return $this->raiseAfterJobEvent($connectionName, $job);
            }

            $job->fire();

            $this->raiseAfterJobEvent($connectionName, $job);
        } catch (Exception $e) {
            $this->handleJobException($connectionName, $job, $options, $e);
        } catch (Throwable $e) {
            $this->handleJobException(
                $connectionName, $job, $options, new FatalThrowableError($e)
            );
        }
    }
    ......
raiseBeforeJobEvent 函数用于触发任务处理前的事件,raiseAfterJobEvent 函数用于触发任务处理后的事件,这里不再多说。 接下来我们再来看一下RedisJob(/vendor/illuminate/queue/Jobs/Job.php)中的fire()函数如何处理从队列中取到的payload的:
   public function fire()
    {
        $payload = $this->payload();
        [$class, $method] = JobName::parse($payload['job']);
        ($this->instance = $this->resolve($class))->{$method}($this, $payload['data']);
    }
    ......
     public static function parse($job)
    {
        return Str::parseCallback($job, 'fire');
    }
    public static function resolve($name, $payload)
    {
        if (! empty($payload['displayName'])) {
            return $payload['displayName'];
        }

        return $name;
    }
    ......
     public static function parseCallback($callback, $default = null)
    {
        return static::contains($callback, '@') ? explode('@', $callback, 2) : [$callback, $default];
    }
分析代码可知,RedisJob从payload中解析出要执行的Job类,使用队列执行器Illuminate\Queue\CallQueuedHandler@call执行调用dispatchNow执行Job类的方法完成了消费:
public function call(Job $job, array $data)
    {
        try {
            $command = $this->setJobInstanceIfNecessary(
                $job, unserialize($data['command'])
            );
        } catch (ModelNotFoundException $e) {
            return $this->handleModelNotFound($job, $e);
        }

        $this->dispatcher->dispatchNow(
            $command, $this->resolveHandler($job, $command)
        );

        if (! $job->hasFailed() && ! $job->isReleased()) {
            $this->ensureNextJobInChainIsDispatched($command);
        }

        if (! $job->isDeletedOrReleased()) {
            $job->delete();
        }
    }
到这里消费者从队列中取出任务到消费的整个流程我们就走完了。我们做一个简单的回顾总结。
3. 回顾总结
Lumen框架启动时为异步队列任务提供了基础的队列服务和Bus任务分发服务。我们程序中的生成者通过dispatch函数将任务push到队列,可以指定底层驱动,还可以设置延时任务等。dispatch函数通过Bus服务将Job类包装成payload添加到默认队列,如果是延时任务会添加到Redis的Zset结构中。消费者在处理任务的时候会装载信号,实现进程重启、退出的同时保证任务不中断;通过memory_get_usage(true)函数判断任务是否内存超限;通过payload中的maxTries判断任务是否需要重试;通过pcntl装载计时器判断是否是否执行超时;通过向任务类中添加fail函数来记录失败的任务;通过zset结构任务的中score和当前时间戳对比形成滑动窗口来执行延时任务。
