

《使用 KeyCloak 对 Kubernetes 进行统一用户管理》 最早发布在 blog.hdls.me/15647317755…
众所周知,K8s 的权限管理体系 (不熟悉的盆友可以跳转至《Kubernetes 安全机制解读》) 中,可以将 RoleBinding 绑定到 ServiceAccount、User、Group 上来实现权限分配。
其中 ServiceAccount 我们经常用到,用来限制某个 pod 的权限;对于 User 和 Group,除了一些特殊的系统 group,并没有具体的资源与之对应,这对于传统项目中的用户管理十分不友好。
上一篇文章中讲到了 OIDC 协议在 K8s 集群中如何工作,这篇文章来具体讲讲如何在 K8s 集群中进行统一用户管理。
准备工作
首先我们需要有一个 Identity Provider 来统一管理 K8s 中的用户,并且提供 OIDC 协议服务,本文采用了 KeyCloak 作为 Identity Provider。
KeyCloak 中的配置
要想实现用户管理,我们需要利用 K8s 中 group 的概念,来对一组用户分配权限,这需要利用 OIDC 协议中的 Claim 概念,来实现 K8s 中用户的分组。
Claim 是 ID Token 中携带的信息,指的是客户端请求的信息范围,如用户名、邮箱等,而这些可以进行扩展用来携带一些用户所属 group 的信息等等。
那么第一步,我们需要扩展 KeyCloak 中的 Claim,如下图:
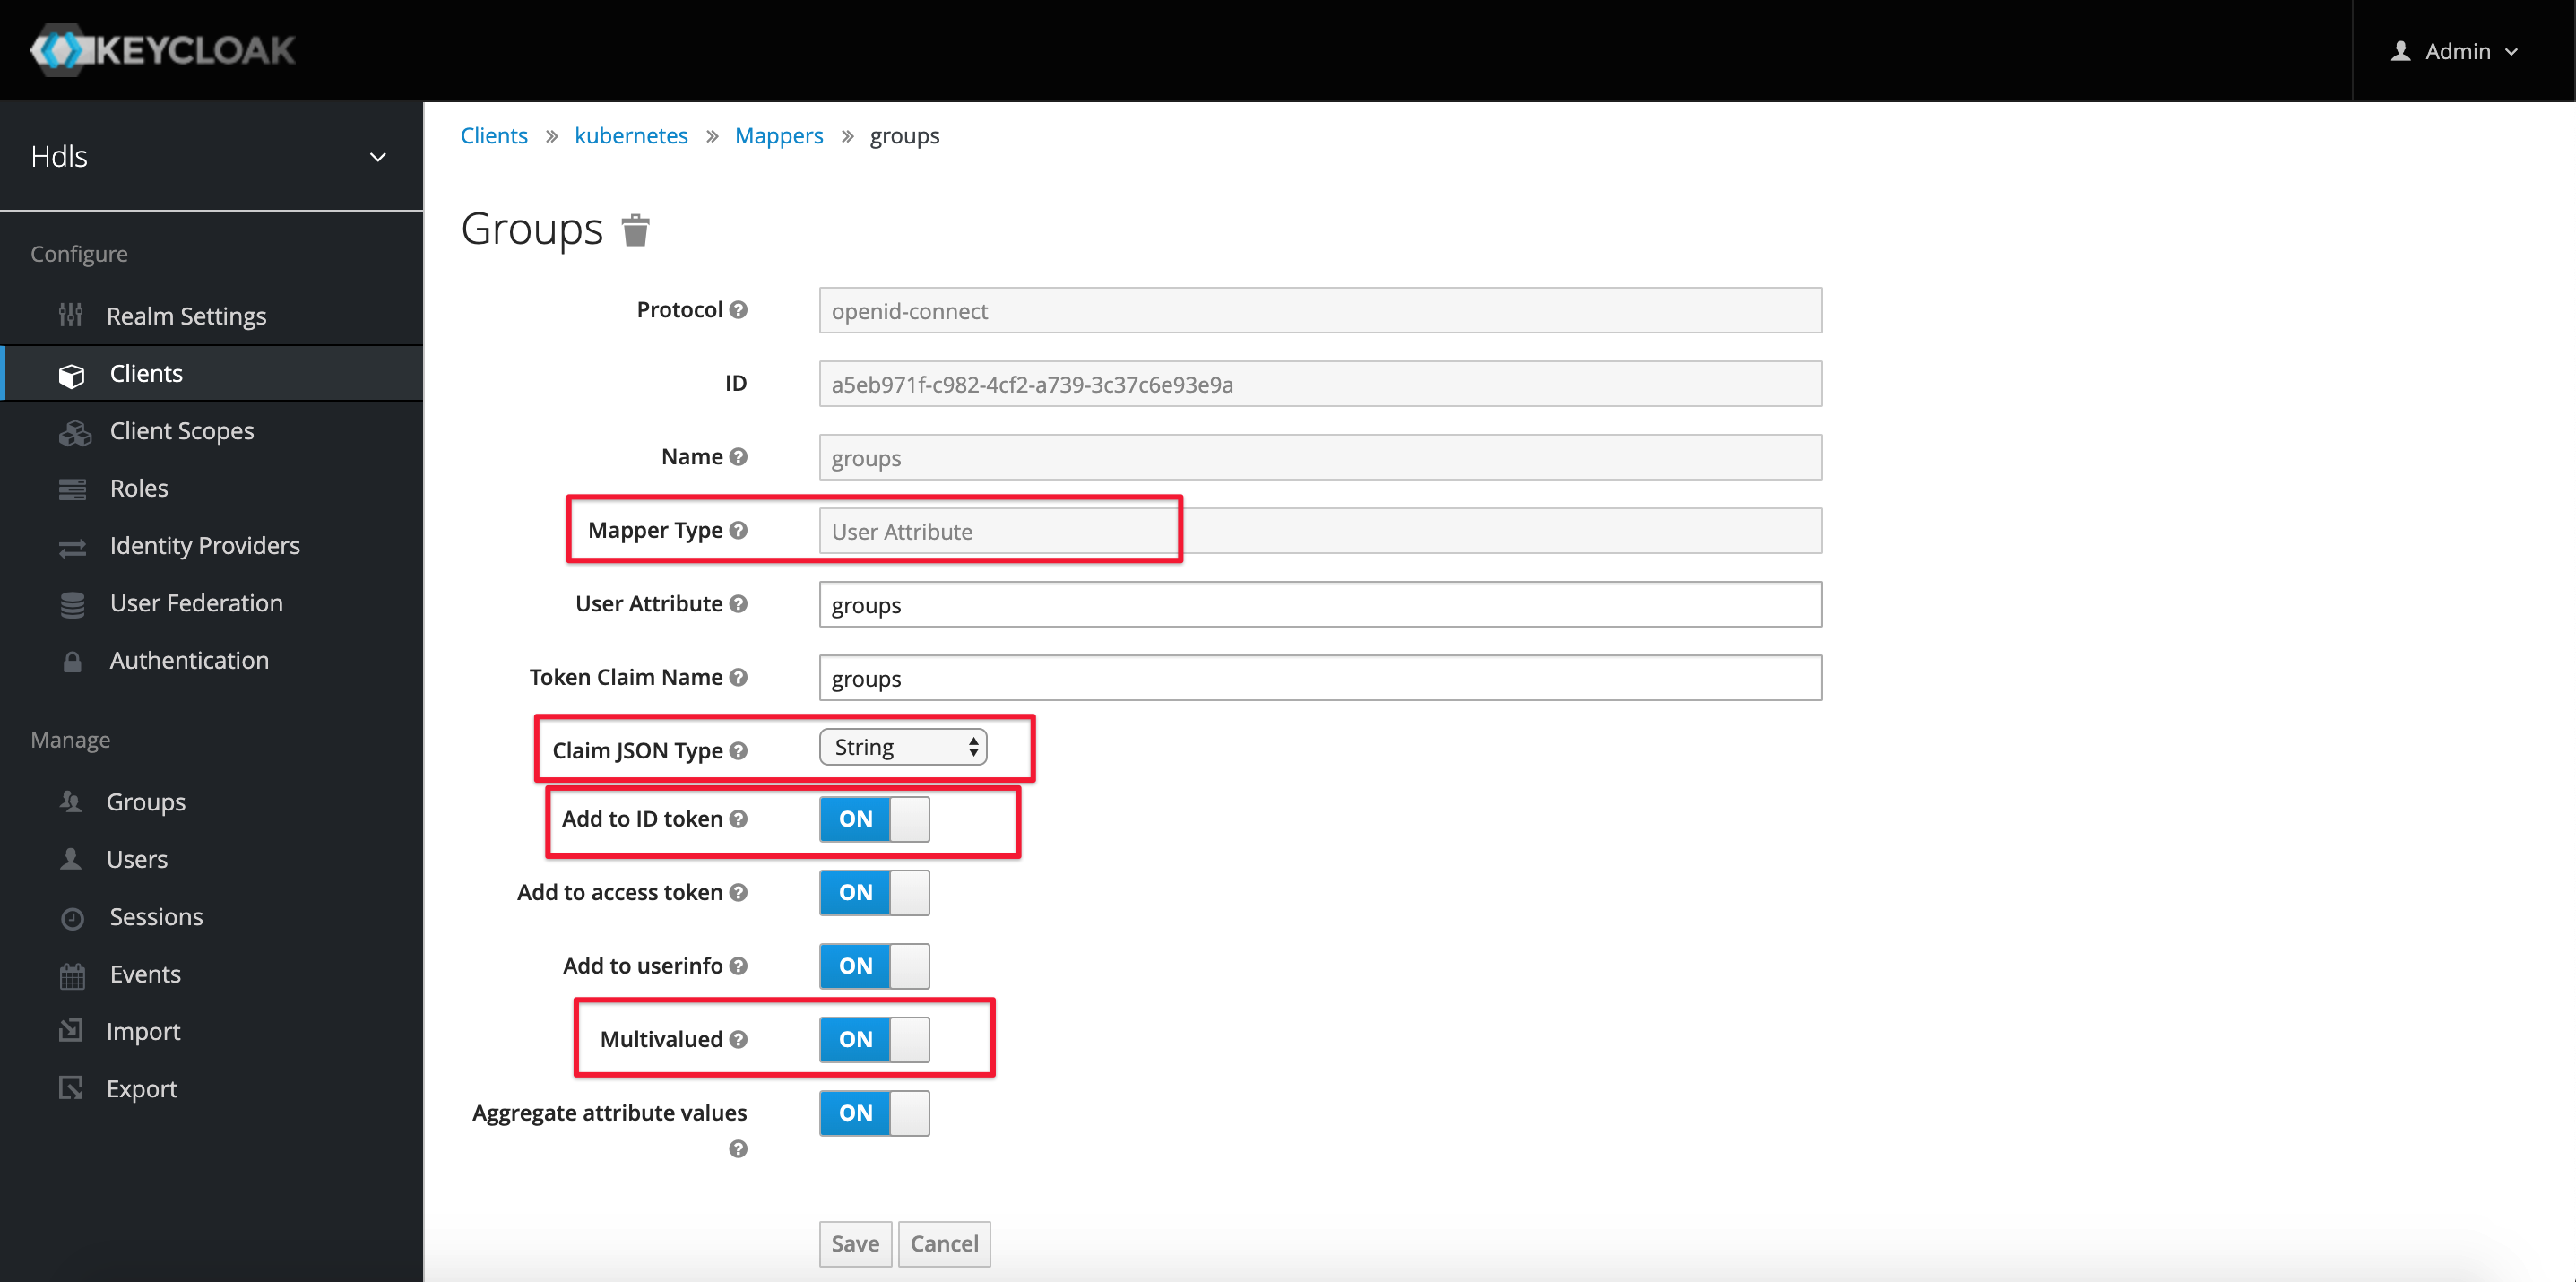
我们在 Client 中添加了一项 “User Attribute”,并将其加入到 ID Token 中;Multivalued 必须设置为 ON,保证 "groups" Claim 的值为一个 String 数组,其中每个值代表 User 所属的一个分组,一个 User 可以同时属于多个分组,每个值之间使用逗号分隔。
第二步就是为用户设置 "groups" 属性:
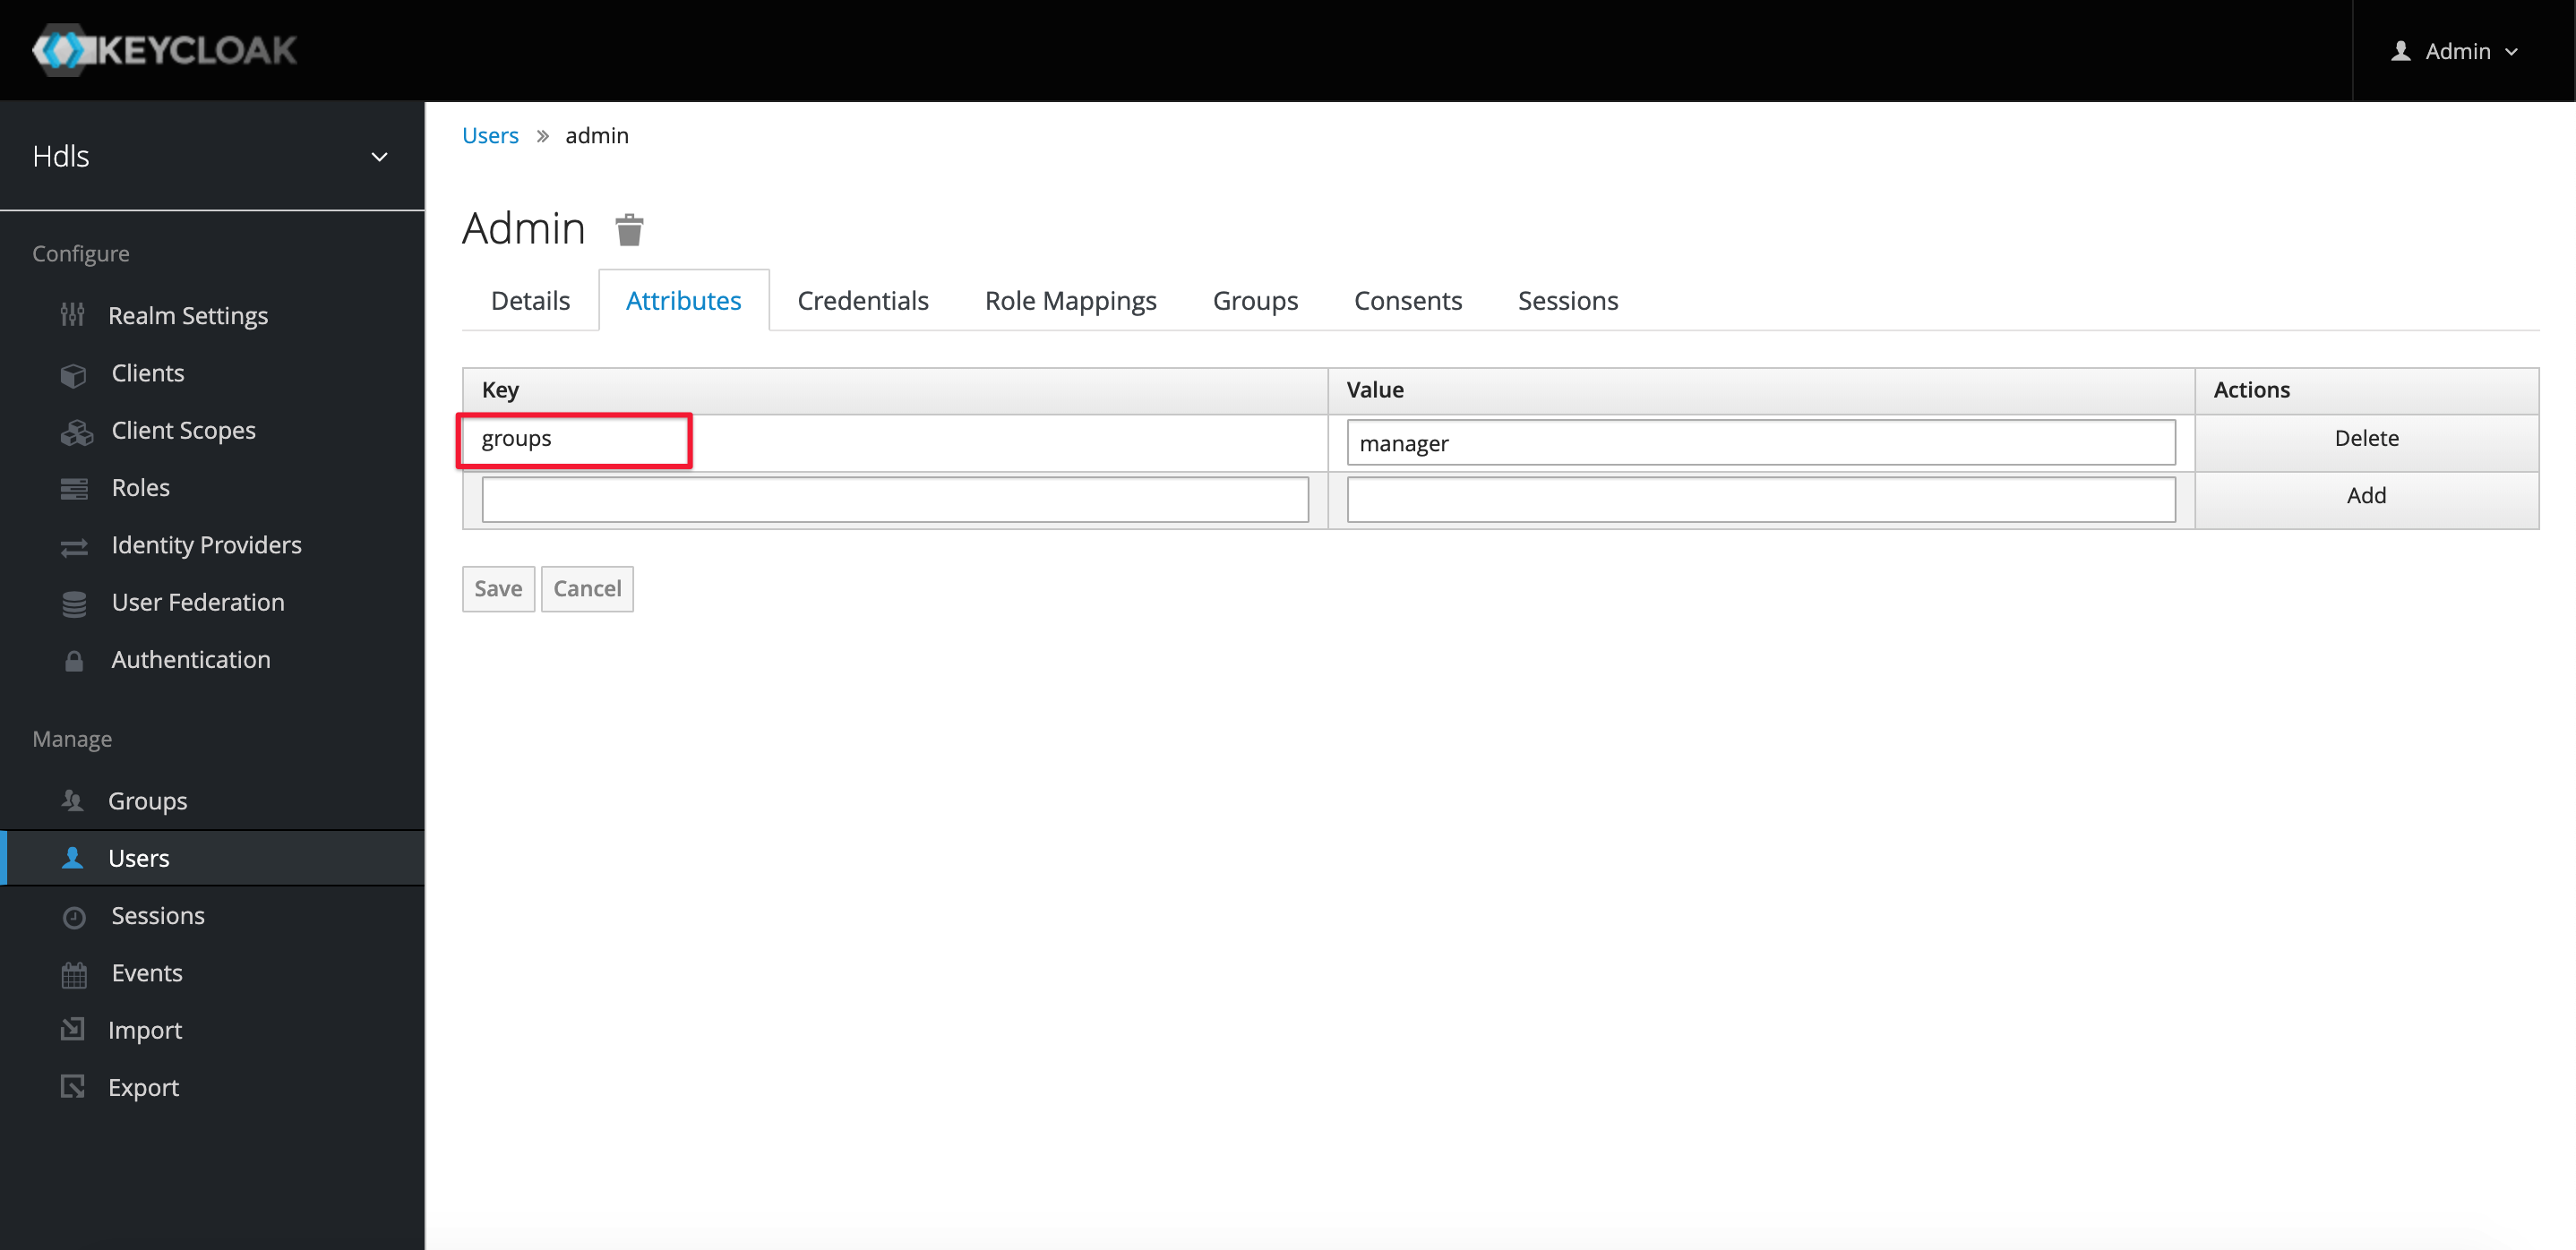
一切都设置好之后,可以在 “admin” 这个用户的 ID Token 中看到其 “groups” 属性:
{
    "jti":"9259af9c-8a3d-45ff-94f6-6780f2a79580",
    "exp":1564739637,
    "nbf":0,
    "iat":1564739337,
    "iss":"https://172.16.105.1:8082/auth/realms/hdls",
    "aud":"kubernetes",
    "sub":"f846ddb1-4435-429f-9ce5-faba7a791d43",
    "typ":"ID",
    "azp":"kubernetes",
    "auth_time":0,
    "session_state":"37b1a2ca-1b3b-4c61-ae2c-f8c14818ca6e",
    "acr":"1",
    "email_verified":false,
    "groups":[
        "manager"
    ],
    "preferred_username":"admin"
}
ApiServer 的配置
ApiServer 中留了几个可配置的环境变量,用以支持 OIDC 插件,官方链接。
oidc-issuer-url:OIDC Server 的 URL,只接受 https 协议。
oidc-client-id:OIDC Server 中配置的 client_id,具有唯一性。
oidc-username-claim:指明 ID Token 中用以标识用户名称的 claim。
oidc-username-prefix:用户名前缀,“-” 表示没有前缀。
oidc-groups-claim:ID Token 中可以表明用户所在 group 的 claim,要求该 claim 必须是数组形式,所以用户可以属于多个 group。
oidc-groups-prefix:group 前缀。
oidc-ca-file:Identity Provider 的 CA 证书所在路径。
本文的配置参数如下:
    - --oidc-issuer-url=https://172.16.105.1:8082/auth/realms/hdls
    - --oidc-client-id=kubernetes
    - --oidc-username-claim=preferred_username
    - --oidc-username-prefix=-
    - --oidc-groups-claim=groups
    - --oidc-ca-file=/etc/kubernetes/pki/ca.crt
KubeConfig 的配置
作为用户,我们需要通过 Client Application 来访问 API Server,kubectl 显然是首选 Client,让 kubectl 以我们创建的用户 "admin" 的身份来访问 Kubernetes,并通过身份认证,而这需要对 KubeConfig 进行配置,来完成以下几个流程:
- 创建一个 kubeconfig user:"admin"。
- 为 "admin" 配置上 client-id,client credential,id-token,refresh-token,certficaite 等等属性。
- 为 "admin" 创建的一个 user context。
- 将它设置为当前 context。
下面的命令可以一键生成配置:
kubectl config set-credentials USER_NAME \
   --auth-provider=oidc \
   --auth-provider-arg=idp-issuer-url=( issuer url ) \
   --auth-provider-arg=client-id=( your client id ) \
   --auth-provider-arg=client-secret=( your client secret ) \
   --auth-provider-arg=refresh-token=( your refresh token ) \
   --auth-provider-arg=idp-certificate-authority=( path to your ca certificate ) \
   --auth-provider-arg=id-token=( your id_token )
Token 的获取方式
ID Token 和 Refresh Token 的生成方式有很多种,其中最简单的方式是使用 curl 进行 Password Grant 方式的身份认证,从而获取想要的 ID Token 和 Refresh Token:
$ curl -k 'https://172.16.105.1:8082/auth/realms/hdls/protocol/openid-connect/token' -d "client_id=kubernetes" -d "client_secret=40dc1fef...c3eeec6" -d "response_type=code token" -d "grant_type=password" -d "username=test" -d "password=dangerous" -d "scope=openid"
{
    "access_token":"eyJhbGciOiJSU...0CMPw",
    "expires_in":300,
    "refresh_expires_in":1800,
    "refresh_token":"eyJhbGciOiJ...W1VUA",
    "token_type":"bearer",
    "id_token":"eyJhbGc...z3TaGJGQ",
    "not-before-policy":0,
    "session_state":"2845e...92ff2",
    "scope":"openid profile email"
}
然而这每次都需要手动生成 Token 并填写进 KubeConfig 中,非常麻烦。好消息是,社区已经有很多可以帮你自动将 Token 写入 KubeConfig 中的工具,非常好用,比如:
用户管理
在将一切都配置成功后,我们再来看给用户分配权限。这需要考虑到 K8s 的 RBAC 系统。
RBAC
对 group 为 manager 的用户,我们对其赋予系统自带的 "cluster-admin" 角色,即为 cluster 的管理员权限:
kind: ClusterRoleBinding
apiVersion: rbac.authorization.k8s.io/v1
metadata:
  name: keycloak-admin-group
roleRef:
  apiGroup: rbac.authorization.k8s.io
  kind: ClusterRole
  name: cluster-admin
subjects:
- kind: Group
  name: manager
  apiGroup: rbac.authorization.k8s.io
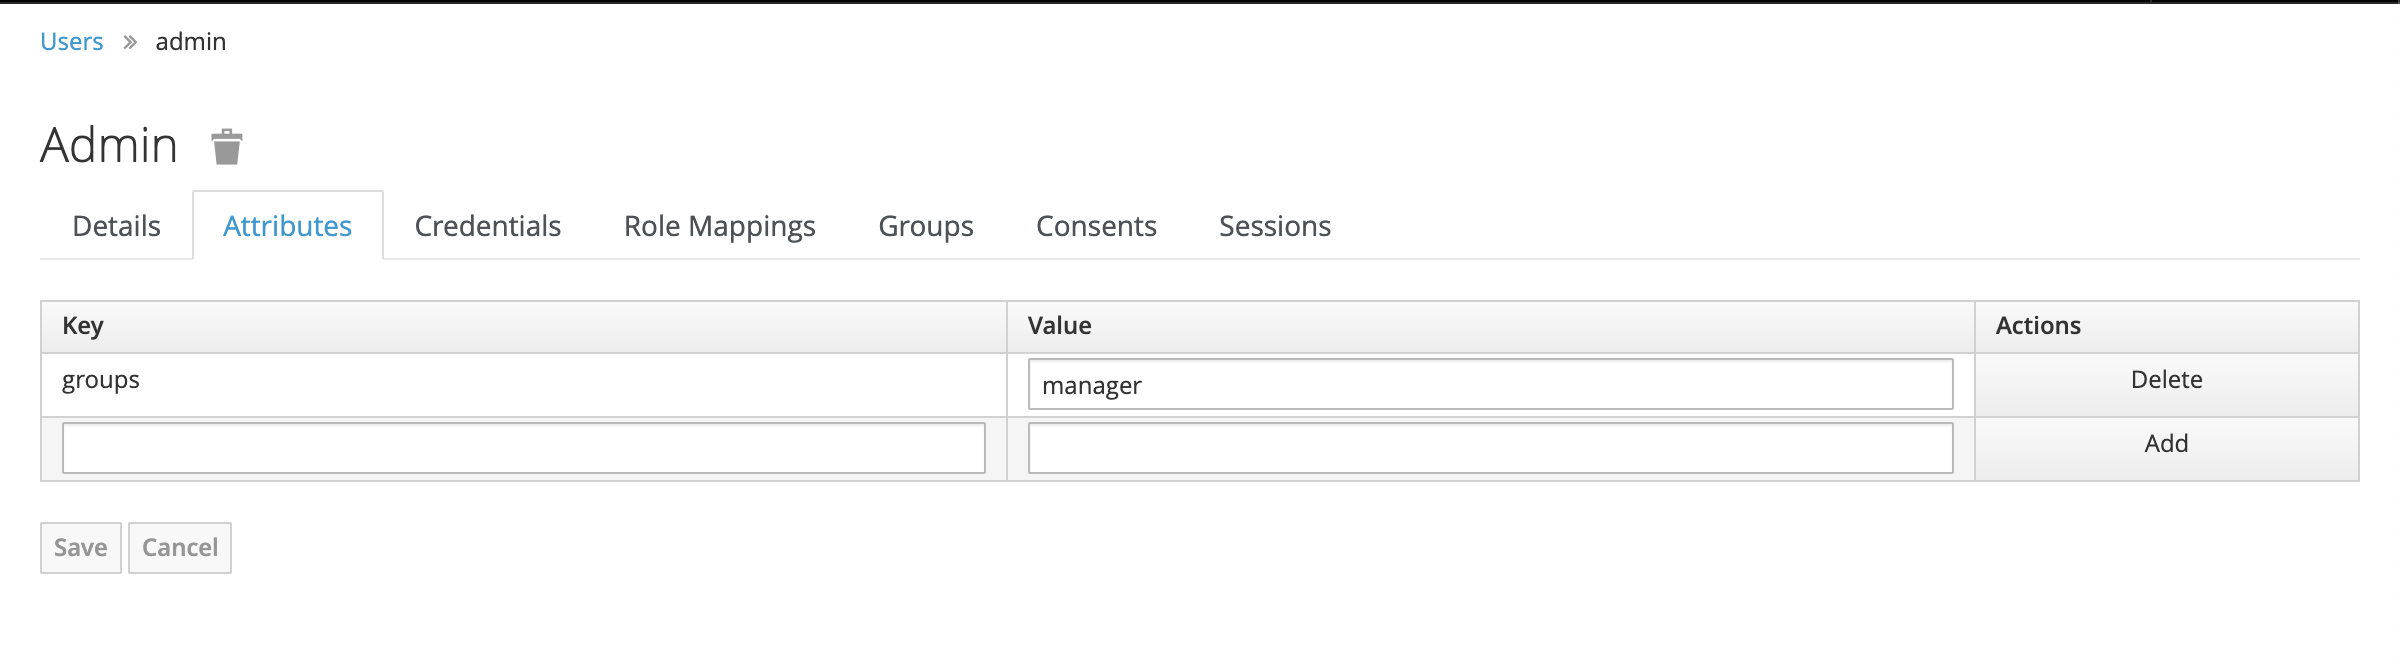
我们在 keyCloak 中将 admin 用户 “加入” 到 “manager” 组中:
然后用该用户访问 APIServer :
[root@172-16-105-1 ~]# kubelogin --username=admin --password=dangerous
You got a valid token until 2019-08-03 15:32:42 +0800 CST
[root@172-16-105-1 ~]#
[root@172-16-105-1 ~]# kubectl get cs
NAME                 STATUS    MESSAGE             ERROR
controller-manager   Healthy   ok
scheduler            Healthy   ok
etcd-0               Healthy   {"health":"true"}
[root@172-16-105-1 ~]# kubectl get no
NAME           STATUS   ROLES    AGE   VERSION
172-16-105-1   Ready    master   54d   v1.14.1
172-16-105-2   Ready    <none>   54d   v1.14.1
[root@172-16-105-1 ~]# kubectl get po
No resources found.
[root@172-16-105-1 ~]# kubectl get all
NAME                     TYPE        CLUSTER-IP       EXTERNAL-IP   PORT(S)        AGE
service/kubernetes       ClusterIP   10.96.0.1        <none>        443/TCP        54d
可以看到 “admin” 用户有所有资源的权限。
然后,我们再对 group 为 developer 的用户,新建一个角色叫做 "hdls-role",只给他们对 pod 的查看权限:
kind: ClusterRole
apiVersion: rbac.authorization.k8s.io/v1
metadata:
  name: hdls-role
rules:
- apiGroups: [""]
  resources: ["pods"]
  verbs: ["get", "list"]
---
kind: ClusterRoleBinding
apiVersion: rbac.authorization.k8s.io/v1
metadata:
  name: hdls-rolebinding
roleRef:
  kind: ClusterRole
  name: hdls-role
  apiGroup: rbac.authorization.k8s.io
subjects:
- kind: Group
  name: developer
  apiGroup: rbac.authorization.k8s.io
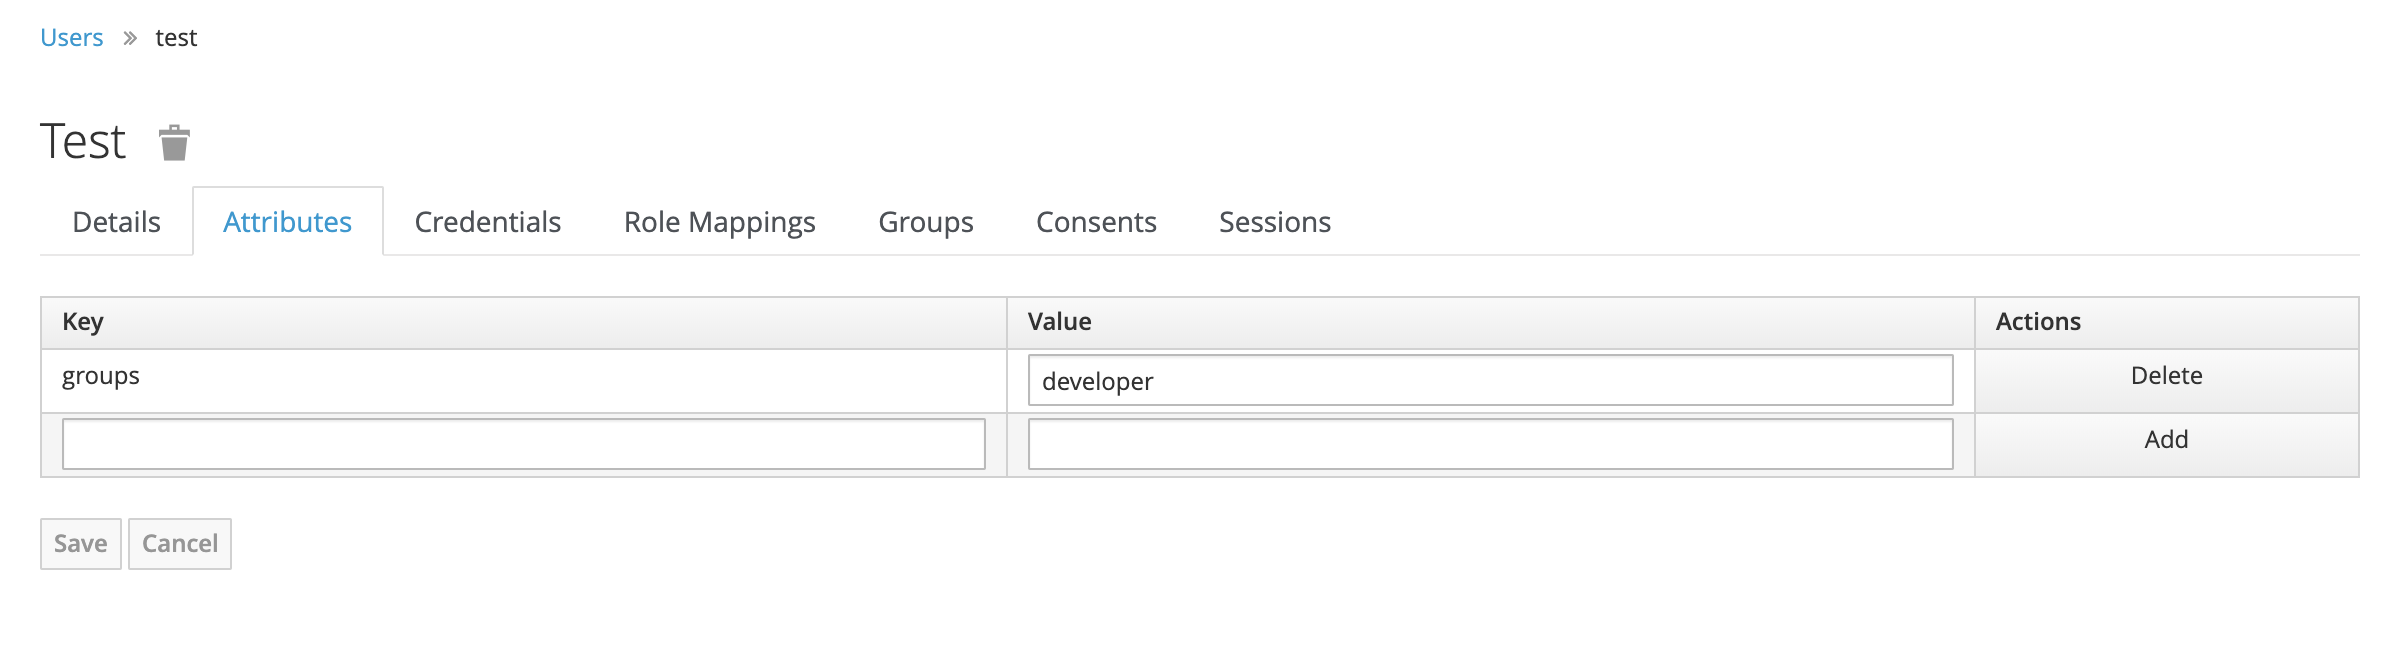
在 keyCloak 中将 test 用户 “加入” 到 “developer” 组中:
然后用该用户访问 APIServer :
[root@172-16-105-1 ~]# kubelogin --username=test --password=dangerous
You got a valid token until 2019-08-03 15:40:21 +0800 CST
[root@172-16-105-1 ~]#
[root@172-16-105-1 ~]# kubectl get po
No resources found.
[root@172-16-105-1 ~]# kubectl get no
Error from server (Forbidden): nodes is forbidden: User "test" cannot list resource "nodes" in API group "" at the cluster scope
[root@172-16-105-1 ~]#
[root@172-16-105-1 ~]# kubectl get cs
Error from server (Forbidden): componentstatuses is forbidden: User "test" cannot list resource "componentstatuses" in API group "" at the cluster scope
[root@172-16-105-1 ~]#
[root@172-16-105-1 ~]# kubectl get all
Error from server (Forbidden): replicationcontrollers is forbidden: User "test" cannot list resource "replicationcontrollers" in API group "" in the namespace "default"
Error from server (Forbidden): services is forbidden: User "test" cannot list resource "services" in API group "" in the namespace "default"
Error from server (Forbidden): daemonsets.apps is forbidden: User "test" cannot list resource "daemonsets" in API group "apps" in the namespace "default"
Error from server (Forbidden): deployments.apps is forbidden: User "test" cannot list resource "deployments" in API group "apps" in the namespace "default"
Error from server (Forbidden): replicasets.apps is forbidden: User "test" cannot list resource "replicasets" in API group "apps" in the namespace "default"
Error from server (Forbidden): statefulsets.apps is forbidden: User "test" cannot list resource "statefulsets" in API group "apps" in the namespace "default"
Error from server (Forbidden): horizontalpodautoscalers.autoscaling is forbidden: User "test" cannot list resource "horizontalpodautoscalers" in API group "autoscaling" in the namespace "default"
Error from server (Forbidden): jobs.batch is forbidden: User "test" cannot list resource "jobs" in API group "batch" in the namespace "default"
Error from server (Forbidden): cronjobs.batch is forbidden: User "test" cannot list resource "cronjobs" in API group "batch" in the namespace "default"
test 用户除了能够获取 pod 信息,对于其他资源处处受限。
总结
本文仅仅通过 KeyCloak 和 kubectl 向大家介绍了 K8s 中如何进行用户管理,相应地,如果自己的用户中心实现 OIDC 协议,并且客户端通过 ID Token 以 "bearer token" 的方式来访问 APIServer,就能真正的将 K8s 的权限系统与上层建筑打通。

