

一、本地分支
- 1、创建分支
git branch name
eg:
$ git branch testing
- 2、切换分支
git checkout name
eg:
$ git checkout testing
- 3、新建分支处理问题
比如现在有一个需要处理的issue,并且命名为issue20,这个时候我们创建一个分支并且修复他可以这样子
git checkout -b issue20
这里我们加上了-b这个参数,起代表的意思是:
创建一个分支,并且选择他
$ git branch issue20
$ git checkout issue20
假设我们已经把issue20修复完成了,这个时候我们要把分支修改后的内容合并到master分上面去
- 4、合并分支
- 1、回到你要合并的分支
- 2、使用
merge指令
$ git checkout '输入要回到的分支名称'
$ git merge '要合并的分支名称'

eg:
$ git checkout master
$ git merge testing
请注意,合并时出现了“Fast forward”的提示。由于当前 master 分支所在的提交对象是要并入的 testing 分支的直接上游,Git 只需把 master 分支指针直接右移。换句话说,如果顺着一个分支走下去可以到达另一个分支的话,那么 Git 在合并两者时,只会简单地把指针右移,因为这种单线的历史分支不存在任何需要解决的分歧,所以这种合并过程可以称为快进(Fast forward)。
合并完成之后,对于我们修复bug的那个分支已经不需要存在了,就可以把起删除掉
- 5、删除分支
git branch -d name
eg:
$ git branch -d testing
但是在项目中合并可能不会那么容易,如果遇到的合并分支的冲突
$ git merge issue20
Auto-merging index.html
CONFLICT (content): Merge conflict in index.html
Automatic merge failed; fix conflicts and then commit the result.
如何查看冲突文件?
- 6、查看冲突文件
$ git status
任何包含未解决冲突的文件都会以未合并(unmerged)的状态列出。Git 会在有冲突的文件里加入标准的冲突解决标记,可以通过它们来手工定位并解决这些冲突。可以看到此文件包含类似下面这样的部分:
<<<<<<< HEAD
<div id="footer">contact : email.support@github.com</div>
=======
<div id="footer">
  please contact us at support@github.com
</div>
>>>>>>> issue20
可以看到=======隔开的上半部分,是 HEAD(即 master 分支,在运行 merge 命令时所切换到的分支)中的内容,下半部分是在 issue20 分支中的内容。解决冲突的办法无非是二者选其一或者由你亲自整合到一起。比如你可以通过把这段内容替换为下面这样来解决:
<div id="footer">
please contact us at email.support@github.com
</div>
这个解决方案各采纳了两个分支中的一部分内容,而且我还删除了 <<<<<<<,======= 和 >>>>>>> 这些行。在解决了所有文件里的所有冲突后,运行 git add 将把它们标记为已解决状态
(译注:实际上就是来一次快照保存到暂存区域。)。因为一旦暂存,就表示冲突已经解决。如果你想用一个有图形界面的工具来解决这些问题,不妨运行 git mergetool,它会调用一个可视化的合并工具并引导你解决所有冲突:
$ git mergetool

This message is displayed because 'merge.tool' is not configured.
See 'git mergetool --tool-help' or 'git help config' for more details.
'git mergetool' will now attempt to use one of the following tools:
opendiff kdiff3 tkdiff xxdiff meld tortoisemerge gvimdiff diffuse diffmerge ecmerge p4merge araxis bc3 codecompare vimdiff emerge
Merging:
index.html

Normal merge conflict for 'index.html':
  {local}: modified file
  {remote}: modified file
Hit return to start merge resolution tool (opendiff):
如果不想用默认的合并工具(Git 为我默认选择了 opendiff,因为我在 Mac 上运行了该命令),你可以在上方"merge tool candidates"里找到可用的合并工具列表,输入你想用的工具名。我们将在第七章讨论怎样改变环境中的默认值。
退出合并工具以后,Git 会询问你合并是否成功。如果回答是,它会为你把相关文件暂存起来,以表明状态为已解决。
再运行一次 git status 来确认所有冲突都已解决:
$ git status
On branch master
Changes to be committed:
  (use "git reset HEAD <file>..." to unstage)

        modified:   index.html
如果觉得满意了,并且确认所有冲突都已解决,也就是进入了暂存区,就可以用git commit来完成这次合并提交。提交的记录差不多是这样:
Merge branch 'issue20'

Conflicts:
  index.html
#
# It looks like you may be committing a merge.
# If this is not correct, please remove the file
#       .git/MERGE_HEAD
# and try again.
#
如果想给将来看这次合并的人一些方便,可以修改该信息,提供更多合并细节。
比如你都作了哪些改动,以及这么做的原因。有时候裁决冲突的理由并不直接或明显,有必要略加注解。
- 7、查看分支列表
$ git branch

其中绿色前面带
*号的表示当前选中的分支- 8、查看分支列表以及分支信息
$ git branch -v

- 9、查看那些分支还未/已合并
已合并,通常我们为了处理某个问题而开的分支,在合并之后就可以删除了
eg:
$ git branch --merged
未合并,如果删除未合并的分支会报错,因为那样子会数据丢失,但是如果你执意删除可以使用-D来进行删除
eg:
$ git branch --no-merged
二、远程分支
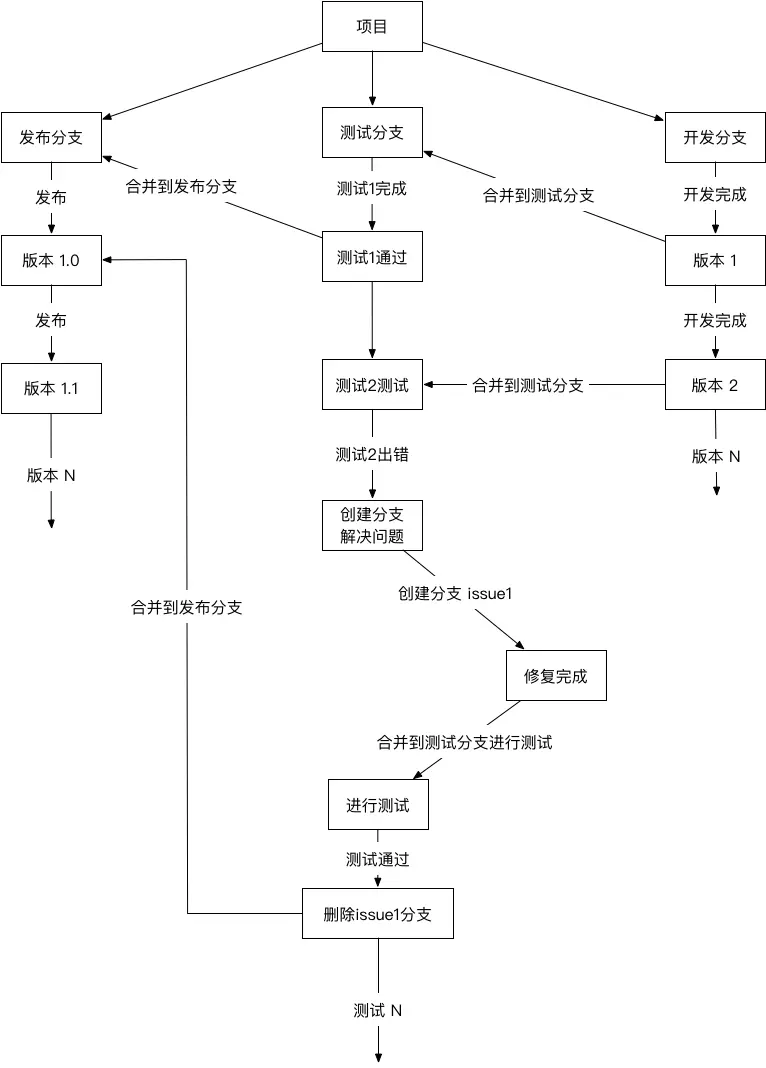
当我们需要协同开发的时候,我们通常会一个发布通道,一个测试通道以及一个正在开发的通道。
发布通道中我们会把测试ok的代码合并到里面去,然后我们新编写的功能开发完成就会加入测试分支。
类似于下面这样子,作者自己画的,有点丑……见谅
- 1、新建远程分支
可以分为两步,第一步新创建本地分支,第二步把本地分支push到服务器上去
eg:
$ git branch haha

eg:
$ git push origin haha
- 2、下拉指定分支
git checkout --track origin/testbranch
如果你从服务器上面下拉分支的时候出现了fatal: 'origin/testbranch' is not a commit and a branch 'testbranch' cannot be created from it
这种错误,那么就可以使用
重点:
git fetch origin 来同步远程服务器上的数据到本地
然后在下拉一次
$ git checkout --track origin/testbranch

Branch testbranch set up to track remote branch testbranch from origin.
Switched to a new branch 'testbranch'
看到Switched to a new branch 'xxx'这样子的字样就说明成功了
- 3、提交数据到指定分支
git push origin 分支名称
git push origin haha
Counting objects: 3, done.
Delta compression using up to 4 threads.
Compressing objects: 100% (2/2), done.
Writing objects: 100% (3/3), 260 bytes | 260.00 KiB/s, done.
Total 3 (delta 0), reused 0 (delta 0)
...
- 4、删除指定分支
git push origin :分支名称
 git push origin :haha
remote: Powered by Gitee.com
To gitee.com:codepgq/EIQ-Smart.git
 - [deleted]         haha
三、合并分支的指定文件
假设现在有两个分支:jack、smith,
然后在jack中新建了两个文件(a.c 和 b.c)
这个时候想把b.c合并到smith中
- 首先在jack
这里如果你没提交有可能会丢失数据
git add .
git commit -m "xxxxx"
- 然后就要切换分支
git checkout simith
- 再把要合并的文件,导入到当前的分支中
git checkout 分支名 文件路径
git checkout jack b.c
这里需要注意,因为b.c就在根文件,所以不需要路径只需要文件名,
但是如果你的文件在子文件夹内,就需要把文件路径也导入进来
更新:2018年11月06日
如何切换Git的源(当个人项目转移到公司账号下或者修改了项目名称)
码云
git remote set-url origin [git@gitee.com](mailto:git@gitee.com):地址.git


github
git remote set-url origin [git@github.com](mailto:git@github.com):地址.git
作为一个开发者,有一个学习的氛围和一个交流圈子特别重要,这是我的交流群761407670(111),大家有兴趣可以进群里一起交流学习
