

前言
有关OkHttp的介绍这里就不做过多赘述,这个框架算是Android开发中的网络框架大佬。在很多知名的框架里也能找到它的身影,例如:Glide、Retrofit等等。
既然这么牛X,我们当然要来分析一下这个框架。本篇文章使用的是3.12.0版本,当然官网最新版本是4.2.2,4.x和3.x的区别主要在于4.x使用kotlin语言对框架进行重写,3.x使用的是Java语言。最后还要提醒一句,在使用网络框架时不要忘记网络权限!网络权限!网络权限!

网络基础知识
有关网络相关的知识在这里就不做介绍了,这部分知识很重要,希望各位小伙伴能够掌握。这里为各位小伙伴准备了SnailClimb大佬的JavaGuide开源项目,里面对相关基础知识做了介绍,有兴趣的小伙伴可以看一下。
使用方法
 private final String url_navi = "https://www.wanandroid.com/navi/json";
    private final String url_friend = "https://www.wanandroid.com/friend/json";
    private TextView tv_response;

    Handler mHandler = new Handler() {
        @Override
        public void handleMessage(@NonNull final Message msg) {
            tv_response.setText(msg.obj.toString());
        }
    };

    @Override
    public void onClick(View v) {
        switch (v.getId()) {
            case R.id.btn_enqueue:
                enqueue();
                break;
            case R.id.btn_execute:
                execute();
                break;
        }
    }

    private void enqueue() {
        OkHttpClient okHttpClient = new OkHttpClient();
        Request request = new Request.Builder()
                .get()
                .url(url_friend)
                .build();
        final Call call = okHttpClient.newCall(request);
        call.enqueue(new Callback() {
            @Override
            public void onFailure(Call call, IOException e) {

            }

            @Override
            public void onResponse(Call call, Response response) throws IOException {
                Message message = Message.obtain();
                message.what = 1;
                message.obj = response.body().string();
                mHandler.sendMessage(message);
            }
        });
    }

    private void execute() {
        final OkHttpClient okHttpClient = new OkHttpClient();
        final Request request = new Request.Builder()
                .get()
                .url(url_navi)
                .build();
        new Thread(new Runnable() {
            @Override
            public void run() {
                try {
                    Response response = okHttpClient.newCall(request).execute();
                    Message message = Message.obtain();
                    message.what = 1;
                    message.obj = response.body().string();
                    mHandler.sendMessage(message);
                } catch (IOException e) {
                    e.printStackTrace();
                }
            }
        }).start();
    }
写这个例子是用到了鸿洋大神的Wandroid网站开放API,非常感谢。
我们都知道,在Android主线程中不能做耗时操作。所以我们将网络请求放到了子线程中。当请求拿到数据之后,通过Handler将数据传到主线程中对UI进行修改。
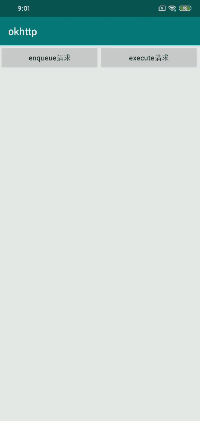
这里使用了OkHttp中的两种请求方法,一种是enqueue方法,另一种是execute方法。前者属于异步方法,后者属于同步方法,这两种方法都会在下文中讲到。最后我们看一下运行效果:
源码解析
我们在进行网络请求时,首先会创建一个OkHttpClient对象,我们来看一下。
OkHttpClient
public class OkHttpClient implements Cloneable, Call.Factory, WebSocket.Factory {
    ...
    public OkHttpClient() {
        this(new Builder());
    }

    OkHttpClient(Builder builder) {
        this.dispatcher = builder.dispatcher;
        this.proxy = builder.proxy;
        this.protocols = builder.protocols;
        this.connectionSpecs = builder.connectionSpecs;
        this.interceptors = Util.immutableList(builder.interceptors);
        this.networkInterceptors = Util.immutableList(builder.networkInterceptors);
        this.eventListenerFactory = builder.eventListenerFactory;
        this.proxySelector = builder.proxySelector;
        this.cookieJar = builder.cookieJar;
        this.cache = builder.cache;
        this.internalCache = builder.internalCache;
        this.socketFactory = builder.socketFactory;
        boolean isTLS = false;
        for (ConnectionSpec spec : connectionSpecs) {
          isTLS = isTLS || spec.isTls();
        }

        if (builder.sslSocketFactory != null || !isTLS) {
          this.sslSocketFactory = builder.sslSocketFactory;
          this.certificateChainCleaner = builder.certificateChainCleaner;
        } else {
          X509TrustManager trustManager = Util.platformTrustManager();
          this.sslSocketFactory = newSslSocketFactory(trustManager);
          this.certificateChainCleaner = CertificateChainCleaner.get(trustManager);
        }

        if (sslSocketFactory != null) {
          Platform.get().configureSslSocketFactory(sslSocketFactory);
        }
        this.hostnameVerifier = builder.hostnameVerifier;
        this.certificatePinner = builder.certificatePinner.withCertificateChainCleaner(certificateChainCleaner);
        this.proxyAuthenticator = builder.proxyAuthenticator;
        this.authenticator = builder.authenticator;
        this.connectionPool = builder.connectionPool;
        this.dns = builder.dns;
        this.followSslRedirects = builder.followSslRedirects;
        this.followRedirects = builder.followRedirects;
        this.retryOnConnectionFailure = builder.retryOnConnectionFailure;
        this.callTimeout = builder.callTimeout;
        this.connectTimeout = builder.connectTimeout;
        this.readTimeout = builder.readTimeout;
        this.writeTimeout = builder.writeTimeout;
        this.pingInterval = builder.pingInterval;
        if (interceptors.contains(null)) {
          throw new IllegalStateException("Null interceptor: " + interceptors);
        }
        if (networkInterceptors.contains(null)) {
          throw new IllegalStateException("Null network interceptor: " + networkInterceptors);
        }
    }
    ...
}
我们通过调用OkHttpClient()的无参构造函数时,在其内部调用了OkHttpClient(Builder builder)构造函数,传入一个Builder对象,通过Builder对象对OkHttpClient()内部的属性字段进行赋值。我们再来看一下Builder类。
OkHttpClient->Builder
public static final class Builder {
    Dispatcher dispatcher;
    @Nullable Proxy proxy;
    List<Protocol> protocols;
    List<ConnectionSpec> connectionSpecs;
    final List<Interceptor> interceptors = new ArrayList<>();
    final List<Interceptor> networkInterceptors = new ArrayList<>();
    EventListener.Factory eventListenerFactory;
    ProxySelector proxySelector;
    CookieJar cookieJar;
    @Nullable Cache cache;
    @Nullable InternalCache internalCache;
    SocketFactory socketFactory;
    @Nullable SSLSocketFactory sslSocketFactory;
    @Nullable CertificateChainCleaner certificateChainCleaner;
    HostnameVerifier hostnameVerifier;
    CertificatePinner certificatePinner;
    Authenticator proxyAuthenticator;
    Authenticator authenticator;
    ConnectionPool connectionPool;
    Dns dns;
    boolean followSslRedirects;
    boolean followRedirects;
    boolean retryOnConnectionFailure;
    int callTimeout;
    int connectTimeout;
    int readTimeout;
    int writeTimeout;
    int pingInterval;

    public Builder() {
      dispatcher = new Dispatcher(); //请求分发器
      protocols = DEFAULT_PROTOCOLS; //默认协议
      connectionSpecs = DEFAULT_CONNECTION_SPECS;
      eventListenerFactory = EventListener.factory(EventListener.NONE);
      proxySelector = ProxySelector.getDefault();
      if (proxySelector == null) {
        proxySelector = new NullProxySelector();
      }
      cookieJar = CookieJar.NO_COOKIES;
      socketFactory = SocketFactory.getDefault();
      hostnameVerifier = OkHostnameVerifier.INSTANCE;
      certificatePinner = CertificatePinner.DEFAULT;
      proxyAuthenticator = Authenticator.NONE;
      authenticator = Authenticator.NONE;
      connectionPool = new ConnectionPool(); //连接池
      dns = Dns.SYSTEM;
      followSslRedirects = true;
      followRedirects = true;
      retryOnConnectionFailure = true;
      callTimeout = 0;
      connectTimeout = 10_000; //连接超时时间
      readTimeout = 10_000; //读取超时时间
      writeTimeout = 10_000; //写入超时时间
      pingInterval = 0;
    }
    ...
}
这个Builder是OkhttpClient的内部类,在它的构造方法中是对其属性字段进行赋值。
Dispatcher
在上一步Buidler赋值的过程中,创建了一个Dispatcher类,这个类是干什么的?
/**
 * Policy on when async requests are executed.
 *
 * <p>Each dispatcher uses an {@link ExecutorService} to run calls internally. If you supply your
 * own executor, it should be able to run {@linkplain #getMaxRequests the configured maximum} number
 * of calls concurrently.
 */
public final class Dispatcher {
  private int maxRequests = 64; //最大请求个数
  private int maxRequestsPerHost = 5; //每个Host的最大请求个数
  private @Nullable Runnable idleCallback;

  private @Nullable ExecutorService executorService; //线程池对象

  private final Deque<AsyncCall> readyAsyncCalls = new ArrayDeque<>(); //将要执行的异步请求队列
  private final Deque<AsyncCall> runningAsyncCalls = new ArrayDeque<>(); //正在执行的异步请求队列
  private final Deque<RealCall> runningSyncCalls = new ArrayDeque<>(); //正在执行的同步请求队列

  public Dispatcher(ExecutorService executorService) {
    this.executorService = executorService;
  }

  public Dispatcher() {
  }

  // 创建一个线程池,核心线程为0,最大为Integer的最大值,空闲线程60s没任务线程自动销毁
  public synchronized ExecutorService executorService() {
    if (executorService == null) {
      executorService = new ThreadPoolExecutor(0, Integer.MAX_VALUE, 60, TimeUnit.SECONDS,
          new SynchronousQueue<Runnable>(), Util.threadFactory("OkHttp Dispatcher", false));
    }
    return executorService;
  }
  ...
  synchronized void executed(RealCall call) {
    runningSyncCalls.add(call);
  }

  void enqueue(AsyncCall call) {
    synchronized (this) {
      readyAsyncCalls.add(call);
    }
    promoteAndExecute();
  }
  ...
}
从这个类的注释我们可以看到,这个类和异步请求有关。
同时,我们可以看到,这个类中设定了最大的请求个数、每个Host最大的请求个数、线程池等等。同时还维护了三个队列,分别表示:准备执行的异步请求、正在执行的异步请求和正在执行的同步请求方法。
在执行executed方法时,实际是将一个同步请求对象加入到正在执行的同步请求队列中去;在执行enqueue方法时,将一个异步请求对象加入到准备执行的异步请求队列中去。
Request
创建完OkhttpClient对象之后,我们又使用new Request.Builder()方法创建Request对象,同时运用构建者模式对其进行赋值。
public final class Request {
  final HttpUrl url;
  final String method;
  final Headers headers;
  final @Nullable RequestBody body;
  final Map<Class<?>, Object> tags;

  private volatile @Nullable CacheControl cacheControl; // Lazily initialized.

  Request(Builder builder) {
    this.url = builder.url;
    this.method = builder.method;
    this.headers = builder.headers.build();
    this.body = builder.body;
    this.tags = Util.immutableMap(builder.tags);
  }

  public static class Builder {
    @Nullable HttpUrl url;
    String method;
    Headers.Builder headers;
    @Nullable RequestBody body;

    public Builder() {
      this.method = "GET";
      this.headers = new Headers.Builder();
    }

    Builder(Request request) {
      this.url = request.url;
      this.method = request.method;
      this.body = request.body;
      this.tags = request.tags.isEmpty()
          ? Collections.<Class<?>, Object>emptyMap()
          : new LinkedHashMap<>(request.tags);
      this.headers = request.headers.newBuilder();
    }

    public Builder url(HttpUrl url) {
      if (url == null) throw new NullPointerException("url == null");
      this.url = url;
      return this;
    }
    ...
  }
  ...
}
我们看到,这一步主要是对Request进行赋值,其中包括:请求地址、请求方法和请求体等等。
创建Call对象
这一步我们通过第一步创建的OkHttpClicent对象调用其newCall方法,传入第二步创建的Request对象,返回一个Call对象。
/**
 * A call is a request that has been prepared for execution. A call can be canceled. As this object
 * represents a single request/response pair (stream), it cannot be executed twice.
 */
public interface Call extends Cloneable {
    //获取初始化Call对象的原始Request对象
    Request request();
    //执行同步请求
    Response execute() throws IOException;
    //执行异步请求
    void enqueue(Callback responseCallback);
    //取消请求
    void cancel();
    //请求是否已经执行
    boolean isExecuted();
    //请求是否被取消
    boolean isCanceled();
    ...
}


public class OkHttpClient implements Cloneable, Call.Factory, WebSocket.Factory {
    ...
    @Override public Call newCall(Request request) {
        return RealCall.newRealCall(this, request, false /* for web socket */);
    }
    ...
}

final class RealCall implements Call {
    ...
    private RealCall(OkHttpClient client, Request originalRequest, boolean forWebSocket) {
        this.client = client;
        this.originalRequest = originalRequest;
        this.forWebSocket = forWebSocket;
        this.retryAndFollowUpInterceptor = new RetryAndFollowUpInterceptor(client, forWebSocket);
        this.timeout = new AsyncTimeout() {
            @Override protected void timedOut() {
                cancel();
            }
        };
        this.timeout.timeout(client.callTimeoutMillis(), MILLISECONDS);
    }

    static RealCall newRealCall(OkHttpClient client, Request originalRequest, boolean forWebSocket) {
        RealCall call = new RealCall(client, originalRequest, forWebSocket);
        call.eventListener = client.eventListenerFactory().create(call);
        return call;
    }
    ...
}
Call其实是一个接口,里面定义了一系列对请求进行操作的方法。RealCall对象实现了Call接口,重写了接口里面的方法。所以,这一步实际上返回的是一个RealCall对象,从这里我们也可以看出,真正发起请求的是RealCall对象。
RealCall -> execute
在执行网络请求时,我们使用了execute方法,我们看一下。
@Override public Response execute() throws IOException {
    synchronized (this) { // 1添加同步锁
      if (executed) throw new IllegalStateException("Already Executed"); // 2判断RealCall是否正在请求
      executed = true;
    }
    captureCallStackTrace();
    timeout.enter();
    eventListener.callStart(this);
    try {
      client.dispatcher().executed(this); //3 将请求对象加入到Dispatcher的正在执行同步请求队列
      Response result = getResponseWithInterceptorChain(); //4 获取拦截器链
      if (result == null) throw new IOException("Canceled");
      return result;
    } catch (IOException e) {
      e = timeoutExit(e);
      eventListener.callFailed(this, e);
      throw e;
    } finally {
      client.dispatcher().finished(this); //5 将请求对象从Dispatcher对象的队列中移除。
    }
 }
这个方法重要的操作都加入了注释,其中注释4处是最重要的,可以看成OkHttp框架最精华的部分,这个方法拦截器链,我们看一下这个方法。
RealCall -> getResponseWithInterceptorChain
Response getResponseWithInterceptorChain() throws IOException {
    // Build a full stack of interceptors.
    List<Interceptor> interceptors = new ArrayList<>();
    interceptors.addAll(client.interceptors()); //开发者自定义拦截器
    interceptors.add(retryAndFollowUpInterceptor); //失败重连拦截器,在初始化RealCall对象时同步初始化
    interceptors.add(new BridgeInterceptor(client.cookieJar())); // 桥接和适配拦截器
    interceptors.add(new CacheInterceptor(client.internalCache())); //缓存拦截器
    interceptors.add(new ConnectInterceptor(client)); // 连接拦截器
    if (!forWebSocket) {
      interceptors.addAll(client.networkInterceptors()); //网络拦截器
    }
    interceptors.add(new CallServerInterceptor(forWebSocket)); //请求服务拦截器

    //创建拦截器链
    Interceptor.Chain chain = new RealInterceptorChain(interceptors, null, null, null, 0,
        originalRequest, this, eventListener, client.connectTimeoutMillis(),
        client.readTimeoutMillis(), client.writeTimeoutMillis());

    //返回拦截器链执行结果
    return chain.proceed(originalRequest);
  }
我们就知道通过执行拦截器链可以获取请求结果,我们看一下这个连接器链是运行流程。
RealInterceptorChain
/**
 * A concrete interceptor chain that carries the entire interceptor chain: all application
 * interceptors, the OkHttp core, all network interceptors, and finally the network caller.
 */
public final class RealInterceptorChain implements Interceptor.Chain {
  private final List<Interceptor> interceptors;
  private final StreamAllocation streamAllocation;
  private final HttpCodec httpCodec;
  private final RealConnection connection;
  private final int index;
  private final Request request;
  private final Call call;
  private final EventListener eventListener;
  private final int connectTimeout;
  private final int readTimeout;
  private final int writeTimeout;
  private int calls;
  public RealInterceptorChain(List<Interceptor> interceptors, StreamAllocation streamAllocation,
      HttpCodec httpCodec, RealConnection connection, int index, Request request, Call call,
      EventListener eventListener, int connectTimeout, int readTimeout, int writeTimeout) {
    this.interceptors = interceptors;
    this.connection = connection;
    this.streamAllocation = streamAllocation;
    this.httpCodec = httpCodec;
    this.index = index;
    this.request = request;
    this.call = call;
    this.eventListener = eventListener;
    this.connectTimeout = connectTimeout;
    this.readTimeout = readTimeout;
    this.writeTimeout = writeTimeout;
  }
  ...
  public Response proceed(Request request, StreamAllocation streamAllocation, HttpCodec httpCodec,
      RealConnection connection) throws IOException {

    判断是否超过拦截器的个数
    if (index >= interceptors.size()) throw new AssertionError();

    calls++;

    // If we already have a stream, confirm that the incoming request will use it.
    if (this.httpCodec != null && !this.connection.supportsUrl(request.url())) {
    throw new IllegalStateException("network interceptor " + interceptors.get(index - 1)
    + " must retain the same host and port");

    }

    // If we already have a stream, confirm that this is the only call to chain.proceed().
    if (this.httpCodec != null && calls > 1) {
        throw new IllegalStateException("network interceptor " + interceptors.get(index - 1)
        + " must call proceed() exactly once");
    }

    // Call the next interceptor in the chain.
    // 请求下一个下一个拦截器
    RealInterceptorChain next = new RealInterceptorChain(interceptors, streamAllocation, httpCodec,
        connection, index + 1, request, call, eventListener, connectTimeout, readTimeout,
        writeTimeout);
    // 获取当前位置的拦截器
    Interceptor interceptor = interceptors.get(index);
    // 执行请求获取响应
    Response response = interceptor.intercept(next);

    // Confirm that the next interceptor made its required call to chain.proceed().
    if (httpCodec != null && index + 1 < interceptors.size() && next.calls != 1) {
      throw new IllegalStateException("network interceptor " + interceptor
          + " must call proceed() exactly once");
    }

    // Confirm that the intercepted response is not null.
    if (response == null) {
      throw new NullPointerException("interceptor " + interceptor + " returned null");
    }

    if (response.body() == null) {
      throw new IllegalStateException(
          "interceptor " + interceptor + " returned a response with no body");
    }
    //返回请求结果
    return response;
  }
}
看到这里我们就已经知道了OkHttp通过拦截链的作用过程:从第一个拦截器开始,一层一层将请求传递下去;在获得响应之后,由最再一层一层传递上来,最终返回出去。这种传递方式是不是有点似曾相识?没错,在我们学习事件分发机制的时候就遇到过这种传递方式。其实这种编码方式叫责任链设计模式,大家先了解一下,后面还会讲。
RealCall -> enqueue
上面我们已经看过同步请求方法execute,接下来让我们看一下异步请求方法enqueue。
  @Override public void enqueue(Callback responseCallback) {
    synchronized (this) { // 1、加同步锁
      if (executed) throw new IllegalStateException("Already Executed"); //2、检查当前请求是否正在执行
      executed = true;
    }
    captureCallStackTrace();
    eventListener.callStart(this);
    client.dispatcher().enqueue(new AsyncCall(responseCallback)); //3、执行Dispatcher.enqueue方法。
  }

public interface Callback {
  //请求失败回调
  void onFailure(Call call, IOException e);
  //获取响应回调
  void onResponse(Call call, Response response) throws IOException;
}
1、调用enqueue方法时传入一个
Callback,这个Callback内部有两个回调方法。
2、加入同步锁,检查当前请求是否正在执行。
3、创建一个AsyncCall(异步请求对象),在调用Dispatcher对象的enqueue方法时将其传入。
Dispatcher -> enqueue
  void enqueue(AsyncCall call) {
    synchronized (this) {
      readyAsyncCalls.add(call); //将异步请求对象加入准备运行的异步请求集合中
    }
    promoteAndExecute();
  }

  private boolean promoteAndExecute() {
    assert (!Thread.holdsLock(this));
    // 1、新建一个可执行的异步请求集合
    List<AsyncCall> executableCalls = new ArrayList<>();
    boolean isRunning;
    synchronized (this) {
      // 2、循环遍历将要运行的异步请求集合
      for (Iterator<AsyncCall> i = readyAsyncCalls.iterator(); i.hasNext(); ) {
        AsyncCall asyncCall = i.next();
        // 3、判断正在执行的异步请求个数是否大于最大的请求个数
        if (runningAsyncCalls.size() >= maxRequests) break; // Max capacity.
        // 4、判断当前执行的异步请求Host个数是否大于Host的限制
        if (runningCallsForHost(asyncCall) >= maxRequestsPerHost) continue; // Host max capacity.
        // 5、将当前异步请求移除
        i.remove();
        // 6、将异步请求加入到可执行的异步请求集合中
        executableCalls.add(asyncCall);
        // 7、在正在运行的异步请求集合中添加异步请求对象
        runningAsyncCalls.add(asyncCall);
      }
      isRunning = runningCallsCount() > 0;
    }
    // 8、循环遍历可执行的异步请求集合
    for (int i = 0, size = executableCalls.size(); i < size; i++) {
      AsyncCall asyncCall = executableCalls.get(i);
      // 9、创建线程池并执行请求
      asyncCall.executeOn(executorService());
    }
    return isRunning;
  }
在Dispatcher.enqueue方法中只做了两件事:
1、将异步请求对象加入到准备执行的异步请求集合中。
2、执行promoteAndExecute方法。
在执行promoteAndExecute方法方法时又做了一下几件事:
1、新建一个可执行的异步请求集合。
2、循环遍历准备运行的异步请求集合。
3、判断正在执行的异步请求个数是否大于最大的请求个数,如果不符合,直接跳出循环。
4、判断当前执行的异步请求Host个数是否大于Host的限制,如果不符合,结束当前循环,进入下一次循环。
5、以上判断都通过后,将当前异步请求移除。
6、将异步请求加入到可执行的异步请求集合中。
7、将异步请求对象加入到正在运行的异步请求集合中。
8、循环遍历可执行的异步请求集合。
9、创建线程池并执行请求。
AsyncCall -> executeOn
final class RealCall implements Call {
  ...
  final class AsyncCall extends NamedRunnable {
    ...
    void executeOn(ExecutorService executorService) {
      assert (!Thread.holdsLock(client.dispatcher()));
      boolean success = false;
      try {
        executorService.execute(this);
        success = true;
      } catch (RejectedExecutionException e) {
        InterruptedIOException ioException = new InterruptedIOException("executor rejected");
        ioException.initCause(e);
        eventListener.callFailed(RealCall.this, ioException);
        responseCallback.onFailure(RealCall.this, ioException);
      } finally {
        if (!success) {
          client.dispatcher().finished(this); // This call is no longer running!
        }
      }
    }
    @Override protected void execute() {
      boolean signalledCallback = false;
      timeout.enter();
      try {
        Response response = getResponseWithInterceptorChain(); // 获取拦截器链
        if (retryAndFollowUpInterceptor.isCanceled()) {
          signalledCallback = true;
          responseCallback.onFailure(RealCall.this, new IOException("Canceled"));
        } else {
          signalledCallback = true;
          responseCallback.onResponse(RealCall.this, response);
        }
      } catch (IOException e) {
        e = timeoutExit(e);
        if (signalledCallback) {
          // Do not signal the callback twice!
          Platform.get().log(INFO, "Callback failure for " + toLoggableString(), e);
        } else {
          eventListener.callFailed(RealCall.this, e);
          responseCallback.onFailure(RealCall.this, e);
        }
      } finally {
        client.dispatcher().finished(this);
      }
    }
    ...
  }
  ...
}

public abstract class NamedRunnable implements Runnable {
  protected final String name;

  public NamedRunnable(String format, Object... args) {
    this.name = Util.format(format, args);
  }

  @Override public final void run() {
    String oldName = Thread.currentThread().getName();
    Thread.currentThread().setName(name);
    try {
      execute();
    } finally {
      Thread.currentThread().setName(oldName);
    }
  }

  protected abstract void execute();
}
我们先讲一下NamedRunnable类:
1、这个类继承了
Runnable接口,通知重写了run方法。
2、定义了一个抽象方法execute,在run方法中调用了execute方法。
然后我们看一下AsyncCall类:
1、这个对象继承自
NamedRunnable类,并重写了execute方法。这里要注意的是这个exectue方法不是本篇文章在使用OkHttp做网络请求举例中调用的execute方法。
2、当执行AsyncCall.executeOn方法时传入了一个线程池,由这个线程池执行任务,并将当前的AsyncCall对象传入。
3、回想一下我们在学习线程池的时候,线程池的execute方法传入一个Runnable对象之后,会调用Runnable对象的run方法。在这里,AsyncCall的父类是NamedRunnable,它实现了Runnable接口,并且重写了run方法,在run方法中又调用了它的抽象方法excute方法,这个抽象方法在AsyncCall对象中实现了。所以,最后网络请求的调用又来到了AsyncCall.execute方法。
4、在这个方法中我们看到了一个熟悉的身影getResponseWithInterceptorChain,这个方法在上面已经分析过,这里就不再做赘述。
小结
分析了这里多,我们来做一下小结吧。
1、同步请求和异步请求的区别在于,同步请求没有使用线程池,而异步请求会放入到线程池中去执行。
2、同步请求和异步请求最终都会调用getResponseWithInterceptorChain方法进行网络请求。
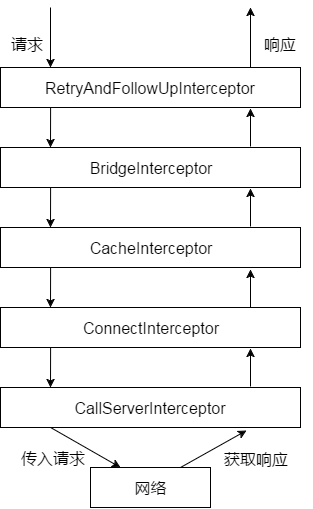
3、getResponseWithInterceptorChain方法会依次执行拦截器,将请求一层层向下传递,得到网络响应后再一层层向上传递(如下图所示),这种编码属于责任链设计模式。
总结
至此,okhttp的执行流程已经讲完了,由于篇幅的原因,有关okhttp中的拦截器和涉及到的设计模式相关知识点会在后续文章中进行补充。本人资历尚浅,能力有限,如果文章哪里写的不对,欢迎大家拍砖,本人将不胜感激。
