

原文链接:www.javaspring.net/nacos/nacos…
Continue to talk about the Nacos build of the production environment, through the previous 《Spring Cloud Alibaba basic tutorial: Nacos data persistence》 We already know the storage principle of Nacos for configuration information. When the cluster is built, you must use centralized storage, such as MySQL storage. Next, follow the previous article and continue to the next step. Through this article, we will complete the construction of the Nacos production environment.
1.Cluster Building
According to the official documentation, Nacos's cluster architecture is roughly as shown below (the MySQL that centralizes storing information is omitted):
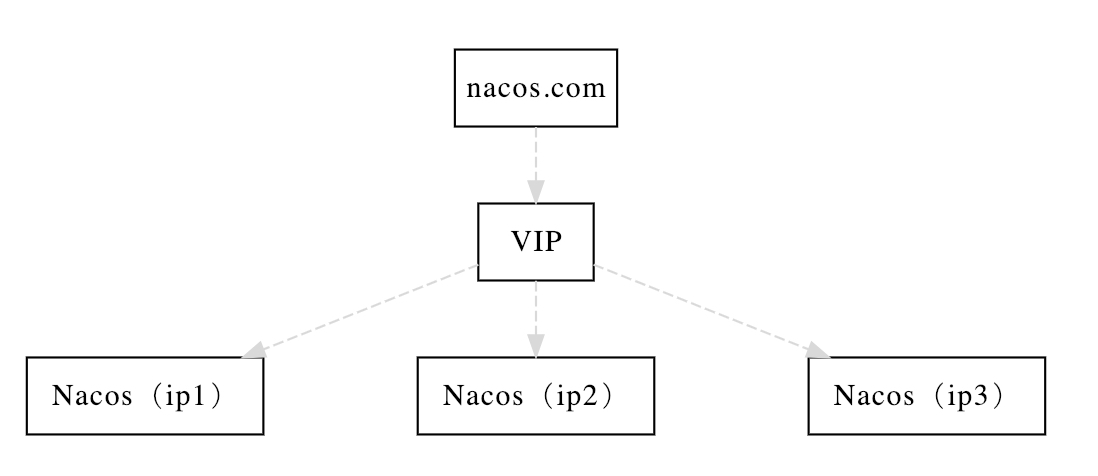
Here we will introduce the details of each step of our construction step by step.
1.1.MySQL data source configuration
For the modification of the data source, the reason has been explained in the previous article Nacos Data Persistence. If you don't understand it, you can read this first and come back here.
Initialize and configure the MySQL data source before configuring the cluster. Mainly divided into the following two steps:
- Step1: Initialize the MySQL database, the database initialization file:
nacos-mysql.sql, can be obtained under theconfdirectory under theNacospackage. - Step 2: Modify the
conf/application.propertiesfile, add support for MySQL data source configuration, add (currently only mysql) data source url, username and password. Configuration examples are as follows:
spring.datasource.platform=mysql

db.num=1
db.url.0=jdbc:mysql://localhost:3306/nacos?characterEncoding=utf8&connectTimeout=1000&socketTimeout=3000&autoReconnect=true
db.user=root
db.password=
More introduction and thinking, see the previous article "Nacos Data Persistence"。
1.2.Cluster Configuration
There is a cluster.conf.example in Nacos's conf directory. You can remove the example extension and use that directly, or create a cluster.conf file separately, then open and configure the Nacos instance address to be deployed later.
This document uses three Nacos servers on different local endpoints as an example. You can configure the following:
127.0.0.1:8841
127.0.0.1:8842
127.0.0.1:8843
Note: The examples here are for local learning testing only, and the actual production environment must be deployed on different nodes in order to be highly available. In addition, the Nacos cluster requires 3 or more nodes and ensures that the three nodes are mutually accessible.
1.3.Launching an instance
After completing the above configuration, we can start to launch the Nacos instance on each node to form a Nacos cluster to use.
Since our test learning uses the local startup multi-instance in this article, there will be some differences with the real production deployment, so here are two cases to explain how to start each Nacos instance.
Local test
In this article, in the cluster configuration, we set up three Nacos instances are local, but different ports, so we need to modify the different port numbers when starting Nacos.
Here is a way to easily start three local instances of Nacos. We can copy the startup.sh script in the bin directory three times to start Nacos instances of three different ports, in order to make it easy to distinguish For the startup script of the instance, we can add the port number to the naming of the script, for example:
- startup-8841.sh
- startup-8842.sh
- startup-8843.sh
Then, modify the parameters in the three scripts separately, as shown in the red part of the following figure (the port number is assigned according to the above script name):

Here we use the -Dserver.port method, in the start command, specify a specific port number for Nacos, in order to start three different Nacos instances on the machine to form a cluster.
After modifying the three script configurations, you can start the Nacos cluster locally by executing the following commands:
sh startup-8841.sh
sh startup-8842.sh
sh startup-8843.sh
Production Environment
In the actual production environment deployment, because each instance is distributed on different nodes, we can directly use the default startup script (unless you need to modify some JVM parameters, etc.). You only need to execute the sh startup.sh command in the bin directory of each node's Nacos.
2.Proxy Configuration
After the Nacos cluster is launched, we need to provide a unified portal for us to maintain and access the Spring Cloud application, as shown in the architecture diagram. To put it simply, we need to make an access point for the three Nacos instances launched above that can be load balanced for them. There are many ways to implement this. Here is a simple example of using Nginx.
In the http section of the Nginx configuration file, we can add the following configuration: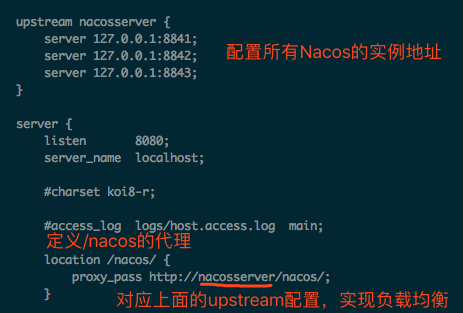
In this way, when we visit: http://localhost:8080/nacos/, it will be load-balanced proxy to the three Nacos instances we started before. Here we do not have a specific strategy for configuring upstream. By default, we use a linear rotation training method. If necessary, we can also configure a more complex distribution strategy. This part is the use of Nginx, and will not be described here.
Here is a question I encountered when trying to build. If you have encountered it, I hope the following instructions can help you solve the problem.
The error message is as follows:
2019-02-20 16:20:53,216 INFO The host [nacos_server] is not valid
 Note: further occurrences of request parsing errors will be logged at DEBUG level.

java.lang.IllegalArgumentException: The character [_] is never valid in a domain name.
    at org.apache.tomcat.util.http.parser.HttpParser$DomainParseState.next(HttpParser.java:926)
    at org.apache.tomcat.util.http.parser.HttpParser.readHostDomainName(HttpParser.java:822)
    at org.apache.tomcat.util.http.parser.Host.parse(Host.java:71)
    at org.apache.tomcat.util.http.parser.Host.parse(Host.java:45)
    at org.apache.coyote.AbstractProcessor.parseHost(AbstractProcessor.java:288)
    at org.apache.coyote.http11.Http11Processor.prepareRequest(Http11Processor.java:809)
    at org.apache.coyote.http11.Http11Processor.service(Http11Processor.java:384)
    at org.apache.coyote.AbstractProcessorLight.process(AbstractProcessorLight.java:66)
    at org.apache.coyote.AbstractProtocol$ConnectionHandler.process(AbstractProtocol.java:791)
    at org.apache.tomcat.util.net.NioEndpoint$SocketProcessor.doRun(NioEndpoint.java:1417)
    at org.apache.tomcat.util.net.SocketProcessorBase.run(SocketProcessorBase.java:49)
    at java.util.concurrent.ThreadPoolExecutor.runWorker(ThreadPoolExecutor.java:1149)
    at java.util.concurrent.ThreadPoolExecutor$Worker.run(ThreadPoolExecutor.java:624)
    at org.apache.tomcat.util.threads.TaskThread$WrappingRunnable.run(TaskThread.java:61)
    at java.lang.Thread.run(Thread.java:748)
The main reason is that nacos_server was used as the name when configuring upstream, and the _ symbol does not appear in the domain name in the Tomcat version used by Nacos, so the screenshot above gives the upstream The name is nacosserver and the _ symbol is removed.
At this point, Nacos's cluster building is complete! We can access Nacos through the proxy address of Nginx configuration: http://localhost:8080/nacos/, which can also be configured in the Spring Cloud application as the access address of the registry and configuration center. The reader can use the code example at the end of the article to modify the original Nacos address to start, to see if the configuration information can be obtained to verify the success of the cluster setup. You can also deliberately close an instance to verify that the Nacos cluster is still working.
3.Think Deeply
Under the guidance of Nacos's official documentation, Nacos's cluster construction is generally very smooth, and there is not much difficulty. But one question worth considering is similar to the thinking about data persistence in the previous article. As a registry and configuration center, is Nacos' architecture too bloated? In addition to Nacos itself, there is a need to rely on more middleware to complete the entire production environment. Compared to other middleware that can be used for service discovery and configuration, it is not so advantageous. Especially for small teams, such complexity and cost investment are also considered when selecting a model.
4.Sample Code
The client code for the article. You can view the alibaba-nacos-config-client project in the following repository:
- Github:github.com/dyc87112/Sp…
- Gitee:gitee.com/didispace/S…
原文链接:www.javaspring.net/nacos/nacos…
本文由博客一文多发平台 OpenWrite 发布!
