

本案例使用node来实现服务器功能,在浏览器地址栏输入localhost:8080时,显示根目录下的所有文件和文件夹
前言:
在学习ajax时介绍过模板引擎的使用以及作用,所以在本案例中先使用原生的ajax的来实现,然后再使用模板引擎来实现,可以比较一下这两种方法的不同之处
本案例重点学习的知识点有:
- node的http模块
- node的fs模块
- 模板引擎art-template
下面是原生ajax实现
目录结构
前台页面
index.html
<!DOCTYPE html>
<html lang="">
<head>
	<meta charset="UTF-8">
	<meta name="viewport" content="width=device-width, initial-scale=1.0">
	<meta http-equiv="X-UA-Compatible" content="ie=edge">
	<link rel="stylesheet" href="index.css">
	<title>Document</title>
</head>
<body>
	<!-- <img src="./img/folder.gif" alt=""> -->
	<table>
		<tr>
			<td>文件类型</td>
			<td>文件名</td>
			<td>文件大小</td>
			<td>文件修改时间</td>
		</tr>
	</table>
</body>
<script>
	var xhr=new XMLHttpRequest();
	xhr.open("get","./filelist.js");
	xhr.send(null);
	xhr.onreadystatechange=function(){
		var htmls="";
		if(xhr.readyState==4){
			//console.log(xhr.responseText);
			var arr=JSON.parse(xhr.responseText);
			console.log(arr);
			for(var i=0;i<arr.length;i++){


				if(arr[i].type=='f'){
					htmls+="<tr><td><img src='./img/text.gif' /></td>";

				}else{
					htmls+="<tr><td><img src='./img/folder.gif' /></td>";
				}


				htmls+="<td>"+arr[i].name+"</td>";
				htmls+="<td>"+arr[i].size+"</td>";
				htmls+="<td>"+arr[i].mtime+"</td></tr>";


			}
			var table=document.querySelector("table");
			table.innerHTML+=htmls;
		}
	}
</script>
</html>
页面样式
index.css
*{
    font-size: 20px;
}
table{
    text-align: left;
    border-collapse: collapse;
}
table td{
     border:1px solid rgb(34, 145, 173);
    padding: 6px;
}
node部分
http.js
var http=require("http");//加载http模块
var fs=require("fs");//加载文件模块
var _date=require("moment");//加载第三方模块
var server=http.createServer();//创建一个server对象
server.listen(8080,function(){//绑定端口,启动web服务器
    console.log("服务器已经启动");
});
server.on("request",function(req,res){//为服务器对象注册request请求处理函数

    // console.log(req.url);
    // res.end();
    if(req.url=="/"){
        fs.readFile("./index.html","utf8",function(err,data){
            res.end(data);//响应只处理一次请求
        });
        console.log(req.url);
    }
    else if(req.url=="/filelist.js"){

        var new_arr=[];
        var count=0;
        fs.readdir("./",function(err,data){
        // var arrData=JSON.stringify(data);
        // res.end(arrData);

            for(var i=0;i<data.length;i++){
                new_arr[i]={};
                (function (i){
                    fs.stat(data[i],function(err,datastat){
                        count++;
                        new_arr[i].name=data[i];
                        new_arr[i].size=datastat.size;
                        new_arr[i].mtime=_date(datastat.mtime).format('YYYY-MM-DD HH:mm:ss');
                        //判断文件类型
                        if(datastat.isFile()){
                            new_arr[i].type="f";
                        }else{
                            new_arr[i].type="d";
                        }
                        if(data.length==count){
                         res.end(JSON.stringify(new_arr));
                        //console.log(new_arr);
                        }
                    });
                })(i);
            }
        })

    }
    else{
        fs.readFile("."+req.url,function(err,data){
            res.end(data);

        });
       // console.log(req.url);
    }


});
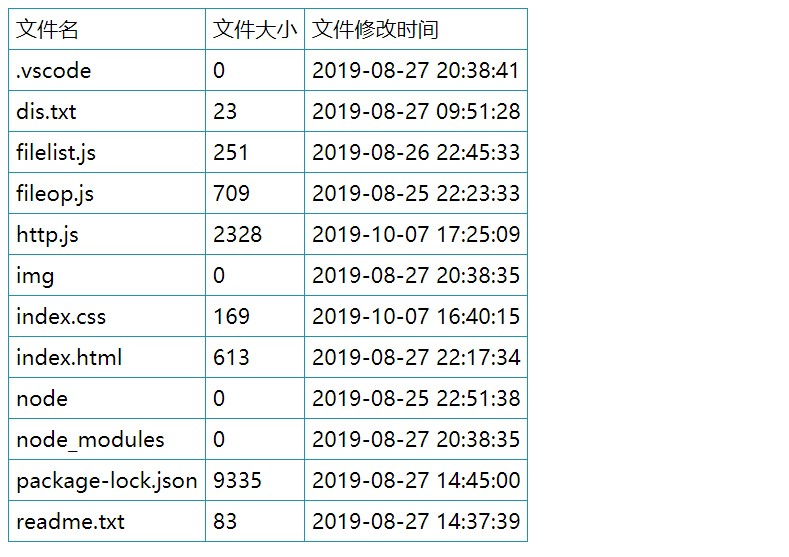
页面效果

以上就是使用原生ajax结合node实现展示文件目录的写法,不难发现,原生的ajax对于响应的数据是要进行处理的,比较麻烦,下面就使用模板引擎来进行升级
art-template模板引擎实现
准备工作
npm安装moment包
npm安装art-template包
修改前台页面
index.html
<!DOCTYPE html>
<html lang="">
<head>
	<meta charset="UTF-8">
	<meta name="viewport" content="width=device-width, initial-scale=1.0">
	<meta http-equiv="X-UA-Compatible" content="ie=edge">
	<link rel="stylesheet" href="index.css">
	<title>Document</title>
</head>
<body>
	<!-- <img src="./img/folder.gif" alt=""> -->
	<table>
		<tr>
			<td>文件名</td>
			<td>文件大小</td>
			<td>文件修改时间</td>
		</tr>

		{{each data}}
			<tr>
				<td>{{$value.name}}</td>
				<td>{{$value.size}}</td>
				<td>{{$value.mtime}}</td>
			</tr>
		{{/each}}

	</table>
</body>
</html>
页面样式
index.css
*{
    font-size: 20px;
}
table{
    text-align: left;
    border-collapse: collapse;
}
table td{
     border:1px solid rgb(34, 145, 173);
    padding: 6px;
}
修改node部分
var http=require("http");//加载http模块
var fs=require("fs");//加载文件模块
var _date=require("moment");//加载第三方模块,格式化时间
var template=require("art-template");//加载第三方自定义模块
template.defaults.root="./";//设置默认的访问路径

var server=http.createServer();//创建一个server对象
server.listen(8080,function(){//绑定端口,启动web服务器
    console.log("服务器已经启动");
});

server.on("request",function(req,res){//为服务器对象注册request请求处理函数
    //console.log(req.url);//默认请求的是/目录
    if(req.url=="/"){
        fs.readFile("./index.html","utf8",function(err,data){
            var new_arr=[];
            var count=0;
            fs.readdir("./",function(err,data){
                // var arrData=JSON.stringify(data);
                // res.end(arrData);

                for(var i=0;i<data.length;i++){
                    new_arr[i]={};
                    (function (i){
                        fs.stat(data[i],function(err,datastat){
                            count++;
                            new_arr[i].name=data[i];
                            new_arr[i].size=datastat.size;
                            new_arr[i].mtime=_date(datastat.mtime).format('YYYY-MM-DD HH:mm:ss');
                            //判断文件类型
                            if(datastat.isFile()){
                                new_arr[i].type="f";
                            }else{
                                new_arr[i].type="d";
                            }
                            if(data.length==count){

                               // console.log(new_arr);
                                var reshtml=template("./index.html",{data:new_arr});
                                res.end(reshtml);

                            // res.end(JSON.stringify(new_arr));
                            //console.log(new_arr);

                            }
                        });
                    })(i);
                }
            })

         });
        console.log(req.url);
    }else{
        fs.readFile("."+req.url,function(err,data){
            res.end(data);
        });
    }
});
页面效果
以上就是实现本案例的两种方式所有内容,下面来分析node部分
思路方面
- 当我们在浏览区地址栏上输入:localhost:8080回车时,默认请求的是/目录,所以在请求根目录时,我们设置读取的是index.html页面,然后再响应回去
- 案例要实现在index.html展示各种文件的文件名,文件大小,文件创建的时间,所以在将index.html响应回去之前要获取这些信息,并随页面一起响应回去,这里我们使用模板引擎技术
难点方面
-
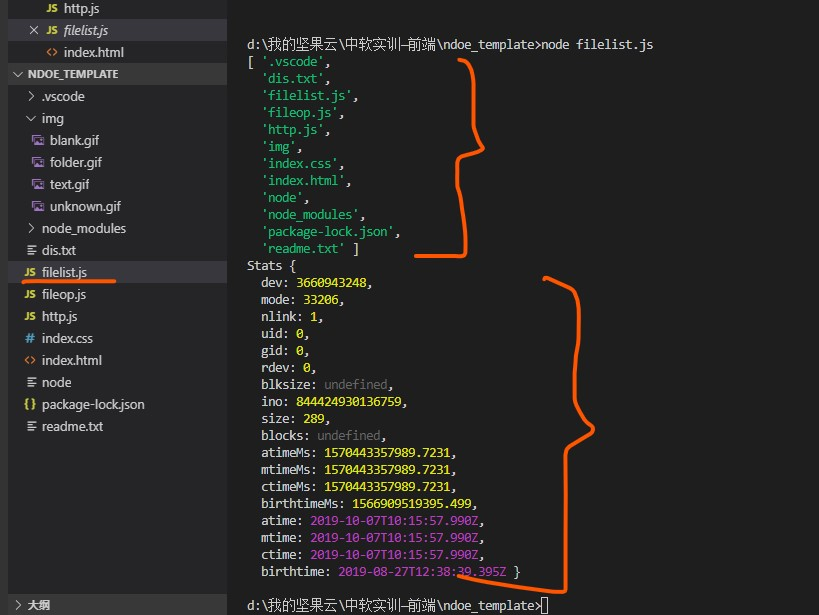
怎么样获取文件名,文件大小,文件的创建时间,我新建了一个文件filelist.js来探究
//该文件为验证用的,与案例无关
var fs=require("fs");
fs.readdir("./",function(err,data){
     console.log(data);
    fs.stat(data[2],function(err,datastat){
        console.log(datastat);
        //console.log(datastat.isFile());
    })
})
执行该文件结果如下
-
在组装传回前台的对象时,i会因为异步问题导致丢失,从而无法正确组装响应回去的对象,所以要用闭包来处理
