

In this article, I will show how to configure MikroTik PPPoE Server with Radius user authentication.
For PPPoE Server configuration with Radius user authentication, I am going to establish a network like below network diagram.
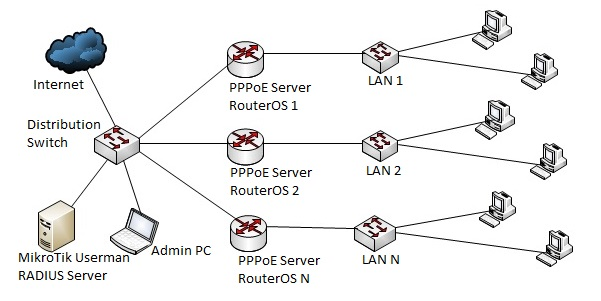
In this network, the Distribution Switch is connected to public internet and MikroTik User Manager Radius Server as well as more than one MikroTik RouterOS where PPPoE Server will be installed and PPPoE user will be authenticated via Radius Server user.
The configuration of this network is containing below IP information.
WAN IP Block: 192.168.110.0/28
Radius Server IP: 192.168.110.10
RouterOS 1 WAN IP: 192.168.110.2
LAN 1 IP Blocks (For three packages):
192.168.10.0/24,
192.168.20.0/24 and
192.168.30.0/24
Profile Configuration for Radius User 设置一组带宽销售包,比如50M,100M
Different type of user is mainly divided with user profile. For example, ISP Company mainly maintains different bandwidth packages for their users. These bandwidth packages can easily be maintained with Radius Server user profile.
For the configuration of this article, we will create three bandwidth packages (512kbps package, 1Mbps package and 2Mbps package) for our users.
- Login to User Manager Radius Server web interface with customer or subscriber credentials using https://radius-server-ip-address/userman
- Click on Profiles button from left button panel and then click on Limitations Click on Add > New menu item from top menu bar. Limitation details window will appear now.
- In Main panel, put your package name what you want in Name input field. As I am creating my first 512kbps package, I am providing 512kbps Package in name field. Also choose owner from Owner dropdown menu.In Rate limits panel, put your bandwidth limitation parameter. For a 512kbps package, I am providing below information.
Also choose priority from Priority dropdown menu. For my configuration I am choosing 8 that mean lowest priority.
Click Save button to save this limitation package. Similarly create 1Mbps and 2Mbps package limitations. Just change Rate limits parameter according to your package requirements.
- Now click on Profiles tab and click on PLUS SIGN (+). Create profile window will appear now. Put profile name what you want in Name input field. For my configuration, I am providing 512kbps users as name. Click on Create First profile will be created and shown in Profiles dropdown menu.
- At the bottom of this profile, you will find Unlimited profile that mean there is no limitation for this profile. So, click on Add new limitation button to add limitation for this profile. Profile part window will appear now.
- You will find your limitation packages that you created before in Limits Click on your desired package (512kbps package for 512kbps users) and click on Add button to add this limitation for this profile.
First profile has been created successfully. Similarly create 1Mbps and 2Mbps user profile and then follow below section to create user in your User Manager Radius Server.
Add User in User Manager Radius Server
The following steps will show how to add users in User Manager Radius Server.
- Click on Users button from left button panel. Now click on Add > One menu item from top menu bar. User details window will appear.
- In Main panel, put client’s username and password that will be used to connect to PPPoE server in Username and Password input field respectively. Also choose owner from Owner dropdown menu.
- In Constraints panel, put IP address that will be provided to this user when username and password will be verified in IP address input field. For example, for this network configuration I assume that I will provide 192.168.10.0/24 block IP if any user is a 512kbps package user. So, I am assigning 192.168.10.2 in IP Address input field for the first user IP. You can also provide client’s MAC Address in Caller ID input field so that this user cannot login using different device.
- Choose your desired profile package for this user from Assign profile dropdown menu and then click on Add button to add this user.
You can add as many users as you want and can assign bandwidth package according to their demand following the above steps carefully.
Add Client Router in Radius Server Router list
The following steps will show you how to add client router in User Manager Radius Server.
- Click on Routers button from left button panel and then click on Add > New menu item from top menu bar. Router Details window will appear now.
- In Main panel, put a meaningful name for your client router in Name input field. Also choose owner from Owner dropdown menu.
- Put your client router IP address (RouterOS 1 IP: 192.168.110.2) in IP address input field.
- Now provide a password in Shared secret input field. This password is important and has to provide while configuring Radius client in RouterOS 1.
- In Radius incoming panel, click on CoA support check box and put 1700 in CoA port input box.
Click on Add button to add this router in Radius Server Router list.
RouterOS 1 has been added to our User Manager radius Server. Similarly you can add as many client routers as you want in your Radius Server following the above steps carefully.
MikroTik User Manager Radius Server configuration has been completed. Now we will configure our MikroTik RouterOS where PPPoE service will be enabled and PPPoE user will be authenticated with Radius user.
Part 2: MikroTik RouterOS Configuration
Now we are going to configure MikroTik RouterOS where PPPoE Service will be enabled and its user will be authenticated from User Manager Radius user. Complete configuration can be divided into below topics.
PPoE Server Configuration in MikroTik RouterOS After completing basic RouterOS configuration, we will now configure PPPoE server in our MikroTik RouterOS. The following steps will show you how to configure PPPoE server in MikroTik Router.
- Click on PPP menu item from Winbox left menu bar. PPP window will appear now.
- Click on Interface tab and then click on PLUS SIGN (+) dropdown menu. Choose PPPoE Server or PPPoE Server Binding dropdown menu option. New Interface window will appear.
- Under General tab, put PPPoE Server Interface name what you want or you can keep automatic name. Click Apply and OK
- Click on PPPoE Servers tab and then click on PLUS SIGN (+). New PPPoE Serivce window will appear.Put your PPPoE Server name in Service Name input box and then choose interface on which you want to setup PPPoE Server (in this article I am selecting ether2) from Interface dropdown menu. Click Apply and OK
- Click on Profiles tab and then double click on default Click on Local Address input field and put PPPoE Server’s IP Address (in this article: 192.168.10.1) in this text field. Click Apply and OK button. Now click on Secrets tab and then click on PPP Authentication and Accounting PPP Authentication and Accounting window will appear. Click on Use Radius check box and then click on Apply and OK button.
Radius Client Configuration in MikroTik RouterOS
The following steps will show you how to configure Radius client in MikroTik RouterOS.
- Click on Radius menu item from left menu bar. Radius window will appear now.
- Click on PLUS SIGN (+). New Radius Server window will appear now.Click on ppp checkbox from Service
- Put Radius Server IP address (in this article: 192.168.110.10) in Address input field.Put Shared secret that you have entered in Radius Server Routers configuration in Secret input field.Click Apply and OK
- Now click on Incoming Radius Incoming window will appear.Click on Accept checkbox and put 1700 in Port input box and then click Apply and OK
Radius client configuration has been completed. Now MikroTik RouterOS is able to communicate with Radius Server to authenticate PPPoE users.
PPPoE Client Configuration
We have configured a PPPoE Server in MikroTik RouterOS that will authenticate users from User Manager Radius Server. Now we need to learn how to configure a PPPoE client so that it can communicate with PPPoE Server successfully.
A number of PPPoE clients are present today. Among them, now I am going to show how to configure PPPoE client in Windows 7 Operating System.
Microsoft PC dialer is used to connect remote PPPoE server in window 7 to get access to internet. So, you have to configure Microsoft PC dialer in windows 7 PC to get access to internet through your MikroTik router.
- Connect an Ethernet cable to windows 7 PC from your network switch.
- Open Network and Sharing Center from Control Panel.
- Now click on Setup a new connection or network link under Change your networking settings area. Set Up a Connection or Network window will appear. In this window, click on Connect to the internet option and click on Next Connect to the Internet window will appear.
- Click on Broadband (PPPoE)option from this window and put username and password that you have created in User Manager Radius Server.
- Now click on Connect If you provide correct username and password, The connection to the Internet is ready to use message will be shown. Now click on Close button. A dialer will be created in your windows 7 PC and you can enter your credential anytime to connect Internet with this dialer.
You are now connected to the internet with PPPoE dialer. Browse any site. I hope, you will be success to browse any site now.
