

前言
在之前的初Android线程池文章中,由于时间原因,只是对Android中的线程池做了一个初步的了解。那篇文章中初步了解了线程池的作用、为什么使用线程池、ThreadPoolExecutor类及其构造方法中的参数含义,最后还初步总结了一下线程池的运行过程。这篇文章将同过示例和源码分析的角度对线程池的运行原理进行深入分析。Let's go!!!
基础知识准备
在进行今天的探究之前,我们还是先了解几个小的知识点。
Runnable和Callable之间的区别
/**
 * The <code>Runnable</code> interface should be implemented by any
 * class whose instances are intended to be executed by a thread. The
 * class must define a method of no arguments called <code>run</code>.
 * <p>
 * This interface is designed to provide a common protocol for objects that
 * wish to execute code while they are active. For example,
 * <code>Runnable</code> is implemented by class <code>Thread</code>.
 * Being active simply means that a thread has been started and has not
 * yet been stopped.
 * <p>
 * In addition, <code>Runnable</code> provides the means for a class to be
 * active while not subclassing <code>Thread</code>. A class that implements
 * <code>Runnable</code> can run without subclassing <code>Thread</code>
 * by instantiating a <code>Thread</code> instance and passing itself in
 * as the target.  In most cases, the <code>Runnable</code> interface should
 * be used if you are only planning to override the <code>run()</code>
 * method and no other <code>Thread</code> methods.
 * This is important because classes should not be subclassed
 * unless the programmer intends on modifying or enhancing the fundamental
 * behavior of the class.
 *
 * @author  Arthur van Hoff
 * @see     java.lang.Thread
 * @see     java.util.concurrent.Callable
 * @since   JDK1.0
 */
@FunctionalInterface
public interface Runnable {
    /**
     * When an object implementing interface <code>Runnable</code> is used
     * to create a thread, starting the thread causes the object's
     * <code>run</code> method to be called in that separately executing
     * thread.
     * <p>
     * The general contract of the method <code>run</code> is that it may
     * take any action whatsoever.
     *
     * @see     java.lang.Thread#run()
     */
    public abstract void run();
}
从注释中我们可以看到,如果一个实体对象想被线程执行,就必须实现这个接口,同时还要实现一个无参的run方法。
/**
 * A task that returns a result and may throw an exception.
 * Implementors define a single method with no arguments called
 * {@code call}.
 *
 * <p>The {@code Callable} interface is similar to {@link
 * java.lang.Runnable}, in that both are designed for classes whose
 * instances are potentially executed by another thread.  A
 * {@code Runnable}, however, does not return a result and cannot
 * throw a checked exception.
 *
 * <p>The {@link Executors} class contains utility methods to
 * convert from other common forms to {@code Callable} classes.
 *
 * @see Executor
 * @since 1.5
 * @author Doug Lea
 * @param <V> the result type of method {@code call}
 */
@FunctionalInterface
public interface Callable<V> {
    /**
     * Computes a result, or throws an exception if unable to do so.
     *
     * @return computed result
     * @throws Exception if unable to compute a result
     */
    V call() throws Exception;
}
Callable中有返回值并且可以抛出异常,它于Runnable相似,都是为多线程准备的。但是,后者不能有返回值,也不能在其内部自动抛出异常。
好了,看到这里我们来总结一下它们的异同。
1、它们两个都是接口(虽然这是一句废话)。
2、它们两个都能编写多线程(感觉又是一句废话)。
3、Callable中的方法有返回值,Runnable中的则没有。
4、Callable中的方法中能够自动抛出异常,Runnable中需要手动抛出异常。
说了这么多感觉还是有点抽象,我们来看一下用法吧。
public abstract class RunnableImp implements Runnable{}
public class CallableImp implements Callable<String> {
    @Override
    public String call() throws Exception {
        return "我是Callable";
    }
}
Handler mHandler = new Handler() {
        @Override
        public void handleMessage(@NonNull Message msg) {
            switch (msg.what) {
                case 1:
                    tv.setText("");
                    tv.setText(msg.obj.toString());
                    break;
            }
        }
    };

@Override
protected void onCreate(@Nullable Bundle savedInstanceState) {
        super.onCreate(savedInstanceState);
        setContentView(R.layout.activity_second);
        Button btn_runable = findViewById(R.id.btn_runable);
        Button btn_callable = findViewById(R.id.btn_callable);
        tv = findViewById(R.id.tv);

        btn_runable.setOnClickListener(this);
        btn_callable.setOnClickListener(this);
    }

@Override
public void onClick(View v) {
        switch (v.getId()) {
            case R.id.btn_runable:
                executeRunnable();
                break;
            case R.id.btn_callable:
                executeCallable();
                break;
        }
    }

public void executeRunnable() {
        RunnableImp runnableImp = new RunnableImp() {
            @Override
            public void run() {
                Message message = Message.obtain();
                message.what = 1;
                message.obj = "我是Runnable";
                mHandler.handleMessage(message);
            }
        };

        Thread thread = new Thread(runnableImp);
        thread.start();
    }

public void executeCallable() {
        FutureTask<String> futureTask = new FutureTask<>(new CallableImp());
        new Thread(futureTask).start();
        try {
            Message message = Message.obtain();
            message.what = 1;
            message.obj = futureTask.get();
            mHandler.handleMessage(message);
        } catch (ExecutionException e) {
            e.printStackTrace();
        } catch (InterruptedException e) {
            e.printStackTrace();
        }
    }
第一部分代码:创建一个抽象类实现
Runnable接口。
第一部分代码:创建一个抽象类实现Callable接口,同时重写call()方法,返回一个String类型的值。
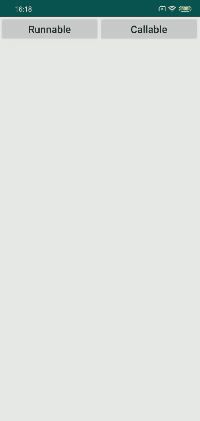
第三部分代码:创建一个Activity,界面中有两个按钮,分别使Runnable和Callcal的方式执行多线程,最后通过Handler将数据返回到主线程中改变界面。
上面的代码没有什么难处,相信都能看得懂,我们来看一下运行结果。
FutureTask
我们在看上面多线程的例子时,发现线程可以和FutureTask结合起来,那么这个类究竟时干什么的呢?
/**
 * A cancellable asynchronous computation.  This class provides a base
 * implementation of {@link Future}, with methods to start and cancel
 * a computation, query to see if the computation is complete, and
 * retrieve the result of the computation.  The result can only be
 * retrieved when the computation has completed; the {@code get}
 * methods will block if the computation has not yet completed.  Once
 * the computation has completed, the computation cannot be restarted
 * or cancelled (unless the computation is invoked using
 * {@link #runAndReset}).
 *
 * <p>A {@code FutureTask} can be used to wrap a {@link Callable} or
 * {@link Runnable} object.  Because {@code FutureTask} implements
 * {@code Runnable}, a {@code FutureTask} can be submitted to an
 * {@link Executor} for execution.
 *
 * <p>In addition to serving as a standalone class, this class provides
 * {@code protected} functionality that may be useful when creating
 * customized task classes.
 *
 * @since 1.5
 * @author Doug Lea
 * @param <V> The result type returned by this FutureTask's {@code get} methods
 */
public class FutureTask<V> implements RunnableFuture<V> {
    ...
}
咱们呢先不着急看里面的代码,先瞅两眼注释,从注释中我们能获取以下几个信息。
1、它可以取消的异步运算。
2、它Future的实现类(我擦,Future是什么东东?不管了,等下再看)。
3、调用方法来让其运行,也能取消运行。
4、只有当运行结束时才能看到运行的结果,当运行没有结束时get()方法会被阻塞掉。
5、一旦运行结束,将不能重新启动或者取消,除非调用runAndReset()方法
6、由于其实现了Runnable接口,Futuretask可以被看作Callable或者Runnable的包装类,可以在Executor类中执行提交。
RunnableFuture
我们看到FutureTask实现了RunnableFuture接口,我们看一下它是干什么的。
/**
 * A {@link Future} that is {@link Runnable}. Successful execution of
 * the {@code run} method causes completion of the {@code Future}
 * and allows access to its results.
 * @see FutureTask
 * @see Executor
 * @since 1.6
 * @author Doug Lea
 * @param <V> The result type returned by this Future's {@code get} method
 */
public interface RunnableFuture<V> extends Runnable, Future<V> {
    /**
     * Sets this Future to the result of its computation
     * unless it has been cancelled.
     */
    void run();
}
从上面我们可以看到RunnableFuture也一个接口,同时它继承自Runnable和Future。执行run方法时可以让Future完成运行,并且还能获取到运行的结果。
看到这里,估计还是不知道这些讲的都是啥。别着急,让我们继续往下看。

Future
Runnable我们已经看过了,让我们看一个Future。
/**
 * A {@code Future} represents the result of an asynchronous
 * computation.  Methods are provided to check if the computation is
 * complete, to wait for its completion, and to retrieve the result of
 * the computation.  The result can only be retrieved using method
 * {@code get} when the computation has completed, blocking if
 * necessary until it is ready.  Cancellation is performed by the
 * {@code cancel} method.  Additional methods are provided to
 * determine if the task completed normally or was cancelled. Once a
 * computation has completed, the computation cannot be cancelled.
 * If you would like to use a {@code Future} for the sake
 * of cancellability but not provide a usable result, you can
 * declare types of the form {@code Future<?>} and
 * return {@code null} as a result of the underlying task.
 *
 * <p>
 * <b>Sample Usage</b> (Note that the following classes are all
 * made-up.)
 *
 * <pre> {@code
 * interface ArchiveSearcher { String search(String target); }
 * class App {
 *   ExecutorService executor = ...
 *   ArchiveSearcher searcher = ...
 *   void showSearch(final String target)
 *       throws InterruptedException {
 *     Future<String> future
 *       = executor.submit(new Callable<String>() {
 *         public String call() {
 *             return searcher.search(target);
 *         }});
 *     displayOtherThings(); // do other things while searching
 *     try {
 *       displayText(future.get()); // use future
 *     } catch (ExecutionException ex) { cleanup(); return; }
 *   }
 * }}</pre>
 *
 * The {@link FutureTask} class is an implementation of {@code Future} that
 * implements {@code Runnable}, and so may be executed by an {@code Executor}.
 * For example, the above construction with {@code submit} could be replaced by:
 * <pre> {@code
 * FutureTask<String> future =
 *   new FutureTask<>(new Callable<String>() {
 *     public String call() {
 *       return searcher.search(target);
 *   }});
 * executor.execute(future);}</pre>
 *
 * <p>Memory consistency effects: Actions taken by the asynchronous computation
 * <a href="package-summary.html#MemoryVisibility"> <i>happen-before</i></a>
 * actions following the corresponding {@code Future.get()} in another thread.
 *
 * @see FutureTask
 * @see Executor
 * @since 1.5
 * @author Doug Lea
 * @param <V> The result type returned by this Future's {@code get} method
 */
public interface Future<V> {
    //在任务执行完之前能否取消任务,返回false说明任务已经执行完毕,反之返回true。
    boolean cancel(boolean mayInterruptIfRunning);
    //判断任务完成之前是否被取消,返回true表示任务完成之前被取消。
    boolean isCancelled();
    //任务完成之后返回true。
    boolean isDone();
    //当任务执行结束之后可以获取执行结果。
    V get() throws InterruptedException, ExecutionException;
    //在给定的时间内等待任务的完成,如果等待时任务完成返回执行结果,否则将会抛出TimeoutException异常。
    V get(long timeout, TimeUnit unit) throws InterruptedException, ExecutionException, TimeoutException;
}
从类的注释我们可以看到,Future是一个接口,他提供给了我们方法来检测当前的任务是否已经结束,还可以等待任务结束并且拿到一个结果,通过调用Future的get()方法可以当任务结束后返回一个结果值,如果工作没有结束,则会阻塞当前线程,直到任务执行完毕,我们可以通过调用cancel()方法来停止一个任务,如果任务已经停止,则cancel()方法会返回true;如果任务已经完成或者已经停止了或者这个任务无法停止,则cancel()会返回一个false。当一个任务被成功停止后,他无法再次执行。isDone()和isCancel()方法可以判断当前工作是否完成和是否取消。
小结
对于Future和FutureTask之间的关系,我们可以总结成一张图。

Callable和Runnable例子时,我们也用到了FutureTask进行多线程操作,并且它于Runnable方式相比较来看,FutureTask可以通过get()方法获取线程的执行结果,而普通的方式则不能。同时,FuturTask在多线程任务执行的过程中,可以对任务做一系列操作,例如:取消、查看任务是否执行完毕等等。
如果想了解更多有关Future和FutureTask等相关知识可以参考以下几篇文章:
Java并发编程:Callable、Future和FutureTask原理解析
Java FutureTask 源码分析 Android上的实现
FutureTask的用法及两种常用的使用场景
线程池使用举例
说了这么多,我们来动手写几个例子吧,毕竟光说不练假把式。
execute方式
public class ExecuteTask implements Runnable {
    private int taskNum;

    public ExecuteTask(int taskNum) {
        this.taskNum = taskNum;
    }

    @Override
    public void run() {
        Log.i("ThreadPoolDemoExecute", "当前执行task" + taskNum);
        try {
            Thread.currentThread().sleep(2000);
        } catch (InterruptedException e) {
            e.printStackTrace();
        }
        Log.i("ThreadPoolDemoExecute", "task:" + taskNum + "执行完毕");
    }
}

public void execute() {
        ThreadPoolExecutor executor = new ThreadPoolExecutor(2
                , 4
                , 200
                , TimeUnit.SECONDS
                , new ArrayBlockingQueue<Runnable>(5));

        for (int i = 0; i < 8; i++) {
            ExecuteTask task = new ExecuteTask(i);
            executor.execute(task);
            Log.i("ThreadPoolDemoExecute", "线程池中线程数目:" + executor.getPoolSize());
            Log.i("ThreadPoolDemoExecute", "线程池中等待执行的任务数:" + executor.getQueue().size());
            Log.i("ThreadPoolDemoExecute", "已经执行完的任务数:" + executor.getCompletedTaskCount());
        }
        executor.shutdown();
    }
在这个例子中首先创建了一个ExecuteTask类,使其实现Runnable接口。在run方法中让当前线程sleep2秒,相当于是执行时间。
然后使用ThreadPoolExecutor创建线程池,由于之前文章已经对这几个参数做了解释,这里就不再讲解。
最后通过循环的方式让创建ExecuteTask对象,并调用ThreadPoolExecutor的execute方法。让我们看一下运行结果。

submit方式
public class Data {
    private String name;

    public Data(String name) {
        this.name = name;
    }

    public String getName() {
        return name;
    }

    public void setName(String name) {
        this.name = name;
    }
}


public class SubmitTask implements Runnable {
    private Data data;
    public SubmitTask(Data data) {
        this.data = data;
    }

    @Override
    public void run() {
        Log.i("ThreadPoolDemoSubmit", "当前执行" + data.getName());
    }
}

public void submit() {
        ThreadPoolExecutor executor = new ThreadPoolExecutor(2
                , 4
                , 200
                , TimeUnit.SECONDS
                , new ArrayBlockingQueue<Runnable>(5));

        for (int i = 0; i < 8; i++) {
            Data data = new Data("任务" + i);
            SubmitTask task = new SubmitTask(data);
            Future<Data> future = executor.submit(task, data);
            try {
                Log.i("ThreadPoolDemoSubmit", future.get().getName() + "执行完毕");
            } catch (ExecutionException e) {
                e.printStackTrace();
            } catch (InterruptedException e) {
                e.printStackTrace();
            }
        }
        executor.shutdown();
}
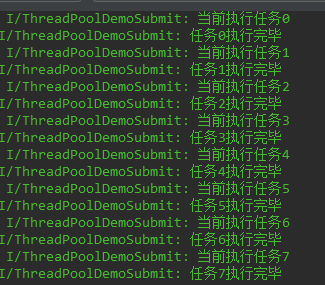
在使用这种方式时,还是先创建了SubmitTask类,同时也让它实现了Runnable接口,重写run方法。
其次还是创建出线程池对象,然后通过循环的方式创建Data对象,同时也创建相应的SubmitTask对象,并将Data对象放入到SubmitTask对象中去。
最后,调用submit方法传入SubmitTask和Data对象,这个方法将会返回一个Future对象,在之前讲解Future时知道可以通过get()方法获取任务的执行结果,运行结果如下图。
execute方法解析
在第一个例子中我们使用的是execute方法向线程池中增加任务,那么我们就看一下这方法的源码。
private final AtomicInteger ctl = new AtomicInteger(ctlOf(RUNNING, 0));
private static final int COUNT_BITS = Integer.SIZE – 3; //32-3=29,线程数量所占位数
private static final int CAPACITY = (1 << COUNT_BITS) – 1;//低29位表示最大线程数,229-1

//五种线程池状态
private static final int RUNNING = -1 << COUNT_BITS;    //int型变量高3位(含符号位)101表RUNING
private static final int SHUTDOWN = 0 << COUNT_BITS;    //高3位000
private static final int STOP = 1 << COUNT_BITS;    //高3位001
private static final int TIDYING = 2 << COUNT_BITS;    //高3位010
private static final int TERMINATED = 3 << COUNT_BITS;    //高3位011

private static int runStateOf(int c)     { return c & ~CAPACITY; }
private static int workerCountOf(int c)  { return c & CAPACITY; }
private static int ctlOf(int rs, int wc) { return rs | wc; }

/**
     * Executes the given task sometime in the future.  The task
     * may execute in a new thread or in an existing pooled thread.
     *
     * If the task cannot be submitted for execution, either because this
     * executor has been shutdown or because its capacity has been reached,
     * the task is handled by the current {@code RejectedExecutionHandler}.
     *
     * @param command the task to execute
     * @throws RejectedExecutionException at discretion of
     *         {@code RejectedExecutionHandler}, if the task
     *         cannot be accepted for execution
     * @throws NullPointerException if {@code command} is null
     */
    public void execute(Runnable command) {
        if (command == null)
            throw new NullPointerException();
        /*
         * Proceed in 3 steps:
         *
         * 1. If fewer than corePoolSize threads are running, try to
         * start a new thread with the given command as its first
         * task.  The call to addWorker atomically checks runState and
         * workerCount, and so prevents false alarms that would add
         * threads when it shouldn't, by returning false.
         *
         * 2. If a task can be successfully queued, then we still need
         * to double-check whether we should have added a thread
         * (because existing ones died since last checking) or that
         * the pool shut down since entry into this method. So we
         * recheck state and if necessary roll back the enqueuing if
         * stopped, or start a new thread if there are none.
         *
         * 3. If we cannot queue task, then we try to add a new
         * thread.  If it fails, we know we are shut down or saturated
         * and so reject the task.
         */
        int c = ctl.get(); //1
        if (workerCountOf(c) < corePoolSize) { //2
            if (addWorker(command, true)) //3
                return;
            c = ctl.get();
        }
        if (isRunning(c) && workQueue.offer(command)) { //4
            int recheck = ctl.get();
            if (! isRunning(recheck) && remove(command)) //5
                reject(command);
            else if (workerCountOf(recheck) == 0) //6
                addWorker(null, false);
        }
        else if (!addWorker(command, false)) //7
            reject(command);
    }
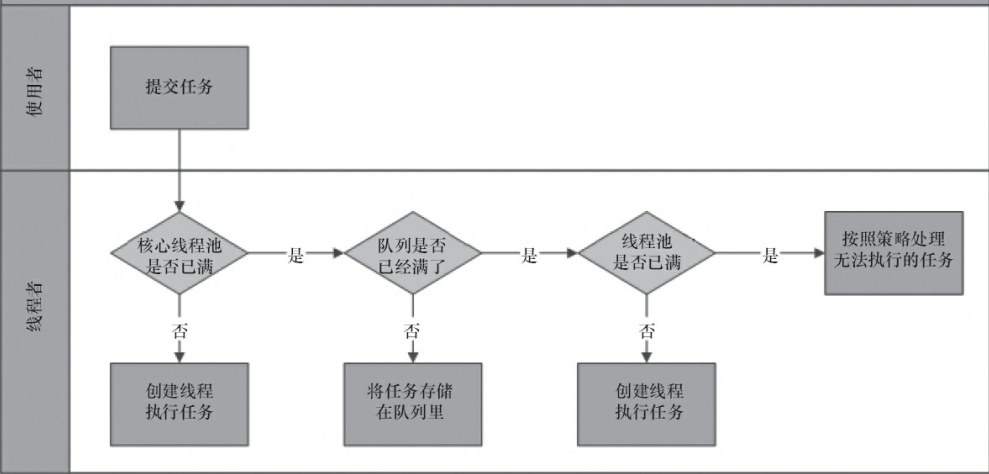
注释上说添加的过程主要分为三个步骤:
1、如果当前线程数小于核心线程数,则尝试新开一个线程给这个任务。调用
addWorker方法时通过原子性检查当前线程池的运行状态和任务个数,通过返回false来避免在不应该添加线程的地方出现错误。
2、如果一个任务可以被成功的添加到队列中去,但仍然需要第二次检查是否真的需要添加一个线程(存在上次检查之后有一个线程死掉的状况,或者进入这个方法时线程池已经关闭)。判断是否有必要需要回滚或者新建一个线程。
3、如果不能将任务放入任务栈中,仍然会仙剑一个线程。当失败时我们就能知道线程池已经关闭或者线程池已经达到上限了,此时将会执行拒接策略。
说了这么多,其实就是在执行execute()方法时做了多重的判断操作,并且多次尝试为任务新建线程将其放入到任务栈,如果实在放不进去说明线程池已经满了或者已经不再工作了。
上述只是关于添加任务执行过程的大致说明,下面我们将看一下代码细节,但是在看代码细节之前还是看一下有关线程池的几种状态。
RUNNING:能接受新提交的任务,并且也能处理阻塞队列中的任务
SHUTDOWN:关闭状态,不再接受新提交的任务,但却可以继续处理阻塞队列中已保存的任务。在线程池处于
RUNNING状态时,调用shutdown()方法会使线程池进入到该状态。(finalize()方法在执行过程中也会调用shutdown()方法进入该状态)
STOP:不能接受新任务,也不处理队列中的任务,会中断正在处理任务的线程。在线程池处于
RUNNING或SHUTDOWN状态时,调用shutdownNow()方法会使线程池进入到该状态
TIDYING:如果所有的任务都已终止了,
workerCount(有效线程数) 为0,线程池进入该状态后会调用terminated()方法进入TERMINATED状态
TERMINATED:
在terminated()方法执行完后进入该状态,默认terminated()方法中什么也没有做
代码细节对应注释
注释1:通过
ctl.get()方法获取一个值,这个值中包含了当前线程池的状态和有效线程数。
注释2:看看当前线程数是否小于核心线程数。
注释3:如果当前线程数小于核心线程数,会调用addWork方法将任务传入,同时传入一个true值表示创建核心线程。
注释4:如果当前线程数不小于核心线程数时,这时要判断当线程池是否在运行,同时还要判断任务栈是否能成功插入任务。
注释5:在满足注释4的条件后,还会重新检查当前线程池的运行状态,如果不是就将任务从任务栈中移除,同时执行拒绝策略。
注释6:如果当先线程池处于运行状态,并且当前线程池的线程数为0,这时将会调用addWork方法,但此时传入的firstTask为空,并且也不是核心线程。
注释7:再次执行了addWorker方法并且将任务传入,同时创建的不是核心线程,如果这次添加任务还是失败,将会执行拒绝策略。
addWorker(Runnable firstTask, boolean core)
execute方法的执行流程我们已经看完了,其中向线程池中插入线程的核心方法是addWorker(Runnable firstTask, boolean core)方法,我们再来看一下这个方法。
/**
     * Checks if a new worker can be added with respect to current
     * pool state and the given bound (either core or maximum). If so,
     * the worker count is adjusted accordingly, and, if possible, a
     * new worker is created and started, running firstTask as its
     * first task. This method returns false if the pool is stopped or
     * eligible to shut down. It also returns false if the thread
     * factory fails to create a thread when asked.  If the thread
     * creation fails, either due to the thread factory returning
     * null, or due to an exception (typically OutOfMemoryError in
     * Thread.start()), we roll back cleanly.
     *
     * @param firstTask the task the new thread should run first (or
     * null if none). Workers are created with an initial first task
     * (in method execute()) to bypass queuing when there are fewer
     * than corePoolSize threads (in which case we always start one),
     * or when the queue is full (in which case we must bypass queue).
     * Initially idle threads are usually created via
     * prestartCoreThread or to replace other dying workers.
     *
     * @param core if true use corePoolSize as bound, else
     * maximumPoolSize. (A boolean indicator is used here rather than a
     * value to ensure reads of fresh values after checking other pool
     * state).
     * @return true if successful
     */
     private boolean addWorker(Runnable firstTask, boolean core) {
        retry:
        for (;;) {
            int c = ctl.get();
            int rs = runStateOf(c);
            // 1 查看线程池是否可以接收新的任务
            if (rs >= SHUTDOWN &&
                ! (rs == SHUTDOWN &&
                   firstTask == null &&
                   ! workQueue.isEmpty()))
                return false;
            for (;;) {
                int wc = workerCountOf(c);
                // 2 看一下当前线程的数量是否超过了容量
                if (wc >= CAPACITY ||
                    wc >= (core ? corePoolSize : maximumPoolSize))
                    return false;
                // 3 调用compareAndIncrementWorkerCount方法使用CAS方法增加线程
                // 如果增加失败,需要跳出重新执行
                if (compareAndIncrementWorkerCount(c))
                    break retry;
                c = ctl.get();  // Re-read ctl
                if (runStateOf(c) != rs)
                    continue retry;
                // else CAS failed due to workerCount change; retry inner loop
            }
        }

        boolean workerStarted = false;
        boolean workerAdded = false;
        Worker w = null;
        try {
            // 4 相间一个Worker对象,并将任务封装到该对象中去
            // 通过线程工厂为Worker创建一个独有的线程
            w = new Worker(firstTask);
            // 5 获取这个线程
            final Thread t = w.thread;
            if (t != null) {
                // 7 获取重入锁,并锁住
                final ReentrantLock mainLock = this.mainLock;
                mainLock.lock();
                try {
                    // Recheck while holding lock.
                    // Back out on ThreadFactory failure or if
                    // shut down before lock acquired.
                    int rs = runStateOf(ctl.get());
                    // 8 判断线程池处于运行状态,或者线程池关闭且任务线程为空
                    if (rs < SHUTDOWN ||
                        (rs == SHUTDOWN && firstTask == null)) {
                        // 9 如果线程已经启动,需要抛出异常
                        if (t.isAlive())
                            throw new IllegalThreadStateException();
                        // 10 private final HashSet<Worker> wokers = new HashSet<Worker>();
                        // 包含线程池中所有的工作线程,只有在获取了全局的时候才能访问它。
                        // 将新构造的工作线程加入到工作线程集合中。
                        workers.add(w);
                        // 11 设置largestPoolSize和workerAdded
                        int s = workers.size();
                        if (s > largestPoolSize)
                            largestPoolSize = s;
                        workerAdded = true;
                    }
                } finally {
                    // 12 解锁
                    mainLock.unlock();
                }
                // 13 添加成功执行线程
                if (workerAdded) {
                     //在被构造为Worker工作线程,且被加入到工作线程集合中后,执行线程任务,
                     //注意这里的start实际上执行Worker中run方法,所以接下来分析Worker的run方法
                    t.start();
                    workerStarted = true;
                }
            }
        } finally {
            if (! workerStarted)
                addWorkerFailed(w);
        }
        return workerStarted;
    }

     private final class Worker extends AbstractQueuedSynchronizer implements Runnable{
        ...
        Worker(Runnable firstTask) {
            setState(-1);
            this.firstTask = firstTask;
            // 通过线程工厂创建线程
            this.thread = getThreadFactory().newThread(this);
        }

        //执行任务
        public void run() {
            runWorker(this);
        }

        ...
    }

    private void addWorkerFailed(Worker w) {
        // 获取锁对象
        final ReentrantLock mainLock = this.mainLock;
        mainLock.lock();
        try {
            // 将任务移除
            if (w != null)
                workers.remove(w);
            // 减少任务个数
            decrementWorkerCount();
            tryTerminate();
        } finally {
            mainLock.unlock();
        }
    }
对这个方法的分析都在代码中的注释,同时在这里跟大家提一下关于CAS的相关知识,大家可以参考Java CAS 原理剖析这篇文章。
小结
execute方法已经分析完毕了,还是用那副经典图来作为总结。
submit方法解析
我们之前也使用了submit方法举例,所以接下来我们来看一下ThreadPoolExecutor的submit方法。
public abstract class AbstractExecutorService implements ExecutorService {
    ...
    /**
     * @throws RejectedExecutionException {@inheritDoc}
     * @throws NullPointerException       {@inheritDoc}
     */
    public Future<?> submit(Runnable task) {
        if (task == null) throw new NullPointerException();
        RunnableFuture<Void> ftask = newTaskFor(task, null);
        execute(ftask);
        return ftask;
    }

    /**
     * @throws RejectedExecutionException {@inheritDoc}
     * @throws NullPointerException       {@inheritDoc}
     */
    public <T> Future<T> submit(Runnable task, T result) {
        if (task == null) throw new NullPointerException();
        RunnableFuture<T> ftask = newTaskFor(task, result);
        execute(ftask);
        return ftask;
    }
    /**
     * @throws RejectedExecutionException {@inheritDoc}
     * @throws NullPointerException       {@inheritDoc}
     */
    public <T> Future<T> submit(Callable<T> task) {
        if (task == null) throw new NullPointerException();
        RunnableFuture<T> ftask = newTaskFor(task);
        execute(ftask);
        return ftask;
    }
    ...
}
但是当我们点进去看时,这里又到了AbstractExecutorService类中。到这里我们从前面的线程池类的继承结构中知道Executor接口中是没有submit方法的,它只是定义了一个execute方法,而是在ExecutorService接口中定义了submit方法,AbstractExecutorService又实现了ExecutorService接口,同时实现了submit方法。最后ThreadPoolExecutor又继承了AbstractExecutorService类。
最终在执行AbstractExecutorService.submit方法时又调用了子类ThreadPoolExecutor````中的execute方法,这种写法其实是[模板方法模式](https://www.cnblogs.com/yulinfeng/p/5902164.html):AbstractExecutorService.submit方法只是一个架子,具体的实现交由子类ThreadPoolExecutor.execute```方法来实现。
这个方法有三个重载,其中我们在举例时是用的第二种。
第一种方法:单独传入一个
Runnable但是没有传入返回值类型,在返回的RunnableFuture对象的泛型时传入的是一个Void,也就是说这种方法无法获取线程执行的返回值。
第二种方法:传入一个
Runnable对象,同时传入了一个返回值的载体,通过载体间接获取线程执行的结果。
第三种方法:传入一个
Callable方法,同时定义了返回值的类型。之前也讲过Callable的实现对象中需要重写call方法,在call方法中有返回值,这个返回值最后被定义给了RunnableFuture对象,通过get方法可以获取到。
Executors
上面讲的都是我们手动创建线程池,下面我们来介绍一个类,它可以帮我们自动创建一个线程池,它就是Executors。
/**
 * Factory and utility methods for {@link Executor}, {@link
 * ExecutorService}, {@link ScheduledExecutorService}, {@link
 * ThreadFactory}, and {@link Callable} classes defined in this
 * package. This class supports the following kinds of methods:
 *
 * <ul>
 *   <li>Methods that create and return an {@link ExecutorService}
 *       set up with commonly useful configuration settings.
 *   <li>Methods that create and return a {@link ScheduledExecutorService}
 *       set up with commonly useful configuration settings.
 *   <li>Methods that create and return a "wrapped" ExecutorService, that
 *       disables reconfiguration by making implementation-specific methods
 *       inaccessible.
*   <li>Methods that create and return a {@link ThreadFactory}
 *       that sets newly created threads to a known state.
 *   <li>Methods that create and return a {@link Callable}
 *       out of other closure-like forms, so they can be used
 *       in execution methods requiring {@code Callable}.
 * </ul>
 *
 * @since 1.5
 * @author Doug Lea
 */
public class Executors {
    ...
    public static ExecutorService newFixedThreadPool(int nThreads) {
        return new ThreadPoolExecutor(nThreads, nThreads,
                                      0L, TimeUnit.MILLISECONDS,
                                      new LinkedBlockingQueue<Runnable>());
    }

    public static ExecutorService newSingleThreadExecutor() {
        return new FinalizableDelegatedExecutorService
            (new ThreadPoolExecutor(1, 1,
                                    0L, TimeUnit.MILLISECONDS,
                                    new LinkedBlockingQueue<Runnable>()));
    }

    public static ExecutorService newCachedThreadPool() {
        return new ThreadPoolExecutor(0, Integer.MAX_VALUE,
                                      60L, TimeUnit.SECONDS,
                                      new SynchronousQueue<Runnable>());
    }

    public static ScheduledExecutorService newScheduledThreadPool(int corePoolSize) {
        return new ScheduledThreadPoolExecutor(corePoolSize);
    }

    public static ExecutorService newWorkStealingPool() {
        return new ForkJoinPool
            (Runtime.getRuntime().availableProcessors(),
             ForkJoinPool.defaultForkJoinWorkerThreadFactory,
             null, true);
    }
    ...
}
这个类相当于一个工厂,只需要我们调用其静态方法,就能为我们创建相应的线程池。这个类中有很多用于创建线程池的静态方法,这里只是找了5个比较具有代表性的方法,我们来分析一下。
newFixedThreadPool:创建一个特定长度的线程池,可以控制并发的数量,超过长度的线程在队列中等待。
newSingleThreadExecutor:创建一个单线程的线程池,并且只用这一个线程执行任务。
newCachedThreadPool:创建一个可缓存的线程池,这个线程池可以是无限大。
newScheduledThreadPool:创建一个定长的线程池,支持定时或周期性的执行任务。
newWorkStealingPool:创建一个多任务的线程池,减少连接数,适用于耗时的操作。
这个类帮助我们自动创建的确很方便,但是也存在一些问题:
newCachedThreadPool方法中传入的最大线程数为Integer.MAX_VALUE,但是核心线程数为0,所以短时间内大量任务进来后,会创建有很多线程池对象,在资源有限的情况下容易导致OOM。
newFixedThreadPool和newSingleThreadExecutor使用的任务队列为LinkedBlockingQueue,去看它的源码可以知道,它的队列长度是Integer.MAX_VALUE,所以这两个方法也存在同newCachedThreadPool一样的问题。
总结
有关Android线程池相关的分析到这里就告一段落了,如果有哪里写的不对的地方,还请各位大佬批评指正,本人将不胜感激。
参考资料
Java并发编程:Callable、Future和FutureTask原理解析
Java FutureTask 源码分析 Android上的实现
FutureTask的用法及两种常用的使用场景
Java CAS 原理剖析
模板方法模式
