

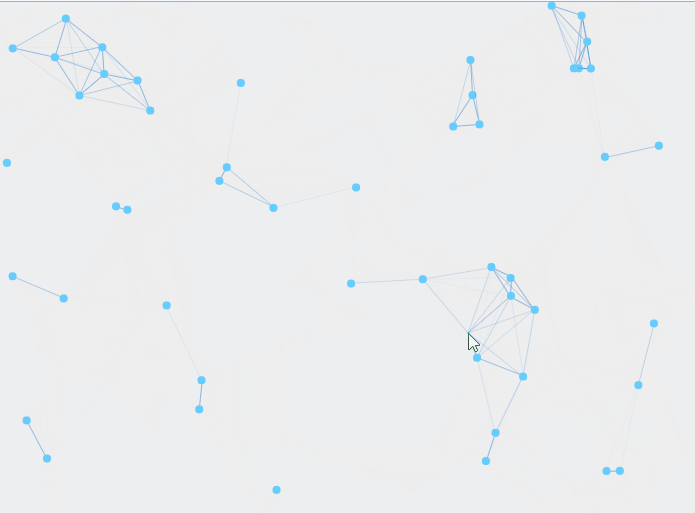
先上效果图,这个动画相信大家在很多地方见过。可能样式稍有不同,但大体一致。原作者不知是谁,看着还是挺炫酷的,话不多说,下面开始。
搭建环境
使用TypeScript开发(自己的ts练习项目)。live-server作为开发服务器,一切从简。
不会TS的同学也不用担心。ts代码很少。不影响阅读。
创建一个项目文件夹并进入打开命令行。
安装依赖包
ts的编译器和开发服务器(提供自动刷新能力)。直接全局安装。
npm i -g live-server typescript
初始化
tsc --init
npm init
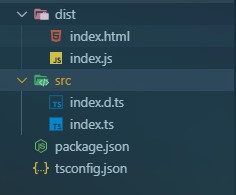
目录结构
配置文件
package.json
{
  "devDependencies": {},
  "scripts": {
    "dev": "live-server ./dist | tsc -watch"
  }
}
tsconfig.json
{
  "compilerOptions": {
    "incremental": true,
    "target": "es5",
    "module": "commonjs",
    "lib": [
      "es2020",
      "dom"
    ],
    "outDir": "./dist",
    "rootDir": "./src",
    "strict": true,
    "esModuleInterop": true
  }
}
启动项目
启动后自动打开浏览器
npm run dev
开始编写
启动项目后。在src下index.ts文件在代码保存后会直接编译到dist文件夹中。页面也会自动刷新
页面结构
<!DOCTYPE html>
<html lang="zh-CN">
  <head>
    <meta charset="UTF-8" />
    <meta name="viewport" content="width=device-width, initial-scale=1.0" />
    <meta http-equiv="X-UA-Compatible" content="ie=edge" />
    <title>document</title>
    <style>
      body,
      html {
        height: 100%;
      }
      body {
        margin: 0;
        background: #eee;
      }
      canvas {
        height: 100%;
        width: 100%;
      }
    </style>
  </head>
  <body>
    <canvas id="cvs"></canvas>
  </body>
  <script src="./index.js"></script>
</html>
第一步让画布全屏
这里比较简单,没啥好说的。
要注意的就是canvas画布的大小是由标签上的属性(width/height)决定的,css的宽高决定是这个元素的显示大小。类似于一张1920*1080的图片你让它在一个100*100的<img />中显示一样,所以css的大小与属性width/height一致最好
/// <reference path="./index.d.ts" />
let cvs = document.getElementById("cvs");
// 此处用类型保护将cvs确定为 HTMLCanvasElement 类型
if (cvs instanceof HTMLCanvasElement) {
  const ctx = cvs.getContext("2d")!;
  // 画布大小
  let width: number = 0;
  let height: number = 0;
  // 设置画布大小与窗口一样大
  const setSize = () => {
    // 获取当前文档内容区宽高
    width = document.documentElement.clientWidth;
    height = document.documentElement.clientHeight;
    // 类型保护只在上个作用域生效,所以这里再写一次
    if (cvs instanceof HTMLCanvasElement) {
      // 设置canvas的实际宽高
      cvs.width = width;
      cvs.height = height;
    }
  };
  window.onresize = setSize;
  setSize();
}
第二步生成指定数量小球
小球有自己x,y坐标和加速度以及半径,这些属性都是后面绘制所需要的
// 小球数量
const dotNum = 50;
// 小球列表
const dotList: Array<TDot> = [];
// 随机数
const random: TRandom = (min, max) =>
  Math.floor(Math.random() * (max - min + 1) + min);
// 随机生成 1 或 -1
const randomSign = () => [-1, 1][random(0, 1)];
for (let i = 0; i < dotNum; i++) {
  dotList.push({
    // 随机坐标(4 是圆半径)
    x: random(4, width - 4),
    y: random(4, height - 4),
    // 随机加速度(randomSign 用来让加速度有正反值,球就有不同的方向)
    xa: Math.random() * randomSign(),
    ya: Math.random() * randomSign(),
    // 圆点半径
    radius: 4
  });
}
第三步让小球动起来
这里用了requestAnimationFrame,它接收一个回调函数并在页面下一帧刷新前调用,这个API是做动画最常用方法。
这里要注意每一帧绘制前要清空前一次绘制的画面。用clearRect(),还有每次画路径前要调用beginPath()方法以重新开始一条路径
// 绘制函数
const draw = () => {
  // 清空上次绘制
  ctx.clearRect(0, 0, width, height);
  dotList.forEach((dot, index) => {
    // 计算下一帧的坐标
    dot.x += dot.xa;
    dot.y += dot.ya;
    // 设置小球的颜色
    ctx.fillStyle = "#6cf";
    // 画小球路径
    ctx.beginPath();
    ctx.arc(dot.x, dot.y, dot.radius, 0, Math.PI * 2);
    // 填充颜色
    ctx.fill();
  });
  requestAnimationFrame(draw);
};
// 动画开始
draw();
效果图,此时小球按各自的速度和方向运动。但不一会就会走出屏幕看不见
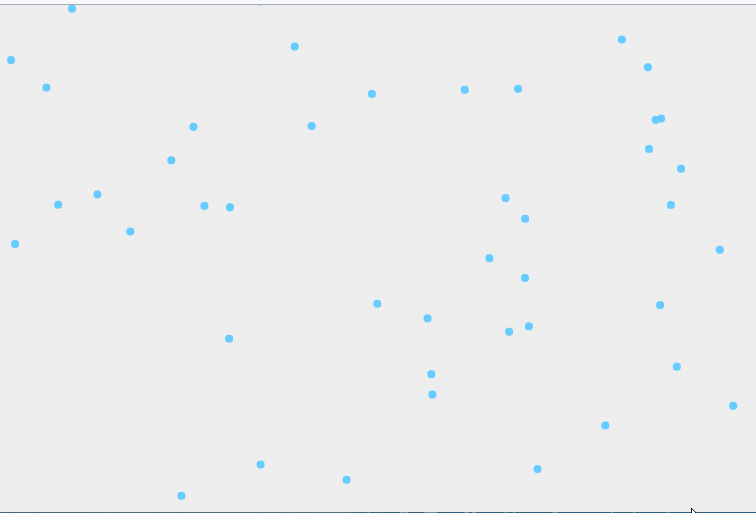
第四步添加边界检测
修改draw函数,通过canvas的宽高计算小球坐标的最大和最小值来进行边界检测并添加反弹效果
const draw = () => {
  // 清空上次绘制
  ctx.clearRect(0, 0, width, height);
  dotList.forEach((dot, index) => {
    // 计算下一帧的坐标
    dot.x += dot.xa;
    dot.y += dot.ya;
    // 计算边界值
    const Xmin = dot.radius;
    const Xmax = width - dot.radius;
    const Ymin = dot.radius;
    const Ymax = height - dot.radius;
    // 判断下一帧坐标是否越界,越界则将加速度取反,小球就可以在边缘反弹。
    (dot.x >= Xmax || dot.x <= Xmin) && (dot.xa = -dot.xa);
    (dot.y >= Ymax || dot.y <= Ymin) && (dot.ya = -dot.ya);
    // 将越界坐标矫正(超过边界值就设为边界值)
    dot.x = dot.x >= Xmax ? Xmax : dot.x <= Xmin ? Xmin : dot.x;
    dot.y = dot.y >= Ymax ? Ymax : dot.y <= Ymin ? Ymin : dot.y;
    // 设置小球的颜色
    ctx.fillStyle = "#6cf";
    // 画小球路径
    ctx.beginPath();
    ctx.arc(dot.x, dot.y, dot.radius, 0, Math.PI * 2);
    // 填充颜色
    ctx.fill();
  });
  requestAnimationFrame(draw);
};
效果图
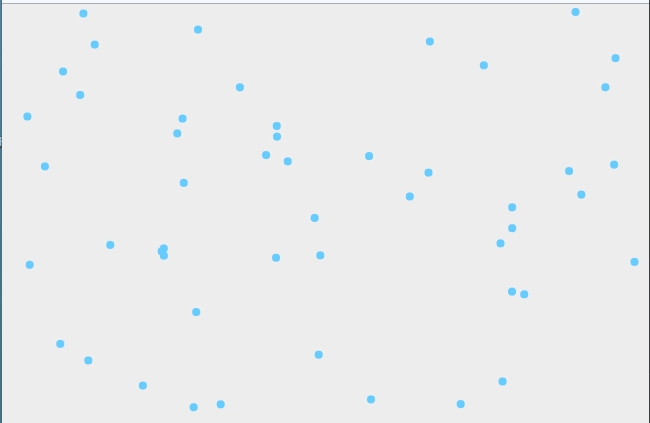
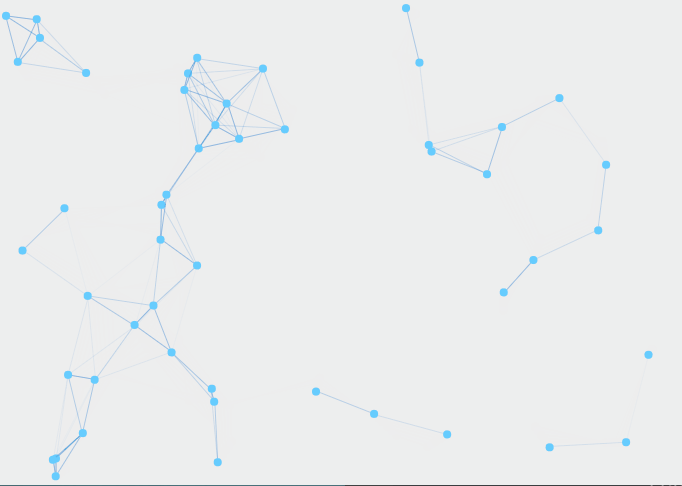
第五步让小球连线
设计连线的规则:
- 两个小球之间距离小于指定值时就在之间画一条线
- 线条粗细和透明度随着距离变近变得粗和不透明
要将所有小球两两计算距离,只需在dotList每次遍历中再将后续的小球与当前小球进行计算,这样就能在一次绘制中将所有小球每两个计算一遍。
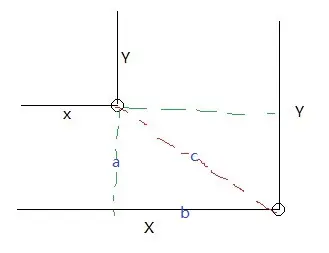
而距离的计算只需用一个简单的勾股定理,如图,a²+b²=c²
增加distSquare变量并修改draw函数,这里画小球代码之所以放在最后是防止线条绘制在小球上面影响美观
// 预设距离值(平方值)
const distSquare = 10000;
// 绘制函数
const draw = () => {
  // 清空上次绘制
  ctx.clearRect(0, 0, width, height);
  dotList.forEach((dot, index) => {
    /** ...省略部分代码 **/
    // 小球之间连线
    for (let i = index + 1; i < dotList.length; i++) {
      // dot后面的小球
      let nextDot = dotList[i];
      // 计算两个小球的x 与 y 坐标差值
      let x_dist = dot.x - nextDot.x;
      let y_dist = dot.y - nextDot.y;
      // 计算斜线长度
      let dist = x_dist * x_dist + y_dist * y_dist;
      // 两点距离小于预设值则让两点连线
      if (dist < distSquare) {
        drawLine(dist, dot, nextDot);
      }
    }
    // 设置小球的颜色
    ctx.fillStyle = "#6cf";
    // 画小球路径
    ctx.beginPath();
    ctx.arc(dot.x, dot.y, dot.radius, 0, Math.PI * 2);
    // 填充颜色
    ctx.fill();
  });
  requestAnimationFrame(draw);
};
实现连线函数
// 将两个小球进行连线(参数:两点距离(平方值)、当前小球、下一个小球)
const drawLine: TDrawLine = (dist, dot, nextDot) => {
  // 距离差值 与 预设距离的比例计算透明度,距离越近越不透明
  let op = (distSquare - dist) / distSquare;
  // 计算线条宽度
  const lineWidth = op / 2;
  ctx.lineWidth = lineWidth;
  // 设置线条颜色和透明度
  ctx.strokeStyle = `rgba(20, 112, 204,${op + 0.2})`;
  // 画路径
  ctx.beginPath();
  ctx.moveTo(dot.x, dot.y);
  ctx.lineTo(nextDot.x, nextDot.y);
  // 画线
  ctx.stroke();
};
上图
第六步鼠标跟随效果
首先实时获取鼠标坐标
// 鼠标坐标(-1表示不在窗口中)
let point: Point = { x: -1, y: -1 };
// 鼠标坐标实时获取
window.addEventListener("mousemove", ({ clientX, clientY }) => {
  point = { x: clientX, y: clientY };
});
// 移出窗口坐标清除
window.addEventListener("mouseout", () => {
  point = { x: -1, y: -1 };
});
然后修改draw函数,加入与鼠标的连线以及范围跟随。
// 绘制函数
const draw = () => {
  // 清空上次绘制
  ctx.clearRect(0, 0, width, height);
  dotList.forEach((dot, index) => {
    /** ......省略部分代码 **/

    // 小球与鼠标之间连线(不为-1表示鼠标在里面)
    if (point.x !== -1) {
      // 计算鼠标与当前小球坐标差值
      let x_dist = point.x - dot.x;
      let y_dist = point.y - dot.y;
      // 计算鼠标与当前小球直线距离
      let dist = x_dist * x_dist + y_dist * y_dist;
      // 小于预设值(可以连线)
      if (dist < distSquare) {
        // 大于等于 预设值的一半 小于预设值(范围是个外圆圈) 加速向鼠标
        if (dist >= distSquare / 2) {
          dot.x += 0.02 * x_dist;
          dot.y += 0.02 * y_dist;
        }
        drawLine(dist, dot, point);
      }
    }
    // 设置小球的颜色
    ctx.fillStyle = "#6cf"; // 画小球路径
    ctx.beginPath();
    ctx.arc(dot.x, dot.y, dot.radius, 0, Math.PI * 2); // 填充颜色
    ctx.fill();
  });
  requestAnimationFrame(draw);
};
这里比较难理解的是小球加速向鼠标的代码
// 小于预设值(可以连线)
if (dist < distSquare) {
  // 大于等于 预设值的一半 小于预设值(范围是个外圆圈) 加速向鼠标
  if (dist >= distSquare / 2) {
    dot.x += 0.02 * x_dist;
    dot.y += 0.02 * y_dist;
  }
  drawLine(dist, dot, point);
}
最里面的判断是当小球坐标位于鼠标外围圆圈中时。把小球的坐标加上 与鼠标坐标差值的百分之二,小球速度会明显变快。
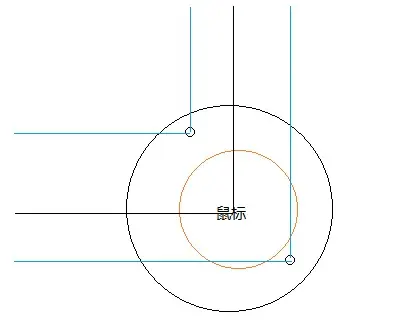
而为什么会朝向鼠标:
当小球在鼠标左边时,坐标差值是正数,向右加速运动。
当小球在鼠标右边时,坐标差值是负数,小球向左加速运动。上下同理。
而小球坐标加上的值是差值的百分比。所以朝向就是鼠标。
至此功能全部完成。
完整代码
index.ts
/// <reference path="./index.d.ts" />

let cvs = document.getElementById("cvs");

// 此处用类型保护将cvs确定为 HTMLCanvasElement 类型
if (cvs instanceof HTMLCanvasElement) {
  const ctx = cvs.getContext("2d")!;
  // 画布大小
  let width: number = 0;
  let height: number = 0;

  // 设置画布大小与窗口一样大
  const setSize = () => {
    // 获取当前文档内容区宽高
    width = document.documentElement.clientWidth;
    height = document.documentElement.clientHeight;
    // 类型保护只在上个作用域生效,所以这里再写一次
    if (cvs instanceof HTMLCanvasElement) {
      // 设置canvas的实际宽高
      cvs.width = width;
      cvs.height = height;
    }
  };
  window.onresize = setSize;
  setSize();

  // 小球数量
  const dotNum = 50;
  // 小球列表
  const dotList: Array<TDot> = [];
  // 随机数
  const random: TRandom = (min, max) =>
    Math.floor(Math.random() * (max - min + 1) + min);
  // 随机生成 1 和 -1
  const randomSign = () => [-1, 1][random(0, 1)];

  for (let i = 0; i < dotNum; i++) {
    dotList.push({
      // 随机坐标(4 是圆半径)
      x: random(4, width - 4),
      y: random(4, height - 4),
      // 随机加速度(randomSign 用来让加速度有正反值,球就有不同的方向)
      xa: Math.random() * randomSign(),
      ya: Math.random() * randomSign(),
      // 圆点半径
      radius: 4
    });
  }

  // 鼠标坐标
  let point: Point = {
    x: -1,
    y: -1
  };

  // 鼠标坐标实时获取
  window.addEventListener("mousemove", ({ clientX, clientY }) => {
    point = {
      x: clientX,
      y: clientY
    };
  });
  // 移出窗口坐标清除
  window.addEventListener("mouseout", () => {
    point = {
      x: -1,
      y: -1
    };
  });

  // 预设值距离值(平方值)
  const distSquare = 10000;
  // 将两个小球进行连线(参数:两点距离(平方值)、当前小球、下一个小球)
  const drawLine: TDrawLine = (dist, dot, nextDot) => {
    // 距离差值 与 预设距离的比例计算透明度,距离越近越不透明
    let op = (distSquare - dist) / distSquare;
    // 计算线条宽度
    const lineWidth = op / 2;
    ctx.lineWidth = lineWidth;
    // 设置线条颜色和透明度
    ctx.strokeStyle = `rgba(20, 112, 204,${op + 0.2})`;
    // 画路径
    ctx.beginPath();
    ctx.moveTo(dot.x, dot.y);
    ctx.lineTo(nextDot.x, nextDot.y);
    // 画线
    ctx.stroke();
  };
  // 绘制函数
  const draw = () => {
    // 清空上次绘制
    ctx.clearRect(0, 0, width, height);

    dotList.forEach((dot, index) => {
      // 计算下一帧的坐标
      dot.x += dot.xa;
      dot.y += dot.ya;

      // 计算边界值
      const Xmin = dot.radius;
      const Xmax = width - dot.radius;
      const Ymin = dot.radius;
      const Ymax = height - dot.radius;

      // 判断下一帧坐标是否越界,越界则将加速度取反,小球就可以在边缘反弹。
      (dot.x >= Xmax || dot.x <= Xmin) && (dot.xa = -dot.xa);
      (dot.y >= Ymax || dot.y <= Ymin) && (dot.ya = -dot.ya);

      // 将越界坐标矫正
      dot.x = dot.x >= Xmax ? Xmax : dot.x <= Xmin ? Xmin : dot.x;
      dot.y = dot.y >= Ymax ? Ymax : dot.y <= Ymin ? Ymin : dot.y;

      // 小球之间连线
      for (let i = index + 1; i < dotList.length; i++) {
        // dot后面的小球
        let nextDot = dotList[i];
        // 计算两个小球的x 与 y 坐标差值
        let x_dist = dot.x - nextDot.x;
        let y_dist = dot.y - nextDot.y;
        // 利用三角函数计算斜线长度,也就是两小球距离
        let dist = x_dist * x_dist + y_dist * y_dist;
        // 两点距离小于预设值则让两点连线
        if (dist < distSquare) {
          drawLine(dist, dot, nextDot);
        }
      }

      // 小球与鼠标之间连线(不为-1表示鼠标在里面)
      if (point.x !== -1) {
        // 计算鼠标与当前小球坐标差值
        let x_dist = point.x - dot.x;
        let y_dist = point.y - dot.y;
        // 计算鼠标与当前小球直线距离
        let dist = x_dist * x_dist + y_dist * y_dist;
        // 小于预设值(可以连线)
        if (dist < distSquare) {
          // 大于等于 预设值的一半 小于预设值(范围是个外圆圈) 加速向鼠标
          if (dist >= distSquare / 2) {
            dot.x += 0.02 * x_dist;
            dot.y += 0.02 * y_dist;
          }
          drawLine(dist, dot, point);
        }
      }

      // 设置小球的颜色
      ctx.fillStyle = "#6cf";
      // 画小球路径
      ctx.beginPath();
      ctx.arc(dot.x, dot.y, dot.radius, 0, Math.PI * 2);
      // 填充颜色
      ctx.fill();
    });
    requestAnimationFrame(draw);
  };

  // 动画开始
  draw();
}
index.d.ts
interface Point {
  x: number;
  y: number;
}

interface TDot extends Point {
  radius: number;
  xa: number;
  ya: number;
}

type TRandom = (min: number, max: number) => number;

type TDrawLine = (dist: number, dot: TDot, nextDot: Point) => void;
结束。第一次写分享,不足之处多多指正!
