

一、游戏中的文字
我们的系列文章中第一篇就跟大家讲了怎么样在游戏中实现在舞台中渲染文字“Hello World”。
但是,经常玩游戏的老哥肯定知道,游戏里面不仅仅只有普普通通的文字,还会有各种花里胡哨的字体,这些字我们要怎么实现呢?
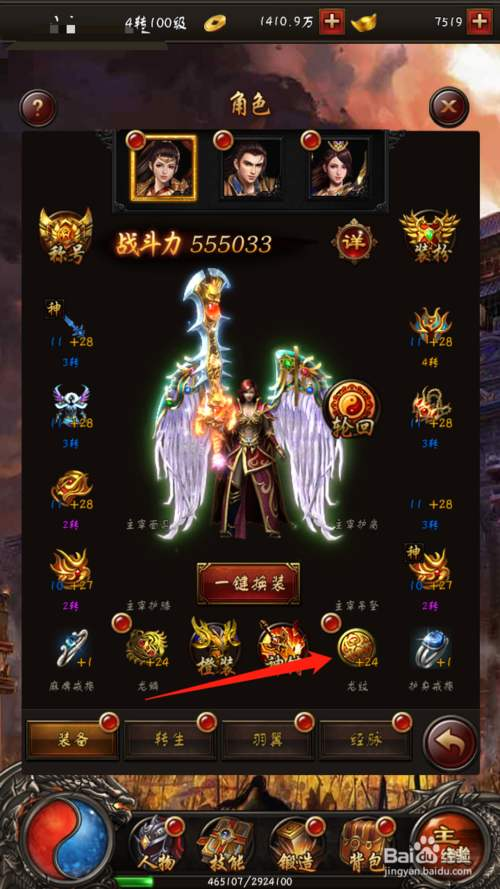
我们可以看到下面这张游戏装备界面的截图中,里面就有很多花里胡哨的字体,这些是没办法通过渲染普通的字体来实现的,或者说靠字体库来实现会很复杂,因为他们有斜体、有阴影、有描边、有渐变等等。
为了解决上面大家对炫酷文字的追求,在H5的游戏中就多了一种叫做位图字体的东西,专门用于渲染上面的炫酷的文字。
什么是位图字体呢?顾名思义,位图字体,即Bitmap Font,将预制的字符以图片的形式渲染在画面上的字体方案。因为是图片,所以,描边、阴影、渐变他样样精通。而一套位图字体文件本身由2部分组成:
- 字符图集(*.png)
- 描述字符在图集中的大小和位置的配置文件 (*.fnt)
通过一比一的把文字当作图片渲染出来,多么炫酷的静态效果对我们来说都很简单啦~
二、怎么才能在游戏中使用文字?
好啦,我们先来简单的总结一下,目前游戏中用于文字渲染的字体有2类:
- 普通字体
- 位图字体
知道了游戏中都有哪些字体,我们就可以来看看,怎么通过代码的形式将我们想要的文字插入界面中啦。
2.1 普通字体
在普通字体中,我们又可以根据字体库是否为系统内置的将字体使用分为:本地字体库、异步加载TTF字体库2类。我们分别来看看要怎么通过代码实现
2.1.1 本地字体库
首先,我们需要创建一个新的laya项目,然后,在起始场景中加入如下代码
/**
 * 使用本地普通文本
 */
public addText() {
    let $text = new Laya.Text();

    $text.font = '宋体';
    $text.fontSize = 30;
    $text.color = '#fff';
    $text.text = 'qwertyuiop一二三四五六七八';
    $text.pos(0, 400);

    this.addChild($text);
}
效果如下:

2.1.2 异步加载TTF字体库
假如你的文字需要从CDN上加载,那你就需要在上面的代码基础上增加如下步骤:
- 加载字体
- 获取字体名称
- 设置字体
代码如下:
/**
 * 加载字体,简化版省略很多校验逻辑
 * @param font
 * @param localPath
 */
public static async loadFont(onlinePath, localPath): Promise<string> {
    // 先尝试在本地加载字体
    let fontFamily = window['qg'].loadFont(localPath);
    try {
        if (!fontFamily || fontFamily === 'null') {
            // 异步加载字体,下次进入再使用
             window['qg'].downloadFile({
                url: onlinePath,
                filePath: localPath
            });
        }
        return fontFamily;
    } catch (e) {
        // 返回默认字体
        return 'Microsoft YaHei';
    }
}
其余步骤和使用本地字体库没有区别
$text.font = loadFont('xxx', 'xxx');
2.2 位图字体
相对与普通字体,位图字体麻烦的地方是如何制作位图字体库。这里我直接给2个传送门,大家可以直接查看如何制作位图字体,Mac如何制作位图字体、Windows如何制作位图字体。
制作完位图字体之后,大家会得到这样的一组字体。

位图字体里面具体是怎么解析和渲染的我们会在下一节讲述。
这里我们要开始讲一下如何在Laya中使用位图字体。在Laya中我们有2种方式使用位图字体:
- 通过
Label或Text直接将字体设置成位图字体; - 通过
FontClip搭配简单的位图图片,渲染位图;
2.2.1 Label或Text组件
/**
* 使用位图字体
*/
public addBitmap() {
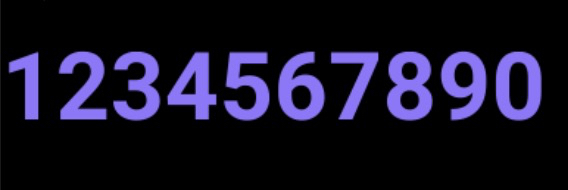
this.loadBitmapFont('purple', 64).then(() => {
let $text = new Laya.Text();
$text.font = 'purple';
$text.fontSize = 64;
$text.text = '1234567890';
$text.pos(0, 600);
this.addChild($text);
});
}
/**
* 加载位图字体
*/
public loadBitmapFont(fontName: string, fontSize: number) {
return new Promise((resolve) => {
let bitmapFont = new Laya.BitmapFont();
// 字体大小
bitmapFont.fontSize = fontSize;
// 允许设置自动缩放
bitmapFont.autoScaleSize = true;
// 加载字体
bitmapFont.loadFont(
`bitmapFont/${fontName}.fnt`,
new Laya.Handler(this, () => {
// 设置空格的宽度
bitmapFont.setSpaceWidth(10);
// 根据字体名称,注册位图字体
Laya.Text.registerBitmapFont(fontName, bitmapFont);
resolve(fontName);
})
);
});
}
效果如下:
2.2.2 FontClip组件
/**
* 使用文字切片
*/
public addFontClip() {
let $fontClip = new Laya.FontClip();
$fontClip.skin = 'bitmapFont/fontClip.png';
$fontClip.sheet = '0123456789';
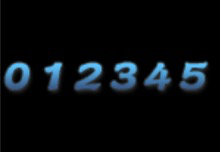
$fontClip.value = '012345';
$fontClip.pos(0, 800);
this.addChild($fontClip);
}
效果如下:
2.2.3 使用场景总结
| 类型 | 场景 |
|---|---|
| Label、Text(普通字体) | 常规字体 |
| Label、Text(位图字体) | 大量、复杂的炫酷字体 |
| FontClip(简单位图) | 少量、简单的炫酷字体 |
三、文字是怎么渲染出来的?
知道代码怎么写了,我们再来看看,引擎到底是怎么渲染的?
3.1 特有概念
下面的概念会在下面的文章出现,这里提前介绍一下:
- Sprite(精灵):它是Laya中基础的显示图形的显示列表节点,也是Laya中唯一的核心显示类。
- Graphic:绘图对象,封装了绘制位图和矢量图的接口,Sprite所有的绘图操作都是通过Graphics来实现的。
- Texture:在OpenGL时代,从应用开发者来看,texture 是一个名词,在物理上指的是 GPU 显存中一段连续的空间,这一个概念也延续到H5游戏中。
在Laya引擎中,我们使用的组件的继承关系如下:
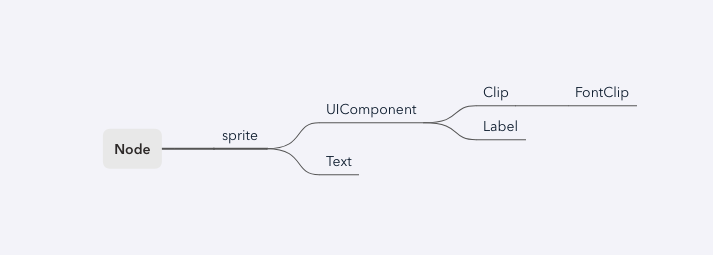
所有组件全部集成sprite对象,渲染都是通过Sprite对象中Graphic对象进行渲染。
3.2 FontClip如何渲染
FontClip字体切片,简化版的位图字体,只需设置一个切片图片和文字内容即可使用,效果同位图字体。
FontClip的整个渲染流程简单的说就是:
1、加载字体,并把根据指定的切片大小将字符对应的Texture保存起来
/**
 * @private
 * 加载切片图片资源完成函数。
 * @param url 资源地址。
 * @param img 纹理。
 */
protected loadComplete(url: string, img: Texture): void {
    if (url === this._skin && img) {
        var w: number = this._clipWidth || Math.ceil(img.sourceWidth / this._clipX);
        var h: number = this._clipHeight || Math.ceil(img.sourceHeight / this._clipY);

        var key: string = this._skin + w + h;
        // ... 省略非关键代码
        for (var i: number = 0; i < this._clipY; i++) {
            for (var j: number = 0; j < this._clipX; j++) {
                this._sources.push(Texture.createFromTexture(img, w * j, h * i, w, h));
            }
        }
        WeakObject.I.set(key, this._sources);

        this.index = this._index;
        this.event(Event.LOADED);
        this.onCompResize();
    }
}
2、解析sheet字段,根据用户输入标明位图的中每个字符对应的位置。设置位图字体内容,空格代表换行。比如"abc123 456",代表第一行对应的文字为"abc123",第二行为"456"。
set sheet(value: string) {
    value += '';
    this._sheet = value;
    //根据空格换行
    var arr: any[] = value.split(' ');
    this._clipX = String(arr[0]).length;
    this.clipY = arr.length;

    this._indexMap = {};
    for (var i: number = 0; i < this._clipY; i++) {
        var line: any[] = arr[i].split('');
        for (var j: number = 0, n: number = line.length; j < n; j++) {
            this._indexMap[line[j]] = i * this._clipX + j;
        }
    }
}
3、根据字符来找到对应的texture,利用组件中的graphic来渲染对应的字符
protected changeValue(): void {
    // ... 省略非关键代码

    // 重新渲染
    for (var i: number = 0, sz: number = this._valueArr.length; i < sz; i++) {
        var index: number = this._indexMap[this._valueArr.charAt(i)];
        if (!this.sources[index]) continue;
        texture = this.sources[index];

        // ... 省略非关键代码
        this.graphics.drawImage(
            texture,
            0 + dX,
            i * (texture.sourceHeight + this.spaceY),
            texture.sourceWidth,
            texture.sourceHeight
        );
    }

    // ... 省略非关键代码
}
3.3 BitmapFont如何解析
上面是简单位图字体的渲染,而我们位图字体的渲染全部是依赖UI组件的,他的过程包括BitmapFont解析、BitmapFont渲染2块。这里我们先来讲一下正常的Bitmap是怎么解析出来。
其实解析过程也很简单,他和FontCLip的区别就是BitmapFont将字符与图片的规则保存到xml文件中。我们只需要正常的解析XML文件,获取规则之后。整体流程就和FontClip一致了。
前面我们提到了一套位图字体包括了位图*.png和位图信息*.fnt两部分,我们具体来看看这个位图信息*.fnt里面到底包括什么东西。
<?xml version="1.0" encoding="UTF-8"?>
<!--Created using Glyph Designer - http://71squared.com/glyphdesigner-->
<font>
    <info face="ColorFont" size="64" bold="1" italic="0" charset="" unicode="0" stretchH="100" smooth="1" aa="1" padding="0,0,0,0" spacing="2,2"/>
    <common lineHeight="64" base="88" scaleW="142" scaleH="200" pages="1" packed="0"/>
    <pages>
        <page id="0" file="purple.png"/>
    </pages>
    <chars count="10">
        <char id="48" x="108" y="2" width="32" height="48" xoffset="3" yoffset="10" xadvance="37" page="0" chnl="0" letter="0"/>
        <char id="49" x="38" y="102" width="21" height="47" xoffset="5" yoffset="10" xadvance="37" page="0" chnl="0" letter="1"/>
        <char id="50" x="2" y="2" width="34" height="48" xoffset="2" yoffset="9" xadvance="37" page="0" chnl="0" letter="2"/>
        <char id="51" x="38" y="2" width="33" height="48" xoffset="2" yoffset="10" xadvance="37" page="0" chnl="0" letter="3"/>
        <char id="52" x="104" y="52" width="35" height="47" xoffset="2" yoffset="10" xadvance="37" page="0" chnl="0" letter="4"/>
        <char id="53" x="2" y="52" width="32" height="48" xoffset="3" yoffset="10" xadvance="37" page="0" chnl="0" letter="5"/>
        <char id="54" x="73" y="2" width="33" height="48" xoffset="3" yoffset="10" xadvance="37" page="0" chnl="0" letter="6"/>
        <char id="55" x="2" y="102" width="34" height="47" xoffset="2" yoffset="10" xadvance="37" page="0" chnl="0" letter="7"/>
        <char id="56" x="36" y="52" width="32" height="48" xoffset="3" yoffset="10" xadvance="37" page="0" chnl="0" letter="8"/>
        <char id="57" x="70" y="52" width="32" height="48" xoffset="3" yoffset="9" xadvance="37" page="0" chnl="0" letter="9"/>
    </chars>
    <kernings count="0"/>
</font>
上述信息中比较关键的节点是info、common、chars,详细记录了当前位图字体使用的字体类型、行高、对应的字符位置等等。
我们再来看看Laya源码中是怎么对位图字体做解析的:
1、加载字体
/**
 * 通过指定位图字体文件路径,加载位图字体文件,加载完成后会自动解析。
 * @param	path		位图字体文件的路径。
 * @param	complete	加载并解析完成的回调。
 */
loadFont(path: string, complete: Handler): void {
    this._path = path;
    this._complete = complete;

    // ... 省略非关键代码

    // 加载xml 和 对应的字体图片
    ILaya.loader.load(
        [
            { url: path, type: ILaya.Loader.XML },
            { url: path.replace('.fnt', '.png'), type: ILaya.Loader.IMAGE },
        ],
        Handler.create(this, this._onLoaded)
    );
}
2、解析XML && 根据信息解析字体,生成字符与Texture的映射
/**
 * 解析字体文件。
 * @param	xml			字体文件XML。
 * @param	texture		字体的纹理。
 */
parseFont(xml: XMLDocument, texture: Texture): void {
    // ... 省略非关键代码

    // 解析xml文件获取对应的参数
    var tX: number = 0;
    var tScale: number = 1;

    var tInfo: any = xml.getElementsByTagName('info');
    if (!tInfo[0].getAttributeNode) {
        return this.parseFont2(xml, texture);
    }
    this.fontSize = parseInt(tInfo[0].getAttributeNode('size').nodeValue);

    var tPadding: string = tInfo[0].getAttributeNode('padding').nodeValue;
    var tPaddingArray: any[] = tPadding.split(',');
    this._padding = [
        parseInt(tPaddingArray[0]),
        parseInt(tPaddingArray[1]),
        parseInt(tPaddingArray[2]),
        parseInt(tPaddingArray[3]),
    ];

    // 根据chars字段读取每张图片对应的位置
    var chars = xml.getElementsByTagName('char');
    var i: number = 0;
    for (i = 0; i < chars.length; i++) {
        var tAttribute: any = chars[i];
        var tId: number = parseInt(tAttribute.getAttributeNode('id').nodeValue);

        var xOffset: number = parseInt(tAttribute.getAttributeNode('xoffset').nodeValue) / tScale;
        var yOffset: number = parseInt(tAttribute.getAttributeNode('yoffset').nodeValue) / tScale;
        var xAdvance: number = parseInt(tAttribute.getAttributeNode('xadvance').nodeValue) / tScale;

        var region: Rectangle = new Rectangle();
        region.x = parseInt(tAttribute.getAttributeNode('x').nodeValue);
        region.y = parseInt(tAttribute.getAttributeNode('y').nodeValue);
        region.width = parseInt(tAttribute.getAttributeNode('width').nodeValue);
        region.height = parseInt(tAttribute.getAttributeNode('height').nodeValue);

        var tTexture: Texture = Texture.create(
            texture,
            region.x,
            region.y,
            region.width,
            region.height,
            xOffset,
            yOffset
        );
        this._maxWidth = Math.max(this._maxWidth, xAdvance + this.letterSpacing);
        // 字体字典
        this._fontCharDic[tId] = tTexture;
        this._fontWidthMap[tId] = xAdvance;
    }
}
3.4 Label渲染文字的流程
Label渲染本身是利用了其组件中的Text来实现最终的渲染。下图为Text渲染的流程图:
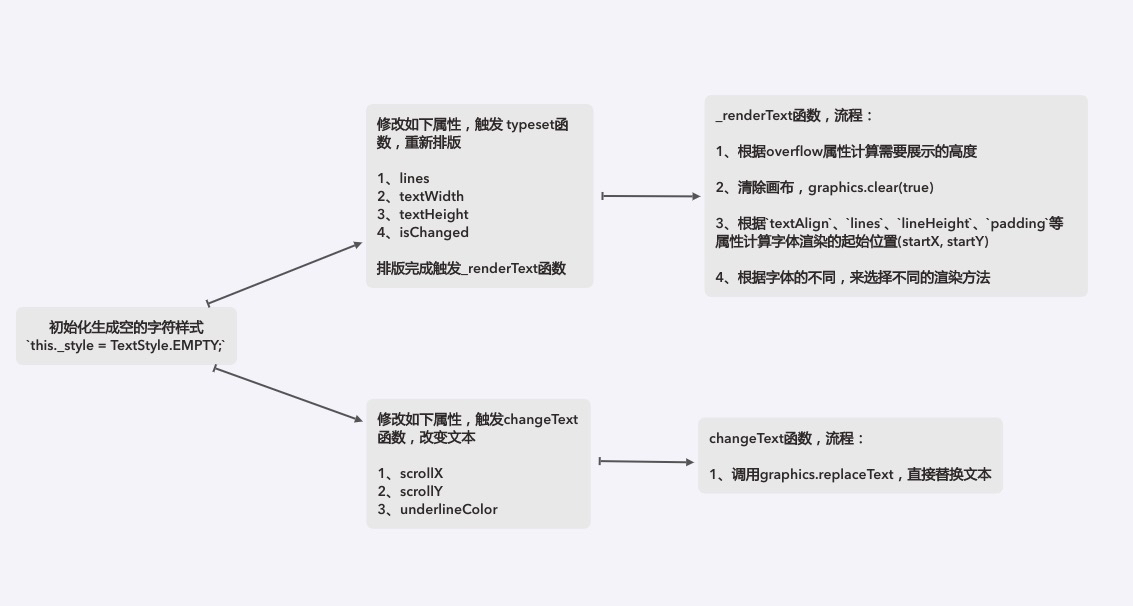
文本渲染中有3个核心的方法:typeset、changeText、_renderText,我们一一来看看源码,代码只保存了关键步骤。
1、typeset排版
/**
 * <p>排版文本。</p>
 * <p>进行宽高计算,渲染、重绘文本。</p>
 */
typeset(): void {
    // ... 省略非关键代码

    // 没有文字,直接晴空
    if (!this._text) {
        this._clipPoint = null;
        this._textWidth = this._textHeight = 0;
        this.graphics.clear(true);
        return;
    }

    // ... 省略非关键代码

    // 重新计算行高
    this._lines.length = 0;
    this._lineWidths.length = 0;
    if (this._isPassWordMode()) {
        //如果是password显示状态应该使用密码符号计算
        this._parseLines(this._getPassWordTxt(this._text));
    } else this._parseLines(this._text);

    // ... 省略非关键代码

    // 更具padding 计算 lineHeight
    this._evalTextSize();

    // 渲染字体
    this._renderText();
}
2、changeText仅仅改变文字
/**
 * <p>快速更改显示文本。不进行排版计算,效率较高。</p>
 * <p>如果只更改文字内容,不更改文字样式,建议使用此接口,能提高效率。</p>
 * @param text 文本内容。
 */
changeText(text: string): void {
    if (this._text !== text) {
        // 设置语言包
        this.lang(text + '');

        if (this._graphics && this._graphics.replaceText(this._text)) {
            // 文本替换成功啥也不做
            //repaint();
        } else {
            // 排版
            this.typeset();
        }
    }
}
3、_renderText渲染文字
/**
 * @private
 * 渲染文字。
 * @param	begin 开始渲染的行索引。
 * @param	visibleLineCount 渲染的行数。
 */
protected _renderText(): void {
    var padding: any[] = this.padding;
    var visibleLineCount: number = this._lines.length;

    // overflow为scroll或visible时会截行
    if (this.overflow != Text.VISIBLE) {
        visibleLineCount = Math.min(
            visibleLineCount,
            Math.floor((this.height - padding[0] - padding[2]) / (this.leading + this._charSize.height)) + 1
        );
    }

    // 清除画布
    var graphics: Graphics = this.graphics;
    graphics.clear(true);

    //处理垂直对齐
    var startX: number = padding[3];
    var textAlgin: string = 'left';
    var lines: any[] = this._lines;
    var lineHeight: number = this.leading + this._charSize.height;
    var tCurrBitmapFont: BitmapFont = (<TextStyle>this._style).currBitmapFont;
    if (tCurrBitmapFont) {
        lineHeight = this.leading + tCurrBitmapFont.getMaxHeight();
    }
    var startY: number = padding[0];

    //处理水平对齐
    if (!tCurrBitmapFont && this._width > 0 && this._textWidth <= this._width) {
        if (this.align == 'right') {
            textAlgin = 'right';
            startX = this._width - padding[1];
        } else if (this.align == 'center') {
            textAlgin = 'center';
            startX = this._width * 0.5 + padding[3] - padding[1];
        }
    }

    if (this._height > 0) {
        var tempVAlign: string = this._textHeight > this._height ? 'top' : this.valign;
        if (tempVAlign === 'middle')
            startY = (this._height - visibleLineCount * lineHeight) * 0.5 + padding[0] - padding[2];
        else if (tempVAlign === 'bottom') startY = this._height - visibleLineCount * lineHeight - padding[2];
    }

    // ... 省略非关键代码

    var x: number = 0,
        y: number = 0;
    var end: number = Math.min(this._lines.length, visibleLineCount + beginLine) || 1;
    for (var i: number = beginLine; i < end; i++) {
        // ... 省略非关键代码

        if (tCurrBitmapFont) {
            // ... 省略非关键代码
            var tWidth: number = this.width;
            tCurrBitmapFont._drawText(word, this, x, y, this.align, tWidth);
        } else {
            // ... 省略非关键代码
            _word.setText(word);
            (<WordText>_word).splitRender = graphics.fillText(_word, x, y, ctxFont, this.color, textAlgin);
        }
    }

    // 位图字体自动缩放
    if (tCurrBitmapFont && tCurrBitmapFont.autoScaleSize) {
        var tScale: number = 1 / bitmapScale;
        this.scale(tScale, tScale);
    }

    if (this._clipPoint) graphics.restore();

    this._startX = startX;
    this._startY = startY;
}
四、Laya2.x游戏引擎入门系列介绍
笔者19年5月开始深度参与了一个OPPO快游戏项目(类似微信小游戏),从零开始折腾到现在,终于算是入了H5游戏开发的门。目前关于Laya引擎开发快游戏的教程还不多,于是笔者决定把这几个月踩过的坑、解决的问题、总结的经验都记录下来,方便其他准备入坑的同学提前规避。
Laya2.x游戏引擎入门系列预计会写以下文章,记录如何从零开始完成一个快游戏的开发和上架:
- Laya2.x游戏引擎入门系列(一):Hello World
- Laya2.x游戏引擎入门系列(二):UI界面开发
- Laya2.x游戏引擎入门系列(三):常用的动画开发
- Laya2.x游戏引擎入门系列(四):像素级还原文字
- Laya2.x游戏引擎入门系列(五):游戏的灵魂 - Script
- Laya2.x游戏引擎入门系列(六):图片治百病【构思中】
- Laya2.x游戏引擎入门系列(七):数据通信【构思中】
- Laya2.x游戏引擎入门系列(八):2D物理世界【构思中】
- Laya2.x游戏引擎入门系列(九):游戏调试【构思中】
- Laya2.x游戏引擎入门系列(十):项目工程化【构思中】
- Laya2.x游戏引擎入门系列(十一):游戏性能优化【构思中】
- Laya2.x游戏引擎入门系列(十二):常见问题汇总【构思中】
同时,Laya2目前将引擎代码通过TypeScript进行了重构,大家如果在写代码中遇到什么疑问都可以直接在GitHub源码中找到答案,后续笔者也会写一些关于Laya2源码解析的文章,有兴趣的朋友可以关注。
第一次尝试写完整的教学文章,如有错误或不严谨的地方,请务必给予指正,十分感谢!
关于我
我是一个莫得感情的代码搬运工,每周会更新1至2篇前端相关的文章,有兴趣的老铁可以扫描下面的二维码关注或者直接微信搜索前端补习班关注。

精通前端很难,让我们来一起补补课吧!
