

什么是Spring?
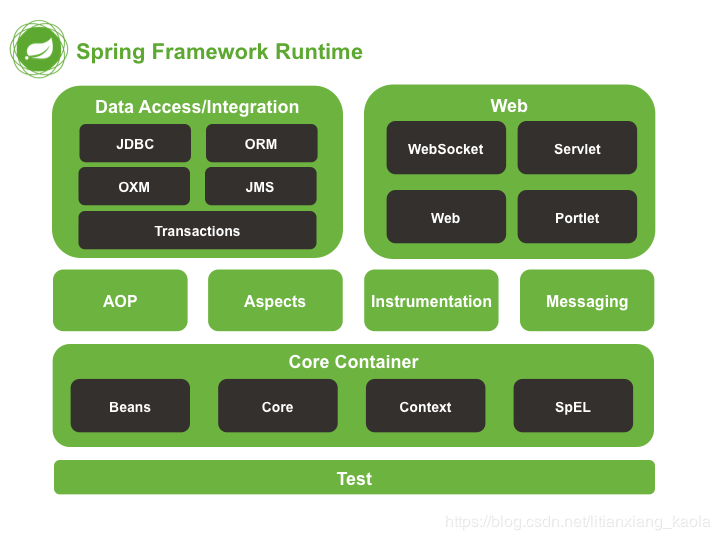
Spring框架存在的意义就是为了降低耦合度, 根据不同的代码采用不同的方式, 通过IOC来降低主业务逻辑之间的耦合度, 通过AOP来降低系统级服务(如日志、安全、事务等)和主业务逻辑之间的耦合度. 此外还提供了一个Web层的框架Spring MVC.
Spring的核心构成
IOC Spring最核心的模块
DAO Spring对访问数据库的支持,主要是JDBC
MVC Spring对MVC设计模式的支持(SSM)
AOP (Aspect Orientied Programing)面向切面编程
ORM 对象关系映射 Spring 和ORM框架整合 Mybatis
Spring容器
在介绍Spring容器之前, 我们先介绍什么是bean. 简单来说, 被Spring容器管理的对象就叫bean, 比如Controller/Action, Service, Dao.
<bean id="userControllerId" class="org.a.IOC.UserController"></bean>
<bean id="userServiceId" class="org.a.IOC.UserServiceImpl"></bean>
<bean id="BookDaoId" class="org.a.IOC.UserDaoImpl"></bean>
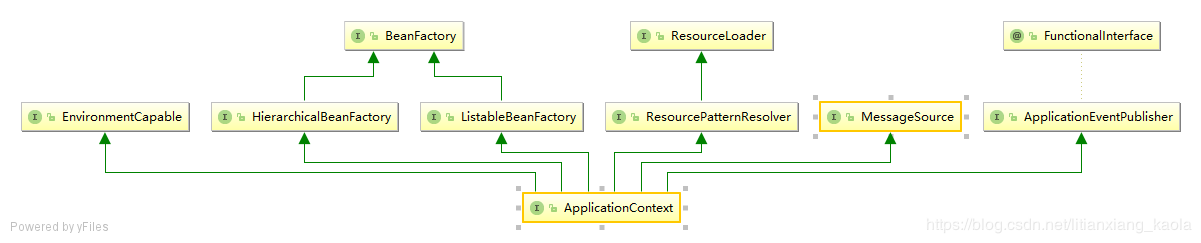
Spring容器管理着项目中所有bean对象的实例化与装配, 有两种, 分别是 BeanFactory 和 ApplicationContext. 其中 ApplicationContext 是 BeanFactory 的一个子接口, 补充了以下几个功能:
- 更容易与Spring的AOP特性集成
- 消息资源处理(用于国际化)
- 事件发布
- 应用程序层特定的上下文,如web应用程序中使用的WebApplicationContext
上述几个功能只需了解就行, 对于两者的区别, 我们需要记住的是:
- BeanFactory 采用延迟加载策略, 在第一次调用getBean()时, 才去读取配置信息, 生成某个bean的实例.
- ApplicationContext 在初始化时就会读取配置信息, 生成所有bean的实例. 上面两种特征导致的结果是, 如果配置信息有错, -BeanFactory在调用getBean()时才会抛异常, 而 ApplicationContext 在初始化的时候就会抛异常, 帮助我们及时检查配置是否正确.
- 两者都支持BeanPostProcessor和BeanFactoryPostProcessor, 但BeanFactory需要手动注册, 而ApplicationContext是自动注册.
大部分情况下我们使用的都是ApplicationContext, 这篇博客下面的内容也都是基于ApplicationContext.
配置元数据
Spring容器通过读取元数据来获取要实例化、装配的对象. 元数据有三种格式, 分别是XML文件, Java注解和Java代码. 本文只介绍XML格式和Java注解格式的元数据.
<beans>
    <bean id="BookServiceId" class="org.tyshawn.service.impl.BookServiceImpl">
        <property name="bookDao" ref="BookDaoId"></property>
    </bean>
    <bean id="BookDaoId" class="org.tyshawn.dao.Impl.BookDaoImpl"></bean>
</beans>
上面这段代码就是基于XML文件的元数据, ApplicationContext 的两个实现类 ClassPathXmlApplicationContext 和 FileSystemXmlApplicationContext 用来加载XML格式的元数据. 两者的区别在于 ClassPathXmlApplicationContext 是基于类路径, 而 FileSystemXmlApplicationContext 是基于文件路径.
ApplicationContext context = new ClassPathXmlApplicationContext("classpath:spring/bean.xml");
ApplicationContext context = new FileSystemXmlApplicationContext("D:\\springtest\\src\\main\\resources\\spring\\bean.xml");
ApplicationContext的实现类AnnotationConfigApplicationContext用来加载Java注解格式的元数据.
@Configuration
@ComponentScan(basePackages = "org.tyshawn")
public class AppConfig {
}
AnnotationConfigApplicationContext context = new AnnotationConfigApplicationContext(AppConfig.class);
IOC
IoC也称为依赖注入(dependency injection, DI). 这是一个过程, 在这个过程中, 首先通过在对象实例上设置的属性来定义bean之间的依赖关系, 然后Spring容器在创建bean时注入这些依赖项(这个注入过程也叫做装配). 依赖注入有两种, 分别是基于构造方法的注入和基于Setter方法的注入.
基于构造方法的注入
public interface IBookDao {
    void insert();
}
public class BookDaoImpl implements IBookDao {
    @Override
    public void insert() {
        System.out.println("add book");
    }
}

public interface IBookService {
    void addBook();
}
public class BookServiceImpl implements IBookService {
    private IBookDao bookDao;
    public BookServiceImpl(IBookDao bookDao) {
        this.bookDao = bookDao;
    }

    @Override
    public void addBook() {
        this.bookDao.insert();
    }
}

<beans>
    <bean id="BookServiceId" class="org.tyshawn.service.impl.BookServiceImpl">
        <constructor-arg ref="BookDaoId"/>
    </bean>
    <bean id="BookDaoId" class="org.tyshawn.dao.Impl.BookDaoImpl"></bean>
</beans>

public class Test{
    public static void main(String[] args) throws ParseException {
        ApplicationContext context = new ClassPathXmlApplicationContext("classpath:spring/bean.xml");
        IBookService bookService = (IBookService) context.getBean("BookServiceId");
        bookService.addBook();
    }
}
基于Setter方法的注入
public interface IBookDao {
    void insert();
}
public class BookDaoImpl implements IBookDao {
    @Override
    public void insert() {
        System.out.println("add book");
    }
}

public interface IBookService {
    void addBook();
}
public class BookServiceImpl implements IBookService {
    private IBookDao bookDao;
    public void setBookDao(IBookDao bookDao) {
        this.bookDao = bookDao;
    }

    @Override
    public void addBook() {
        this.bookDao.insert();
    }
}

<beans>
    <bean id="BookServiceId" class="org.tyshawn.service.impl.BookServiceImpl">
        <property name="bookDao" ref="BookDaoId"></property>
    </bean>
    <bean id="BookDaoId" class="org.tyshawn.dao.Impl.BookDaoImpl"></bean>
</beans>

public class Test{
    public static void main(String[] args) throws ParseException {
        ApplicationContext context = new ClassPathXmlApplicationContext("classpath:spring/bean.xml");
        IBookService bookService = (IBookService) context.getBean("BookServiceId");
        bookService.addBook();
    }
}
Bean的作用域
Bean的作用域有六种, 其中后四种只支持Web应用.
| 作用域 | 描述 |
|---|---|
| singleton | 默认. bean在每一个Spring容器内只有一个实例 |
| prototype | 每次从Spring容器中获取到的bean都是一个新的实例 |
| request | bean在每一个 HTTP Request 中只有一个实例, 只支持Web应用 |
| session | bean在每一个 HTTP Session 中只有一个实例, 只支持Web应用 |
| application | bean在每一个 ServletContext 中只有一个实例, 只支持Web应用 |
| websocket | bean在每一个 WebSocket 中只有一个实例, 只支持Web应用 |
<bean id="accountService" class="com.something.DefaultAccountService" scope="singleton"/>
<bean id="accountService" class="com.something.DefaultAccountService" scope="prototype"/>
<bean id="loginAction" class="com.something.LoginAction" scope="request"/>
<bean id="userPreferences" class="com.something.UserPreferences" scope="session"/>
<bean id="appPreferences" class="com.something.AppPreferences" scope="application"/>
singleton和application的区别 (1) 在作用域为singleton时, bean在每一个Spring容器内只有一个实例, 而应用可以有多个容器. (2) 在作用域为application时, bean在整个应用中只有一个实例. (3) 作用域application只支持Web应用.
//可以看到, 从两个容器中获取的bean不是同一个
public class Test{
    public static void main(String[] args) throws ParseException {
        ApplicationContext context1 = new ClassPathXmlApplicationContext("classpath:spring/bean.xml");
        ApplicationContext context2 = new FileSystemXmlApplicationContext("D:\\springtest\\src\\main\\resources\\spring\\bean.xml");
        IBookService bookService1 = (IBookService) context1.getBean("BookServiceId");
        IBookService bookService2 = (IBookService) context2.getBean("BookServiceId");
        System.out.println(bookService1);
        System.out.println(bookService2);
    }
}

org.tyshawn.service.impl.BookServiceImpl@23faf8f2
org.tyshawn.service.impl.BookServiceImpl@2d6eabae
具有多例bean依赖的单例bean
一个bean的作用域是 singleton, 而它的属性的作用域是 prototype, 如下所示:
<bean id="BookServiceId" class="org.tyshawn.service.impl.BookServiceImpl" scope="singleton">
    <constructor-arg ref="BookDaoId"/>
</bean>
<bean id="BookDaoId" class="org.tyshawn.dao.Impl.BookDaoImpl" scope="prototype"></bean>
我们想要的效果是, 每次获取BookServiceId时都是同一个bean, 而它的属性BookDaoId都是一个新的bean. 但这种情况是不可能的, 因为BookServiceId只会实例化, 装载一次. 要想达到我们期望的效果, 需要使用方法注入:
方法注入
Spring框架通过使用来自CGLIB库的字节码生成器来动态生成覆盖该方法的子类来实现此方法注入.
public class BookServiceImpl implements IBookService {
    private IBookDao bookDao;

    public IBookDao getBookDao() {
        return bookDao;
    }

    @Override
    public void addBook() {
        IBookDao bookDao = getBookDao();
        System.out.println(bookDao);
    }
}

<bean id="BookServiceId" class="org.tyshawn.service.impl.BookServiceImpl" scope="singleton">
    <lookup-method name="getBookDao" bean="BookDaoId"></lookup-method>
</bean>
<bean id="BookDaoId" class="org.tyshawn.dao.Impl.BookDaoImpl" scope="prototype"></bean>

public class Test{
    public static void main(String[] args) throws ParseException {
        ApplicationContext context = new ClassPathXmlApplicationContext("classpath:spring/bean.xml");
        BookServiceImpl bookService1 = (BookServiceImpl) context.getBean("BookServiceId");
        BookServiceImpl bookService2 = (BookServiceImpl) context.getBean("BookServiceId");
        bookService1.addBook();
        bookService2.addBook();
    }
}

org.tyshawn.dao.Impl.BookDaoImpl@6121c9d6
org.tyshawn.dao.Impl.BookDaoImpl@87f383f
Bean的生命周期
生命周期回调
(1) 初始化回调
在Spring容器将bean实例化, 设置属性值之后将会执行初始化回调. 初始化回调有两种设置方式:
方式一(推荐)
<bean id="exampleInitBean1" class="org.tyshawn.example.ExampleBean" init-method="init"/>

public class ExampleBean {
    public void init() {
        System.out.println("do some initialization work.");
    }
}
方式二(不推荐)
<bean id="exampleInitBean2" class="org.tyshawn.example.AnotherExampleBean"/>

public class AnotherExampleBean implements InitializingBean {
    @Override
    public void afterPropertiesSet() throws Exception {
        System.out.println("do some initialization work.");
    }
}

public class Test{
    public static void main(String[] args) throws ParseException {
        ApplicationContext context = new ClassPathXmlApplicationContext("classpath:spring/bean.xml");
        ExampleBean example1 = (ExampleBean) context.getBean("exampleInitBean1");
        AnotherExampleBean example2 = (AnotherExampleBean) context.getBean("exampleInitBean2");
        System.out.println(example1);
        System.out.println(example2);
    }
}

do some initialization work.
do some initialization work.
org.tyshawn.example.ExampleBean@4eb7f003
org.tyshawn.example.AnotherExampleBean@eafc191
(2) 销毁回调
当bean被销毁之前, 将会执行销毁回调. 销毁回调有两种设置方式:
方式一(推荐)
<bean id="exampleDestoryBean1" class="org.tyshawn.example.ExampleBean" destroy-method="destory"/>

public class ExampleBean {
    public void destroy() {
        System.out.println("do some destruction  work.");
    }
}
方式二(不推荐)
<bean id="exampleDestoryBean2" class="org.tyshawn.example.AnotherExampleBean"/>

public class AnotherExampleBean implements DisposableBean {
    @Override
    public void destroy() {
        System.out.println("do some destruction  work.");
    }
}

public class Test{
    public static void main(String[] args) throws Exception {
        ConfigurableApplicationContext context = new ClassPathXmlApplicationContext("classpath:spring/bean.xml");
        ExampleBean example1 = (ExampleBean) context.getBean("exampleDestoryBean1");
        AnotherExampleBean example2 = (AnotherExampleBean) context.getBean("exampleDestoryBean2");
	  //当容器被关闭时, 容器内的bean就被销毁了
        context.registerShutdownHook();
    }
}

do some destruction  work.
do some destruction  work.
(3) 初始化回调 / 销毁回调的两种方式同时配置
当 初始化回调 / 销毁回调的两种方式同时配置时会出现什么结果呢?
<bean id="exampleDestoryBean2" class="org.tyshawn.example.AnotherExampleBean" destroy-method="cleanup"/>

public class AnotherExampleBean implements DisposableBean {
    @Override
    public void destroy() {
        System.out.println("do some destruction work.");
    }

    public void cleanup() {
        System.out.println("do some cleanup work.");
    }
}

public class Test{
    public static void main(String[] args) throws Exception {
        ConfigurableApplicationContext context = new ClassPathXmlApplicationContext("classpath:spring/bean.xml");
        AnotherExampleBean example2 = (AnotherExampleBean) context.getBean("exampleDestoryBean2");
        context.registerShutdownHook();
    }
}

do some destruction work.
do some cleanup work.
结果是两种方式都执行, 但 DisposableBean / InitializingBean 在前, destroy-method / init-method 在后.
(4) 启动和关闭回调
如果Spring容器中的bean实现了 Lifecycle 接口, 当Spring容器启动时, 将会调用这些bean的start()方法, 当Spring容器关闭时, 将会调用这些bean的stop()方法.
public interface Lifecycle {
    void start();

    void stop();

    boolean isRunning();
在很多情况下, start()方法和stop()方法的调用顺序是重要的, 如果两个bean存在依赖关系, 比如 a 依赖 b (b是a的属性), 这时 a 先调用start()方法, b 先调用stop()方法. 但如果我们不知道依赖关系, 却想让 a 在 b 之前调用start()方法, 这时我们就可以用 SmartLifecycle 接口代替 Lifecycle 接口.
public interface Phased {
    int getPhase();
}

public interface SmartLifecycle extends Lifecycle, Phased {
    boolean isAutoStartup();

    void stop(Runnable callback);
SmartLifecycle接口的方法介绍:
当 isAutoStartup() 返回true, Spring容器启动时会调用bean的 start() 方法
当 isRunning() 返回true, Spring容器销毁时会调用bean的 stop(Runnable runnable) 方法
getPhase() 返回的是优先级, 当有多个bean时, 返回值大的先执行start()方法, 销毁时顺序相反. 容器内没有实现SmartLifecycle接口, 而实现了Lifecycle接口的bean返回值是0. 负数代表最高优先级.
  <bean id="exampleDestoryBean" class="org.tyshawn.example.ExampleBean" />

  public class ExampleBean implements SmartLifecycle {
      private boolean isRunning = false;

      @Override
      public boolean isAutoStartup() {
          return true;
      }

      @Override
      public void stop(Runnable runnable) {
          runnable.run();
          System.out.println("stop runnable ...");
      }

      @Override
      public void start() {
          isRunning = true;
          System.out.println("start run ...");
      }

      @Override
      public void stop() {
          System.out.println("stop run ...");
      }

      @Override
      public boolean isRunning() {
          return isRunning;
      }

      @Override
      public int getPhase() {
          return -1;
      }
  }

  public class Test{
      public static void main(String[] args) throws Exception {
          ConfigurableApplicationContext context = new ClassPathXmlApplicationContext("classpath:spring/bean.xml");
          ExampleBean example = (ExampleBean) context.getBean("exampleDestoryBean");
          System.out.println(example);
          context.registerShutdownHook();
      }
  }

  start run ...
  org.tyshawn.example.ExampleBean@1b26f7b2
  stop runnable ...
(5)初始化回调/销毁回调 和 启动/关闭回调的执行顺序
在了解了初始化回调/销毁回调 和 启动/关闭回调之后, 我们肯定很想知道当他们同时存在时, 他们的执行顺便是怎么样的, 如下:
<bean id="exampleBean" class="org.tyshawn.example.ExampleBean" init-method="init" destroy-method="destroy"/>

public class ExampleBean implements SmartLifecycle{
    private boolean isRunning = false;

    public void init() {
        System.out.println("do some init work.");
    }

    public void destroy() {
        System.out.println("do some destruction  work.");
    }

    @Override
    public boolean isAutoStartup() {
        return true;
    }

    @Override
    public void stop(Runnable runnable) {
        runnable.run();
        System.out.println("stop runnable ...");
    }

    @Override
    public void start() {
        isRunning = true;
        System.out.println("start run ...");
    }

    @Override
    public void stop() {
        System.out.println("stop run ...");
    }

    @Override
    public boolean isRunning() {
        return isRunning;
    }

    @Override
    public int getPhase() {
        return -1;
    }
}

public class Test{
    public static void main(String[] args) throws Exception {
        ConfigurableApplicationContext context = new ClassPathXmlApplicationContext("classpath:spring/bean.xml");
        ExampleBean example1 = (ExampleBean) context.getBean("exampleBean");
        context.registerShutdownHook();
    }
}

do some init work.
start run ...
stop runnable ...
do some destruction work.
从上面的实例可知, 容器启动时先执行初始化回调, 再执行启动回调. 容器关闭时, 先执行关闭回调, 再执行销毁回调.
XXXAware
Spring提供了一系列以Aware结尾的接口, 翻译为XXX可感知, 作用是如果某个bean需要Spring提供一些特定的依赖, 就实现对应的XXXAware接口. 下面是我们常用三个Aware接口:
| 接口 | 作用 |
|---|---|
| BeanNameAware | 提供声明bean时的id |
| BeanFactoryAware | 提供BeanFactory容器 |
| ApplicationContextAware | 提供ApplicationContext容器 |
(1) BeanNameAware
<bean id="exampleDestoryBean" class="org.tyshawn.example.ExampleBean" />

public class ExampleBean implements BeanNameAware{

    @Override
    public void setBeanName(String beanName) {
        System.out.println("beanName: " + beanName);
    }
}

public class Test{
    public static void main(String[] args) throws Exception {
        ApplicationContext context = new ClassPathXmlApplicationContext("classpath:spring/bean.xml");
        ExampleBean example = (ExampleBean) context.getBean("exampleDestoryBean");
    }
}

beanName: exampleDestoryBean
(2) BeanFactoryAware
<bean id="exampleBean" class="org.tyshawn.example.ExampleBean" />

public class AnotherExampleBean implements ApplicationContextAware {

    @Override
    public void setApplicationContext(ApplicationContext applicationContext) throws BeansException {
        System.out.println("ApplicationContext: " + applicationContext);
    }
}

public class Test{
    public static void main(String[] args) throws Exception {
        ApplicationContext context = new ClassPathXmlApplicationContext("classpath:spring/bean.xml");
        ExampleBean example = (ExampleBean) context.getBean("exampleBean");
    }
}

BeanFactory: org.springframework.beans.factory.support.DefaultListableBeanFactory@2344fc66: defining beans [exampleBean]; root of factory hierarchy
(3) ApplicationContextAware
<bean id="exampleBean" class="org.tyshawn.example.AnotherExampleBean" />

public class AnotherExampleBean implements ApplicationContextAware {

    @Override
    public void setApplicationContext(ApplicationContext applicationContext) throws BeansException {
        System.out.println("ApplicationContext: " + applicationContext);
    }
}

public class Test{
    public static void main(String[] args) throws Exception {
        ApplicationContext context = new ClassPathXmlApplicationContext("classpath:spring/bean.xml");
        AnotherExampleBean example = (AnotherExampleBean) context.getBean("exampleBean");
    }
}

ApplicationContext: org.springframework.context.support.ClassPathXmlApplicationContext@573fd745: startup date [Thu Apr 18 18:59:43 CST 2019]; root of context hierarchy
BeanPostProcessor
如果我们想在Spring容器完成bean的初始化前后加一些定制逻辑, 我们可以向容器注册一个或多个定制BeanPostProcessor实现. 当有多个BeanPostProcessor定制时, 我们同时要实现Ordered接口.
<bean id="exampleBean" class="org.tyshawn.example.AnotherExampleBean" init-method="init"/>
<bean class="org.tyshawn.example.CustomBeanPostProcessor1"/>
<bean class="org.tyshawn.example.CustomBeanPostProcessor2"/>

public class CustomBeanPostProcessor1 implements BeanPostProcessor, Ordered {
    @Override
    public Object postProcessBeforeInitialization(Object bean, String beanName) throws BeansException {
        System.out.println("bean执行init()方法之前的定制逻辑1.");
        return bean;
    }

    @Override
    public Object postProcessAfterInitialization(Object bean, String beanName) throws BeansException {
        System.out.println("bean执行init()方法之后的定制逻辑1.");
        return bean;
    }

    @Override
    public int getOrder() {
        return 2;
    }
}

public class CustomBeanPostProcessor2 implements BeanPostProcessor, Ordered {
    @Override
    public Object postProcessBeforeInitialization(Object bean, String beanName) throws BeansException {
        System.out.println("bean执行init()方法之前的定制逻辑2.");
        return bean;
    }

    @Override
    public Object postProcessAfterInitialization(Object bean, String beanName) throws BeansException {
        System.out.println("bean执行init()方法之后的定制逻辑2.");
        return bean;
    }

    @Override
    public int getOrder() {
        return 1;
    }
}

public class AnotherExampleBean {
    public void init() {
        System.out.println("init() ...");
    }
}

public class Test{
    public static void main(String[] args) throws Exception {
        ApplicationContext context = new ClassPathXmlApplicationContext("classpath:spring/bean.xml");
        AnotherExampleBean example = (AnotherExampleBean) context.getBean("exampleBean");
    }
}

bean执行init()方法之前的定制逻辑2.
bean执行init()方法之前的定制逻辑1.
init() ...
bean执行init()方法之后的定制逻辑2.
bean执行init()方法之后的定制逻辑1.
bean的生命周期
bean在Spring容器中的生命周期是怎么样的呢?
(1) 实例化
(2) 设置属性值
(3) 调用BeanNameAware的setBeanName()方法
(4) 调用BeanFactoryAware的setBeanFactory()方法
(5) 调用ApplicationContext的setApplicationContext()方法
(6) 调用BeanPostProcessor的postProcessBeforeInitialization()方法
(7) 调用InitializingBean的afterPropertiesSet()方法
(8) 调用xml配置的初始化方法
(9) 调用BeanPostProcessor的postProcessAfterInitialization()方法
(10) 容器启动.
(11) bean可以使用了.
(12) 容器关闭.
(13) 调用DisposableBean的destory()方法
(14) 调用xml配置的销毁方法
代码实例如下:
<bean id="exampleBean" class="org.tyshawn.example.ExampleBean" init-method="init" destroy-method="dest"/>
<bean class="org.tyshawn.example.CustomBeanPostProcessor"/>

public class CustomBeanPostProcessor implements BeanPostProcessor {
    @Override
    public Object postProcessBeforeInitialization(Object bean, String beanName) throws BeansException {
        System.out.println("调用BeanPostProcessor的postProcessBeforeInitialization()方法");
        return bean;
    }

    @Override
    public Object postProcessAfterInitialization(Object bean, String beanName) throws BeansException {
        System.out.println("调用BeanPostProcessor的postProcessAfterInitialization()方法");
        return bean;
    }
}

public class ExampleBean implements InitializingBean, DisposableBean, SmartLifecycle, BeanNameAware, BeanFactoryAware, ApplicationContextAware {
    private boolean isRunning = false;

    public void init() {
        System.out.println("调用xml配置的初始化方法");
    }

    public void dest() {
        System.out.println("调用xml配置的销毁方法");
    }

    @Override
    public void afterPropertiesSet() throws Exception {
        System.out.println("调用InitializingBean的afterPropertiesSet()方法");
    }

    @Override
    public void destroy() {
        System.out.println("调用DisposableBean的destory()方法");
    }

    @Override
    public boolean isAutoStartup() {
        return true;
    }

    @Override
    public void stop(Runnable runnable) {
        runnable.run();
        System.out.println("容器关闭.");
    }

    @Override
    public void start() {
        isRunning = true;
        System.out.println("容器启动.");
    }

    @Override
    public void stop() {
    }

    @Override
    public boolean isRunning() {
        return isRunning;
    }

    @Override
    public int getPhase() {
        return -1;
    }

    @Override
    public void setBeanName(String beanName) {
        System.out.println("调用BeanNameAware的setBeanName()方法");
    }

    @Override
    public void setBeanFactory(BeanFactory beanFactory) throws BeansException {
        System.out.println("调用BeanFactoryAware的setBeanFactory()方法");
    }

    @Override
    public void setApplicationContext(ApplicationContext applicationContext) throws BeansException {
        System.out.println("调用ApplicationContext的setApplicationContext()方法");
    }

    public void sayHello() {
        System.out.println("bean可以使用了.");
    }
}

public class Test{
    public static void main(String[] args) throws Exception {
        ConfigurableApplicationContext  context = new ClassPathXmlApplicationContext("classpath:spring/bean.xml");
        ExampleBean example = (ExampleBean) context.getBean("exampleBean");
        example.sayHello();
        context.registerShutdownHook();
    }
}

调用BeanNameAware的setBeanName()方法
调用BeanFactoryAware的setBeanFactory()方法
调用ApplicationContext的setApplicationContext()方法
调用BeanPostProcessor的postProcessBeforeInitialization()方法
调用InitializingBean的afterPropertiesSet()方法
调用xml配置的初始化方法
调用BeanPostProcessor的postProcessAfterInitialization()方法
容器启动.
bean可以使用了.
容器关闭.
调用DisposableBean的destory()方法
调用xml配置的销毁方法
FactoryBean
面试中常常问到FactoryBean和BeanFactory的区别, 我们已经知道BeanFactory是一个Spring容器, 应用中所有bean的实例都存储在其中, 那FactoryBean是什么呢?
FactoryBean是一个生成bean的工厂. 一般情况下我们都是用XML文件来配置bean, 但如果我们有复杂的初始化逻辑, 相对于冗长的XML, 用Java代码可以更好地表达, 这时我们就可以创建自己的FactoryBean, 在该类中编写复杂的初始化逻辑, 然后将定制的FactoryBean插入容器中.
public interface FactoryBean<T> {
    T getObject() throws Exception;

    Class<?> getObjectType();

    boolean isSingleton();
FactoryBean接口的方法介绍:
- getObject(), 返回工厂创建的对象的实例.
- getObjectType(), 返回对象类型.
- isSingleton, 是否是单例.
  <bean id="tool" class="org.tyshawn.example.ToolFactory">
      <property name="toolName" value="iphone xs"/>
  </bean>

  public class Tool {
      private String name;

      public Tool(String name) {
          this.name = name;
      }

      public String getName() {
          return name;
      }

      public void setName(String name) {
          this.name = name;
      }
  }

  public class ToolFactory implements FactoryBean<Tool> {
      private String toolName;

      @Override
      public Tool getObject() throws Exception {
          return new Tool(toolName);
      }

      @Override
      public Class<?> getObjectType() {
          return Tool.class;
      }

      @Override
      public boolean isSingleton() {
          return false;
      }

      public String getToolName() {
          return toolName;
      }

      public void setToolName(String toolName) {
          this.toolName = toolName;
      }
  }

  public class Test{
      public static void main(String[] args) throws Exception {
          ConfigurableApplicationContext  context = new ClassPathXmlApplicationContext("classpath:spring/bean.xml");
          Tool tool = (Tool) context.getBean("tool");
          System.out.println(tool.getName());
      }
  }

  iphone xs
基于注解的容器配置
(1) 容器配置
@ComponentScan用来配置类扫描路径.
@Configuration
@ComponentScan(basePackages = "org.example")
public class AppConfig  {
}
等同于XML配置
<?xml version="1.0" encoding="UTF-8"?>
<beans xmlns="http://www.springframework.org/schema/beans"
    xmlns:xsi="http://www.w3.org/2001/XMLSchema-instance"
    xmlns:context="http://www.springframework.org/schema/context"
    xsi:schemaLocation="http://www.springframework.org/schema/beans
        https://www.springframework.org/schema/beans/spring-beans.xsd
        http://www.springframework.org/schema/context
        https://www.springframework.org/schema/context/spring-context.xsd">

    <context:component-scan base-package="org.example"/>

</beans>
(2) 声明bean
在基于XML的配置中, 下面这行代码声明了一个bean.
<bean id="bookDaoId" class="org.tyshawn.dao.Impl.BookDaoImpl"></bean>
在基于注解的容器配置中, 我们可以通过以下注解声明一个bean.
- @Component, 声明一个bean.
- @Controller, 声明一个web层的bean.
- @Service, 声明一个service层的bean.
- @Repository, 声明一个dao层的bean. (3) 自动注入属性
@Autowired 为按类型注入属性, 如果注入属性有多个时, 需要通过 @Qualifier 指定名称. @Resource = @Autowired + @Qualifier.
@Configuration
@ComponentScan(basePackages = "org.tyshawn")
public class AppConfig {
}

@Repository("bookDao")
public class BookDaoImpl implements IBookDao {
    @Override
    public void insert() {
        System.out.println("add book");
    }
}

@Service("bookService")
public class BookServiceImpl implements IBookService {
//    @Autowired
//    @Qualifier(value = "bookDao")
    @Resource(name = "bookDao")
    private IBookDao bookDao;

    @Override
    public void addBook() {
        bookDao.insert();
    }
}

public class Test{

    public static void main(String[] args) {
        ApplicationContext context = new AnnotationConfigApplicationContext(AppConfig.class);
        IBookService bookService = context.getBean("bookService", BookServiceImpl.class);
        bookService.addBook();
    }
}
add book
(3) 作用域
- @Scope(“singleton”)
- @Scope(“prototype”)
- @RequestScope
- @SessionScope
- @ApplicationScope
  @Configuration
  @ComponentScan(basePackages = "org.tyshawn")
  public class AppConfig {
  }

  @Component("exampleBean")
  @Scope("prototype")
  public class ExampleBean {
  }

  public class Test{

      public static void main(String[] args) {
          ApplicationContext context = new AnnotationConfigApplicationContext(AppConfig.class);
          ExampleBean exampleBean1 = context.getBean("exampleBean", ExampleBean.class);
          ExampleBean exampleBean2 = context.getBean("exampleBean", ExampleBean.class);
          System.out.println(exampleBean1);
          System.out.println(exampleBean2);
      }
  }
  org.tyshawn.example.ExampleBean@64c87930
  org.tyshawn.example.ExampleBean@400cff1a
(4) 生命周期回调
- @PostConstruct, 初始化回调
- @PreDestroy, 销毁回调
  @Configuration
  @ComponentScan(basePackages = "org.tyshawn")
  public class AppConfig {
  }

  @Component("exampleBean")
  public class ExampleBean {
      @PostConstruct
      public void init() {
          System.out.println("初始化方法");
      }

      @PreDestroy
      public void destroy() {
          System.out.println("销毁方法");
      }
  }

  public class Test{

      public static void main(String[] args) {
          AnnotationConfigApplicationContext context = new AnnotationConfigApplicationContext(AppConfig.class);
          ExampleBean exampleBean = context.getBean("exampleBean", ExampleBean.class);
          System.out.println(exampleBean);
          context.registerShutdownHook();
      }
  }

  初始化方法
  org.tyshawn.example.ExampleBean@5d47c63f
  销毁方法
关于Spring的介绍到此结束, 对于新手来说这些内容足够我们了解Spring是个什么技术, 也足够我们去应付面试官了. 如果想要更深层次的了解Spring, 可以去看官方文档, 阅读源码.
来源:t.im/kzfp
开源项目推荐
作者的开源项目推荐:
- Pre基于Spring Boot 、Spring Security 、Vue的前后端分离的的RBAC权限管理系统
- Prex基于Spring Cloud、Oauth2 、Vue的前后端分离的微服务架构RBAC权限管理系统
关注公众号回复开源项目即可获取

