自己负责的app 在测试阶段首页启动有概率白屏(实际表现是anr)卡死问题最终定位到类加载同步锁的问题导致的。问题解决以后,我们来看看问题产生的真正原因是什么,搞清楚来龙去脉有助于我们认识事情的真相。争取下次碰到类似问题能够迅速反应过来找到问题。
首先我们将app中发生的问题抽象出来,用简洁的代码来复现一下这个场景:
public class Test {

    public static class A {

        static {
            System.out.println("class A init.");
            B b = new B();
        }

        public static void test() {
            System.out.println("method test called in class A");
        }
    }

    public static class B {

        static {
            System.out.println("class B init.");
            A a = new A();
        }

        public static void test() {
            System.out.println("method test called in class B");
        }
    }

    public static void main(String[] args) {
        new Thread(new Runnable() {
            @Override
            public void run() {
                A.test();
            }
        }).start();

        new Thread(new Runnable() {
            @Override
            public void run() {
                B.test();
            }
        }).start();
    }
}
|
然后我们跑一下这段代码,看看这段代码执行结果是什么:
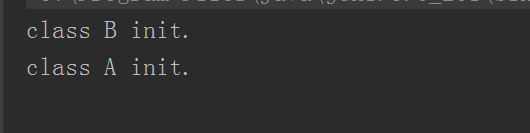
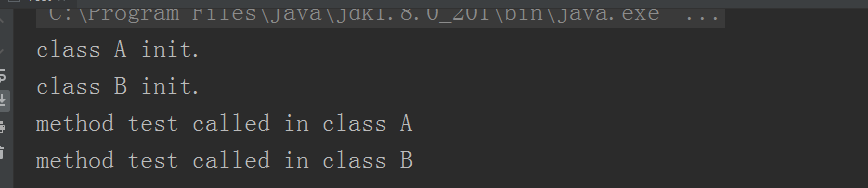
注意看,我一共贴出来两段执行结果的截图,第一张图的日志明显看出来,class A和class B的 类初始化都没有完成。等于这段程序在类加载阶段就发生了死锁等待。 而第二个执行结果的截图就是正常的。
问题产生的原因:
类在被装载到虚拟机的时候,实际上会对 load class的这个行为进行加锁,所谓加锁就是 同一时间只能有一个线程去初始化一个类(当然可以允许不同线程同时加载不同的class,但是同一个class只能同时被一个thread加载)。如果有n个线程的话 那么就只有一个线程能得到执行,其余线程只能等待。
回到文章开头的例子就是:
假设线程编号为123的线程加载class A,此时这个class A就被加上了一个锁,其他任何线程都无法进来,这个线程123加载class A的时候 发现里面有代码在调用class B,于是这个线程编号为123的类,就去加载class B。
但是运气不太好,在编号为123的线程a去加载class B之前,就已经有一个线程编号为456的线程去加载了class B,然后线程456在加载class B的时候 发现 我需要加载class A,结果456去加载class A的时候发现class A也被锁住了。
所以最后就是123在等待456 把B加载完成 才能完成自己对A的加载,结果456在等待123把A加载完成才能完成对B的加载,你等我我等你,最终就导致死锁了。且这种问题跟执行顺序有关,不是必现
那么问题来了,这个load class的过程中 既然加锁了,那么锁在哪?在什么地方加的。带着这个问题,我们去读了读源码。我们把这个A的classLoader打印出来:
System.out.println(A.class.getClassLoader());
|

我们继续看,这里我们将AppClassLoader的loadClass的源码贴上来
public Class<?> loadClass(String var1, boolean var2) throws ClassNotFoundException {
    int var3 = var1.lastIndexOf(46);
    if (var3 != -1) {
        SecurityManager var4 = System.getSecurityManager();
        if (var4 != null) {
            var4.checkPackageAccess(var1.substring(0, var3));
        }
    }

    if (this.ucp.knownToNotExist(var1)) {
        Class var5 = this.findLoadedClass(var1);
        if (var5 != null) {
            if (var2) {
                this.resolveClass(var5);
            }

            return var5;
        } else {
            throw new ClassNotFoundException(var1);
        }
    } else {
        return super.loadClass(var1, var2);
    }
}
|
最终我们发现load class的实际过程是交给他的父类去完成的:
//这里实际上对于普通的jvm应用来说,并没有遵循双亲委派的类加载模型,对于普通应用来说,class的加载都交给各自应用自己的classloader的loadclass方法来加载。比如那些著名的java后台服务器tomcat,jboss,jetty等,这些服务器可以装载n个不同的应用,每个应用
//都有自己的classloader,这样可以避免不同应用之间出现相同名字类的时候出现加载错乱的问题。
//所以针对我们上面的这个例子,以及百分之99网上针对此问题的例子最终类在加载的时候走的还是loadClass的方法,并不会走到下面的findclass去加载类。这点一定要注意。
//但是不管最终走的是findclass还是loadclass去加载,我们这里都能看出来,这里是有一个同步锁的,而且锁的对象是根据传入的类的名字来的。
//这就证明了两件事:1.jvm支持多线程同时加载不同的class,否则可以想到我们的应用会有多慢。2.jvm不支持多个线程同时加载同一个class。这里代码很简单不过多分析了。大家知道意思就好
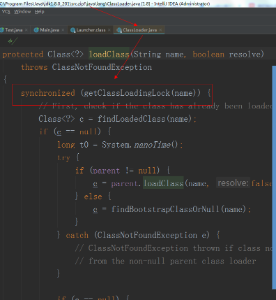
protected Class<?> loadClass(String name, boolean resolve)
throws ClassNotFoundException
{
synchronized (getClassLoadingLock(name)) {
// First, check if the class has already been loaded
Class<?> c = findLoadedClass(name);
if (c == null) {
long t0 = System.nanoTime();
try {
if (parent != null) {
c = parent.loadClass(name, false);
} else {
c = findBootstrapClassOrNull(name);
}
} catch (ClassNotFoundException e) {
// ClassNotFoundException thrown if class not found
// from the non-null parent class loader
}
if (c == null) {
// If still not found, then invoke findClass in order
// to find the class.
long t1 = System.nanoTime();
c = findClass(name);
// this is the defining class loader; record the stats
sun.misc.PerfCounter.getParentDelegationTime().addTime(t1 - t0);
sun.misc.PerfCounter.getFindClassTime().addElapsedTimeFrom(t1);
sun.misc.PerfCounter.getFindClasses().increment();
}
}
if (resolve) {
resolveClass(c);
}
return c;
}
}
protected Object getClassLoadingLock(String className) {
Object lock = this;
if (parallelLockMap != null) {
Object newLock = new Object();
lock = parallelLockMap.putIfAbsent(className, newLock);
if (lock == null) {
lock = newLock;
}
}
return lock;
}
|
这里一进来就一目了然了是吧,里面有同步锁,但是事情的真相真的就是到此为止了吗?这里看我截图标注的地方,有很多红线,我们实际上前面的代码都是跑在jvm里面,并没有跑在android 虚拟机里面,这里的classloader也是标准jvm的,并不是android的。
虽然我们用jvm模拟了 我们钱包android的问题,但是android底层到底有没有加锁,怎么加的,我们还是追进去看一看。

首先我们得到android中普通类的加载的classloader(注意下面的源码过长,我在附上源码的时候,会省略部分和本文主体无关的代码)
 */
public class PathClassLoader extends BaseDexClassLoader {

    public PathClassLoader(String dexPath, ClassLoader parent) {
        super(dexPath, null, null, parent);
    }
    public PathClassLoader(String dexPath, String librarySearchPath, ClassLoader parent) {
        super(dexPath, null, librarySearchPath, parent);
    }
}
|
我们发现这个classloader并没有loadclass的行为,于是去他的父类看看
public class BaseDexClassLoader extends ClassLoader {
    private final DexPathList pathList;
    public BaseDexClassLoader(String dexPath, File optimizedDirectory,
            String librarySearchPath, ClassLoader parent) {
        super(parent);
        this.pathList = new DexPathList(this, dexPath, librarySearchPath, null);

        if (reporter != null) {
            reportClassLoaderChain();
        }
    }
    public BaseDexClassLoader(ByteBuffer[] dexFiles, ClassLoader parent) {
        // TODO We should support giving this a library search path maybe.
        super(parent);
        this.pathList = new DexPathList(this, dexFiles);
    }

    @Override
    protected Class<?> findClass(String name) throws ClassNotFoundException {
        List<Throwable> suppressedExceptions = new ArrayList<Throwable>();
        Class c = pathList.findClass(name, suppressedExceptions);
        if (c == null) {
            ClassNotFoundException cnfe = new ClassNotFoundException(
                    "Didn't find class \"" + name + "\" on path: " + pathList);
            for (Throwable t : suppressedExceptions) {
                cnfe.addSuppressed(t);
            }
            throw cnfe;
        }
        return c;
    }

    /**
     * @hide
     */
    public void addDexPath(String dexPath) {
        pathList.addDexPath(dexPath, null /*optimizedDirectory*/);
    }


}
|
看起来似乎android中 加载class都是通过findclass来进行,并不是通过jvm中的loadclass,然后我们继续跟 basedexclassloader的findclass方法最终是通过DexPathList的findclass方法来完成类的加载,Dex应该大家都知道了,本质上来说android在编译的时候会把jvm编译出来的class文件 经过一些特定的优化 并把他们打包成一起最终打包的结果就是一个个的dex文件。我们可以简单的把dex文件理解成是众多class文件的集合。
来看看DexPathList的findclass方法
 public Class<?> findClass(String name, List<Throwable> suppressed) {
        for (Element element : dexElements) {
            Class<?> clazz = element.findClass(name, definingContext, suppressed);
            if (clazz != null) {
                return clazz;
            }
        }


        if (dexElementsSuppressedExceptions != null) {
            suppressed.addAll(Arrays.asList(dexElementsSuppressedExceptions));
        }
        return null;
    }
|
而这个Element实际上是一个DexPathList的静态内部类,我们重点看看他的findClass方法
 public Class<?> findClass(String name, ClassLoader definingContext,
                List<Throwable> suppressed) {
            return dexFile != null ? dexFile.loadClassBinaryName(name, definingContext, suppressed)
                    : null;
        }
|
所以最终是DexFile的loadClassBinaryName方法来完成了类的加载,我们继续看看DexFile的代码:
public Class loadClassBinaryName(String name, ClassLoader loader, List<Throwable> suppressed) {
        return defineClass(name, loader, mCookie, this, suppressed);
    }


    private static Class defineClass(String name, ClassLoader loader, Object cookie,
                                     DexFile dexFile, List<Throwable> suppressed) {
        Class result = null;
        try {
            result = defineClassNative(name, loader, cookie, dexFile);
        } catch (NoClassDefFoundError e) {
            if (suppressed != null) {
                suppressed.add(e);
            }
        } catch (ClassNotFoundException e) {
            if (suppressed != null) {
                suppressed.add(e);
            }
        }
        return result;
    }


private static native Class defineClassNative(String name, ClassLoader loader, Object cookie,
                                                  DexFile dexFile)
|
最终我们发现android中加载一个类,最终是通过defineClassNative这个jni方法来完成的。也就是说起码在java层面,android的classloader并没有加锁,但是jvm中却是在java层面加了锁。所以我们猜想,既然android中也暴露出来了类加载的问题,所以android的类加载过程也是一定会有锁的,只是这个锁并不在java层面来完成,那么就只能在c++层面来完成了,so,这里我们继续跟,看看到底是不是在c++层面完成的加锁操作。
最终我们来到DexFile.cc 这个文件来看看我们c++代码 是怎么加载类的。
//注意看这里参数列表 可以明确看出来这是一个jni方法
static jclass DexFile_defineClassNative(JNIEnv* env,
                                        jclass,
                                        jstring javaName,
                                        jobject javaLoader,
                                        jobject cookie,
                                        jobject dexFile) {
  std::vector<const DexFile*> dex_files;
  const OatFile* oat_file;
  if (!ConvertJavaArrayToDexFiles(env, cookie, /*out*/ dex_files, /*out*/ oat_file)) {
    VLOG(class_linker) << "Failed to find dex_file";
    DCHECK(env->ExceptionCheck());
    return nullptr;
  }


  ScopedUtfChars class_name(env, javaName);
  if (class_name.c_str() == nullptr) {
    VLOG(class_linker) << "Failed to find class_name";
    return nullptr;
  }
  const std::string descriptor(DotToDescriptor(class_name.c_str()));
  const size_t hash(ComputeModifiedUtf8Hash(descriptor.c_str()));
  for (auto& dex_file : dex_files) {
    const DexFile::ClassDef* dex_class_def =
        OatDexFile::FindClassDef(*dex_file, descriptor.c_str(), hash);
    if (dex_class_def != nullptr) {
      ScopedObjectAccess soa(env);
      ClassLinker* class_linker = Runtime::Current()->GetClassLinker();
      StackHandleScope<1> hs(soa.Self());
      Handle<mirror::ClassLoader> class_loader(
          hs.NewHandle(soa.Decode<mirror::ClassLoader>(javaLoader)));
      ObjPtr<mirror::DexCache> dex_cache =
          class_linker->RegisterDexFile(*dex_file, class_loader.Get());
      if (dex_cache == nullptr) {
        // OOME or InternalError (dexFile already registered with a different class loader).
        soa.Self()->AssertPendingException();
        return nullptr;
      }
      ObjPtr<mirror::Class> result = class_linker->DefineClass(soa.Self(),
                                                               descriptor.c_str(),
                                                               hash,
                                                               class_loader,
                                                               *dex_file,
                                                               *dex_class_def);
      // Add the used dex file. This only required for the DexFile.loadClass API since normal
      // class loaders already keep their dex files live.
      class_linker->InsertDexFileInToClassLoader(soa.Decode<mirror::Object>(dexFile),
                                                 class_loader.Get());
      //其实这个result就是我们的class了,这里看出来我们通过上面class_linker的defineclass方法可以得到一个真正的class对象,然后在这里通过类型转换以后返回一个jni对象给java层
		if (result != nullptr) {
        VLOG(class_linker) << "DexFile_defineClassNative returning " << result
                           << " for " << class_name.c_str();
        return soa.AddLocalReference<jclass>(result);
      }
    }
  }
  VLOG(class_linker) << "Failed to find dex_class_def " << class_name.c_str();
  return nullptr;
}
|
最后我们来看看class_liner的DefineClass方法
//首先我们注意看他的参数,第一个参数就是传递的一个线程对象
mirror::Class* ClassLinker::DefineClass(Thread* self,
                                        const char* descriptor,
                                        size_t hash,
                                        Handle<mirror::ClassLoader> class_loader,
                                        const DexFile& dex_file,
                                        const DexFile::ClassDef& dex_class_def) {


//然后继续看关键代码:


//注意看这里就是一把锁,一旦有线程进来 那么只要锁没释放那么其余线程走到这里来就会被阻塞。
 ObjectLock<mirror::Class> lock(self, klass);
  klass->SetClinitThreadId(self->GetTid());
  // Make sure we have a valid empty iftable even if there are errors.
  klass->SetIfTable(GetClassRoot(kJavaLangObject)->GetIfTable());


  // Add the newly loaded class to the loaded classes table.
  ObjPtr<mirror::Class> existing = InsertClass(descriptor, klass.Get(), hash);
  if (existing != nullptr) {
    // We failed to insert because we raced with another thread. Calling EnsureResolved may cause
    // this thread to block.
    return EnsureResolved(self, descriptor, existing);
  }

  // Load the fields and other things after we are inserted in the table. This is so that we don't
  // end up allocating unfree-able linear alloc resources and then lose the race condition. The
  // other reason is that the field roots are only visited from the class table. So we need to be
  // inserted before we allocate / fill in these fields.
  //看名字 我们也能猜到这里是真正加载class对象的地方了
  LoadClass(self, *new_dex_file, *new_class_def, klass);


void ClassLinker::LoadClass(Thread* self,
                            const DexFile& dex_file,
                            const DexFile::ClassDef& dex_class_def,
                            Handle<mirror::Class> klass) {
  const uint8_t* class_data = dex_file.GetClassData(dex_class_def);
  if (class_data == nullptr) {
    return;  // no fields or methods - for example a marker interface
  }
  LoadClassMembers(self, dex_file, class_data, klass);
}
//所以最终我们是通过loadClassMembers这个方法来完成对类的加载的,其实这个方法里面就是把类加载的完整过程给走了一遍,其中当然包括我们的静态代码块的执行过程。
 而这个函数执行的最后一句话就是  self->AllowThreadSuspension()  ,也就是将锁释放掉。
|
所以最终我们就得到了一个结论,对于类加载过程的锁机制来说,jvm是将这个锁放到了java层自己处理,而android则是放在了c层进行处理。虽然处理方式大相径庭,但还是保持了虚拟机的运行规则。产生问题以后的表现都是一致的。
最后对于android程序来讲,如果你的应用程序确实存在某些类的初始化过程被多线程调用且这些类的初始化过程还存在相互嵌套的情况,那么可以在程序的入口处,先将一个class手动初始化。例如我们可以在android的application的onCreate方法里面添加:
Class.forName("your class name ")
|
这样,优先在主线程里手动触发一个class的加载,则可以完美避开我们例子中的问题。相对应的钱包类似的问题也就迎刃而解了。毕竟一时半会我们要修改原来相互嵌套的逻辑也不是一件容易的事。用这种方法既可以避免bug的产生,也可以给足时间让他人将错误的写法修改完毕。


