

前言
本文基于 React Native 的实践项目进行总结, 该项目基于 React Native 和 H5 在开发效率、功能性能、用户体验等方面的差异性,对功能模块进行精心设计,主要基于我们现在实际项目的业务,结合移动端特有的特性。
本文围绕 React Native 项目的环境配置、运行,React Native 介绍,项目的主要功能,React Native 开发存在的坑等多个方面进行展开。如果你还没有 React Native 开发经验,那么这篇文章将很好的向你展示 React Native 的各方面,包括官方文档、生态、兼容性等等,希望你在这篇文章中找到你想要的答案。
辛苦整理良久,还望手动点赞鼓励~
博客 github地址为:github.com/fengshi123/… ,汇总了作者的所有博客,也欢迎关注及 star ~
本项目 github 地址为:github.com/fengshi123/…
配套的服务端 express 项目 github 地址为:github.com/fengshi123/…
一、启动项目
1.1、环境配置
在这个 React Native App 开发中,我的开发环境相关配置如下:
| 工具名称 | 版本号 |
|---|---|
| node.js | 11.12.0 |
| npm | 6.7.0 |
| yarn | 1.17.3 |
| Android Studio | 3.4.1 |
| JDK | 1.8 |
| react | 16.8.6 |
| react-native | 0.60.5 |
1.2、运行项目
(1)安装 yarn、react-native 命令行工具
$ npm install -g yarn react-native-cli
(2)设置 yarn 镜像源
$ yarn config set registry https://registry.npm.taobao.org --global
$ yarn config set disturl https://npm.taobao.org/dist --global
(3)安装第三方插件
进入到 react_native_project 目录底下,安装第三方插件:
$ yarn
(4)Android Studio 配置
Android Studio 的配置这里不再做介绍,可以参考 react-native 官网;
(5)编译并运行项目
$ react-native run-android
(6)启动项目
第 5 步后,如果真机或模拟器提示,Metro 没有启动,可关闭第 5 步开启的 node 窗口,再重启 Metro:
npm start
(7)服务端配套项目
记得 clone 本项目配套的服务端 express 项目,并启动它。
二、React Native 介绍
“ Learn once, write anywhere ”,React Native 的定义就像是:学习 React ,同时掌握 web 与 app 两种开发技能。 React Native 使用 React 的设计模式,开发者编写 js 代码,通过 React Native 的中间层转化为原生控件和操作,拥有接近原生开发的用户体验。下面引用官网上 4 条特性:
(1)使用 JavaScript 和 React 编写原生移动应用
React Native 使你只使用 JavaScript 也能编写原生移动应用。 它在设计原理上和 React 一致,通过声明式的组件机制来搭建丰富多彩的用户界面。
(2)React Native 应用是真正的移动应用
React Native 产出的并不是“网页应用”, 或者说“HTML5应用”,又或者“混合应用”。 最终产品是一个真正的移动应用,从使用感受上和用 Objective-C 或 Java 编写的应用相比几乎是无法区分的。 React Native 所使用的基础 UI 组件和原生应用完全一致。 你要做的就是把这些基础组件使用 JavaScript 和 React 的方式组合起来。
(3)别再傻等编译了
React Native 让你可以快速迭代开发应用。 比起传统原生应用漫长的编译过程,现在你可以在瞬间刷新你的应用。开启 Hot Reloading 的话,甚至能在保持应用运行状态的情况下热替换新代码!
(4)可随时呼叫原生外援
React Native 完美兼容使用 Objective-C、Java 或是 Swift 编写的组件。 如果你需要针对应用的某一部分特别优化,中途换用原生代码编写也很容易。 想要应用的一部分用原生,一部分用 React Native 也完全没问题。
三、项目功能
3.1、功能设计
考虑到更好的体验 React Native 和 H5 在开发效率、功能性能、用户体验等方面的差异性,我们对功能模块进行精心设计,主要基于我们现在实际项目的业务,结合移动端特有的特性。相关的模块功能设计如下图所示。

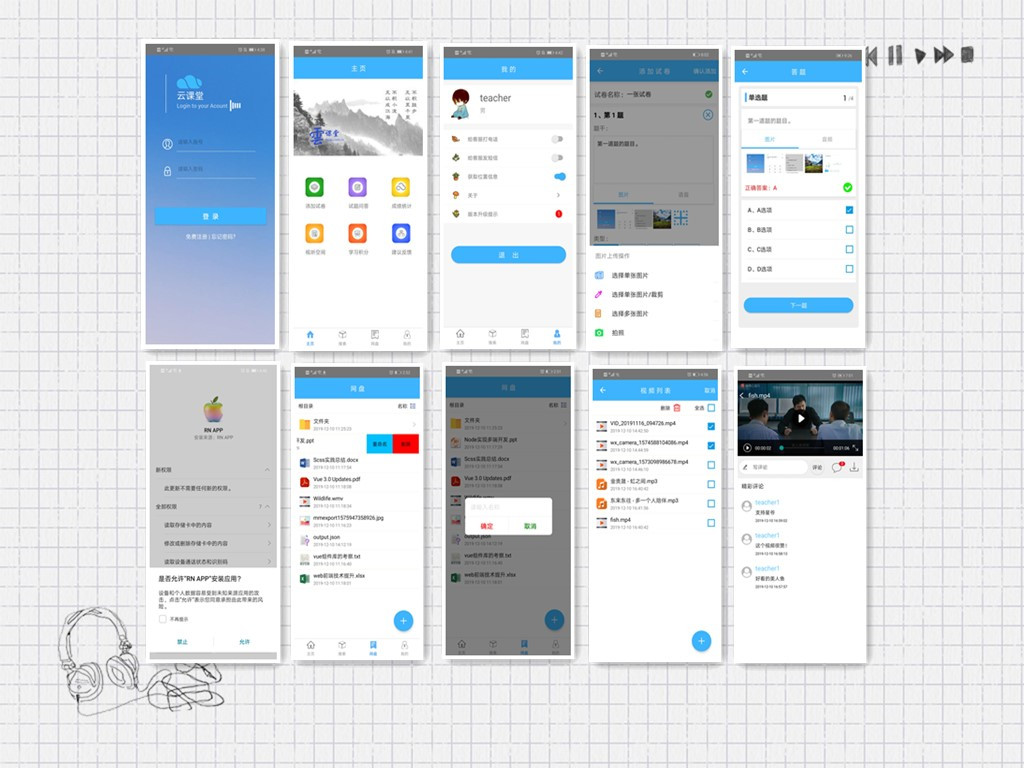
3.2、功能界面展示
截取一些功能展示如下:
3.3、项目结构目录
我们的项目目录结构如下:
> ├─ .vscode		        编辑器配置
> ├─ android	                android 原生目录
> ├─ ios			ios 原生目录
> ├─node_modules		项目依赖包
> ├─ src                        代码主目录
> │  ├─assets		        存放样式文件
> │  │  ├─images                存放图片
> │  │  └─styles	        样式文件的 js 目录
> │  │  ├─index.js              存放图片路径,可以参照主页面模块写法
> │  ├─components		存放块级组件
> │  ├─navigation	        存放导航配置
> │  │  ├─ index.js		导航配置主文件
> │  ├─pages			存放页面级组件,不同模块不同目录
> │  └─utils		        存放工具方法
> │  │  ├─ constant.js          一些常量配置,例如:服务器 IP 端口等
> │  │  ├─ globalVar.js         一些全局变量
> │  │  └─ request.js	        ajax 请求
> ├─.eslintrc.js		eslint 配置
> ├─.gitignore.js	        git 忽略配置
> ├─index.js		        项目入口
> ├─package.json		项目依赖包配置
3.4、主要功能介绍
3.4.1、网盘功能
此模块包含功能:文件夹创建、重命名、文件上传、下载、侧滑操作、长按列表操作、下拉刷新操作、文件预览(包含图片)等。
3.4.1.1 文件列表长按操作
(1) 使用插件
react-native-popup-menu
(2)功能实现
- 插件安装
yarn add react-native-popup-menu
- 逻辑实现
在 react_native_project/src/pages/netDisk/NetDisk.js 组件中实现相应逻辑,关键代码及注释如下:
// 插件引入
import {
    Menu,
    MenuProvider,
    MenuOptions,
    MenuOption,
    MenuTrigger,
  } from 'react-native-popup-menu';

// render
<MenuProvider>
    <Menu>
        <MenuTrigger
            onAlternativeAction={() => this.getDirFile(rowData.item)}
            triggerOnLongPress={true}
            customStyles={triggerStyles}>
            <Image
                source={ rowData.item.icon }
                style={styles.thumbnail}
            />
            <View>
                <Text>{rowData.item.name}</Text>
                <Text>{dayjs(rowData.item.time).format('YYYY-MM-DD HH:mm:ss')}</Text>
            </View>
            <View>
                {
                    rowData.item.type === 'dir'?
                    <NBIcon type="AntDesign" name="right"/> : null
                }
            </View>
        </MenuTrigger>
        <MenuOptions customStyles={optionsStyles}>
            <MenuOption value={1} text='重命名' onSelect={() => {this.setState({
                modalVisible: true,
                fileItem: rowData.item,
                dialogType: 'Rename',
                hasInputText: true,
                inputVal: rowData.item.name,
                isSideSlip: false
            });}}/>
            <MenuOption value={2} text='删除' onSelect={() => {
                this.setState({
                    modalVisible: true,
                    fileItem: rowData.item,
                    dialogType: 'Delete',
                    confirmText: '确定删除?',
                    hasInputText: false,
                    isSideSlip: false
                });
            }}/>
            <MenuOption value={3} text='下载'
                onSelect={() => this.downloadFile(rowData.item)} disabled={rowData.item.type === 'dir'}/>
        </MenuOptions>
    </Menu>
</MenuProvider>
(3)注意事项
- triggerOnLongPress 设置为 true 时,表示长按显示下拉菜单,此时 onAlternativeAction 方法可用于单次触发进入文件夹或者进行文件预览相关功能。
(4)参考文档
- 插件 github 地址:github.com/instea/reac…
3.4.1.2 文件侧滑操作
(1)使用插件
react-native-swipe-list-view
(2)功能实现
- 插件安装
yarn add react-native-swipe-list-view
- 逻辑实现
在 react_native_project/src/pages/netDisk/NetDisk.js 组件中实现相应逻辑,关键代码及注释如下:
// 插件引入
import { SwipeListView } from 'react-native-swipe-list-view/lib/index';

// render
<SwipeListView
    style={styles.list}
    data={this.state.filesList}
    renderItem={ (rowData) => (
        <TouchableHighlight
            style={styles.rowFront}
            underlayColor={'#AAA'}
        >
            <View style={{flexDirection:'row',flex: 1,alignItems:'center'}}>
                <Text>{rowData.item.name}</Text>
            </View>
        </TouchableHighlight>
    )}
    renderHiddenItem={ (rowData, rowMap) => {
    return (
        <View style={styles.standaloneRowBack} key={rowData.item.time}>
            <NbButton style={[styles.backRightBtn, styles.backRightBtnLeft]} onPress={() =>{
                this.setState({
                    modalVisible: true,
                    fileItem: rowData.item,
                    fileIndex: rowData.item.key,
                    fileRowMap: rowMap,
                    dialogType: 'Rename',
                    hasInputText: true,
                    inputVal: rowData.item.name,
                    isSideSlip: true
                });
            }}>
                <Text style={styles.backTextWhite}>重命名</Text>
            </NbButton>
            <NbButton style={[styles.backRightBtn, styles.backRightBtnRight]} onPress={() => {
                this.setState({
                    modalVisible: true,
                    fileItem: rowData.item,
                    fileIndex: rowData.item.key,
                    fileRowMap: rowMap,
                    dialogType: 'Delete',
                    confirmText: '确定删除?',
                    hasInputText: false,
                    isSideSlip: true
                });
                }}>
                <Text style={styles.backTextWhite}>删除</Text>
            </NbButton>
        </View>
    );}
    }
    rightOpenValue={-150}
    stopRightSwipe={-150}
    disableRightSwipe={true}
    swipeToOpenPercent={20}
    swipeToClosePercent={0}
/>
(3)注意事项
- 侧滑操作完毕记得关闭侧滑
  // 关闭侧滑
  closeRow(rowMap, rowKey) {
        if (rowMap[rowKey]) {
            rowMap[rowKey].closeRow();
        }
    }
(4)参考文档
- 插件 github 地址:github.com/jemise111/r…
3.4.1.3 文件下载
(1) 使用插件
rn-fetch-blob
(2)功能实现
- 插件安装
yarn add rn-fetch-blob
- 重新编译
因为该插件涉及到 Android 原生功能,所以配置完该插件,需要重新编译 Android。
- 逻辑实现
在 react_native_project/src/pages/netDisk/NetDisk.js 组件中实现相应逻辑,关键代码及注释如下:
// 插件引入
import RNFetchBlob from 'rn-fetch-blob';

// 下载方法
 async actualDownload(item) {
    let dirs = RNFetchBlob.fs.dirs;
    const android = RNFetchBlob.android;
    RNFetchBlob.config({
        fileCache : true,
        path: `${dirs.DownloadDir}/${item.name}`,
        // android only options, these options be a no-op on IOS
        addAndroidDownloads : {
          // Show notification when response data transmitted
          notification : true,
          // Title of download notification
          title : '下载完成',
          // File description (not notification description)
          description : 'An file.',
          mime : getMimeType(item.name.split('.').pop()),
          // Make the file scannable  by media scanner
          mediaScannable : true,
        }
      })
      .fetch('GET', `${CONSTANT.SERVER_URL}${item.path}`)
      .then(async(res) => {
            await android.actionViewIntent(res.path(), getMimeType(item.name.split('.').pop()));
        });
 }
(3)注意事项
- 下载的文件无法打开
// 问题
So basically this needs to be added to line 122-123 of file android/src/main/java/com/RNFetchBlob/RNFetchBlob.java:
// 解决办法
intent.addFlags(Intent.FLAG_ACTIVITY_NEW_TASK);
If above is not working do to the below step: overwrite the 121 line in android/src/main/java/com/RNFetchBlob/RNFetchBlob.java:

intent.setFlags(Intent.FLAG_ACTIVITY_NEW_TASK); // 121 line
intent.addFlags(Intent.FLAG_GRANT_READ_URI_PERMISSION); // 122 line
(4)参考文档
- 插件 github 地址:github.com/eventsPorta…
3.4.1.4 文件上传
(1)使用插件
// 获取本机文件
react-native-file-selector
(2)功能实现
- 插件安装
yarn add react-native-file-selector
- 重新编译
因为该插件涉及到 Android 原生功能,所以添加完该插件,需要重新编译 Android。
- 逻辑实现
在 react_native_project/src/pages/netDisk/NetDisk.js 组件中实现相应逻辑,关键代码及注释如下:
// 插件引入
import RNFileSelector from 'react-native-file-selector';

// 选择文件并上传
RNFileSelector.Show(
    {
        title: '请选择文件',
        onDone: (filePath) => {
            let data = new FormData();
            let file = { uri: 'file://' + filePath, type: 'multipart/form-data', name: escape(path.basename(filePath))};
            data.append('file', file);
            let options = {
                url: '/files/uploadFile',  // 请求 url
                data: data,
                tipFlag: true, // 默认统一提示,如果需要自定义提示,传入 true
            };
            request(options).then(async (res) => {
                if (res.status == 200) {
                    await this.fetchData();
                    ToastAndroid.show(
                        '上传成功',
                        ToastAndroid.SHORT,
                        ToastAndroid.CENTER
                        );
                }
            });
        },
        onCancel: () => {
            ToastAndroid.show(
                '取消上传',
                ToastAndroid.SHORT,
                ToastAndroid.CENTER
                );
        }
    }
);
(3)注意事项
- 为了避免中文字符文件名上传后文件名不一致,可以通过 escape 和 unescape 进行编码和解码。
(4)参考文档
- react-native-file-selector 插件 github 地址:github.com/prscX/react…
3.4.1.5 文件预览(txt、office文件、pdf等)
(1) 使用插件
react-native-doc-viewer
(2)功能实现
- 插件安装
yarn add react-native-doc-viewer
- 重新编译
因为该插件涉及到 Android 原生功能,所以添加完该插件,需要重新编译 Android。
- 逻辑实现
在 react_native_project/src/pages/netDisk/NetDisk.js 组件中实现相应逻辑,关键代码及注释如下:
// 插件引入
import OpenFile from 'react-native-doc-viewer';

// 文件预览
OpenFile.openDoc([{
    url: `${CONSTANT.SERVER_URL}${item.path}`,
    fileName: item.name.split('.').shift(),
    cache: false,
    fileType: item.name.split('.').pop()
}], (error) => {
    if (error) {
        this.setState({ animating: false });
        console.log(error);
        ToastAndroid.show('请先安装相关应用软件', ToastAndroid.SHORT);
    } else {
        this.setState({ animating: false });
        // ToastAndroid.show('该文件不支持预览', ToastAndroid.SHORT);
    }
});
(3)注意事项
- 在
node_modules/react-native-doc-viewer/android/src/main/java/com/reactlibrary/RNReactNativeDocViewerModule.java文件中 删除import com.facebook.react.views.webview.ReactWebViewManager;
(4)参考文档
- react-native-doc-viewer 插件 github 地址:github.com/philipphech…
3.4.1.6 图片预览
(1) 使用插件
react-native-image-zoom-viewer
(2)功能实现
- 插件安装
react-native-image-zoom-viewer
- 逻辑实现
在 react_native_project/src/pages/netDisk/NetDisk.js 组件中实现相应逻辑,关键代码及注释如下:
// 插件引入
import ImageViewer from 'react-native-image-zoom-viewer';

// 图片预览方法
saveImg(url) {
    let promise = CameraRoll.saveToCameraRoll(url);
    promise.then((result) => {
        console.log(result);
        ToastAndroid.show('已保存到相册', ToastAndroid.SHORT);
        }).catch((error) => {
        console.log(error);
        ToastAndroid.show('保存失败', ToastAndroid.SHORT);
        });
}
// render
<Modal
    transparent={true}
    visible={imgModalVisible}
    onRequestClose={() => this.props.closeImg()}>
    <ImageViewer
        onCancel={()=> this.props.closeImg()}
        onClick={(onCancel) => {onCancel();}}
        onSave={(url) => this.saveImg(url)}
        saveToLocalByLongPress={true}
        imageUrls={images}
        index={imgIndex}
        doubleClickInterval={1000}
        menuContext={{ 'saveToLocal': '保存到相册', 'cancel': '取消' }}/>
</Modal>
(3)注意事项
- 此插件 “图片保存到相册” 方法只适用于本机预览的照片,远程图片保存方法可用 react-native 自带方法 CameraRoll.saveToCameraRoll(url)。
(4)参考文档
- react-native-image-zoom-viewer 插件 github 地址:github.com/ascoders/re…
3.4.2、视听学习
此模块包含功能:音/视频上传、下载、删除、判断网络、播放、全屏播放、转向全屏播放、评论、分享等功能,其中上传、下载、删除功能在网盘模块和试题模块已说明。
3.4.2.1 视频播放功能
(1)使用插件
react-native-video
(2)功能实现
- 插件安装
yarn add react-native-video
- 重新编译
因为该插件涉及到 Android 原生功能,所以添加完该插件,需要重新编译 Android。
- 逻辑实现
在 react_native_project/src/pages/video/VideoPlayer.js 组件中实现相应逻辑,关键代码及注释如下:
// 插件引入
import Video from 'react-native-video';

// 视频进度时间方法
function formatTime(second) {
  let h = 0, i = 0, s = parseInt(second);
  if (s > 60) {
    i = parseInt(s / 60);
    s = parseInt(s % 60);
  }
  // 补零
  let zero = function (v) {
    return (v >> 0) < 10 ? '0' + v : v;
  };
  return [zero(h), zero(i), zero(s)].join(':');
}

// render
// 自带参数和方法请看 api
<Video
    ref={(ref) => this.videoPlayer = ref}
    source={{uri: CONSTANT.SERVER_URL + '/' + this.state.videoUrl}}
    rate={this.state.playRate}
    volume={this.state.volume}
    muted={this.state.isMuted}
    paused={!this.state.isPlaying}
    resizeMode={'contain'}
    playWhenInactive={false}
    playInBackground={false}
    ignoreSilentSwitch={'ignore'}
    progressUpdateInterval={250.0}
    onLoadStart={this._onLoadStart}
    onLoad={this._onLoaded}
    onProgress={this._onProgressChanged}
    onEnd={this._onPlayEnd}
    onError={this._onPlayError}
    onBuffer={this._onBuffering}
    style={{ width: this.state.videoWidth, height: this.state.videoHeight}}
/>
(3)参考文档
- react-native-video 插件 github 地址:github.com/react-nativ…
3.4.2.2 视频最大化、转向
(1) 使用插件
react-native-orientation
(2)功能实现
- 插件安装
yarn add react-native-orientation
- 重新编译
因为该插件涉及到 Android 原生功能,所以添加完该插件,需要重新编译 Android。
- 逻辑实现
在 react_native_project/src/pages/video/VideoPlayer.js 组件中实现相应逻辑,关键代码及注释如下:
// 插件引入
import Orientation from 'react-native-orientation';

// 点击工具栏上的全屏按钮
  onControlShrinkPress() {
    if (this.state.isFullScreen) {
      Orientation.lockToPortrait();
    } else {
        Orientation.lockToLandscapeRight();
    }
  }

  // 屏幕旋转时宽高会发生变化,可以在onLayout的方法中做处理,比监听屏幕旋转更加及时获取宽高变化
  _onLayout = (event) => {
    //获取根View的宽高
    let {width, height} = event.nativeEvent.layout;
    // 一般设备横屏下都是宽大于高,这里可以用这个来判断横竖屏
    let isLandscape = (width > height);
    if (isLandscape && !this.showKeyboard){
      this.setState({
        videoWidth: width,
        videoHeight: height,
        isFullScreen: true,
      });
    } else {
      this.setState({
        videoWidth: width,
        videoHeight: width * 9/16,
        isFullScreen: false,
      });
    }
    Orientation.unlockAllOrientations();
  };
(3)参考文档
- 插件 github 地址:github.com/yamill/reac…
3.4.2.3 微信、朋友圈分享
(1) 使用插件
react-native-wechat
(2)功能实现
- 插件安装
yarn add react-native-wechat
- 重新编译
因为该插件涉及到 Android 原生功能,所以添加完该插件,需要重新编译 Android。
- 逻辑实现
在 react_native_project/src/components/video/VideoShare.js 组件中实现相应逻辑,关键代码及注释如下:
// 插件引入
import * as WeChat from 'react-native-wechat';

// const wxAppId = ''; // 微信开放平台注册的app id
// const wxAppSecret = ''; // 微信开放平台注册得到的app secret
// WeChat.registerApp(wxAppId);

// 分享
shareItemSelectedAtIndex(index) {
    // this.props.onShareItemSelected && this.props.onShareItemSelected(index);
    WeChat.isWXAppInstalled().then((isInstalled) => {
        this.setState({
          isWXInstalled: isInstalled
        });
        if (isInstalled && index === 0) {
          WeChat.shareToSession({
                title: this.state.videoTitle,
                type: 'video',
                videoUrl: CONSTANT.SERVER_URL + '/' + this.state.videoUrl
            }).catch((error) => {
                console.log(error.message);
            });
        } else if (isInstalled && index === 1) {
            WeChat.shareToTimeline({
                  title: this.state.videoTitle,
                  type: 'video',
                  videoUrl: CONSTANT.SERVER_URL + '/' + this.state.videoUrl
              }).catch((error) => {
                  console.log(error.message);
              });
          } else {
          console.log('微信未安装');
        }
      });
  }
(3)参考文档
- 插件 github 地址:github.com/yamill/reac…
- 微信平台注册参考:www.jianshu.com/p/6a792118f…
3.4.3、试题模块
3.4.3.1、拍照 & 上传图片 创建试题功能
(1)使用插件
react-native-image-crop-picker
(2)功能实现
- 插件安装
yarn add react-native-image-crop-picker
- 重新编译
因为该插件涉及到 Android 原生功能,所以添加完该插件,需要重新编译 Android。
- 逻辑实现
在 react_native_project/src/components/exam/ImageAudioTab.js 组件中实现相应逻辑,关键代码及注释如下:
// 插件引入
import ImagePicker from 'react-native-image-crop-picker';

// 从相册选择图片
ImagePicker.openPicker(paramObj).then(image => {
	this.props.handleImage(qsIndex, image);
}).catch(err => {
	console.log(err);
});

// 调用摄像头功能
openCamera(qsIndex) {
	ImagePicker.openCamera({
		width: 300,
		height: 400,
		cropping: true,
	}).then(image => {
		this.props.handleImage(qsIndex, image);
	}).catch(err => {
		console.log(err);
	});
}
(3)注意事项
- 拍照或者一次只选择一张图片时,才能进行图片的剪裁操作,一次选择多张图片无法进行图片的剪裁操作;
(4)参考文档
- react-native-image-crop-picker 插件 github 地址:github.com/ivpusic/rea…
3.4.3.2、语音录入 创建试题功能
(1) 使用插件
react-native-audio // 语音录入
react-native-sound // 语音播放
react-native-spinkit // 动画效果
(2)功能实现
- 插件安装
yarn add react-native-audio react-native-sound react-native-spinkit
- 重新编译
因为语音录入插件涉及到 Android 原生功能,所以添加完该插件,需要重新编译 Android。
- 逻辑实现
在 react_native_project/src/components/exam/ImageAudioTab.js 组件中实现相应逻辑,关键代码及注释如下:
// 插件引入
import { AudioRecorder, AudioUtils } from 'react-native-audio';
import Sound from 'react-native-sound';
import Spinkit from 'react-native-spinkit';

// 音频路径配置
prepareRecordingPath = (path) => {
	const option = {
		SampleRate: 44100.0, //采样率
		Channels: 2, //通道
		AudioQuality: 'High', //音质
		AudioEncoding: 'aac', //音频编码
		OutputFormat: 'mpeg_4', //输出格式
		MeteringEnabled: false, //是否计量
		MeasurementMode: false, //测量模式
		AudioEncodingBitRate: 32000, //音频编码比特率
		IncludeBase64: true, //是否是base64格式
		AudioSource: 0, //音频源
	};
	AudioRecorder.prepareRecordingAtPath(path, option);
}

// 开始录音
startSoundRecording(qsIndex, stemAudio) {
	if (stemAudio.length >= 5) {
		ToastAndroid.show('每道题最多 5 段语音哦', ToastAndroid.SHORT);
		return;
	}
	console.log('startSoundRecording....');
	// 请求授权
	AudioRecorder.requestAuthorization()
		.then(isAuthor => {
			if (isAuthor) {
				this.prepareRecordingPath(this.audioPath + qsIndex + '_' + stemAudio.length + '.aac');
				// 录音进展
				AudioRecorder.onProgress = (data) => {
					this.recordTime = Math.floor(data.currentTime);
				};
				// 完成录音
				AudioRecorder.onFinished = (data) => {
					// data 返回需要上传到后台的录音数据;
					this.isRecording = false;
					if (!this.recordTime) {
						ToastAndroid.show('录音时间太短...', ToastAndroid.SHORT);
						return;
					}
					this.props.handleAudio(qsIndex, data.audioFileURL, this.recordTime);
					// 重置为 0
					this.recordTime = 0;
				};
				// 录音
				AudioRecorder.startRecording();
				this.isRecording = true;
			}
		});
}

// 结束录音
stopSoundRecording() {
	console.log('stopSoundRecording....');
	// 已经被节流操作拦截,没有在录音
	if (!this.isRecording) {
		return;
	}
	AudioRecorder.stopRecording();
}

// 播放录音
playSound(qsIndex, index, stemAudio, audioFlag, path) {
	this.props.changeAudioState(qsIndex, index, 2);
	let whoosh = new Sound(path.slice(7), '', (err) => {
		if (err) {
			return console.log(err);
		}
		whoosh.play(success => {
			if (success) {
				console.log('success - 播放成功');
			} else {
				console.log('fail - 播放失败');
			}
			this.props.changeAudioState(qsIndex, index, 1);
		});
	});
}
(3)注意事项
- 语音录入如果没有做节流操作,短时间内不断重复点击开始录入和结束录入,会导致录音出错,所以我们监听用户长按操作时,才打开手机的录音器,开始录音;
(4)参考文档
- react-native-audio 插件 github 地址:github.com/jsierles/re… ;
- react-native-sound 插件 github 地址:github.com/zmxv/react-… ;
- react-native-spinkit 插件 github 地址:github.com/maxs15/reac… ;
3.4.3.3、图表实现成绩统计
(1) 使用插件
victory-native // 图标绘制插件
react-native-svg // svg 图片绘制
(2)功能实现
- 插件安装
yarn add victory-native react-native-svg
- 重新编译
因为该插件涉及到 Android 原生功能,所以添加完该插件,需要重新编译 Android。
- 逻辑实现
在 react_native_project/src/pages/exam/ResultStatistics.js 组件中实现相应逻辑,关键代码及注释如下:
// 插件引入
import {
  VictoryPie,
  VictoryLegend,
  VictoryTooltip
} from 'victory-native';

// 图形绘制组件使用
<VictoryLegend
	orientation="vertical"
	data={[
	  {
		name: '不及格   < 60 分',
		symbol: { fill: colorScale[0], type: 'square' },
	  },
	  {
		name: '及格     60 - 75 分',
		symbol: { fill: colorScale[1], type: 'square' },
	  },
	  {
		name: '良好     75 - 85 分',
		symbol: { fill: colorScale[2], type: 'square' },
	  },
	  {
		name: '优秀     > 85 分',
		symbol: { fill: colorScale[3], type: 'square' },
	  }
	]}
	width={180}
	height={125}
/>
<VictoryPie
	colorScale={colorScale}
	data={[
	  { y: this.state.result[3], label: '不及格:' + this.state.result[3] + '人'},
	  { y: this.state.result[2], label: '及格:' + this.state.result[2] + '人' },
	  { y: this.state.result[1], label: '良好:' + this.state.result[1] + '人' },
	  { y: this.state.result[0], label: '优秀:' + this.state.result[0] + '人' }
	]}
	innerRadius={60}
	height={300}
	width={345}
	animate={{
	  duration: 2000
	}}
	labelComponent={
		<VictoryTooltip
			active={({ datum }) => datum.y === 0 ? false : true}
			constrainToVisibleArea={true}
			flyoutHeight={30}
			flyoutStyle={{ strokeWidth: 0.1}}
		/>
	}
/>
(3)注意事项
- 暂无
(4)参考文档
- victory-native 插件 github 地址:github.com/FormidableL… ;
- react-native-svg 插件 github 地址:github.com/react-nativ… ;
- victory-native 插件的具体文档:formidable.com/open-source… ;
3.4.4、其它
3.4.4.1、电话 & 短信功能
(1)使用插件
Linking // react native 自带的插件
(2)功能实现
- 逻辑实现
在 react_native_project/src/components/user/ListItem.js 组件中实现相应逻辑,关键代码及注释如下:
// 拨打电话功能 or 短信功能
call(flag) {
let tel = flag === 1 ? 'tel:10086' : 'smsto:10086';
Linking.canOpenURL(tel).then(supported => {
  if (!supported) {
	ToastAndroid.show.show('您未授权通话和短信权限');
  } else {
	return Linking.openURL(tel);
  }
}).catch(err => console.error('An error occurred', err));
}
(3)注意事项
- 暂无
(4)参考文档
- Linking 组件文档地址:reactnative.cn/docs/linkin…
3.4.4.2、手机定位功能
(1) 使用插件
- 暂无,封装 Android 原生方法进行实现;
(2)功能实现
- 获取定位功能逻辑实现
在 react_native_project/android/app/src/main/java/com/react_native_project/module 目录中创建实现类 LocationModule.java,需要注意的是这个类需要实现 ReactContextBaseJavaModule 这个类:
public class LocationModule extends ReactContextBaseJavaModule {
    private final ReactApplicationContext mContext;
    public LocationModule(ReactApplicationContext reactContext) {
        super(reactContext);
        mContext = reactContext;
    }

    /**
     * @return js调用的模块名
     */
    @Override
    public String getName() {
        return "LocationModule";
    }


    /**
     * 使用ReactMethod注解,使这个方法被js调用
     */
    @ReactMethod
    public void getLocation(Callback locationCallback) {
            // 省略一些逻辑实现 ...
            locationCallback.invoke(lat,lng,country,locality);
        }else{
            locationCallback.invoke(false);
        }
    }
}
- 模块注册
对刚刚实现定位功能的模块进行注册,在 react_native_project/android/app/src/main/java/com/react_native_project/module 目录中创建注册包管理类 LocationReactPackage .java,相关逻辑如下:
public class LocationReactPackage implements ReactPackage {
    /**
     * @param reactContext 上下文
     * @return 需要调用的原生控件
     */
    @Override
    public List<ViewManager> createViewManagers(ReactApplicationContext reactContext) {
        return Collections.emptyList();
    }

    /**
     * @param reactContext 上下文
     * @return 需要调用的原生模块
     */
    @Override
    public List<NativeModule> createNativeModules(
            ReactApplicationContext reactContext) {
        List<NativeModule> modules = new ArrayList<>();
        modules.add(new LocationModule(reactContext));
        return modules;
    }
}
- 添加包管理类
在 react_native_project/android/app/src/main/java/com/react_native_project/MainApplication.java 中添加包管理类,相关逻辑如下:
protected List<ReactPackage> getPackages() {
  @SuppressWarnings("UnnecessaryLocalVariable")
  List<ReactPackage> packages = new PackageList(this).getPackages();
  packages.add(new LocationReactPackage());
  return packages;
}
- react native 中使用封装类
我们在 react_native_project/src/components/user/ListItem.js 组件中实现相应逻辑,关键代码及注释如下:
import { NativeModules } from 'react-native';

// 获取地理位置
showLocation() {
 NativeModules.LocationModule.getLocation((lat, lng, country, locality) => {
  let str = '获取位置信息失败,您可能手机位置信息没有开启!';
  if (lat && lng) {
	str = country + ',' + locality + ',纬度:' + lat + ',' + '经度:' + lng;
  }
  ToastAndroid.show(str, ToastAndroid.SHORT);
 });
}
(3)注意事项
- 因为该功能是由 Android 原生编码封装,所以封装完 Android 原生类,需要进行编译,再在 JS 端进行调用,才有效果。
(4)参考文档
- 相关参考文档地址:www.cnblogs.com/weschen/p/8…
3.4.4.3、在线升级
(1) 使用插件
rn-fetch-blob
(2)功能实现
- 插件安装
yarn add rn-fetch-blob
- 重新编译
因为该插件涉及到 Android 原生功能,所以添加完该插件,需要重新编译 Android。
- 逻辑实现
我们实现在线升级功能的大概逻辑是,在 app 管理端上传 apk 安装包,然后点击发布,这时服务端会通过 websocket 将最新发布的版本号通知 app,app 收到最新版本号,会跟当前的 app 版本比较,如果当前版本号小于最新版本号,则会弹窗提示有最新版本,询问用户是否下载安装,用户如果确认安装最新版本,则会从服务器下载最新的 apk,并进行安装。在 react_native_project/src/components/user/ListItem.js 组件中实现相应逻辑,关键代码及注释如下:
import RNFetchBlob from 'rn-fetch-blob';

  checkUpdate = () => {
    const android = RNFetchBlob.android;
    //下载成功后文件所在path
    const downloadDest = `${
      RNFetchBlob.fs.dirs.DownloadDir
      }/app_release.apk`;

    RNFetchBlob.config({
      //配置手机系统通知栏下载文件通知,下载成功后点击通知可运行apk文件
      addAndroidDownloads: {
        useDownloadManager: true,
        title: 'RN APP',
        description: 'An APK that will be installed',
        mime: 'application/vnd.android.package-archive',
        path: downloadDest,
        mediaScannable: true,
        notification: true
      }
    }).fetch(
      'GET',
       CONSTANT.SERVER_URL+'/appVersion/download?path='+this.newVersionInfo.path
    ).then(res => {
      //下载成功后自动打开运行已下载apk文件
      android.actionViewIntent(
        res.path(),
        'application/vnd.android.package-archive'
      );
    });
  }
(3)注意事项
- 暂无
(4)参考文档
- rn-fetch-blob 插件文档地址:github.com/eventsPorta…
四、React Native 开发踩的坑
4.1、运行 react-native run-android 出现错误:Task :app:mergeDebugAssets FAILED OR Task :app:processDebugResources FAILED 。
解决:
cd android && ./gradlew clean
cd .. && react-native run-android
4.2、如果手机真机出现连接不上开发开发服务器的情况。
解决:
命令窗口运行以下命令:
adb reverse tcp:8081 tcp:8081
4.3、kotlin 相关 jar 包无法下载。
解决:
对应的插件的 android/build.gradle 配置阿里云仓库(例如遇到这个问题时,是在插件 react-native-webview)
// Maven中心仓库墙内版
  maven { url "https://maven.aliyun.com/repository/central"  }
// jCenter中心仓库墙内版
  maven { url "https://maven.aliyun.com/repository/jcenter"  }
  maven{url 'http://maven.aliyun.com/nexus/content/groups/public/'}
4.4、文件预览插件:react-native-doc-viewer安装完 run-android 编译失败。
解决:
Could be fixed by removing the import in node_modules/react-native-doc-viewer/android/src/main/java/com/reactlibrary/RNReactNativeDocViewerModule.java

Remove the ununsed import:

import com.facebook.react.views.webview.ReactWebViewManager;
4.5、第三方插件 rn-fetch-blob 下载文档无法打开。
解决:
So basically this needs to be added to line 122-123 of file android/src/main/java/com/RNFetchBlob/RNFetchBlob.java:

intent.addFlags(Intent.FLAG_ACTIVITY_NEW_TASK);
If above is not working do to the below step: overwrite the 121 line in android/src/main/java/com/RNFetchBlob/RNFetchBlob.java:

intent.setFlags(Intent.FLAG_ACTIVITY_NEW_TASK); // 121 line
intent.addFlags(Intent.FLAG_GRANT_READ_URI_PERMISSION); // 122 line
五、总结
本文主要基于 React Native 框架的实践进行总结,分享了 React Native 理念、React Native 项目的功能介绍、React Native 项目编译以及 React Native 存在的一些坑,希望对完全阅读完的你有启发和帮助,如果有不足,欢迎批评、指正、交流!
姐妹篇《 Weex 实践总结 》,可以进行 React Native 和 Weex 的对比。
辛苦整理良久,还望手动点赞鼓励~
博客 github地址为:github.com/fengshi123/… ,汇总了作者的所有博客,也欢迎关注及 star ~
本项目 github 地址为:github.com/fengshi123/…
配套的服务端 express 项目 github 地址为:github.com/fengshi123/…
