

简单介绍
本文主要是讲 XCTest 的使用
我们知道在程序的开发中,单元测试是相当的重要,废话不多说,直接动手吧。
- 我们在创建 Xcode 项目的时候全部勾选的话默认会创建
XCTestDemoTestsXCTestDemoUITests这 2 个模块。现在主要讲解XCTestDemoTests的使用。其中的模板代码如下:
// 每次测试前调用,可以在测试之前创建在test case方法中需要用到的一些对象等
// Put setup code here. This method is called before the invocation of each test method in the class.
- (void)setUp {
}

// 每次测试结束时调用tearDown方法
// Put teardown code here. This method is called after the invocation of each test method in the class.
- (void)tearDown {
}

// 单元测试方法的例子
// 我们可以自定义添加  - (void)testxxxx{} 方法,- (void)testxxx 类似的方法在启动测试的时候都会自动跑。
// This is an example of a functional test case.
// Use XCTAssert and related functions to verify your tests produce the correct results.
- (void)testExample {

}

// 性能测试方法,通过测试block中方法执行的时间,比对设定的标准值和偏差觉得是否可以通过测试
- (void)testPerformanceExample {
    // This is an example of a performance test case.
    [self measureBlock:^{
        // Put the code you want to measure the time of here.
    }];
}
- XCTAssert 的使用,在单元测试中,我们通常使用 XCTAssert 相关的方法,方法有如下:
    // 通用断言,为 true 就通过测试
    XCTAssert(false);

    // 为 true 就通过测试
    XCTAssertTrue(false);

    // 为 false 就通过测试
    XCTAssertFalse(true);

    // 相等就通过测试
    XCTAssertEqual(1, 2);
    // 不相等就通过测试
    XCTAssertNotEqual(0, 0);

    // 相差的值在精确度范围内就通过测试
    XCTAssertEqualWithAccuracy(10, 12, 1);
    // 相差的值不在精确度范围内就通过测试
    XCTAssertNotEqualWithAccuracy(10, 12, 1);

    // 为 nil 就通过测试
    XCTAssertNil(nil);
    // 不为 nil 就通过测试
    XCTAssertNotNil(nil);

    // 直接不通过测试,可以自己判断是否加 XCTFail();
    XCTFail();
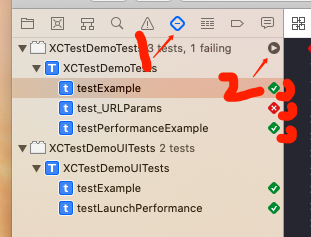
- 我们可以使用
❀ + U 来启动全部单元测试❀ + 6 切换到测试模块 这个和 Xcode 的版本有关或者使用下图的方法来启动测试:

- 如何写测试用例呢?
比如我们在开发框架的时候,一般会写一些测试用例。下面我们就模拟写一个简单的框架,同时我们写一些测试用例。如:我们要写一个获取 URL 中的参数的方法。
代码如下:
#import <Foundation/Foundation.h>

NS_ASSUME_NONNULL_BEGIN

@interface NSString (BMURLParams)

@property (nonatomic, copy, readonly) NSDictionary *bm_URLParams; ///< URLParams

@end

NS_ASSUME_NONNULL_END
#import "NSString+BMURLParams.h"

@implementation NSString (BMURLParams)

- (NSDictionary *)bm_URLParams {
    NSRange range = [self rangeOfString:@"?"];
    if (range.location == NSNotFound) {
        return nil;
    }

    NSString *propertys = [self substringFromIndex:(range.location+1)];
    NSMutableDictionary *tempDic = @{}.mutableCopy;
    [[propertys componentsSeparatedByString:@"&"] enumerateObjectsUsingBlock:^(NSString * _Nonnull obj, NSUInteger idx, BOOL * _Nonnull stop) {
        NSArray *dicArray = [obj componentsSeparatedByString:@"="];
        if (dicArray.count > 1) {
            tempDic[dicArray[0]] = dicArray[1];
        }
    }];
    return tempDic;
}

@end
- 我们在 XCTestDemoTests 文件中,实现导入
#import "NSString+BMURLParams.h"同时加上如下的方法:
- (void)test_URLParams {
    XCTAssert(@"https://www.baidu.com/s".bm_URLParams == nil);

     XCTAssert([(@"https://www.baidu.com/s?name=jck".bm_URLParams)
                isEqualToDictionary:(@{@"name" : @"jck"})]);

    XCTAssert([(@"https://www.baidu.com/s?name=jack&type=1".bm_URLParams)
                isEqualToDictionary:(@{@"name" : @"jack",
                                       @"type" : @"1"})]);

    XCTAssert([(@"https://www.baidu.com/s?name=jack&type=1&user=80222".bm_URLParams)
                isEqualToDictionary:(@{@"name" : @"jack",
                                       @"type" : @"1",
                                       @"user" : @"80222"})]);

}
- 跑一下测试用例,发现如下的效果
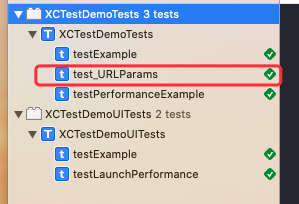
说明我们的用例全部通过了,当然这里的用例比较少,我们可以加上各种可能的情况。现在我们把获取参数的代码故意写错为如下的代码:
#import "NSString+BMURLParams.h"

@implementation NSString (BMURLParams)

- (NSDictionary *)bm_URLParams {
    NSRange range = [self rangeOfString:@"?"];
    if (range.location == NSNotFound) {
        return nil;
    }

    NSString *propertys = [self substringFromIndex:(range.location+1)];
    NSMutableDictionary *tempDic = @{}.mutableCopy;
    [[propertys componentsSeparatedByString:@"&"] enumerateObjectsUsingBlock:^(NSString * _Nonnull obj, NSUInteger idx, BOOL * _Nonnull stop) {
        NSArray *dicArray = [obj componentsSeparatedByString:@"="];
        if (dicArray.count > 1) {
            tempDic[dicArray[1]] = dicArray[0];
        }
    }];
    return tempDic;
}
@end
在跑一下单元测试就会有如下的效果:

性能测试
现在我们模拟测试网络接口的返回速度是否复合我们的预期,实现我们创建应该发送网络请求的类
BMRequestManager, 代码如下:
@interface BMRequestManager : NSObject
+ (void)getDataWithSuccBlock:(dispatch_block_t)block;
@end
@implementation BMRequestManager
+ (void)getDataWithSuccBlock:(dispatch_block_t)block {
    dispatch_after(dispatch_time(DISPATCH_TIME_NOW, (int64_t)(6.0 * NSEC_PER_SEC)), dispatch_get_main_queue(), ^{
        !block ? : block();
    });
}
@end
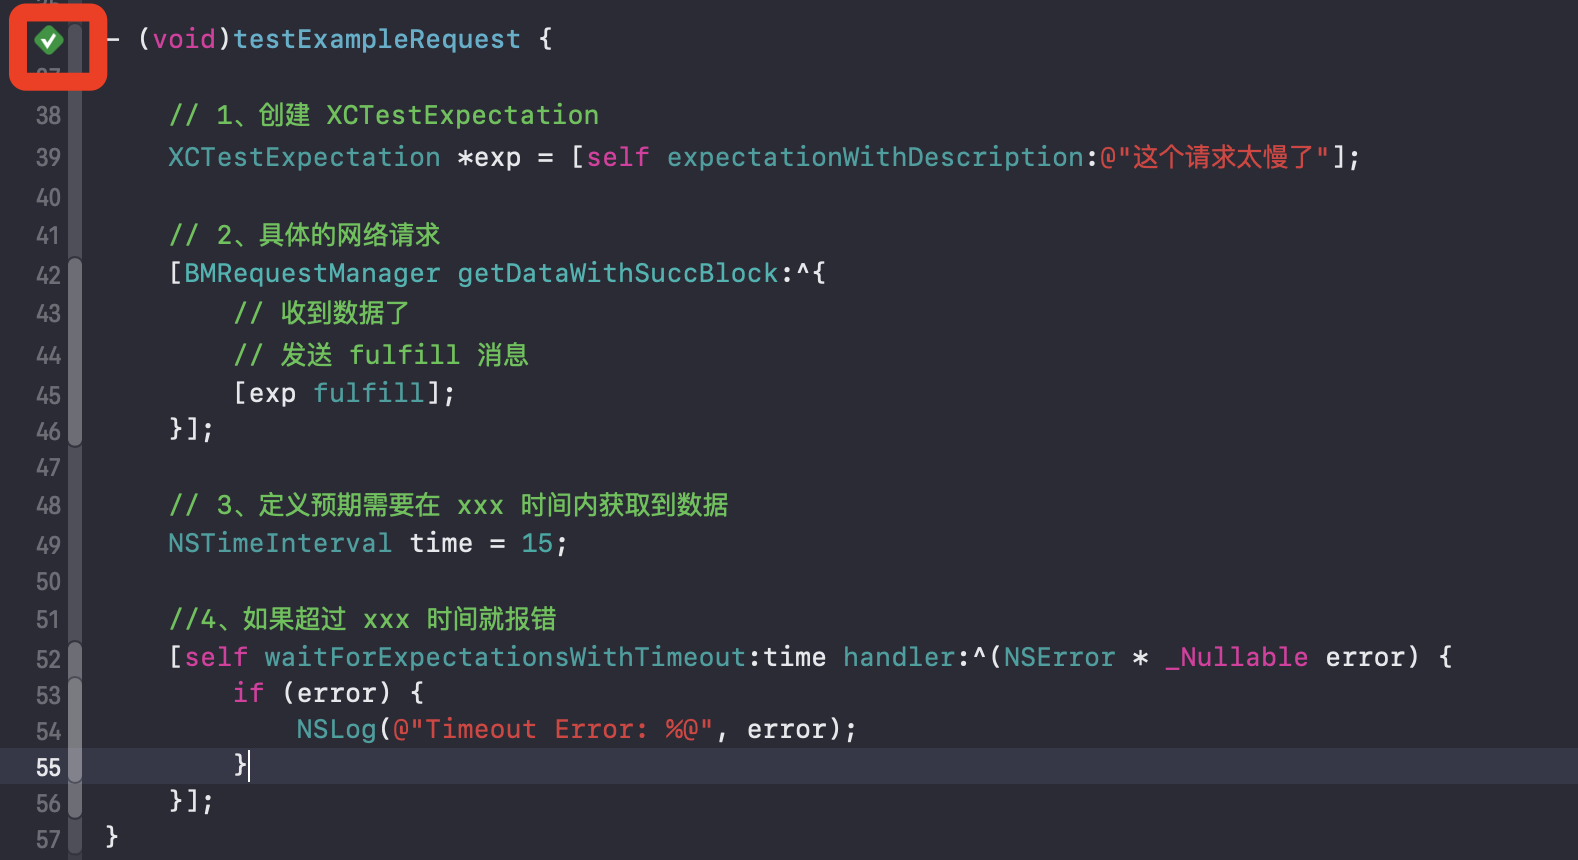
- 我们编写测试用例代码:
- (void)testExampleRequest {

    // 1、创建 XCTestExpectation
    XCTestExpectation *exp = [self expectationWithDescription:@"这个请求太慢了"];

    // 2、具体的网络请求
    [BMRequestManager getDataWithSuccBlock:^{
        // 收到数据了
        // 发送 fulfill 消息
        [exp fulfill];
    }];

    // 3、定义预期需要在 xxx 时间内获取到数据
    NSTimeInterval time = 15;

    //4、如果超过 xxx 时间就报错
    [self waitForExpectationsWithTimeout:time handler:^(NSError * _Nullable error) {
        if (error) {
            NSLog(@"Timeout Error: %@", error);
        }
    }];
}
由于我们上面设置的预期时间是 15 秒,但我们实际我们 6 秒就获取到了数据,使用我们在跑用例的时候用如下效果:
如果我们设置的预期时间是 5 秒,代码如下:
- (void)testExampleRequest {

    // 1、创建 XCTestExpectation
    XCTestExpectation *exp = [self expectationWithDescription:@"这个请求太慢了"];

    // 2、具体的网络请求
    [BMRequestManager getDataWithSuccBlock:^{
        // 收到数据了
        // 发送 fulfill 消息
        [exp fulfill];
    }];

    // 3、定义预期需要在 xxx 时间内获取到数据
    NSTimeInterval time = 5.0;

    //4、如果超过 xxx 时间就报错
    [self waitForExpectationsWithTimeout:time handler:^(NSError * _Nullable error) {
        if (error) {
            NSLog(@"Timeout Error: %@", error);
        }
    }];
}
- 跑用例的时候有如下效果:
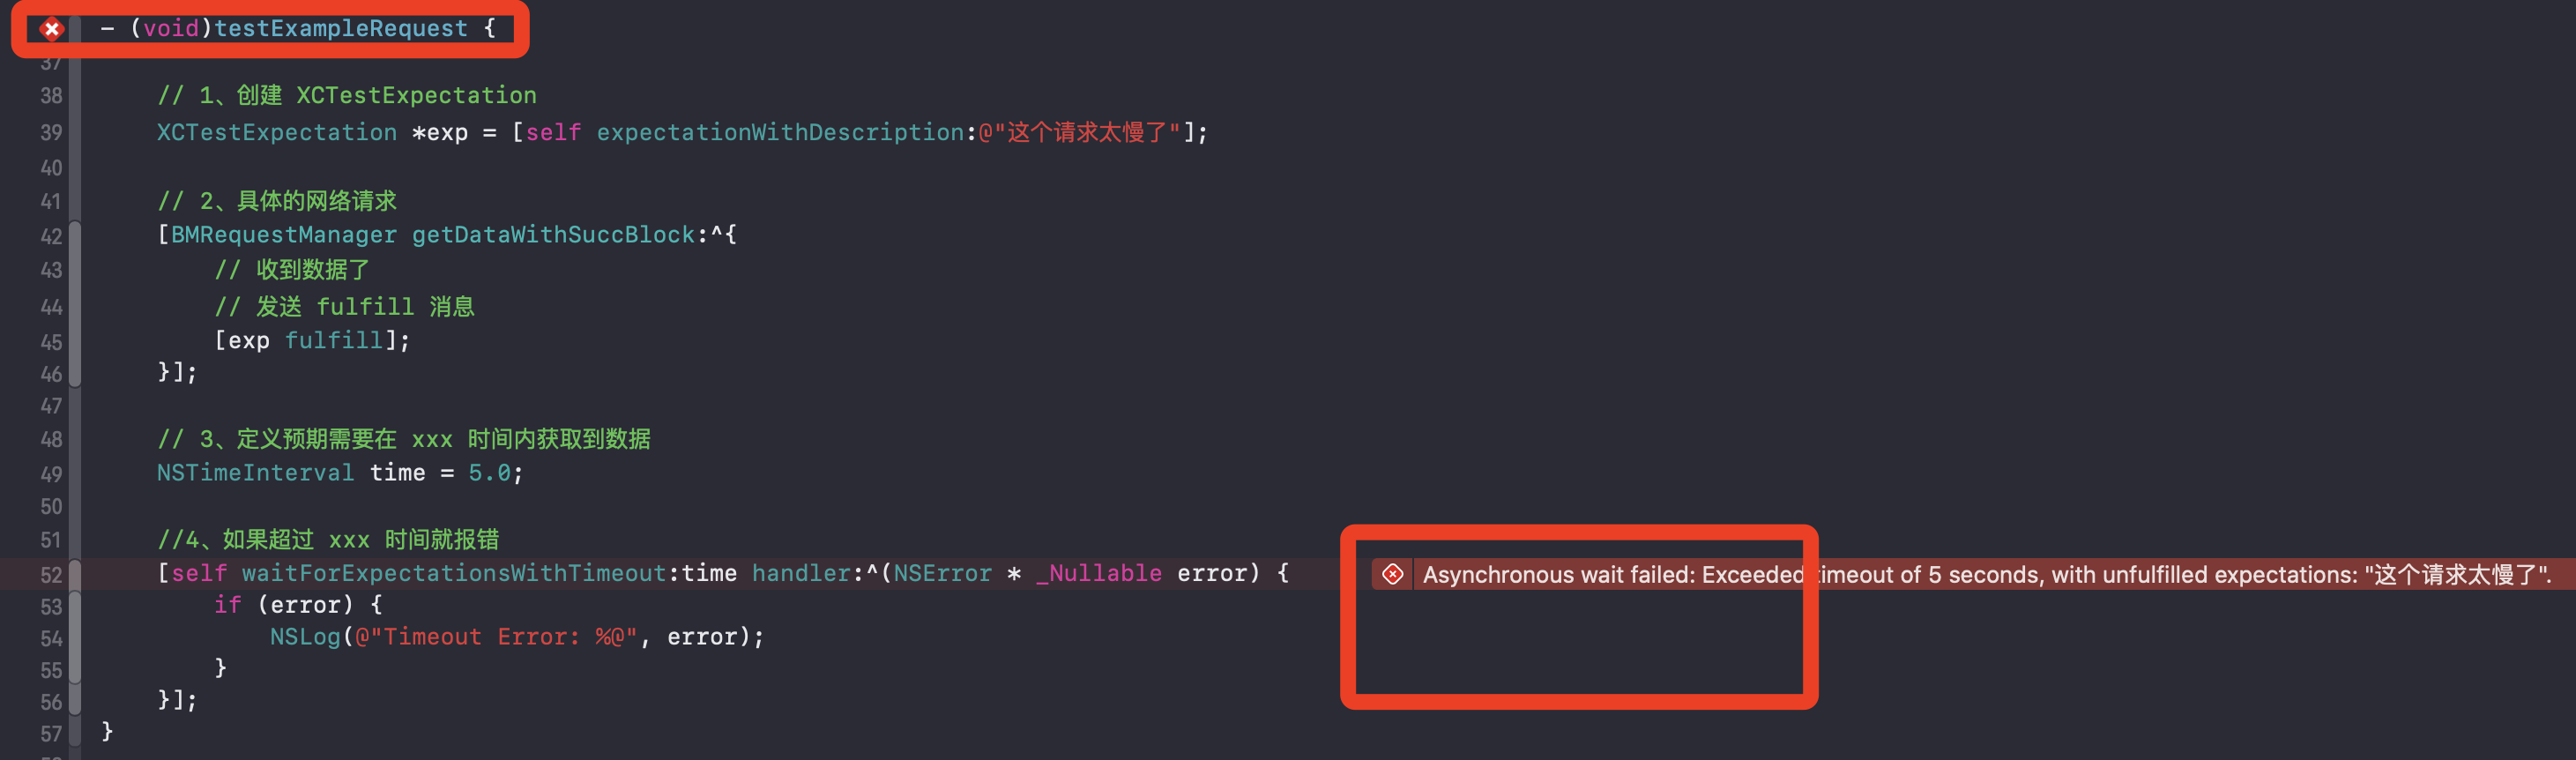
说明用例不通过。
- 当然我们也可以测试其他的一些代码的执行时间和预期时间来比较,看代码是否通过预期时间。
