大家在做前端开发的时候,为了保证团队成员提交代码的质量,一般都会对代码进行代码质量检查和代码美化工作,通常的做法是进行一系列的配置,借助于 eslint、prettier、lint-staged、husky 等工具实现代码的检测工作。但是这个过程涉及众多,配置起来也很繁琐,而且针对不同的项目都需要进行重复配置,无疑增加了大家的工作量,那么我要解决的就是这个问题,提供一个命令行工具来封装上述检测工具,简化配置步骤。
🚗如何开发一个命令行工具
首先大家要明白什么是命令行工具,命令行工具英文名叫 command-line interface,缩写,CLI,(下面都简称CLI)CLI可以让用户实时的与系统进行交互,获取系统的实时信息,完成用户自定义的功能。比如 git、create-react-app、vue-cli 等都是大家平时接触的比较多的命令行工具。
那么回到标题,如何开发一个命令行工具呢?
oclif
简介
这里我采用了oclif,一款可以帮我们快速构建 CLI 的框架,并且可以支持 Javascript 或者 Typescript语言。
oclif 提供了两种类型的命令行工具,Single-command 和 Multi-command。Single-command 比如 ls 或者 curl 命令,Multi-command 比如 git, 可以提供多个命令,类似于 git add、 git commit等。这里根据需要,选择了 Single-command。
快速创建
运行如下命令行可以快速创建一个 Single-command 命令行:
$ npx oclif single big-lint
然后根据命令行的提示,输入一些基本信息,就可以直接帮我们创建好一个 CLI 工程。
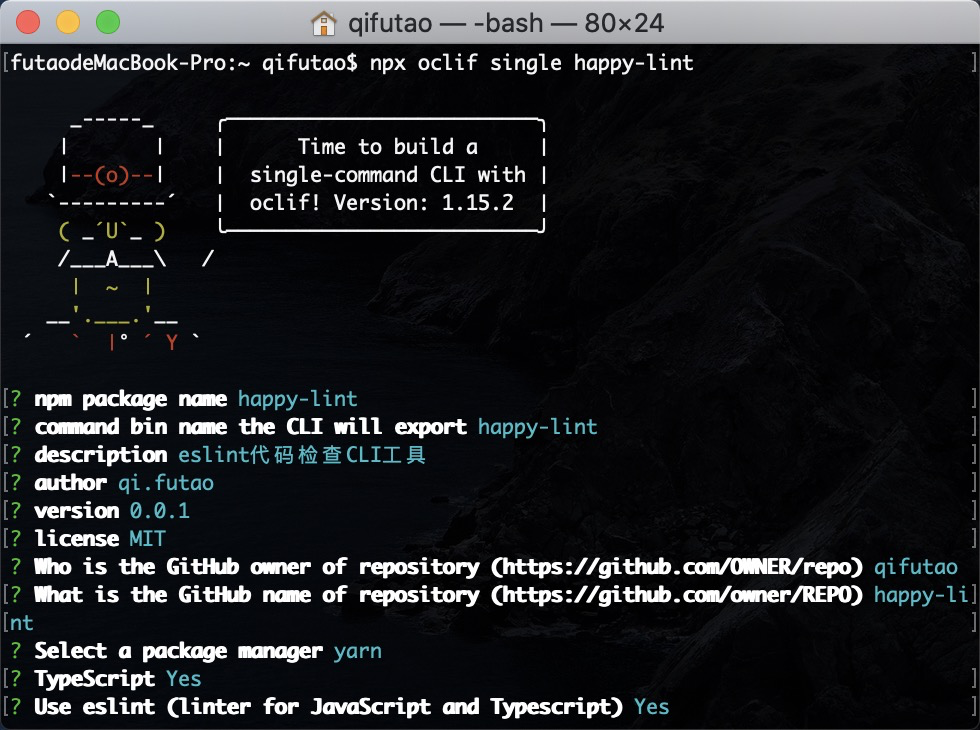
执行如下命令输入如下信息,表示一个 CLI 就创建成功了。这里我选择了使用 Typescript 来创建 CLI,毕竟都2020年了,再不会 Typescript有点说不过去了😅。
$ cd big-lint
$ ./bin/run
hello world from ./src/index.js!
$ ./bin/run --help
Describe the command here

describe the command here

USAGE
  $ big-lint [FILE]

OPTIONS
  -f, --force
  -h, --help       show CLI help
  -n, --name=name  name to print
  -v, --version    show CLI version
tips:这里需要注意的是,在给你的 CLI 起名字的时候,可以执行 npm view packageName来查看名字是否已经被别人占用,因为我们开发好的 CLI 工具最终是会发布到 npm 上的,如果名字被占用了是无法发布的,到时候再改起来比较麻烦。
此时打开 package.json 文件,可以看到其中的 main 字段:
{
    "main": "src/index.js",
}
main 字段指定的是一个入口文件,就是我们执行 $ ./bin/run 命令的时候执行的文件。
src/index.js
import {Command, flags} from '@oclif/command'

class HappyLint extends Command {
  static description = 'describe the command here'

  static flags = {
    // add --version flag to show CLI version
    version: flags.version({char: 'v'}),
    help: flags.help({char: 'h'}),
    // flag with a value (-n, --name=VALUE)
    name: flags.string({char: 'n', description: 'name to print'}),
    // flag with no value (-f, --force)
    force: flags.boolean({char: 'f'}),
  }

  static args = [{name: 'file'}]

  async run() {
    const {args, flags} = this.parse(HappyLint)

    const name = flags.name || 'world'
    this.log(`hello ${name} from ./src/index.ts`)
    if (args.file && flags.force) {
      this.log(`you input --force and --file: ${args.file}`)
    }
  }
}

export = HappyLint
如果想用 $ big-lint 代替 $ ./bin/run 命令,可以在工程目录下执行 $ npm link 命令,接下来你就可以愉快的使用 $ big-lint --help 查看效果了。
到这里,一个简单的 CLI 工具就完成了,接下来开始我们的正题,如何实现代码检测。
🚀如何实现代码检测和代码美化
检测工具
为了保证每次提交到 git 仓库代码的规范性,前端的解决方案一般会使用 eslint、prettier、lint-staged 配合 git hook 和 husky, 在 git commit 的时候就对代码进行 eslint 规范校验。接着需要安装上述依赖包,然后在 package.json 文件中进行配置:
{
  "lint-staged": {
    "src/**/*.js": [
      "eslint --fix --ext .js",
      "prettier --write",
      "git add"
    ]
  },
  "husky": {
    "hooks": {
      "pre-commit": "lint-staged"
    }
  },
}
big-lint 存在的意义就是要简化这样一个过程,省略繁杂的配置。
构建自己的CLI
安装依赖
现在 cd 到我们之前创建的 big-lint 工程中,在根目录下执行如下命令,安装相应的包:
$ yarn add husky eslint prettier lint-staged eslint-config-airbnb eslint-config-airbnb-base eslint-config-airbnb-typescript eslint-config-prettier eslint-formatter-pretty eslint-plugin-babel eslint-plugin-compat eslint-plugin-eslint-comments eslint-plugin-import eslint-plugin-jest eslint-plugin-jsx-a11y eslint-plugin-react eslint-plugin-unicorn -S
大致思路
big-lint 将提供两种检测模式:
- 对提交的代码进行检测
- 通过指定 dir 参数,对指定路径下的代码进行检测
参数说明:
big-lint [options] [dir]

Arguments:
dir                       指定校验的路径(支持node的glob语法)                     [string]

Flags:
--staged, -S              only lint git staged files                          [boolean] [default: false]
--prettier, -p            format code with prettier                           [boolean] [default: false]
--eslint, -e              enable lint javascript                              [boolean] [default: false]
--fix, -f                 fix all eslint and stylelint auto-fixable problems  [boolean] [default: false]
--format, -F              output format of console                            [string]  [default: stylish]
--cwd, -c                 current working directory                           [default: process.cwd()]
对提交的代码进行检测
通过 --staged 参数,来判断当前是否只对提交的代码进行检测,实现方式就是借助于 lint-staged、husky、eslint。下面用代码来实现:
定义 OPTIONS
src/utils/options.ts
import {flags} from '@oclif/command'

const flagConfig = {
  staged: flags.boolean({
    char: 'S',
    default: false,
    description: 'only lint git staged files',
  }),
  prettier: flags.boolean({
    char: 'P',
    default: false,
    description: 'format code with prettier',
  }),
  eslint: flags.boolean({
    char: 'e',
    default: false,
    description: 'enabel lint javascript',
  }),
  fix: flags.boolean({
    char: 'f',
    default: false,
    description: 'fix all eslint and stylelint auto-fixable problems',
  }),
  cwd: flags.string({
    char: 'c',
    default: process.cwd(),
    description: 'current working directory',
  }),
  format: flags.string({
    char: 'F',
    default: 'stylish',
    description: 'output format of console',
  }),
}

export default flagConfig
控制台行执行:
$ big-lint --help
可以看到如下信息,说明我们设置的 flags 生效了:
检测js(eslint)

USAGE
  $ big-lint [DIR]

ARGUMENTS
  DIR  指定路径

OPTIONS
  -F, --format=format  [default: stylish] output format of console
  -P, --prettier       format code with prettier
  -S, --staged         only lint git staged files
  -c, --cwd=cwd        [default: /Users/Documents/big-lint] current working directory
  -e, --eslint         enabel lint javascript
  -f, --fix            fix all eslint and stylelint auto-fixable problems
修改 src/index.js 下的 run 方法,根据 staged 参数来判断是走哪段逻辑。
async run() {
  const {args, flags} = this.parse(HappyLint)
  const {staged, ...rest} = flags
  const {dir} = args

  if (staged) {
    await this.lintStaged(rest)
  } else {
    await this.lint({...rest, dir})
  }
}
先看下 lintStaged 的代码:
async lintStaged(flags: any) {
  const {prettier, eslint, fix, format} = flags
  getEslintConfig()

  let eslintCommon = fix ? `${eslintPath} --fix` : eslintPath

  // 增加格式化输出
  if (format !== 'stylish') {
    eslintCommon = `${eslintCommon} -f ${format}`
  }

  const lintstagedrc = {
    ...(prettier && {
      '*.{js,jsx,ts,tsx,less,scss,sass,css}': [
          `${prettierPath} --write`,
          'git add',
        ],
    }),
    ...(eslint && {
        '*{.js,.jsx,.ts,.tsx}': [
          eslintCommon,
          'git add',
        ],
       }),
    }
    const rcPath = join(__dirname, '.lintstagedrc.json')
    writeFileSync(rcPath, JSON.stringify(lintstagedrc))

    try {
      const child = spawn(lintStagedPath, ['-c', rcPath], {stdio: 'inherit'})
      child.on('close', (code: any) => {
        process.exit(code) // eslint-disable-line
      })
    } catch (error) {

    }
}
getEslintConfig 方法会先判断在工程根路径下是否存在默认 .eslintrc.js、 .prettierrc 、.editorconfig 配置文件,如果没有的话默认会自动生成一份配置文件置于工程根目录下。
这里使用了 cross-spawn 来调用工程根路径下的 node_modules/.bin/lint-staged 执行命令, spawn 的第二个参数是一个数组,传入执行命令的参数, -c 参数指定了 lint-staged 命令的 配置文件路径。
spawn 函数的返回一个子进程,当子进程的 stdio 流已被关闭时会触发 close 事件,我们需要监听下这个事件,因为 lint-staged 检验不通过活,我们需要执行 process.exite(code) 方法将进程杀掉。
到这里, lintStaged 的逻辑就走完了,现在可以测试下效果了。
找一个测试工程,在 package.json 文件中进行如下配置:
{
    "husky": {
        "hooks": {
          "pre-commit": "big-lint --eslint --staged"
        }
    },
}
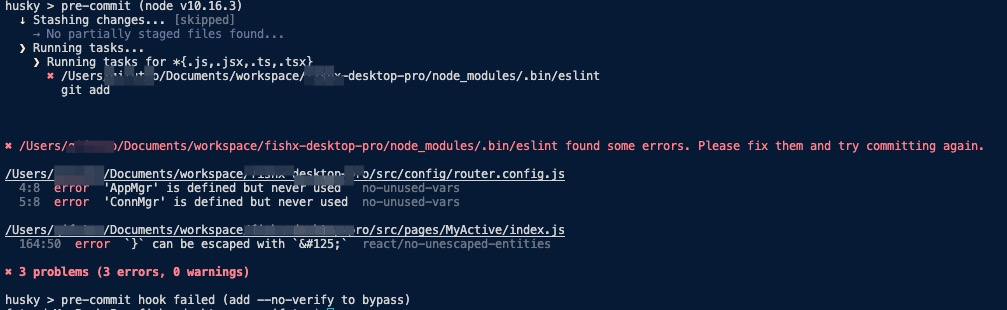
在该工程下加入 .eslintrc.js 配置文件,执行 $ git add, $ git commit -m 'test',如果存在 eslint 报错,可以看到以下错误信息。
接下来再看下 lint 的代码:
async lint(flags: any) {
    const {dir, cwd, prettier, eslint, fix, format} = flags
    if (dir === undefined) {
      this.error('please specify a path to lint')
    }
    // 支持多路径,以逗号分隔
    let filePath: any

    if (dir.split(',').length !== 0) {
      filePath = dir.split(',')
    } else {
      filePath = dir
    }

    const allFiles = getFiles(filePath, cwd)
    try {
      if (eslint) {
        getEslintConfig()
        const eslintExtensions = ['.js', '.jsx', '.ts', '.tsx']
        const files = allFiles.filter(item => endsWithArray(item, eslintExtensions))
        if (files.length > 0) {
          let args = fix ? ['--fix', ...files] : [...files]
          args = format !== 'stylish' ? ['-f', format, ...args] : [...args]
          spawn.sync(eslintPath, args, {stdio: 'inherit'})
        }
      }

      if (prettier) {
        const prettierExtensions = ['.js', '.jsx', '.ts', '.tsx', '.css', '.less', '.scss', '.sass']
        const files = allFiles.filter(item =>
          endsWithArray(item, prettierExtensions),
        )
        if (files.length > 0) {
          spawn.sync(prettierPath, ['--write', ...files], {stdio: 'inherit'})
        }
      }
    } catch (error) {
      this.error(error)
    }
  }
通过 getFiles 方法获取指定路径下除去 node_modules 下的所有 js文件,对其进行代码校验。
src/utils/utils.ts
export const getFiles = (patterns: any, cwd: any) => {
  const result = globby
  .sync(patterns, {
    gitignore: true,
    ignore: ['**/node_modules/**', '.git'],
    onlyFiles: true,
    dot: true,
  })
  .map((item: any) => {
    // ignore 包必须使用相对路径
    return path.relative(cwd, item)
  })

  return ignore()
  .add(getIgnores(cwd))
  .filter(result)
}
在测试工程里面的 pacakge.json 文件里进行如下配置:
{
    "scripts": {
        "lint": "big-lint --eslint 'src/'",
        "prettier": "big-lint --prettier 'src/'",
        "fix": "big-lintpy-lint --eslint --fix 'src/'"
      },
}
执行 $ npm run lint 命令,可以对src 目录下代码进行 eslint 规则校验,执行 npm run prettier 可以对 src 目录下的代码进行 prettier 代码美化, 执行 $ npm run fix 可以对 src 目录下的代码进行自动代码修复。
发布自己的CLI工具
要发布自己的 npm 包,首先要去 npm 官网上注册一个npm的账号,进入到 CLI 目录中,执行 $ npm login, 填写好登录信息。
修改 package.json 文件中的 keywords 字段,这里需要填写你要发布的 npm 包关键字信息,如果你想让你的 npm 包被更多人搜索使用的话,keywords 字段需要尽量描述精确。
name 字段和 version 字段是必填字段,name 要唯一,不能是别人已经使用过的,homepage 字段是你的 npm 包的主页,因为我的 npm 包是开源的,所以这里就填写了 github 地址。
以上信息确认无误后,执行 $ npm run prepack 命令, 再执行 npm publish 命令就可以完成 npm 包的发布了。
下面的是我的公众号二维码图片,欢迎关注。