

修订
- 2020-01-06
- 前言中的“...都是
Tapable的实例”改为“...都是Tapable的子类”。 - 修正并行写成串行的错误。
前言
Webpack 本质上是一种事件流的机制,它的工作流程就是将各个插件串联起来,而实现这一切的核心就是 Tapable,Webpack 中最核心的负责编译的 Compiler 和负责创建 bundles 的 Compilation 都是 Tapable 的子类,并且实例内部的生命周期也是通过 Tapable 库提供的钩子类实现的。
class Compiler extends Tapable {
    constructor(context) {
        super();
        this.hooks = {
            shouldEmit: new SyncBailHook(["compilation"]),
            done: new AsyncSeriesHook(["stats"]),
            additionalPass: new AsyncSeriesHook([]),
            beforeRun: new AsyncSeriesHook(["compiler"]),
            run: new AsyncSeriesHook(["compiler"]),
            emit: new AsyncSeriesHook(["compilation"]),
            assetEmitted: new AsyncSeriesHook(["file", "content"]),
            afterEmit: new AsyncSeriesHook(["compilation"]),
            thisCompilation: new SyncHook(["compilation", "params"]),
            compilation: new SyncHook(["compilation", "params"]),
            normalModuleFactory: new SyncHook(["normalModuleFactory"]),
            contextModuleFactory: new SyncHook(["contextModulefactory"]),
            beforeCompile: new AsyncSeriesHook(["params"]),
            compile: new SyncHook(["params"]),
            make: new AsyncParallelHook(["compilation"]),
            afterCompile: new AsyncSeriesHook(["compilation"]),
            watchRun: new AsyncSeriesHook(["compiler"]),
            failed: new SyncHook(["error"]),
            invalid: new SyncHook(["filename", "changeTime"]),
            watchClose: new SyncHook([]),
            infrastructureLog: new SyncBailHook(["origin", "type", "args"]),
            environment: new SyncHook([]),
            afterEnvironment: new SyncHook([]),
            afterPlugins: new SyncHook(["compiler"]),
            afterResolvers: new SyncHook(["compiler"]),
            entryOption: new SyncBailHook(["context", "entry"])
        };
  }
}
Tapable 是什么?
我们知道 Node.js 的特点是事件驱动,它是通过内部的 EventEmitter 类实现的,这个类能够进行事件的监听与触发。
const { EventEmitter } = require('events');
const event = new EventEmitter();

event.on('eventName', value => {
  console.log('eventName 触发:', value);
});

event.emit('eventName', 'Hello, eventName');
Tapable 的功能与 EventEmitter 类似,但是更加强大,它包含了多种不同的监听和触发事件的方式。
Tapable 的 Hook 类
通过上文 Compiler 类内部能看到 Tapable 提供的类都是给生命周期实例化的,因此我们叫它钩子类。
Tapable 导出的钩子类:
const {
  SyncHook,
  SyncBailHook,
  SyncWaterfallHook,
  SyncLoopHook,
  AsyncSeriesHook,
  AsyncSeriesBailHook,
  AsyncSeriesWaterfallHook,
  AsyncParallelHook,
  AsyncParallelBailHook,
} = require('tapable');
Hook 的类型可以按照 事件回调的运行逻辑 或者 触发事件的方式 来分类。
事件回调的运行逻辑:
类型 | 描述 |
Basic | 基础类型,单纯的调用注册的事件回调,并不关心其内部的运行逻辑。 |
Bail | 保险类型,当一个事件回调在运行时返回的值不为 |
Waterfall | 瀑布类型,如果当前执行的事件回调返回值不为 |
Loop | 循环类型,如果当前执行的事件回调的返回值不是 |
触发事件的方式:
类型 | 描述 |
Sync | Sync 开头的 Hook 类只能用 |
AsyncSeries | Async 开头的 Hook 类,没法用 |
AsyncParalle |
使用方式
在开始对源码进行解析之前,我们首先来看下 Tapable 一些重要的使用方式。
注册事件回调
注册事件回调有三个方法: tap、tapAsync 和 tapPromise,其中 tapAsync 和 tapPromise 不能用于 Sync 开头的钩子类,强行使用会报错。tapAsync 和 tapPromise 与 tap 的使用方法类似,我单独以 tap 举例。
const { SyncHook } = require('tapable');
const hook = new SyncHook();

// 注册事件回调
// 注册事件回调的方法,例如 tap,它们的第一个参数可以是事件回调的名字,也可以是配置对象
hook.tap('first', () => {
  console.log('first');
});

hook.tap(
  // 配置对象
  {
    name: 'second',
  },
  () => {
    console.log('second');
  }
);
执行顺序
在注册事件回调时,配置对象有两个可以改变执行顺序的属性:
stage:这个属性的类型是数字,数字越大事件回调执行的越晚。
const { SyncHook } = require('tapable');
const hook = new SyncHook();

hook.tap('first', () => {
  console.log('first');
});

hook.tap({
    name: 'second',
  // 默认 stage 是 0,会按注册顺序添加事件回调到队列尾部
  // 顺序提前,stage 可以置为负数(比零小)
  // 顺序提后,stage 可以置为正数(比零大)
  stage: 10,
}, () => {
  console.log('second');
});

hook.tap('third', () => {
  console.log('third');
});

hook.call('call');

/**
 * Console output:
 *
 * first
 * third
 * second
*/before:这个属性的类型可以是数组也可以是一个字符串,传入的是注册事件回调的名称。
const { SyncHook } = require('tapable');
const hook = new SyncHook();

hook.tap('first', (name) => {
  console.log('first', name);
});

hook.tap('second', (name) => {
  console.log('second', name);
});

hook.tap({
  name: 'third',
  // 把 third 事件回调放到 second 之前执行
  before: 'second',
}, (name) => {
  console.log('third', name);
});

hook.call('call');

/**
 * Console output:
 *
 * first
 * third
 * second
 */
另外,这两个属性最好不要同时使用,比较容易混乱。
触发事件
触发事件的三个方法是与注册事件回调的方法一一对应的,这点从方法的名字上也能看出来:call 对应 tap、callAsync 对应 tapAsync 和 promise 对应 tapPromise。一般来说,我们注册事件回调时用了什么方法,触发时最好也使用对应的方法。
call
call 传入参数的数量需要与实例化时传递给钩子类构造函数的数组长度保持一致。
const { SyncHook } = require('tapable');
// 1.实例化钩子类时传入的数组,实际上只用上了数组的长度,名称是为了便于维护
const hook = new SyncHook(['name']);

// 3.other 会是 undefined,因为这个参数并没有在实例化钩子类的数组中声明
hook.tap('first', (name, other) => {
  console.log('first', name, other);
});

// 2.实例化钩子类的数组长度为 1,这里却传了 2 个传入参数
hook.call('call', 'test');

/**
 * Console output:
 *
 * first call undefined
 */
callAsync
callAsync 与 call 不同的是:在传入了与实例化钩子类的数组长度一致个数的传入参数时,还需要在最后添加一个回调函数,否则在事件回调中执行回调函数可能会报错。
const { AsyncSeriesHook } = require('tapable');
const hook = new AsyncSeriesHook(['name']);

// 事件回调接收到 callback
hook.tapAsync('first', (name, callback) => {
  console.log('first', name, callback);
  callback();
});

// 最后一个传入参数是回调函数
hook.callAsync('callAsync', (error) => {
    console.log('callAsync', error);
});

/**
 * Console output:
 *
 * first callAsync [Function]
 * callAsync first
 */
另外,事件回调中接收的 callback 必须要执行,否则不会执行后续的事件回调和 callAsync 传入的回调,这是因为事件回调接收的 callback 已经是对 callAsync 传入的回调做了一层封装的结果了,其内部有一个判断逻辑:
- 如果 callback 执行时不传入值,就会继续执行后续的事件回调。
- 如果传入错误信息,就会直接执行
callAsync传入的回调,不再执行后续的事件回调;这实际上意味着事件回调执行有错误,也就是说callAsync传入的是一个错误优先回调,既然是错误优先回调,那它是可以接收第二个参数的,这个参数将被传入正确的值,在这边先不用管第二个参数,下文会有更详尽的介绍。
hook.tapAsync('first', (name, callback) => {
  console.log('first', name, callback);
  // 继续执行 second 事件回调
  callback();
});

hook.tapAsync('second', (name, callback) => {
  console.log('second', name, callback);
  // 执行 callAsync 传入的回调
  // 第二个参数传入没有效果,因为 Sync 类型的 Hook 不对第二个参数做处理
  callback('second error', 'second result');
});

hook.tapAsync('third', (name, callback) => {
  console.log('third', name, callback);
  callback('third');
});

// 错误优先回调
// result 打印 undefined
hook.callAsync('callAsync', (error, result) => {
    console.log('callAsync', error, result);
});

/**
 * Console output:
 *
 * first callAsync [Function]
 * second callAsync [Function]
 * callAsync second error undefined
 */
promise
promise 执行之后会返回一个 Promise 对象。在使用 tapPromise 注册事件回调时,事件回调必须返回一个 Promise 对象,否则会报错,这是为了确保事件回调能够按照顺序执行。
const { AsyncSeriesHook } = require('tapable');
const hook = new AsyncSeriesHook(['name']);

hook.tapPromise('first', (name) => {
  console.log('first', name);

  return Promise.resolve('first');
});

hook.tapPromise('second', (name) => {
  console.log('second', name);

  return Promise.resolve('second');
});

const promise = hook.promise('promise');

console.log(promise);

promise.then(value => {
  // value 是 undefined,不会接收到事件回调中传入的值
  console.log('value', value);
}, reason => {
  // 事件回调返回的 Promise 对象状态是 Rejected
  // reason 会有事件回调中传入的错误信息
  console.log('reason', reason);
});

/**
 * Console output:
 *
 * first promise
 * Promise { <pending> }
 * second promise
 * value undefined
 */
拦截器
我们可以给钩子类添加拦截器,这样就能对事件回调的注册、调用以及事件的触发进行监听。
const { SyncHook } = require('tapable');
const hook = new SyncHook();

hook.intercept({
  // 注册时执行
  register(tap) {
    console.log('register', tap);
    return tap;
  },
  // 触发事件时执行
  call(...args) {
    console.log('call', args);
  },
  // 在 call 拦截器之后执行
  loop(...args) {
    console.log('loop', args);
  },
  // 事件回调调用前执行
  tap(tap) {
    console.log('tap', tap);
  },
});
上下文
用 tap 或者其他方法注册事件回调以及添加拦截器时,可以把配置对象中的 context 设置为 true,这将让我们在事件回调或者拦截器方法中获取 context 对象,这个对象会变成它们的第一个参数。
const { SyncHook } = require('tapable');
// 钩子类的构造函数接收一个数组作为参数,数组中是事件回调的参数名,表明事件回调需要几个参数
const hook = new SyncHook(['name']);

hook.intercept({
  // 在添加拦截器的配置对象中启用 context
  context: true,
  register(tap) {
    console.log('register', tap);
    return tap;
  },
  call(...args) {
    // args[0] 会变成 context 对象
    console.log('call', args);
  },
  loop(...args) {
    // args[0] 会变成 context 对象
    console.log('loop', args);
  },
  tap(context, tap) {
    // 第一个参数变成 context 对象
    context.fileChanged = true;
    console.log('tap', context, tap);
  },
});

hook.tap(
  {
    name: 'first',
    context: true,
  },
  // 第一个参数变成 context 对象
  (context, name) => {
    // context 中将会有 fileChanged 属性
    // context: { fileChanged: true }
    console.log('first', context, name);
  }
);

hook.call('call');

/**
 * Console output:
 *
 * register { type: 'sync', fn: [Function], name: 'first', context: true }
 * call [ {}, 'call' ]
 * tap { fileChanged: true } { type: 'sync', fn: [Function], name: 'first', context: true }
 * first { fileChanged: true } call
 */
钩子类
Tapable 暴露的所有钩子类都是继承自 Hook 的,因此它们的构造函数统一只接收一个数组参数,这个数组中是事件回调的参数名,主要作用是表明事件回调需要几个参数。
接下来我会着重介绍 SyncHook、AsyncSeriesBailHook、AsyncSeriesWaterfallHook、SyncLoopHook、AsyncParallelHook、AsyncParallelBailHook 这六个钩子类,其他钩子的用法与它们类似。
SyncHook
Basic 类型的钩子类很简单就是按照顺序执行事件回调,没有任何其他功能。
const { SyncHook } = require('tapable');
const hook = new SyncHook(['name']);

// 注册事件回调
hook.tap('first', name => {
  console.log('first', name);
});

hook.tap('second', name => {
  console.log('second', name);
});

// 触发事件
hook.call('call');

/**
 * Console output:
 *
 * first call
 * second call
 */
AsyncSeriesBailHook

Bail 类型的钩子类在事件回调有返回值时,会终止后续事件回调的运行,但是这只对 tap 方法有效,下面来看下不同的注册事件回调的方法是怎么触发这一功能的。
const { AsyncSeriesBailHook } = require('tapable');
const hook = new AsyncSeriesBailHook(['name']);

hook.tap('first', (name) => {
  console.log('first', name);
  // return 不为 undefined 的值
  // return 'first return';
  /**
   * Console output:
   *
   * first callAsync
   * end null first return
   */
})

hook.tapAsync('second', (name, callback) => {
  console.log('second', name);
  // callback 的第一个参数需要传入 null,表明没有错误;
  // 第二个参数需要传入不为 undefined 的值;
  // 这便是错误优先回调的标准格式。
  // callback(null, 'second return');
  /**
   * Console output:
   *
   * first callAsync
   * second callAsync
   * end null second return
   */
  callback();
})

hook.tapPromise('third', (name, callback) => {
  console.log('third', name);
  // Promise 最终状态被置为 Fulfilled,并且值不为 undefined
  // return Promise.resolve('third return');
  /**
   * Console output:
   *
   * first callAsync
   * second callAsync
   * third callAsync
   * end null third return
   */
  return Promise.resolve();
})

hook.tap('fourth', (name) => {
  console.log('fourth', name);
})

hook.callAsync('callAsync', (error, result) => {
  console.log('end', error, result);
});

// 使用 promise 方法触发事件,事件回调中也是用一样的方式来停止后续事件回调执行的;
// 区别主要在于处理错误和值的方式而已,这便是异步回调和 Promise 的不同之处了,
// 并不在本文探讨范围之内。
// const promise = hook.promise('promise');
// promise.then(value => {
//   console.log('value', value);
// }, reason => {
//   console.log('reason', reason);
// });
AsyncSeriesWaterfallHook

Waterfall 类型的钩子类在当前事件回调返回不为 undefined 的值时,会把下一个事件回调的第一个参数替换成这个值,当然这也是针对 tap 注册的事件回调,其他注册方法触发这一功能的方式如下:
const { AsyncSeriesWaterfallHook } = require('tapable');
const hook = new AsyncSeriesWaterfallHook(['name']);

hook.tap('first', name => {
  console.log('first', name);
  // 返回不为 undefined 的值
  return name + ' - ' + 'first';
})

hook.tapAsync('second', (name, callback) => {
  // 因为 tap 注册的事件回调返回了值,所以 name 为 callAsync - first
  console.log('second', name);
  // 在第二个参数中传入不为 undefined 的值
  callback(null, name + ' - ' + ' second');
})

hook.tapPromise('third', name => {
  console.log('third', name);
  // Promise 最终状态被置为 Fulfilled,并且值不为 undefined
  return Promise.resolve(name + ' - ' + 'third');
})

hook.tap('fourth', name => {
  // 当前事件回调没有返回不为 undefined 的值,因此 name 没有被替换
  console.log('fourth', name);
})

hook.callAsync('callAsync', (error, result) => {
  console.log('end', error, result);
});

/**
 * Console output:
 *
 * first callAsync
 * second callAsync - first
 * third callAsync - first -  second
 * fourth callAsync - first -  second - third
 * end null callAsync - first -  second - third
 */
SyncLoopHook

Loop 类型的钩子类在当前执行的事件回调的返回值不是 undefined 时,会重新从第一个注册的事件回调处执行,直到当前执行的事件回调没有返回值。在下面的代码中,我做了一些处理,使得它的打印值更为直观。
const { SyncLoopHook } = require('tapable');
const hook = new SyncLoopHook(['name']);
const INDENT_SPACE = 4;
let firstCount = 0;
let secondCount = 0;
let thirdCount = 0;
let indent = 0;

function indentLog(...text) {
  console.log(new Array(indent).join(' '), ...text);
}

hook.tap('first', name => {
  if (firstCount === 1) {
    firstCount = 0;
    indent -= INDENT_SPACE;
    indentLog('</callback-first>');
    return;
  }
  firstCount++;
  indentLog('<callback-first>');
  indent += INDENT_SPACE;
  return true;
})

hook.tap('second', name => {
  if (secondCount === 1) {
    secondCount = 0;
    indent -= INDENT_SPACE;
    indentLog('</callback-second>');
    return;
  }
  secondCount++;
  indentLog('<callback-second>');
  indent += INDENT_SPACE;
  return true;
})

hook.tap('third', name => {
  if (thirdCount === 1) {
    thirdCount = 0;
    indent -= INDENT_SPACE;
    indentLog('</callback-third>');
    return;
  }
  thirdCount++;
  indentLog('<callback-third>');
  indent += INDENT_SPACE;
  return true;
})

hook.call('call');

/**
 * Console output:
 *
 *  <callback-first>
 *  </callback-first>
 *  <callback-second>
 *     <callback-first>
 *     </callback-first>
 *  </callback-second>
 *  <callback-third>
 *     <callback-first>
 *     </callback-first>
 *     <callback-second>
 *         <callback-first>
 *         </callback-first>
 *     </callback-second>
 *  </callback-third>
 */
AsyncParallelHook
AsyncParallel 类型的钩子类会并行执行所有的事件回调,因此异步的事件回调中的错误并不会阻止其他事件回调的运行。
const { AsyncParallelHook } = require('tapable');
const hook = new AsyncParallelHook(['name']);

hook.tap('first', (name) => {
  console.log('first', name);
})

hook.tapAsync('second', (name, callback) => {
  setTimeout(() => {
    console.log('second', name);
    callback();
  }, 2000);
})

hook.tapPromise('third', (name) => {
  return new Promise((resolve, reject) => {
    setTimeout(() => {
      console.log('third', name);
      // 抛出了错误,但是只是提前执行了 callAsync 传入回调函数,并不会阻止其他事件回调运行
      reject('third error');
    }, 1000);
  });
})

hook.callAsync('callAsync', (error) => {
  console.log('end', error);
});

/**
 * Console output:
 *
 * first callAsync
 * third callAsync
 * end third error
 * second callAsync
 */
AsyncParallelBailHook
这个类型的钩子类看起来很让人疑惑,以 AsyncParallel 开头的钩子类会并行执行所有事件回调,而 Bail 类型的钩子类在事件回调返回不为 undefined 时会终止后续事件回调的运行,这两个结合起来要怎么使用呢?
实际上,AsyncParallelBailHook 确实会并行执行所有事件回调,但是这个钩子类中的事件回调返回值如果不为 undefined,那么 callAsync 传入的回调函数的第二参数会是最先拥有返回值(这里的返回值有多种方式:return result、callback(null, result) 和 return Promise.resolve(result))逻辑的事件回调的那个返回值,看如下代码:
const { AsyncParallelBailHook } = require('tapable');
const hook = new AsyncParallelBailHook(['name']);

hook.tap('first', (name) => {
  console.log('first', name);
})

// 最先拥有返回值逻辑的事件回调
hook.tapAsync('second', (name, callback) => {
  setTimeout(() => {
    console.log('second', name);
    // 使用 callback 传入了不是 undefined 的返回值。
    callback(null, 'second result');
  }, 1000);
})

// 虽然这个异步的事件回调中的 Promise 对象会比第二个异步的事件回调早执行完毕,
// 但是因为第二个事件回调中已经拥有了返回值的逻辑,
// 因此这个事件回调不会执行 callAsync 传入的回调函数。
hook.tapPromise('third', (name) => {
  console.log('third', name);
  // 返回了一个 Promise 对象,并且它的状态是 Fulfilled, 值不为 undefined。
  return Promise.resolve('third result');
})

hook.callAsync('callAsync', (error, result) => {
  console.log('end', error, result);
});

/**
 * Console output:
 *
 * first callAsync
 * third callAsync
 * second callAsync
 * end null second result
 */
原理解析
通过上文我们已经大致了解了 Tapable 的使用方式,接下来我们来看下 Tapable 究竟是如何运作的。要探寻这个秘密,我们需要从 tap 和 call 这两个方法开始分析,这两个方法都是建立在同步的前提下,因此会简单一些。
另外,我们说过所有的钩子类都是继承自 Hook 类,但是 Tapable 并没有暴露它并且它也没法直接使用,因此下面主要把 SyncHook 钩子类作为入口进行解析。在解析的过程中,我们也需要在本地通过 npm 安装 Tapable 库,并写一些简单的 DEMO 进行调试,以便于理解。
// 安装 Tapable
npm i -D tapable
// index.js
// DEMO
const { SyncHook } = require('tapable');
const hook = new SyncHook(['name']);
hook.tap('run', (name) => {
console.log('run', name);
});
hook.call('call');
Tapable的版本问题:写文章时
Tapable最新的latest版本是 1.1.3,但是Webpack团队已经在开发 2.0.0 版本,现在是beta阶段,可能 API 还会有所变动,并且就目前来看beta版本对比 1.0.0 版本也没啥大的改动,所以文章依旧选用 1.1.3 版本进行解析。
钩子类位置
通过查看 Tapable 库的 package.json,可以找到 main: lib/index.js。下面是这个文件的代码:
// tapable/lib/index.js
...
exports.SyncHook = require("./SyncHook");
...
可以看到 SyncHook 是从 SyncHook.js 中暴露出来的,SyncHook 类中暂时没有发现什么有价值的代码,但是我可以看到 tapAsync 和 tapPromise 被重写了,内部是抛出错误的逻辑,因此解释了 SyncHook 类为什么不允许执行这两个方法。
// tapable/lib/SyncHook.js
...
class SyncHook extends Hook {
    tapAsync() {
        throw new Error("tapAsync is not supported on a SyncHook");
    }

    tapPromise() {
        throw new Error("tapPromise is not supported on a SyncHook");
    }

    compile(options) {
        factory.setup(this, options);
        return factory.create(options);
    }
}
...
实例化
我们要使用钩子类,那必须要先进行实例化。SyncHook 中代码很简单,大部分逻辑都继承了 Hook,我们继续向上追踪。下面是 Hook 实例化的代码,虽然给予了注释,但是还有一些是需要结合详细流程来看的代码,下文有详细解析,因此暂时不必理会。
// tapable/lib/Hook.js
...
class Hook {
    constructor(args) {
        if (!Array.isArray(args)) args = [];
        // 事件回调的接收参数名数组,主要用到了数组的长度,
        // 因为需要知道传入了几个参数,所以参数名主要是为了便于维护。
        this._args = args;
        // 注册的事件回调都会放到这个数组中,数组里面已经是排序好的事件回调。
        this.taps = [];
        // 保存着拦截器配置对象。
        this.interceptors = [];

        // 下面三个触发事件的方法都经过了一层封装。
        this.call = this._call;
        this.promise = this._promise;
        this.callAsync = this._callAsync;

        // 拼接代码时使用。
        this._x = undefined;
    }
  ...
}
...
注册
实例化之后,我们就要正式开始使用了,首先肯定要先注册事件回调,之后触发事件才有意义。下面是 tap 方法在 Hook 中的代码:
// tapable/lib/Hook.js
...
class Hook {
    ...
    tap(options, fn) {
        // tap 的第一个参数可以是当前事件回调的名字,也可以是一个配置对象,
        // 下面是对这个的处理和一些容错。
        if (typeof options === "string") options = { name: options };
        if (typeof options !== "object" || options === null)
            throw new Error(
                "Invalid arguments to tap(options: Object, fn: function)"
            );
        // 最后把 options 和 fn 等都合并到一个对象中去,
        // 其中有一个 type 属性,在之后的处理时会根据 type 的不同触发不同的逻辑
        options = Object.assign({ type: "sync", fn: fn }, options);
        if (typeof options.name !== "string" || options.name === "")
            throw new Error("Missing name for tap");
        options = this._runRegisterInterceptors(options);
        this._insert(options);
    }

    _runRegisterInterceptors(options) {
        for (const interceptor of this.interceptors) {
            if (interceptor.register) {
                // options 如果在 register 拦截器中重新返回,那它就会把 options 替换掉
                const newOptions = interceptor.register(options);
                if (newOptions !== undefined) options = newOptions;
            }
        }
        return options;
    }

    _resetCompilation() {
        this.call = this._call;
        this.callAsync = this._callAsync;
        this.promise = this._promise;
    }

    _insert(item) {
        // 重置三个调用事件的方法,暂时不用管它,解析完触发流程之后就会知道它的作用。
        this._resetCompilation();
        let before;
        // 如果 before 属性存在,把它转换成 Set 数据结构
        if (typeof item.before === "string") before = new Set([item.before]);
        else if (Array.isArray(item.before)) {
            before = new Set(item.before);
        }
        let stage = 0;
        if (typeof item.stage === "number") stage = item.stage;
        let i = this.taps.length;

        while (i > 0) {
            i--;
            const x = this.taps[i];
          // 第一次遍历会添加到数组尾部。
          // taps 数组中每次都会存在相邻的两个相同的值,
          // 靠后的下标就是最后要被赋值的下标。
            this.taps[i + 1] = x;
            const xStage = x.stage || 0;
          // 如果碰到传入 before 中有当前 name 的,就继续遍历,直到把 before 全部清空。
            if (before) {
                if (before.has(x.name)) {
                    before.delete(x.name);
                    continue;
                }
            // 如果 before 中的值没被删干净,
            // 新加入的事件回调最终会在最前面执行。
                if (before.size > 0) {
                    continue;
                }
            }
          // 如果当前 stage 大于传入的 stage,那么继续遍历。
            if (xStage > stage) {
                continue;
            }
            i++;
            break;
        }
        // 循环结束的时候 i 已经是要赋值的那个下标了。
        this.taps[i] = item;
    }
}
  ...
}
...
触发
注册流程并没有什么特殊之处,主要目的无非是把包含事件回调的配置对象放入一个数组中存储并进行排序;而下来的触发流程,其主体思想是执行编译拼接成的静态脚本,这样可能会更加快速,具体可以看 #86。
通过上文我们了解到 call 方法是在 Hook 类中定义的,在 Hook 类的构造函数中我们看到 call 方法的值是 _call 方法。
// tapable/lib/Hook.js
...
class Hook {
    constructor(args) {
    ...
        this.call = this._call;
    ...
    }
  ...
}
...
在 Hook 类文件的最下方找到下面代码,会发现 _call 方法是通过 Object.defineProperties 定义到 Hook.prototype 上的,它的值是通过 createCompileDelegate 函数返回的。
// tapable/lib/Hook.js
...
function createCompileDelegate(name, type) {
    return function lazyCompileHook(...args) {
        this[name] = this._createCall(type);
        return this[name](...args);
    };
}

Object.defineProperties(Hook.prototype, {
    _call: {
        value: createCompileDelegate("call", "sync"),
        configurable: true,
        writable: true
    },
  ...
});
createCompileDelegate 函数返回的最终结果:
this._call = function lazyCompileHook(...args) {
    this.call = this._createCall('sync');
    return this.call(...args);
};
在 _call 方法执行之后,会去调用 _createCall 方法,_createCall 方法内部又会调用 compile 方法。
// tapable/lib/Hook.js
...
class Hook {
  ...
    compile(options) {
        // 提示必须在子类中重写 compile 方法
        throw new Error("Abstract: should be overriden");
    }

    _createCall(type) {
        return this.compile({
            taps: this.taps,
            interceptors: this.interceptors,
            args: this._args,
            type: type
        });
    }
  ...
}
...
但是,我们看到 Hook 类中的 compile 方法里面是抛出错误的逻辑,提示我们必须要在子类中重写这个方法,因此我们需要到 SyncHook 类中查看重写 Hook 类的 compile 方法。
// tapable/lib/SyncHook.js
...
class SyncHook extends Hook {
  ...
    compile(options) {
        factory.setup(this, options);
        return factory.create(options);
    }
}
...
可以看到 compile 内部使用了 factory.create 来返回值,到此我们先停一停,回过头来看 Hook 类中的 _createCall 方法,它的返回值(compile 我们并没有分析完,但是从它的名字也能看出来,它会编译生成静态脚本)最终会赋值给 call 方法,也就是说在第二次及之后执行 call 方法会直接执行已经编译好的静态脚本,这里用到了惰性函数来优化代码的运行性能。
class Hook {
    constructor(args) {
        // 第一次执行的时候 call 还是等于 _call 的。
        this.call = this._call;
    }
}

this._call = function lazyCompileHook(...args) {
    // 第二次执行的时候,call 已经是 this._createCall(...) 返回的已经编译好的静态脚本了。
    this.call = this._createCall('sync');
    return this.call(...args);
};
至 compile 方法为止,我们来看下 call 方法的流程图:

另外,我们在解析注册流程时,在添加事件回调的 _insert 方法开头处看到了 _resetCompilation 方法,当时并没有谈到它的作用,但是在大致解析了 call 方法之后,我们可以谈一谈了。
...
class Hook {
    ...
  _resetCompilation() {
        this.call = this._call;
    ...
    }

    _insert(item) {
        this._resetCompilation();
    ...
  }
  ...
}
...
可以看到,在 _resetCompilation 方法内部把 call 方法的值重置成了 _call 方法,这是因为我们执行 call 方法时执行的是编译好的静态脚本,所以如果注册事件回调时不重置成 _call 方法,那么因为惰性函数的缘故,执行的静态脚本就不会包含当前注册的事件回调了。
编译
我们多次提到了编译生成的静态脚本,那它到底是如何编译?又长什么样呢?为了揭开这个神秘面纱,让我们重新回到 SyncHook 中的 compile 方法中去,它内部使用到了 factory 变量,这个变量是实例化 SyncHookCodeFactory 类的结果,而 SyncHookCodeFactory 类继承自 HookCodeFactory 类。
// tapable/lib/SyncHook.js
...
class SyncHookCodeFactory extends HookCodeFactory {
    content({ onError, onDone, rethrowIfPossible }) {
        return this.callTapsSeries({
            onError: (i, err) => onError(err),
            onDone,
            rethrowIfPossible
        });
    }
}

const factory = new SyncHookCodeFactory();

class SyncHook extends Hook {
  ...
    compile(options) {
        factory.setup(this, options);
        return factory.create(options);
    }
}
...
接下来我们来看下 SyncHookCodeFactory 是如何被实例化的,SyncHookCodeFactory 本身并没有构造函数,我们向上查看它的父类 HookCodeFactory。HookCodeFactory 类的构造函数就是声明了一些属性,并没有什么特殊之处,另外 config 在目前版本的 Tapable 代码中并没有用上,所以不用管它。
// tapable/lib/HookCodeFactory.js
class HookCodeFactory {
    constructor(config) {
        this.config = config;
        this.options = undefined;
        this._args = undefined;
    }
}
...
我们继续看 compile 方法,它内部调用了 factory 的 setup 方法和 create 方法,这两个方法都在 HookCodeFactory 类中。我们先看 setup 方法,在调用时,instance 接收的是 SyncHook 的实例,options 接收的是 Hook 类中 _createCell 方法中传入的对象。
class HookCodeFactory {
  ...
    // factory.setup(this, options);
    // 注释中的 this 都是 SyncHook 的实例
    // instance = this
    // options = {
    //  taps: this.taps,
    //  interceptors: this.interceptors,
    //  args: this._args,
    //  type: type
    // }
    setup(instance, options) {
        instance._x = options.taps.map(t => t.fn);
    }
  ...
}
setup 方法内部的逻辑是把 taps 数组中的配置对象转换成只包含事件回调的数组并返回给 SyncHook 实例的 _x 属性,这个 _x 属性会在静态脚本内部派上大用场,我们之后再看。
接下来,我们来看 create 方法,compile 方法最终返回的就是这个方法执行后结果。我们最主要关心的是使用 new Function 来创建函数的这一段逻辑,这正是 Tapable 的核心所在,也就是它生成了静态脚本。
class HookCodeFactory {
  ...
    create(options) {
        // 初始化
        this.init(options);
        let fn;
        switch (this.options.type) {
            case "sync":
                fn = new Function(
                    this.args(),
                    '"use strict";\n' +
                        this.header() +
                        this.content({
                            onError: err => `throw ${err};\n`,
                            onResult: result => `return ${result};\n`,
                            resultReturns: true,
                            onDone: () => "",
                            rethrowIfPossible: true
                        })
                );
                break;
      ...
        }
        // 清除初始化的操作
        this.deinit();
        return fn;
    }

  init(options) {
        this.options = options;
        // 复制一份事件回调参数声明数组
        this._args = options.args.slice();
    }

    deinit() {
        this.options = undefined;
        this._args = undefined;
    }
  ...
}
new Function 的第一个参数是函数需要的形参,这个形参接收是用 , 分隔的字符串,但是实例化 SyncHook 类时传入的参数声明是数组类型,因此通过 args 方法拼接成字符串;args 方法接收一个对象,对象中有 before 和 after,before 主要用于拼接 context,after 主要用于拼接回调函数(例如 callAsync 传入的回调函数)。
class HookCodeFactory {
  ...
    args({ before, after } = {}) {
        let allArgs = this._args;
        if (before) allArgs = [before].concat(allArgs);
        if (after) allArgs = allArgs.concat(after);
        if (allArgs.length === 0) {
            return "";
        } else {
            return allArgs.join(", ");
        }
    }
    ...
}
new Function 的第二个参数便是函数体了,它是由 header 方法和 content 方法执行的结果拼接而成,我们先看 header 方法,它内部就是声明了一些之后需要用到变量,比如 _context 就是存储 context 的对象,当然 _context 是对象还是 undefined,取决于 taps 的配置对象是否启用了 context,启用那么 _context 就是对象了。
另外,_x、_taps 和 _interceptors 的值实际上都是 SyncHook 类的实例上对应的属性。这边的 this 因为 new Function 生成的函数最终是赋值给 SyncHook 类的实例的 call 方法,所以是指向 SyncHook 类的实例的。
class HookCodeFactory {
  ...
    header() {
        let code = "";
        if (this.needContext()) {
            code += "var _context = {};\n";
        } else {
            code += "var _context;\n";
        }
        code += "var _x = this._x;\n";
        if (this.options.interceptors.length > 0) {
            code += "var _taps = this.taps;\n";
            code += "var _interceptors = this.interceptors;\n";
        }
        for (let i = 0; i < this.options.interceptors.length; i++) {
            const interceptor = this.options.interceptors[i];
            if (interceptor.call) {
                code += `${this.getInterceptor(i)}.call(${this.args({
                    before: interceptor.context ? "_context" : undefined
                })});\n`;
            }
        }
        return code;
    }

    needContext() {
        // 找到一个配置对象启用了 context 就返回 true
        for (const tap of this.options.taps) if (tap.context) return true;
        return false;
    }
    ...
}
最后就是 content 方法了,这个方法并不在 HookCodeFactory 类中,因此我们前往继承它的子类,也就是 SyncHookCodeFactory 类中查看。
// tapable/lib/SyncHookCodeFactory.js
...
class SyncHookCodeFactory extends HookCodeFactory {
    // {
    //  onError: err => `throw ${err};\n`,
    //  onResult: result => `return ${result};\n`,
    //  resultReturns: true,
    //  onDone: () => "",
    //  rethrowIfPossible: true
    // }
    content({ onError, onDone, rethrowIfPossible }) {
        return this.callTapsSeries({
            onError: (i, err) => onError(err),
            onDone,
            rethrowIfPossible
        });
    }
}
...
从上面代码中可以看到 content 方法内部调用了 HookCodeFactory 类的 callTapsSeries 方法,我们需要继续返回到 HookCodeFactory 类中。这边有点绕的缘故在于:不同的钩子它们的拼接逻辑是不一样的,因此需要在子类中定义 content 方法,让子类自己去写拼接的逻辑。
下面是 callTapsSeries 方法的主体逻辑,其他跟 SyncHook 不相关的代码我给去掉了。
// tapable/lib/HookCodeFactory.js
class HookCodeFactory {
  ...
    // {
    //  onDone: () => ""
    // }
    callTapsSeries({
        onDone,
    }) {
        if (this.options.taps.length === 0) return onDone();
        let code = "";
        let current = onDone;
        // 从后向前遍历
        for (let j = this.options.taps.length - 1; j >= 0; j--) {
            const i = j;
            // current 第一次的值是传入的 onDone 函数,之后每次都是上一次拼接结果的箭头函数,
            // 这样能够保证整体的事件回调是按照顺序拼接的。
            const done = current;
            const content = this.callTap(i, {
                onDone: done,
            });
            current = () => content;
        }
        code += current();
        return code;
    }
  ...
}
...
每个事件回调的调用代码都是通过 callTap 方法拼接的,下面是它的代码:
class HookCodeFactory {
  ...
    callTap(tapIndex, { onDone }) {
        let code = "";
        code += `var _fn${tapIndex} = ${this.getTapFn(tapIndex)};\n`;
        const tap = this.options.taps[tapIndex];
        switch (tap.type) {
            case "sync":
                // 拼接调用代码
                code += `_fn${tapIndex}(${this.args({
                    before: tap.context ? "_context" : undefined
                })});\n`;
                if (onDone) {
                    code += onDone();
                }
                break;
        }
        return code;
    }
  ...
}在所有的事件回调都遍历之后,callTapsSeries 方法中的 current 变量的值会类似下面这样,current 执行之后就会得到执行事件回调的脚本了。
// 3.最终 current 的值
current = () => {
var code = `
var _fn0 = _x[0];
_fn0(name);
`
// 2.第二次循环 current 的值
code += () => {
var code = `
var _fn1 = _x[1];
_fn1(name);
`;
// 1.第一次循环 current 的值
code += () => {
var code = `
var _fn2 = _x[2];
_fn2(name);
`;
return code;
};
return code;
};
return code;
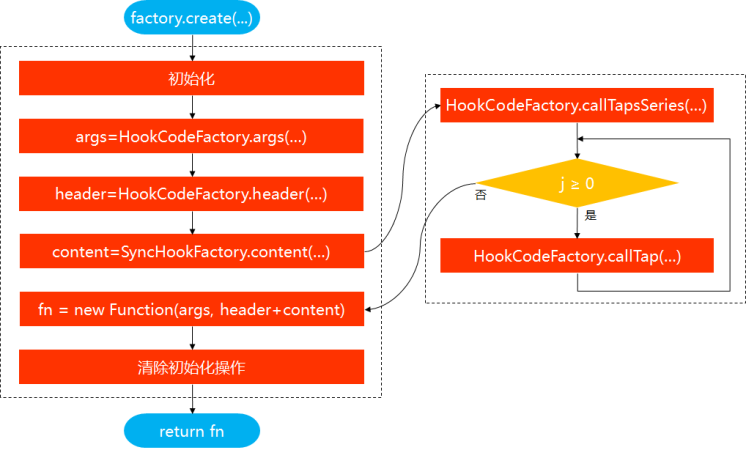
}到此为止,函数体解析完毕,这也就代表着静态脚本已经全部拼接,下面是拼接好的一份静态脚本示例:
// 静态脚本
(function anonymous(name) {
  "use strict";
  var _context;
  var _x = this._x;
  var _fn0 = _x[0];
  _fn0(name);
  var _fn1 = _x[1];
  _fn1(name);
  var _fn2 = _x[2];
  _fn2(name);
})
剩下的事,便是把 new Function 生成的函数返回给 call 方法,然后让 call 方法去执行静态脚本了。我们通过流程图来回顾一下创建静态脚本的过程:
总结
实际上我只是介绍了 Tapable 大部分主要的使用方式,像 MultiHook 之类的钩子或者方法并没有说明,这是因为文章的主要内容还是在于钩子类的使用以及下半部分原理解析相关,因此我只需要把它们涉及到的 API 和概念讲解清楚便可,详细的使用方式可以看 Tapable Github 的 README.md。
原理解析部分我把 SyncHook 钩子类作为入口,一步步深入解析了整个注册和触发流程,最让人印象深刻的便是 Tapable 的编译生成静态脚本了。在大体流程了解之后,如果想要了解其他钩子类,我建议可以先调试把静态脚本取出来,看看它生成的是什么脚本,这样反推会更容易理解代码。
