

SwiftUI介绍
SwiftUI is a modern way to declare user interfaces for any Apple platform. Create beautiful, dynamic apps faster than ever before.
环境依赖:
- Xcode 11 (Download from Apple)
- iOS 13 / macOS 10.15 / tvOS 13 / watchOS 6
- macOS Catalina in order to have SwiftUI render in the canvas (Download from Apple)
语法设计
随着整个软件开发领域的发展,近年来涌现的 React Native ,Weex,Flutter技术,逐渐证明了一个事实:在 UI 开发领域,描述性语言是最佳方式。 SwiftUI使用易于阅读和编写的声明式 Swift 语法,创建了一个非常接近HTML 描述语言的 DSL(domain-specific language)。 苹果一直在尝试所见即所得的理念,早期 xib 到 stroyboard,但是发展的都不大顺畅。
简单对比一下其他语法:
SwiftUI
VStack {
    Text("a1")
    Text("a2")
    Text("a3")
}
Flutter
Stack(
        children: <Widget>[
                 Text("a1"),
                 Text("a2"),
                 Text("a3"),
         ],
)
HTML
<div>
  <label>a1</label>
  <label>a2</label>
  <label>a3</label>
</div>
- HTML,界面描述能力最好,但是缺乏编程能力
- Flutter,具有很强的编程能力,函数调用里的 ,、{}的符号的存在,布局代码观感不大好。
Xcode 11新技能
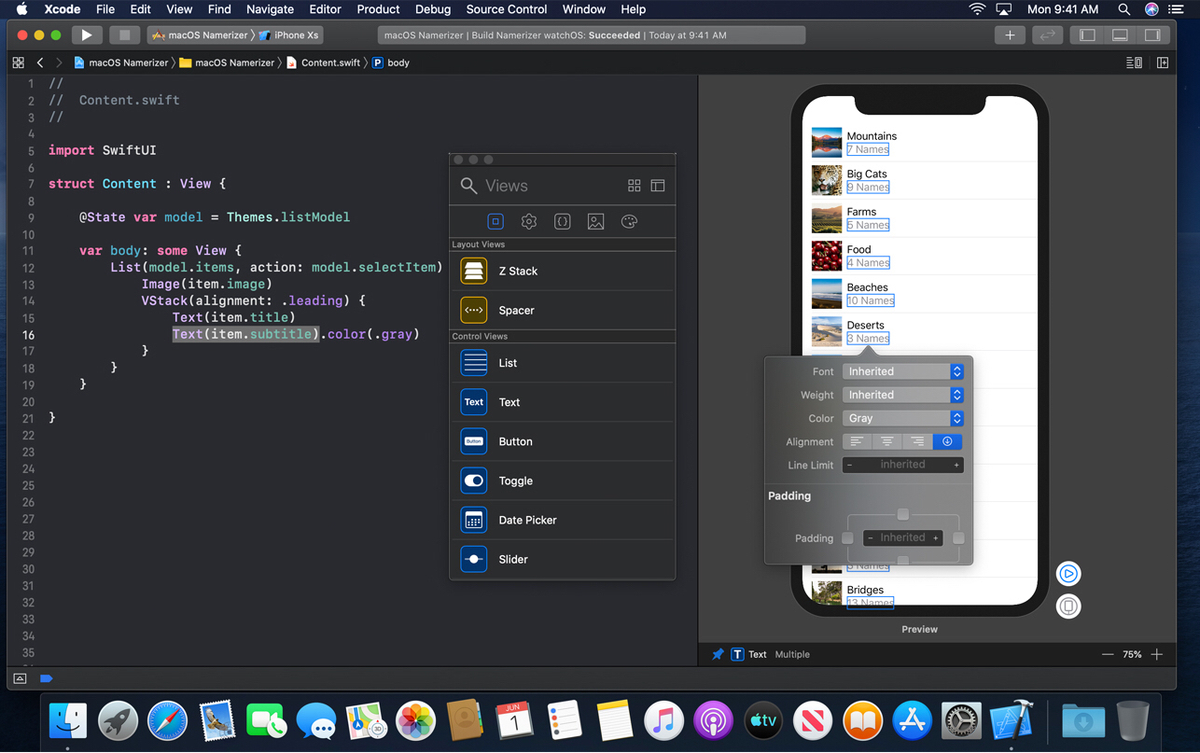
拖放: 只需拖动画布上的控件即可在用户界面中排列组件。单击打开检查器可以拖具体控件,也可以拖控件的字体、颜色、圆角、对齐方式等属性。代码中可以任意拖,但是画布只能拖控件,不能拖属性。画布相关修改后,代码中自动生成。
cmd+鼠标左键,呼出快速操作,不仅在代码中支持,预览画布中也支持,Inspect功能很强大。

预览: 右上角:Editor and Canvas,快捷键:shift + cmd + enter。 现在你可以为任何 SwiftUI 视图创建一个或多个预览,以获取示例数据并配置几乎所有用户可能看到的内容,诸如大字体、本地化或黑暗模式。预览还可以显示你的 UI 在任何设备和任何方向上的效果。 预览 是 Apple 用来对标 RN 或者 Flutter 的 Hot Reloading 的开发工具。 Xcode会自动刷新,也可以手动刷新,快捷键:option + cmd + P
基础控件
简单排列Label、Button、Image:
struct ViewsTest: View {
    var body: some View {
        VStack {
            Text("Label")
                .foregroundColor(Color.orange)
                .font(Font.system(size: 17))
            Button(action: {
                print("click")
            }) {
                Text("Button")
            }
            Image("image_write")
                .onTapGesture {
                    print("image click")
            }
        }
    }
}
struct ViewsTest_Previews: PreviewProvider {
    static var previews: some View {
        ViewsTest()
    }
}
View协议的定义:
public protocol View {
    /// The type of view representing the body of this view.
    ///
    /// When you create a custom view, Swift infers this type from your
    /// implementation of the required `body` property.
    associatedtype Body : View
    /// Declares the content and behavior of this view.
    var body: Self.Body { get }
}
PreviewProvider协议定义:
public protocol PreviewProvider : _PreviewProvider {
    /// The type of the previews variable.
    associatedtype Previews : View
    /// Generates a collection of previews.
    static var previews: Self.Previews { get }

    /// Returns which platform to run the provider on.
    ///
    /// When `nil`, Xcode infers the platform based on the file the
    /// `PreviewProvider` is defined in. This should only be provided when the
    /// file is in targets that support multiple platforms.
    static var platform: PreviewPlatform? { get }
}
_PreviewProvider协议的定义就看不到源码了。
some View 这种写法使用了 Swift 5.1 的 Opaque return types 特性。它向编译器作出保证,每次 body 得到的一定是某一个确定的,遵守 View 协议的类型,但是请编译器“网开一面”,不要再细究具体的类型。类似于OC id。
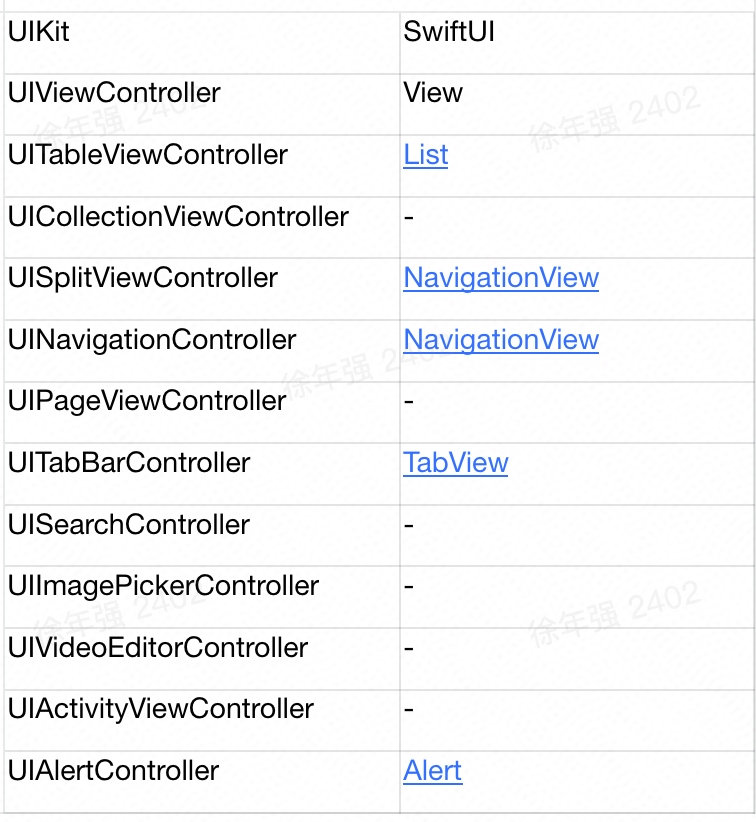
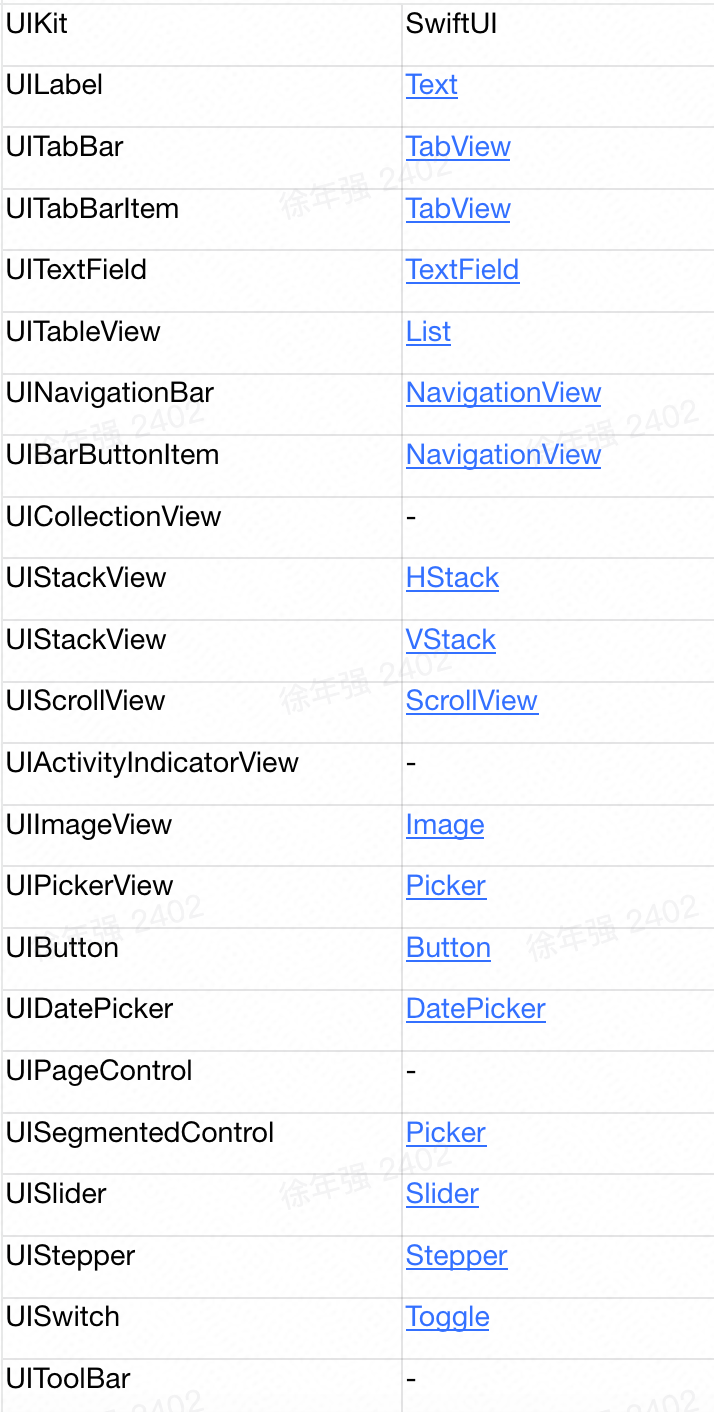
UIKit与SwiftUI相同功能组件对比:
View Controllers
布局
先上代码:
        VStack(alignment: .center, spacing: 10) {
            Text("a")
            Text("b")
            HStack(alignment: .top, spacing: 20) {
                Text("c")
                Text("d")
            }
        }
a、b、(c、d)垂直排列,c、d水平排列。
HStack:用于将子视图在水平线上依次排列 VStack:用于将子视图在垂直线上依次排列 ZStack:用于将子视图在垂直于屏幕线上依次排列,可以实现覆盖子视图。类似在 UIKit中向一个 View添加不同的 SubView。 支持各种Stack的嵌套。
看下VStack的定义:
public struct VStack<Content> : View where Content : View {
    /// Creates an instance with the given `spacing` and Y axis `alignment`.
    ///
    /// - Parameters:
    ///     - alignment: the guide that will have the same horizontal screen
    ///       coordinate for all children.
    ///     - spacing: the distance between adjacent children, or nil if the
    ///       stack should choose a default distance for each pair of children.
    @inlinable public init(alignment: HorizontalAlignment = .center, spacing: CGFloat? = nil, @ViewBuilder content: () -> Content)
}
我们发现返回值是Content协议类型,并使用@ViewBuilder进行标记。这里使用了 Swift 5.1 的另一个新特性:Funtion builders。
这个新特性的大概预览:
// Original source code:
@TupleBuilder
func build() -> (Int, Int, Int) {
  1
  2
  3
}
// This code is interpreted exactly as if it were this code:
func build() -> (Int, Int, Int) {
  let _a = 1
  let _b = 2
  let _c = 3
  return TupleBuilder.buildBlock(_a, _b, _c)
}
ViewBuilder的定义为:
@_functionBuilder public struct ViewBuilder {
    /// Builds an empty view from an block containing no statements, `{ }`.
    public static func buildBlock() -> EmptyView
    /// Passes a single view written as a child view (e..g, `{ Text("Hello") }`) through
    /// unmodified.
    public static func buildBlock<Content>(_ content: Content) -> Content where Content : View
}
使用 @_functionBuilder 进行标记的类型 (这里的 ViewBuilder),可以被用来对其他内容进行标记。
HStack调用等效伪代码,不能实际编译:
HStack(alignment: .center,spacing: 20) { viewBuilder -> Content in
    let text1 = Text("c")
    let text2 = Text("d")
    return viewBuilder.buildBlock(text1, text2)
}
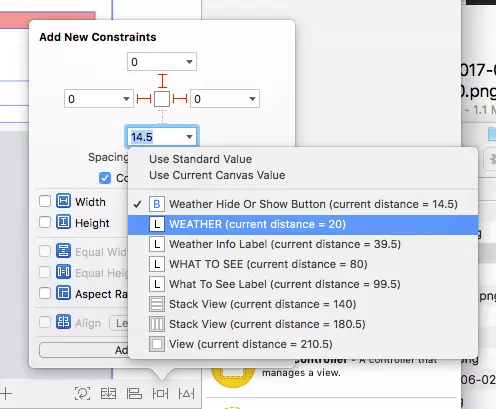
Stack类似OC UIStackView,没用过? 看这个:
控件优先级:
如果两个控件需要设置哪个优先展示,使用布局优先级 .layoutpriority(1) ,数字越大,优先级越高
HStack(alignment: .lastTextBaseline, spacing: 10) { // alignment对齐方式,spacing控件间距
            Text("Hello").layoutPriority(100)
            Text("哈哈哈").layoutPriority(20).alignmentGuide(.lastTextBaseline) { d in
                d[.bottom] * 0.5
            }
            Text("World").layoutPriority(10)
        }
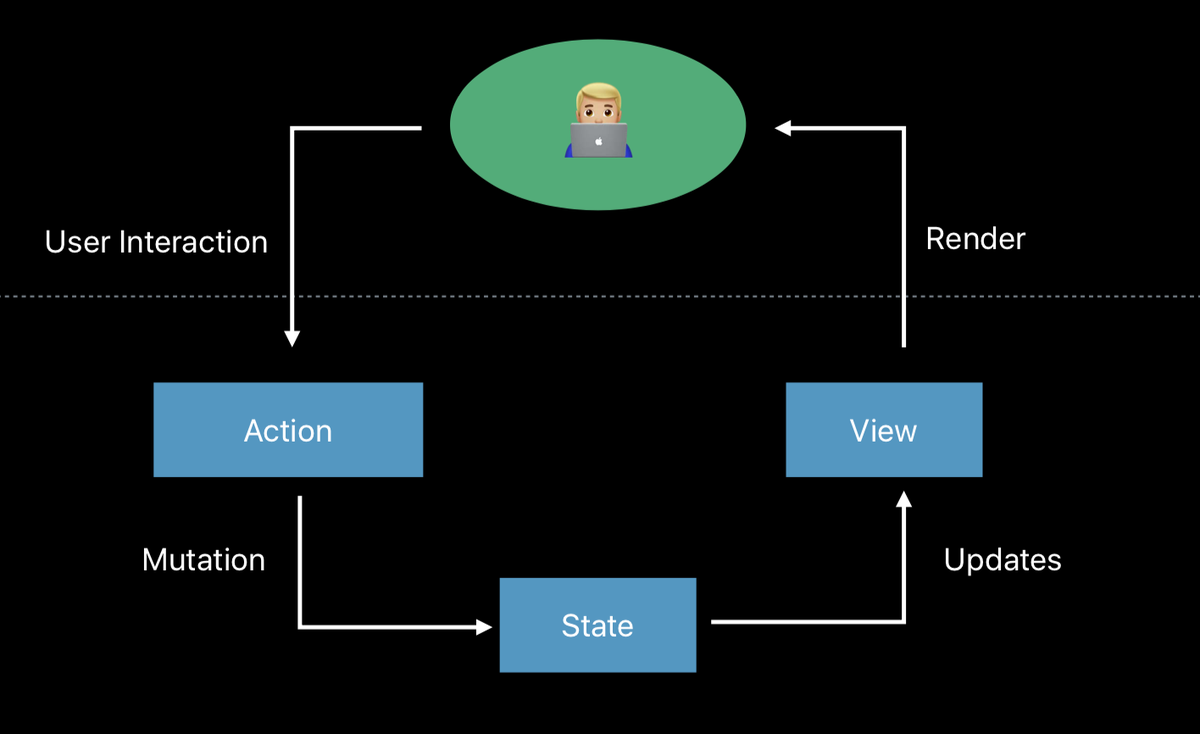
数据绑定
系统提供Combine 库,类比 reactive-cocoa,rxSwift 库。
@State @Binding @EnvironmentObject @ObservedObject 等一系列的Combine提供的功能,支持实现数据绑定,view自动更新数据。
Combine 的链式调用和 SwiftUI 组件里的 ViewModifier 虽然形似但内核是不一样的,Combine 本身就是数据流处理的模式;而 SwiftUI 里链式调用只是为了形式上返回单一对象。
@State
定义一个响应式状态,它的变化会导致依赖它的视图自动更新(单向)
示例:点击play按钮,label自动计数
struct DataFlowTest: View {
    @State var number : Int = 0
    var body: some View {
        VStack {
            Text("play number is : \(self.number)")
            Button(action: {
                self.number += 1
            }) {
                Text("Play")
            }
        }
    }
}
@Binding
视图和数据的双向绑定。 传递参数使用'$'符号
struct DataFlowTest: View {
    @State var number : Int = 0
    var body: some View {
        VStack {
            Text("play number is : \(self.number)")
            PlayButton(count: $number)
        }
    }
}
struct PlayButton : View {
    @Binding var count : Int
    var body: some View {
        Button(action: {
            self.count += 1
        }) {
            Text("Play")
        }
    }
}
ObservableObject(之前版本用BindableObject)
自定义绑定类型不能使用@Binding,需要使用@ObservedObject(之前使用@ObjectBinding) 作用等价于 @Binding,但是支持使用一个外部对象。
Xcode 11 beta 5 : BindableObject protocol is become ObservableObject and willChange become objectWillChange.
class UserData: ObservableObject {
    let objectWillChange = PassthroughSubject<Void, Never>() // 注意:变量名必须是这个objectWillChange
    var userName = "no name" {
        willSet {
            objectWillChange.send()
        }
    }
}
struct DataFlowTest: View {
    @State var userData = UserData()
    var body: some View {
        VStack {
            Text("user name is : \(self.userData.userName)")
            PlayButton(userModel: userData)
        }
    }
}
struct PlayButton : View {
    @ObservedObject var userModel: UserData
    var body: some View {
        Button(action: {
            self.userModel.userName = "Tom"
        }) {
            Text("Play")
        }
    }
}
EnvironmentObject
用于实现单个model绑定多个view

1.使用environmentObject()绑定同一个对象userModel
struct ContentView: View {
    let userModel = UserData()
    var body: some View {
        NavigationView {
            List {
                Section() {
                    NavigationLink(destination: DataFlowModelTest().environmentObject(userModel)) {
                        Text("DataFlow model")
                    }
                    NavigationLink(destination: DataFlowModelTest2().environmentObject(userModel)) {
                        Text("DataFlow model 2")
                    }
                }
            }
        }
    }
}
2.使用@EnvironmentObject标记所要绑定的对象
这时候修改某个view中的UserData对象,其他view的值自动变换
struct DataFlowModelTest: View {
    @EnvironmentObject var userModel : UserData
    var body: some View {
        VStack {
            Text("change name :\(userModel.userName)")
            Button(action: {
                self.userModel.userName = "tom"
            }) {
                Text("change name")
            }
        }
    }
}
动画
在 SwiftUI 中,做动画变的十分简单。
直接在 View 上使用 .animation modifier
@inlinable public func animation(_ animation: Animation?) -> some View
@State var showDetail = false
 var body: some View {
    Button(action: {
        self.showDetail.toggle()
    }) {
        Image("image_write")
            .imageScale(.large)
            .rotationEffect(.degrees(showDetail ? 90 : 0))
            .animation(.linear(duration: 10))
            .animation(nil)
            .scaleEffect(showDetail ? 3 : 1)
            .padding()
            .animation(.spring())
    }
}
SwiftUI 做的事情等效于是把之前的所有 modifier 检查一遍,然后找出所有满足 Animatable 协议的 view 上的数值变化,比如角度、位置、尺寸等,然后将这些变化打个包,创建一个事务 (Transaction) 并提交给底层渲染去做动画。
使用 withAnimation {} 来控制某个 State,进而触发动画。
withAnimation() 接受一个指定所需动画类型的参数。 比如,按钮点击后,字体颜色2s时间变化为黄色:
@State var bgColor = Color.green
var body: some View {
    Button(action: {
       withAnimation(.easeInOut(duration: 2)) {
           self.bgColor = Color.orange
       }
    }) {
       Text("change color")
        .background(bgColor)
    }
}
这个方法相当于把一个 animation 设置到 View 数值变化的 Transaction 上,并提交给底层渲染去做动画。
转场动画
@inlinable public func transition(_ t: AnyTransition) -> some View
view支持直接调用.transition,即可实现转场动画。系统提供offset、scale、opacity、slide、move等。
      ShowDetailView()
         .transition(.slide)
自定义转场动画:
extension AnyTransition {
    static var customTransition: AnyTransition {
        let insertion = AnyTransition.move(edge: .trailing)
            .combined(with: .opacity)
        let removal = AnyTransition.scale
            .combined(with: .opacity)
        return .asymmetric(insertion: insertion, removal: removal) // insertion:入场动画,removal:出场动画
    }
}
        // 调用,跟系统的一样
     ShowDetailView()
        .transition(.customTransition)
与UIKit交互
UIKit中加载SwiftUI的View
UIHostingController
Use the UIHostingController to bridge SwiftUI views into a UIKit view and view controller hierarchy.
UIHostingController 是一个 UIViewController 子类,它将负责接受一个 SwiftUI 的 View 描述并将其用 UIKit 进行渲染 (在 iOS 下的情况)。UIHostingController 就是一个普通的 UIViewController,因此完全可以做到将 SwiftUI 创建的界面一点点集成到已有的 UIKit app 中,而并不需要从头开始就是基于 SwiftUI 的构建。
eg:设置rootViewController为swiftUI的view,需要使用UIHostingController构建
window.rootViewController = UIHostingController(rootView: ContentView())
SwiftUI中加载UIKit的View、ViewController
SwiftUI的View中加载UIKit的View
UIViewRepresentable
Use the UIViewRepresentable protocol to bridge UIKit views into SwiftUI, not view controllers.
比如SwiftUI中需要加载WebView,SwiftUI是没有WebView控件的,而WebKit的WKWebView是继承自UIView,所以需要使用UIViewRepresentable中转。
struct WebViewTestRepresentable : UIViewRepresentable {
    typealias UIViewType = WKWebView

    func makeUIView(context: UIViewRepresentableContext<WebViewTestRepresentable>) -> WebViewTest.UIViewType {
        return WKWebView()
    }

    func updateUIView(_ uiView: WebViewTest.UIViewType, context: UIViewRepresentableContext<WebViewTestRepresentable>) {
        let req = URLRequest(url: URL(string: "https://www.apple.com")!)
        uiView.load(req)
    }
}

struct WebViewTestView_Previews : PreviewProvider {
    static var previews: some View {
        WebViewTestRepresentable()
    }
}
SwiftUI的view加载UIKit的UIViewController
UIViewControllerRepresentable
Create a structure that conforms to UIViewControllerRepresentable and implement the protocol requirements to include a UIViewController in your SwiftUI view hierarchy.
具体方法: 新建一个结构体,继承自UIViewControllerRepresentable,实现Protocol:创建、更新UIViewController
struct UIKitVCRepresentable : UIViewControllerRepresentable {
    func makeUIViewController(context: UIViewControllerRepresentableContext<UIKitVCRepresentable>) -> UIViewController {
        return UIKitViewController() // 返回新构建的UIViewController子类
    }
    // vc展示的时候回调,类似oc里viewWillAppear/viewDidAppear
    func updateUIViewController(_ uiViewController: UIViewController, context: UIViewControllerRepresentableContext<UIKitVCRepresentable>) {
    }
}
注意: 这种方式实现的是嵌套在SwiftUI的view中的UIViewController,类似OC中addController
最后
目前只支持苹果生态内的所有os系统,but 最近出了个支持web开发的测试项目:SwiftWebUI Swift 是开源的,跨平台运行也不是问题,以后可能会支持更多的平台。
参考
developer.apple.com/documentati… developer.apple.com/documentati… developer.apple.com/videos/play… developer.apple.com/tutorials/s… fuckingswiftui.com/ onevcat.com/2019/06/swi… swift.gg/2019/09/12/…
