前言
在前面的一文React进阶(2)-上手实践Redux-如何获取store的数据当中,已经知道组件怎么获取store的数据,并渲染到页面上,那么在该节当中揭示怎么更改store的数据,实现页面的更新
您将在本文当中学到
-
编写action代码,确定具体要做的事情,它只负责创建对象
-
改变store数据的唯一方法就是要派发action,需要通过调用store.dispatch函数
-
reducer纯函数中实现数据更新等逻辑判断操作
-
触发store,注册订阅subscribe函数,监听store数据的变化,保持页面的状态与store的同步
-
重新获取store的数据,最终实现页面数据状态的更新
......

文章内容略有些长,建议扯纸的时间阅读,比较基础,如理解有误,欢迎路过的老师多提意见和指正
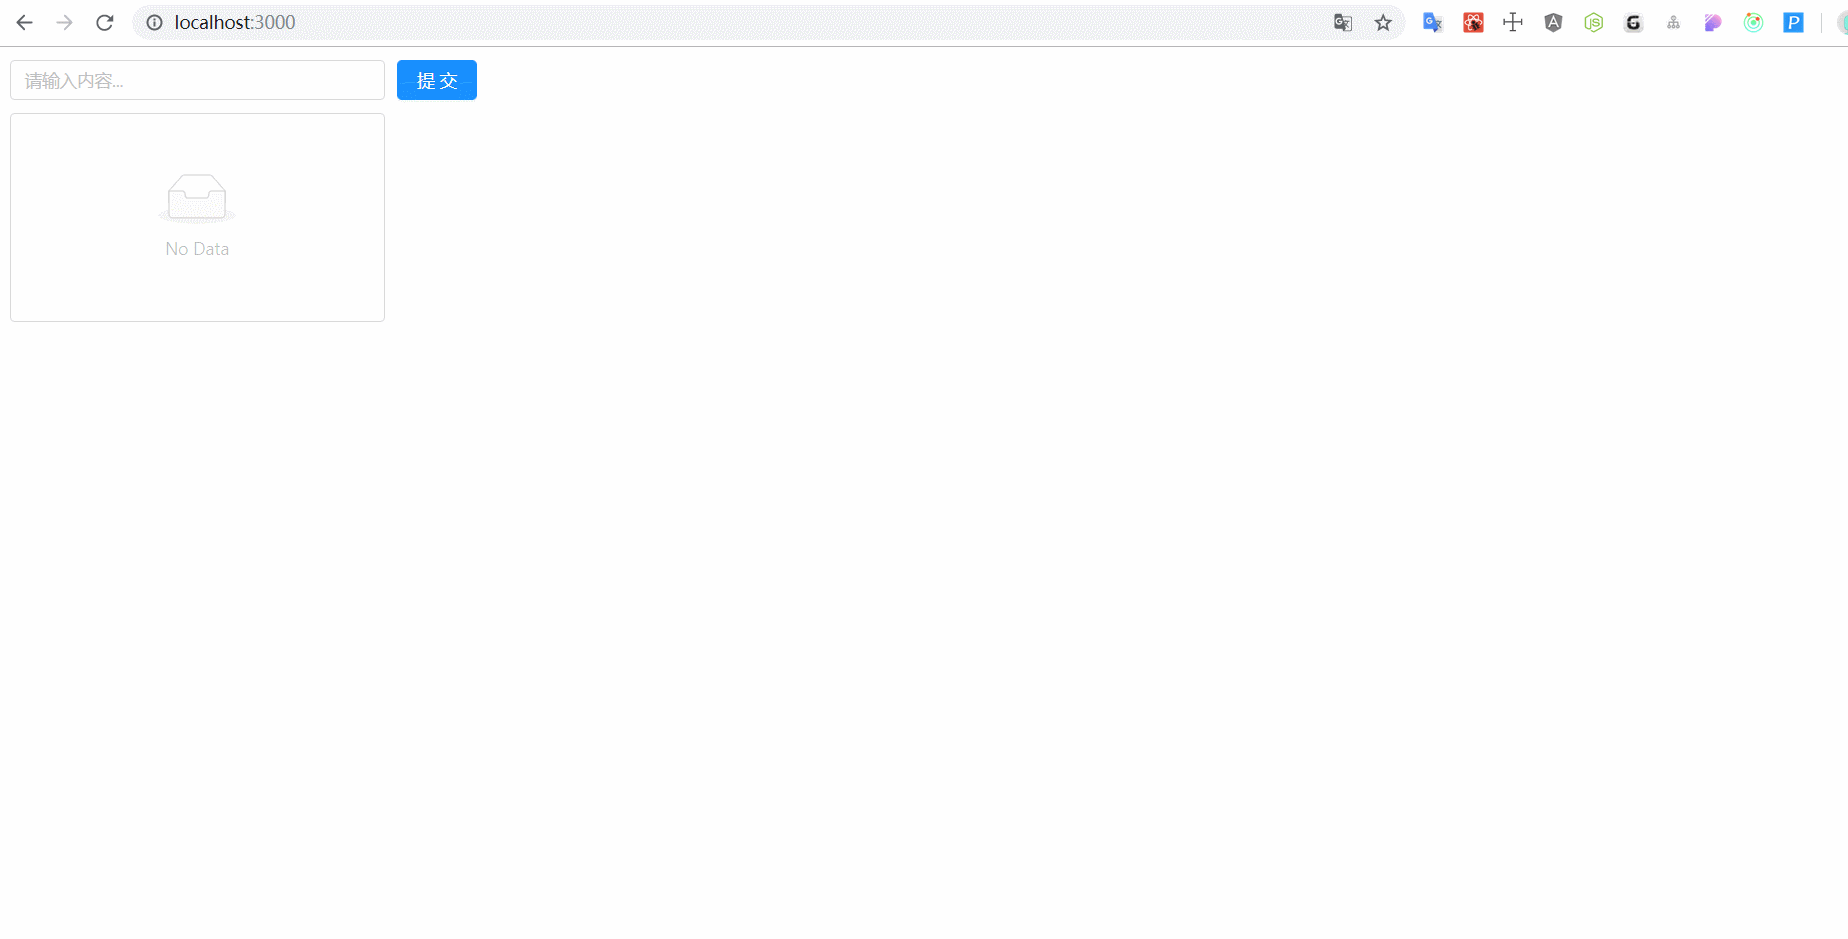
下面就一起来编写todolist的添加,删除等代码的,最终的效果图如下所示
如何改变store的数据,实现页面的更新?
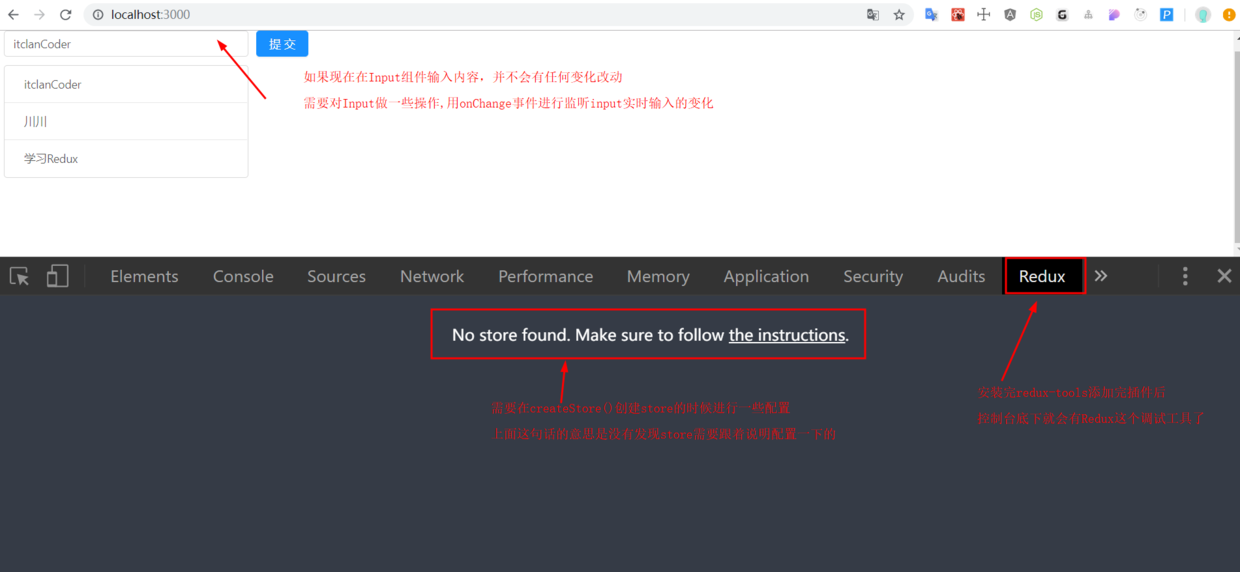
在前文的示例代码中已经知道组件怎么从store中取数据了,然而现在,如果想要更新state的数据?怎么办?
在reducer函数接收的第二个参数action就是接下来要干的事情了
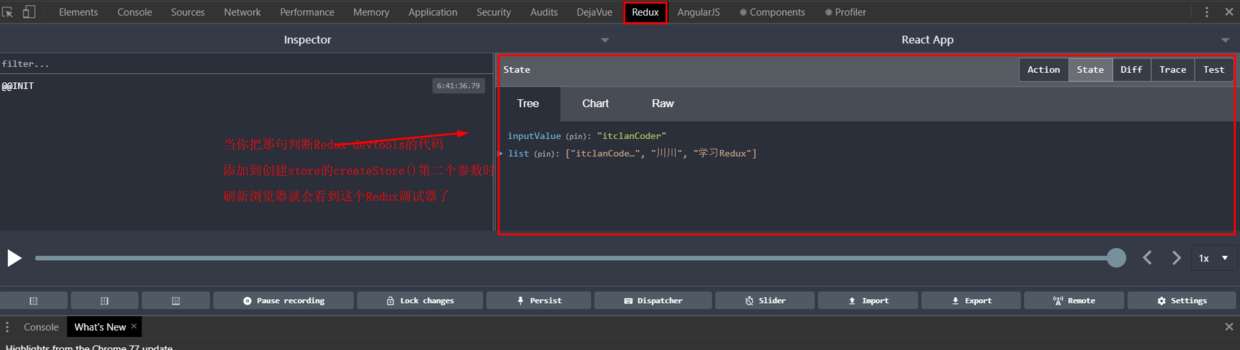
在Redux中为了能够查看store中的各个状态,在chrome浏览器需先安装一个redux Devtools这个调试工具
当然安装这个插件,需要科学上网.如果没有的话,在qq浏览器的插件市场里也是能够找得到的
qq浏览器各种插件也是应有尽有,与在chrome控制台里调试是一样的
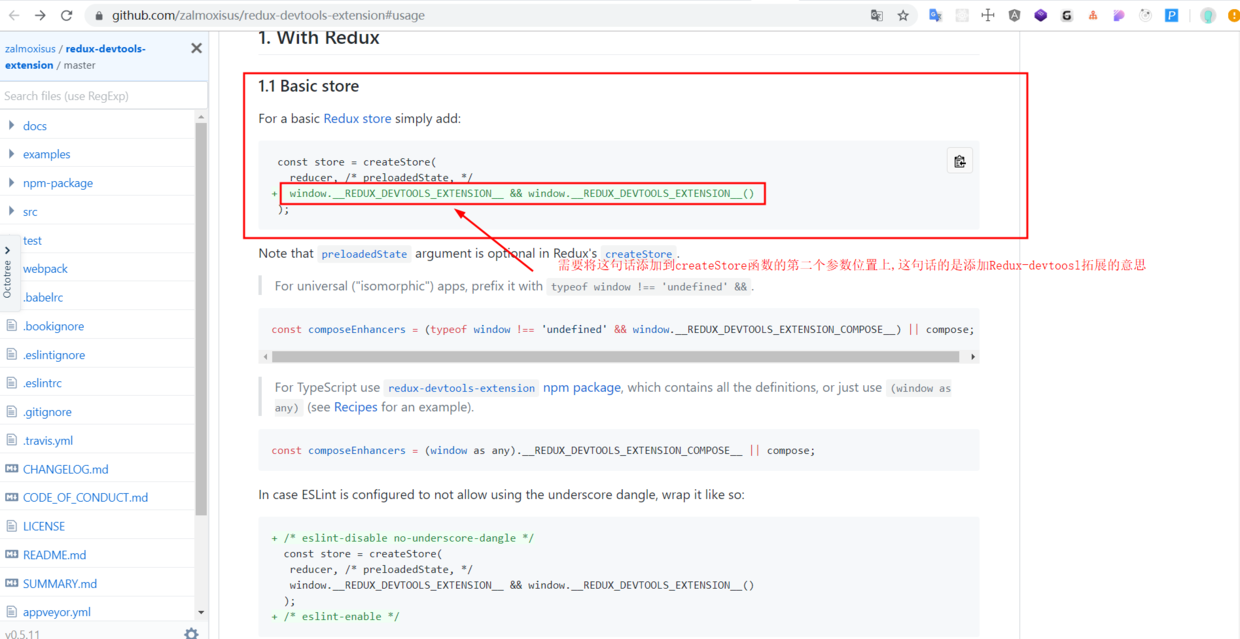
方式一:创建store的时候,进行composeEnhancers构建增强型的应用,在代码里添加配置,将window.__REDUX_DEVTOOLS_EXTENSION__ && window.__REDUX_DEVTOOLS_EXTENSION__(),这行代码配置添加到createStore()的第二个参数上
const store = createStore(reducer, window.__REDUX_DEVTOOLS_EXTENSION__ && window.__REDUX_DEVTOOLS_EXTENSION__()); // createStore第二个参数添加这个redux-devtools的配置可以开启调试功能
npm install --save redux-devtools-extension
然后在主页面入口代码里,添加redux-devtools-extension拓展,同时引入applyMiddleware应用中间件,并在componseWidthDevTools中调用,如下所示
import { createStore, applyMiddleware } from 'redux';
import { composeWithDevTools } from 'redux-devtools-extension';

const store = createStore(reducer, composeWithDevTools(
  applyMiddleware()
));
以上两种方法都可以开启Redux的调试功能,第二种方法比较强大,推荐使用,这种配置完后,在各个浏览器都是可以使用的,至于其他一些额外拓展功能的,在后续的文章中,会不断会讲到
具体更改store的实例代码如下所示:
import React from 'react';
import ReactDOM from 'react-dom';
import { Input, Button, List } from 'antd'; // 引入antd组件库
import 'antd/dist/antd.css'; // 引入antd样式

// 1. 创建一个store管理仓库,从redux库中引入一个createStore函数
import { createStore } from 'redux';

// 2. 引入createStore后,store并没有创建,需要调用createStore()后才有store
const store = createStore(reducer,window.__REDUX_DEVTOOLS_EXTENSION__ && window.__REDUX_DEVTOOLS_EXTENSION__()); // 创建好reducer后,需要将reducer作为参数传到createStore当中去,这样store才能拿到reducer的state数据

// 3. 创建reducer函数,管理组件共享的数据状态以及一些动作
// reducer是一个纯函数,返回一个新的state给store
// 4. 初始化state值,将原先组件内部的状态的数据,移除到reducer里面去管理
function reducer(state = {
    inputValue: 'itclanCoder',
    list: ['itclanCoder', '川川', '学习Redux']
}, action){
    console.log(state, action);
    if(action.type === 'handle_Input_Change'){
        // 对原有的上一次的state做一次深拷贝,在Redux中,reducer不允许直接修改state
      // const newState = Object.assign({}, state);这个Object.assign()也是一个非常常用浅拷贝的方法,与下面的方法最终实现的效果是一致的,等价于下面的方法
      // 创建了一个newState完全复制了state,通过对newState的修改避免了对state的修改
        const newState = JSON.parse(JSON.stringify(state));
        newState.inputValue = action.value; // 将新的value值赋值给newState
        return newState;
    }
    return state;
}

// TodoList组件
class TodoList extends React.Component {
    constructor(props){
        super(props);
        // 5. 在组件内部通过getState()方法就可以拿到store里面的数据
        this.state = store.getState();
        // this环境的绑定
        this.handleInputChange = this.handleInputChange.bind(this);
        this.handleStoreChange = this.handleStoreChange.bind(this);
        // 触发订阅,让store感知到state的变化
        store.subscribe(this.handleStoreChange); // 接收一个函数,重新获取store最新的数据,subscribe里面必须接收一个函数,会自动的调用this.handleStoreChange这个方法,保持store上的状态和this.state的同步,否则是会报错的,这个订阅函数放在componentWillMount或者componentDidMount生命周期函数内监听数据的变化,只要store状态发生了改变,那么就会调用这个handleStoreChange函数
    }
    // componentWillMount(){
        // store.subscribe(this.handleStoreChange);
    // }
    // 组件卸载,移除时调用该函数,一般取消,清理已注册的订阅,定时器的清理,取消网络请求,在这里面操作
    componentWillUnmount(){
        store.unsubscribe(this.handleStoreChange); // 取消订阅,清理已注册的监听
    }

    render() {
        return (
            <div style={{ margin: "10px 0 0 10px"}}>
                    <div>
                        <Input onChange={this.handleInputChange} value={this.state.inputValue} style={{ width:"300px",marginRight:"10px"}} placeholder="请输入内容..." />
                        <Button type="primary">提交</Button>
                    </div>
                    <List
                      style={{ width: '300px',marginTop:'10px'}}
                      bordered
                      dataSource={this.state.list}
                      renderItem={item => <List.Item>{item}</List.Item>}/>
            </div>
        )
    }

    handleInputChange(e){
        console.log(e.target.value);
        // 定义action,确定一个操作,动作,注意action必须遵循一定的规范,是一个对象,type字段是确定要做的动作,类型,监听表单输入框的变化,value是输入框的值
        const action = {
            type: 'handle_Input_Change',
            value: e.target.value
        }
        store.dispatch(action); // 通过store派发dispatch一个action,只有这里接收一个action,Reducer里面才能对新旧数据进行计算等操作,改变store中状态的唯一方法就是派发action

    }

    handleStoreChange(){
        console.log("handleStorechange,触发了");
        this.setState(store.getState()); // 触发setState重新获取store的数据,让input的数据与store保持同步了的
    }
}
const container = document.getElementById('root');

ReactDOM.render(<TodoList />, container);
具体的效果如下所示

再次来梳理一下更改store的数据的一个过程,经历了哪些具体操作
- 浏览器里添加redux-devtools,在创建
store的createStore()的第二个参数中添加redux-devtools插件的配置,使浏览器支持Redux查看store的各种状态
const store = createStore(reducer, window.__REDUX_DEVTOOLS_EXTENSION__ && window.__REDUX_DEVTOOLS_EXTENSION__())
- 给Input组件绑定onChange事件监听事件处理函数
定义action对象,确定动作类型,这个action必须遵循一定的规则,得是一个对象,当然在后续当中,怎么支持函数,又是另外的知识了的
- 通过store的dispatch方法,接收action对象,告知store,有action这么一个事件动作,改变store中的状态的唯一方法就是派发action
如下实例代码所示
<Input onChange={this.handleInputChange}>

handleInputChange(e){
   const action = { // 定义action,action必须是一个对象
       type: 'handle_input_change',
       value: e.target.value
   }
   store.dispatch(action); // 派发dispatch,将action传递给store
}
- 在Reducer中会接收到action,通过if等判断,确定要执行state的操作,这个reducer必须是个纯函数,要有返回值,返回的结果会返回给store,这里的state是上一次(原先)组件的状态
这里需要格外注意的是:
reducer可以接收state的值,但是不能直接修改state的值,当拿到state的数据后,需要先拷贝一份原先state的数据,在拷贝出新的数据基础上进行操作
创建了一个newState完全复制了state,通过对newState的修改避免了对state的修改
function reducer(state, action){
     if(action.type ==== 'handle_input_change'){
          // 对原有的state进行一个深拷贝,在redux中,redux是不允许直接修改state的,但可以接收state,这也是为什么当我们拿到state后,我们需要拷贝一份数据,一个新的state出来
         // const newState = Object.assign({}, state);这个Object.assign()也是一个非常常用浅拷贝的方法,与下面的方法最终实现的效果是一致的
          const newState = JSON.parse(JSON.stringify(state));
          newState.inputValue = action.value;
          return newState; // 返回新的state
     }
     return state;
}
其中值得一提的就是拷贝数据对象的方法
Object.assign({}, state)
// 等价于
JSON.parse(JSON.stringify(state));
- 当执行上述的操作后,当组件想要感知store的变化,需要在constructor函数内或者componentWillMount(在react17版本中将会被废弃)或componentDidMount生命周期函数内调用store的subscribe方法
个人推荐放在constructor或者componentDidMount中
同时它接收一个函数 这个其实是设计模式的订阅者模式,触发store的订阅,当store发生了变化,会自动的执行该函数
保持store上的状态和this.state的同步,监听数据的变化,只要store状态发生了改变,那么就会调用这个handleStoreChange函数
subscribe(listener),用于注册回调,监听state的变化
store.subscribe(this.handleStoreChange) // 这里面接收一个listen函数,主要用来获取新的store,这句代码放在constructor或者componentwillMount以及componentDidMount中都是可以的
handleStoreChange(){
    this.setState(store.getState())
}
- 最后在组件移除时,销毁时,在componentWillUnmount中取消store的订阅事件
// 组件卸载,移除时调用该函数,一般取消,清理已注册的订阅,定时器的清理,取消网络请求,在这里面操作
    componentWillUnmount(){
        store.unsubscribe(this.handleStoreChange);
    }
通过以上六个步骤,就完成了一次store的更新操作
你可以联想到我们之前举到的那个换房的例子的,租户(组件)怎么获取拿到房源具体信息,首先房产中介经理会从内部的系统(redux)中,引入一个createStore的方法,进而创建一个store的仓库,随之创建一个实时记录本(reducer)
真正的新老房信息的变更操作都是在reducer这个函数中完成的,并且它是一个纯函数,必须要有返回值
在Reducer函数中,接收两个参数,第一个是上一次组件的状态值,而第二个是组件具体的动作action,具体要干的什么事情
在reducer中,规定只能读取state的数据,并不能直接修改state的数据,而且返回的结果是根据state与action(用户指定的动作)共同决定
其最新的结果返回给房产中介经理手中(store),在reducer创建完之后,必须要将reducer作为参数,让createStore函数接收,这样store才真正的拥有了state的数据
那么此刻,租户(组件)想要获取房源信息,则引入store,在一开始constructor函数或者componentWillMount函数中,调用getState()方法,从而获得了state的数据,最终显示到页面上
而如果想要更改store的数据,租户想要换携带有沙发,电视等大房子,这个具体的动作就是action,首先换房子是一个动作,在元素上绑定相应的事件
在该监听事件内,定义一个action动作,确定要做的事件类型,这个action必须遵循一定的规则,必须是一个对象
定义好action动作后,store接收到这个action动作请求后,store想要获取它的具体信息,便会派发一个使者dispatch,同时携带上action的具体动作信息,作为参数传递给dispatch方法
这样的话store就真正的知道了具体的动作,而具体的数据变更等操作,需要在reducer这个实时记录本中进行变更操作,在reducer里面进行一些逻辑判断操作
并且在reducer中只能读取state,并不能修改,如果想要修改,需要拷贝一份state出来,在新的state基础上进行操作,同时也要将这个新的state进行返回.达到一个以新换旧的操作
最后在组件中如何感知到store的变化,实现数据的同步更新呢,在redux中,需要在组件内的constructor或者componentWillMount,componentDidMount函数中进行触发subscribe()函数
同时它必须接收一个函数,触发store的订阅,在这个接收的函数当中重新获取一次store的数据,保持视图的this.state与store仓库的state数据的同步更新
这样的话,最终就完成了一次action的动作,页面也随之更新了
上面的代码进行了一次action,`reducer的编写,下面接着继续的,做得并不完整,那怎么实现一个添加内容的操作呢
输入框表单内添加内容,点击右侧的提交按钮,将Input框的内容添加到底下的列表当中 具体效果如下所示

import React from 'react';
import ReactDOM from 'react-dom';
import { Input, Button, List, message } from 'antd'; // 引入antd组件库
import 'antd/dist/antd.css'; // 引入antd样式

// 1. 创建一个store管理仓库,从redux库中引入一个createStore函数
import { createStore } from 'redux';

// 2. 引入createStore后,store并没有创建,需要调用createStore()后才有store
const store = createStore(reducer,window.__REDUX_DEVTOOLS_EXTENSION__ && window.__REDUX_DEVTOOLS_EXTENSION__()); // 创建好reducer后,需要将reducer作为参数传到createStore当中去,这样store才能拿到reducer的state数据

// 3. 创建reducer函数,管理组件共享的数据状态以及一些动作
// reducer是一个纯函数,返回一个新的state给store
// 4. 初始化state值,将原先组件内部的状态的数据,移除到reducer里面去管理
function reducer(state = {
    inputValue: '',
    list: []
}, action){
    console.log(state, action);
    if(action.type === 'handle_Input_Change'){
        // 对原有的上一次的state做一次深拷贝,在Redux中,reducer不允许直接修改state
       // const newState = Object.assign({}, state);这个Object.assign()也是一个非常常用浅拷贝的方法,与下面的方法最终实现的效果是一致的,等价于下面的方法
        const newState = JSON.parse(JSON.stringify(state));
        newState.inputValue = action.value; // 将新的value值赋值给newState
        return newState;
    }
    if(action.type === 'addInputcontent'){
        const newState = JSON.parse(JSON.stringify(state));
        if(newState.inputValue === ''){
            message.error('输入表单内不能为空,请输入内容');
        }else{
            newState.list.push(newState.inputValue); // 往list数组中添加input的内容
            newState.inputValue = '';
            return newState; // 返回newState
        }

    }
    return state;
}

// TodoList组件
class TodoList extends React.Component {
    constructor(props){
        super(props);
        // 5. 在组件内部通过getState()方法就可以拿到store里面的数据
        this.state = store.getState();
        // this环境的绑定
        this.handleInputChange = this.handleInputChange.bind(this);
        this.handleStoreChange = this.handleStoreChange.bind(this);
        this.handleAddClick = this.handleAddClick.bind(this);
        // 触发订阅,让store感知到state的变化
        store.subscribe(this.handleStoreChange); // 接收一个函数,重新获取store最新的数据,subscribe里面必须接收一个函数,否则是会报错的,这个订阅函数放在componentWillMount生命周期函数内调用操作也是可以的
    }
    // componentWillMount(){
        // store.subscribe(this.handleStoreChange);
    // }
    render() {
        return (
            <div style={{ margin: "10px 0 0 10px"}}>
                    <div>
                        <Input onChange={this.handleInputChange} value={this.state.inputValue} style={{ width:"300px",marginRight:"10px"}} placeholder="请输入内容..." />
                        <Button type="primary" onClick={this.handleAddClick}>提交</Button>
                    </div>
                    <List
                      style={{ width: '300px',marginTop:'10px'}}
                      bordered
                      dataSource={this.state.list}
                      renderItem={item => <List.Item>{item}</List.Item>}/>
            </div>
        )
    }

    handleInputChange(e){
        console.log(e.target.value);
        // 定义action,确定一个操作,动作,注意action必须遵循一定的规范,是一个对象,type字段是确定要做的动作,类型,监听表单输入框的变化,value是输入框的值
        const action = {
            type: 'handle_Input_Change',
            value: e.target.value
        }
        store.dispatch(action); // 通过store派发dispatch一个action,只有这里接收一个action,Reducer里面才能对新旧数据进行计算等操作,这是改变store数据的唯一的方法,必须要通过派发一个action给store

    }

    handleStoreChange(){
        console.log("handleStorechange,触发了");
        this.setState(store.getState()); // 触发setState重新获取store的数据,让input的数据与store保持同步了的
    }

    // 添加列表的操作
    handleAddClick(){
        console.log("添加按钮执行了");
        // 定义action动作
        const action = {
            type: 'addInputcontent'
        }
        store.dispatch(action); // 还要将action传递给dispatch,这样store才会接收到,这是改变store数据的唯一的方法,必须要通过派发一个action给store,必不可少的一步
    }
}
const container = document.getElementById('root');

ReactDOM.render(<TodoList />, container);
上面的代码就完成一个添加列表的功能 在次梳理一下过程
- 给JSX元素,组件Button按钮绑定事件
<Button type="primary" onClick={this.handleAddClick}>提交</Button>
// 添加列表的操作
    handleAddClick(){
        console.log("添加按钮执行了");
        // 定义action动作
        const action = {
            type: 'addInputcontent'
        }
        store.dispatch(action); // 还要将action传递给dispatch,这样store才会接收到,这是改变store数据的唯一的方法,必须要通过派发一个action给store,必不可少的一步
    }
- 在reducer函数中进行逻辑判断,数据变更等操作
if(action.type === 'addInputcontent'){
        const newState = JSON.parse(JSON.stringify(state));
        if(newState.inputValue === ''){
            message.error('输入表单内不能为空,请输入内容');
        }else{
            newState.list.push(newState.inputValue); // 往list数组中添加input的内容
            newState.inputValue = ''; // 提交表单内容后,让表单内容置空操作
            return newState; // 返回newState
        }

    }
基于原有的代码,添加这两步就完成了一个添加列表的操作的 那么删除列表的功能怎么实现呢? 以下是实现的效果
import React from 'react';
import ReactDOM from 'react-dom';
import { Input, Button, List, message, Modal } from 'antd'; // 引入antd组件库
import 'antd/dist/antd.css'; // 引入antd样式


// 1. 创建一个store管理仓库,从redux库中引入一个createStore函数
import { createStore } from 'redux';

// 2. 引入createStore后,store并没有创建,需要调用createStore()后才有store
const store = createStore(reducer, window.__REDUX_DEVTOOLS_EXTENSION__ && window.__REDUX_DEVTOOLS_EXTENSION__()); // 创建好reducer后,需要将reducer作为参数传到createStore当中去,这样store才能拿到reducer的state数据

// 3. 创建reducer函数,管理组件共享的数据状态以及一些动作
// reducer是一个纯函数,返回一个新的state给store
// 4. 初始化state值,将原先组件内部的状态的数据,移除到reducer里面去管理
function reducer(state = {
    inputValue: '',
    list: []
}, action) {
    console.log(state, action);
    if (action.type === 'handle_Input_Change') {
        // 对原有的上一次的state做一次深拷贝,在Redux中,reducer不允许直接修改state
        // const newState = Object.assign({}, state);与下面的是等价的
        const newState = JSON.parse(JSON.stringify(state));
        newState.inputValue = action.value; // 将新的value值赋值给newState
        return newState;
    }
    if (action.type === 'addInputcontent') {
        const newState = JSON.parse(JSON.stringify(state));
        if (Trim(newState.inputValue) === '') {
            message.error('输入表单内不能为空,请输入内容');
        } else {
            newState.list.push(newState.inputValue); // 往list数组中添加input的内容
            newState.inputValue = '';
            return newState; // 返回newState
        }

    }
    if (action.type === 'deletelist') {
        // 下面这个也是拷贝原对象的一种方式与上面等价
        const newState = Object.assign({}, state);
        newState.list.splice(action.index, 1);
        return newState;
    }
    return state;
}

// 去除前后空格
function Trim(str) {
    return str.replace(/(^\s*)|(\s*$)/g, "");
}
const { confirm } = Modal
// TodoList组件
class TodoList extends React.Component {

    constructor(props) {
        super(props);
        // 5. 在组件内部通过getState()方法就可以拿到store里面的数据
        this.state = store.getState();
        // this环境的绑定
        this.handleInputChange = this.handleInputChange.bind(this);
        this.handleStoreChange = this.handleStoreChange.bind(this);
        this.handleAddClick = this.handleAddClick.bind(this);
        // 触发订阅,让store感知到state的变化
        store.subscribe(this.handleStoreChange); // 接收一个函数,重新获取store最新的数据,subscribe里面必须接收一个函数,否则是会报错的,这个订阅函数放在componentWillMount生命周期函数内调用操作也是可以的
    }
    // componentWillMount(){
    // store.subscribe(this.handleStoreChange);
    // }
    // 组件卸载,移除时调用该函数,一般取消,清理已注册的订阅,定时器的清理,取消网络请求,在这里面操作
    componentWillUnmount() {
        store.unsubscribe(this.handleStoreChange);
    }

    render() {
        return (
            <div style={{ margin: "10px 0 0 10px"}}>
                    <div>
                        <Input onChange={this.handleInputChange} value={this.state.inputValue} style={{ width:"300px",marginRight:"10px"}} placeholder="请输入内容..." />
                        <Button type="primary" onClick={this.handleAddClick}>提交</Button>
                    </div>
                    <List
                      style={{ width: '300px',marginTop:'10px'}}
                      bordered
                      dataSource={this.state.list}
                      renderItem={(item,index) => <List.Item onClick={this.handleDelList.bind(this, index,item)}>{item}</List.Item>}/>
            </div>
        )
    }

    handleInputChange(e) {
        console.log(e.target.value);
        // 定义action,确定一个操作,动作,注意action必须遵循一定的规范,是一个对象,type字段是确定要做的动作,类型,监听表单输入框的变化,value是输入框的值
        const action = {
            type: 'handle_Input_Change',
            value: e.target.value
        }
        store.dispatch(action); // 通过store派发dispatch一个action,只有这里接收一个action,Reducer里面才能对新旧数据进行计算等操作

    }

    handleStoreChange() {
        console.log("handleStorechange,触发了");
        this.setState(store.getState()); // 触发setState重新获取store的数据,让input的数据与store保持同步了的
    }

    // 添加列表的操作
    handleAddClick() {
        console.log("添加按钮执行了");
        // 定义action动作
        const action = {
            type: 'addInputcontent'
        }
        store.dispatch(action); // 还要将action传递给dispatch,这样store才会接收到
    }

    // 删除列表操作
    handleDelList(index,item) {
        this.showDeleteConfirm(index, item);
    }

    showDeleteConfirm(index,item) {
        const action = {
            type: 'deletelist',
            index: index
        }
        confirm({
            title: '确定要删除该列表?',
            content: item,
            okText: '确认',
            okType: 'danger',
            cancelText: '取消',
            onOk() {
                console.log('OK');
                 store.dispatch(action); // 想要改变store的数据,必须通过dispatch派发一个action
            },
            onCancel() {
                console.log('Cancel');
            },
        });
    }
}
const container = document.getElementById('root');

ReactDOM.render(<TodoList />, container);
实现删除列表的过程与添加列表差不多
- 给列表绑定事件,添加事件处理函数
<List
      style={{ width: '300px',marginTop:'10px'}}
      bordered
      dataSource={this.state.list}
      renderItem={(item,index) => <List.Item onClick={this.handleDelList.bind(this, index,item)}>{item}</List.Item>}/>

const { confirm } = Modal; // 记得引入这个,不然删除确认模态框不会生效的,底下调用了该确认函数
 // 删除列表操作
    handleDelList(index,item) {
        this.showDeleteConfirm(index, item);
    }

    showDeleteConfirm(index,item) {
        const action = {
            type: 'deletelist',
            index: index
        }
        confirm({
            title: '确定要删除该列表?',
            content: item,
            okText: '确认',
            okType: 'danger',
            cancelText: '取消',
            onOk() {
                console.log('OK');
                 store.dispatch(action); // 想要改变store的数据,必须通过dispatch派发一个action
            },
            onCancel() {
                console.log('Cancel');
            },
        });
    }
- 在reducer函数中进行对公共组件数据逻辑的操作
if (action.type === 'deletelist') {
        // 下面这个也是拷贝原对象的一种方式,也很常用
        const newState = Object.assign({}, state);
        newState.list.splice(action.index, 1); // 这是删除当前列表的核心方法,通过数组的splice方法实现,第一个参数代表的是删除哪个,第二个是删除一个
        return newState;
    }
至于上面添加了一个当删除列表时,模态框的确认操作,至于添加一些组件是放在reducer里面还是放在外面,要视具体的业务逻辑而定
比如这里的删除确认模态框的,点击列表时,弹出是否删除的模态框,而具体是否要删除,应当在onOk这个函数里面进行派发action的, 如果你放到reducer里面做处理,那么始终会出现一些问题的,注意逻辑的操作顺序
文章写到这里,一个todolist的添加,删除操作就完成了,当然看到这样的代码,这么一个小小的demo操作,绕来绕去,估计奔溃了的,这样的代码堆叠在一起肯定是不行的
在后续的学习当中,我们将会把store,reducer,以及action进行分开独立管理的,之所以写在一个文件里,是方便后续怎么样将store,reducer,以及action抽离出去的
如果一上来就拆分,在各个文件之间进行切换,对于初学者,是很容易绕晕的.当然如果你是大神,就另当别论了的
上面的代码是次要的,重要的是理清Redux中store,React Component,action creators,reducer相互之间的关系,如果不清晰他们之间的关系,在遇到复杂的大型项目时,各个文件切来切去的,绝对是一头雾水,懵逼的,维护起来也是想死的心都有
结语
本文并不是什么高大上的内容,主要是对学习Redux的一个小小的初探,在真正实际项目中,复杂度远不止像这样的一个例子的,但是作为入门,todolist确实能让自己对Redux有一定的认识
也许你会觉得这么个简单的例子,竟然这么多代码,使用vue的话,几行代码就搞定了,Vue中也有vuex这样的数据流管理框架,使用起来也是大同小异,两个各有优点,都很强
使用React编写代码更偏向底层一些的,虽然Redux比较绕,但都是有固定的套路流程的,其中理解Redux的工作流程是非常重要的
主要开始用ant-design这个UI组件库对todolist做了一个简单的布局,然后如何将组件的数据抽离到Redux中去管理
组件如何获取Redux中store的数据,以及怎么更新store的数据的更新,在上文当中都有与之对应的操作和解释
用几句简单话:概括下使用Redux的流程
-
安装redux,然后从redux中引入createStore这个方法,并调用它,从而创建store
-
紧着在创建reducer纯函数,在reducer里面进行state的逻辑操作,reducer的返回值取决于state与action这个的决定,最终该函数的返回的最新结果会返回给store,完成新旧数据的替换,
-
而在组件中如何获取store的数据,是通过getState方法进行获取store中的所有状态
-
如何保持页面的组件与store数据同步更新,需要注册订阅subscribe方法,该方法接收一个函数,在该接收的函数内触发重新获取store的数据 更多细枝末节内容,可见上文