我的博客:程序员笑笑生,欢迎浏览博客!
上一章 SpringCloud进阶:Spring Cloud Stream 消费者分组当中,我们通过配置消费者分组,实现了在同一个组内,消息只被一个消费者接收的功能。本章将介绍消息分区的功能。
前言
在Spring Cloud Stream中很容易使单个应用程序连接到消息中间件,但是更多的情况是多实例的应用程序,在实际的应用场景中,我们需要将同一种类型的消息,比如同一个用户,或者同一个类型的日志消息始终由同一个消费者消费并做统计,但是消息被分散到了不同的实例上去了, 就不好办了 。这个时候就可以使用消息分区了。
一 、Instance Index 和 Instance Count
当我们在采用集群的方式部署同一个应用时,每一个实例都可以接受到同一个应用有多少个实例数量,以及当前自己的实例在集群中的索引。Stream通过 spring.cloud.stream.instanceCount 实例数量和 spring.cloud.stream.instanceIndex 当前的实例索引实现这一点。如果实例总数instanceCount 是3,那么instanceIndex 索引从0开始到1、2 ,这两个属性的正确配置对于解决分区行为非常的重要,可以用来确保消息在多个实例之间正确的分割。
二 、未分区测试
2.1 生产者配置
发送消息实体类:
public class Message implements Serializable {

    private int id;
    private String body;
    public Message() {
    }
    public Message(int id, String body) {
        this.id = id;
        this.body = body;
    }
创建发送消息的通道接口
public interface SenderSource {
    String OUTPUT = "input";

    @Output(SenderSource.OUTPUT)
    MessageChannel output();

}
发送消息的测试类:
@RunWith(SpringRunner.class)
@SpringBootTest(classes=SenderApplication.class)
public class MessageTest {

    @Autowired
    SenderSource source;
    @Test
    public void sender() {
        Message message = new Message(1, "test send");
        for (int i = 0; i < 10; i++) {
            source.output().send(MessageBuilder.withPayload(message).build());
        }
    }
}
applicaiton.yml配置:
spring:
  cloud:
    stream:
      bindings:
         input:
            destination: topic
            binder: rabbit1
      binders:
         rabbit1:
             type: rabbit
             environment:
                spring:
                 rabbitmq:
                     host: localhost
                     port: 5672
2.2 消费者配置
创建Message实体:
public class Message implements Serializable {
    private int id;
    private String body;
    public Message() {
    }
    public Message(int id, String body) {
        this.id = id;
        this.body = body;
    }
接受消息
@SpringBootApplication
@EnableBinding(Sink.class)
@EnableEurekaClient
public class ReceiverApplication {

    public static void main(String[] args) {
        SpringApplication.run(ReceiverApplication.class, args);
    }

    @Value("${server.port}")
    private String port;
    /**
     * 监听rabbitmq的消息,具体什么队列,什么topic,通过配置信息application获取
     *
     * @param msg
     */
    @StreamListener(Sink.INPUT)
    public void reader(Message msg) {
        System.out.println("receiver port:"+port +",message:"+ msg);
    }
}
消费者application.xml配置
spring:
  cloud:
    stream:
      bindings:
         input:
            destination: topic
            binder: rabbit1
            group: group1
      binders:
         rabbit1:
             type: rabbit
             environment:
                spring:
                 rabbitmq:
                     host: localhost
                     port: 5672
server:
  port: 8081

eureka:
    instance:
      hostname: eureka7001.com  #eureka服务端的实例名称
      instance-id: receiver1
    client:
      service-url:
         # 与注册中心交互的url
        defaultZone: http://eureka7001.com:7001/eureka/
        enabled: true
可以修改端口号和eureka.instance-id 启动多个实例,同时也启动Eureka。之后我们通过消息生产者发送消息:
我们看到同样的消息是被分散到了不同的实例中的
实例一:

实例二:

二、添加分区
2.1 首先配置生产者
指定分区键的表达式,payload表示获取消息后,进行hash取值计算出分区的值
spring.cloud.stream.bindings.input.producer.partitionKeyExpression=payload
消息分区数量
spring.cloud.stream.bindings.input.producer.partitionCount=2
spring:
  cloud:
    stream:
      bindings:
         input:
            producer:
               partitionKeyExpression: payload
               partitionCount: 2
            destination: topic
            binder: rabbit1

      binders:
         rabbit1:
             type: rabbit
             environment:
                spring:
                 rabbitmq:
                     host: localhost
                     port: 5672
2.2 配置消费者:
表示开启分区
spring.cloud.stream.bindings.inputProduct.consumer.partitioned=true
指定了当前消费者的总实例数量,当前的实例是2
spring.cloud.stream.instanceCount=2
设置当前实例的索引号,从 0 开始
spring.cloud.stream.instanceIndex=0
不同的实例instanceIndex根据情况配置
spring:
  cloud:
    stream:
      bindings:
         input:
           consumer:
               partitioned: true
            destination: topic
            binder: rabbit1
            group: group1
      binders:
         rabbit1:
             type: rabbit
             environment:
                spring:
                 rabbitmq:
                     host: localhost
                     port: 5672
     instance-count: 2
     instance-index: 0
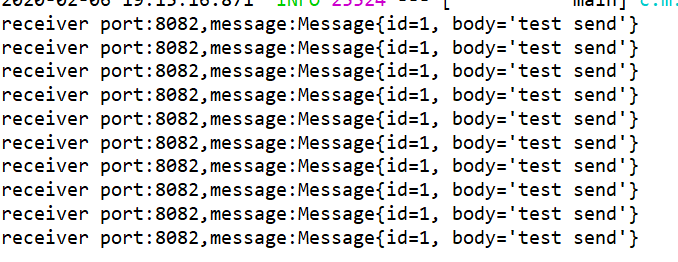
修改完成后,重启所有的实例,并通过生产者发送消息,我们看到了所有的消息都发送到了一个实例中:

这样我们就实现了同一类型的消息,发送到同一个实例当中了。
三、自定义分区策略
在上文的演示中,我们通过spring.cloud.stream.bindings.input.producer.partitionKeyExpression=payload实现了消息分区,什么意思呢,当我们配置了这个属性时,当前的实例payload代表的我们定义的message信息,Spring Cloud Stream默认在获取到这个message后,通过hash的方法,计算 公式:
key.hashCode() % partitionCount
计算出消息在哪个分区中,了解了这些,我们就可以做到了更多了。在Spring Cloud Stream中提供了实现 org.springframework.cloud.stream.binder.PartitionKeyExtractorStrategy接口自定义分区策略,我们可以简单实现以下,同样的消息,我们随机的分区,但是确保分区分区的值在实例数量的范围之类,比如我有2个消费者实例,那么随机生成的分区的值在0到1之间:
创建MyPartitionKeyStrategy类实现PartitionKeyExtractorStrategy接口:
import org.springframework.cloud.stream.binder.PartitionKeyExtractorStrategy;
import org.springframework.messaging.Message;

import java.util.Random;

public class MyPartitionKeyStrategy implements PartitionKeyExtractorStrategy {
    @Override
    public Object extractKey(Message<?> message) {

        com.microservice.stream.controller.Message sendMsg = (com.microservice.stream.controller.Message) message.getPayload();

        Random random =new Random();

        final int r = random.nextInt(2);

        System.out.println("r:" + r);

        return r;
    }
}
通过配置类的方法,注入当前的分区策略:
@Configuration
public class StrategyConf {
    @Bean
    MyPartitionKeyStrategy myPartitionKeyStrategy() {
        return new MyPartitionKeyStrategy();
    }

}
修改生产者的yml配置,将partitionKeyExpression改成注入类的方法名称:
spring:
  cloud:
    stream:
      bindings:
         input:
            producer:
            # 配置注入了的方法名称
               partitionKeyExpression: myPartitionKeyStrategy
               partitionCount: 2
            destination: topic
            binder: rabbit1

      binders:
         rabbit1:
             type: rabbit
             environment:
                spring:
                 rabbitmq:
                     host: localhost
                     port: 5672
再去通过生产者发送消息,那么,消息有随机的发往不同的实例了:
实例一:

实例二:

在实际的企业环境中,我们可以根据自己的需求实现自己的分区策略。
总结
本章通过未分区测试、设置分区以及自定义分区策略了解了Spring Cloud Stream中如何的使用分区功能。在实际的开发中不免会遇到这样的需求。掌握并能够使用它也是很重要的。
----END----
以就是本期的分享,你还可以关注公众号: 程序员笑笑生,关注更多精彩内容!


SpringCloud基础教程(一)-微服务与SpringCloud
SpringCloud基础教程(二)-服务发现 Eureka
SpringCloud基础教程(五)-配置中心热生效和高可用
SpringCloud 基础教程(六)-负载均衡Ribbon
SpringCloud 基础教程(七)-Feign声明式服务调用
SpringCloud 基础教程(八)-Hystrix熔断器(上)
SpringCloud 基础教程(九)-Hystrix服务监控(下)
SpringCloud 基础教程(十一)- Sleuth 调用链追踪简介
SpringCloud 基础教程(十二)-Zipkin 分布式链路追踪系统搭建
SpringCloud 进阶: 消息驱动(入门) Spring Cloud Stream【Greenwich.SR3】
SpringCloud 进阶: Spring Cloud Stream 核心组件
SpringCloud 进阶: 消息驱动之Spring Cloud Stream 消费者分组
SpringCloud 进阶: 消息驱动之Spring Cloud Stream 消息分区
更多精彩内容,请期待...
本文由博客一文多发平台 OpenWrite 发布!