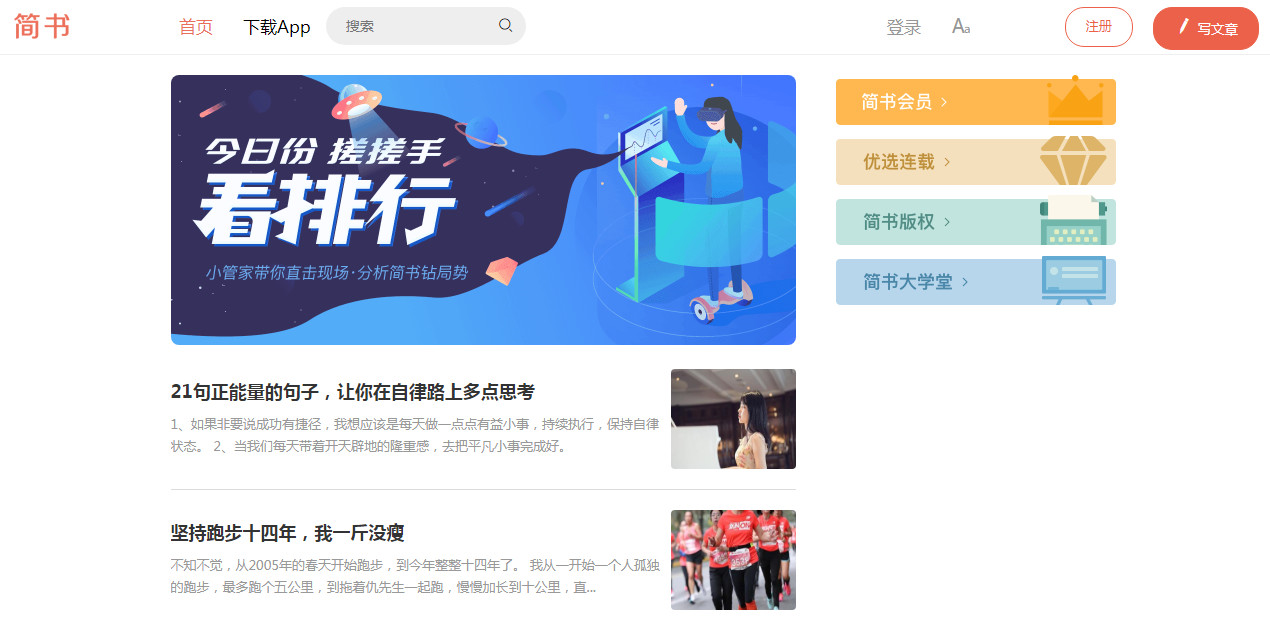
实现效果
实现步骤
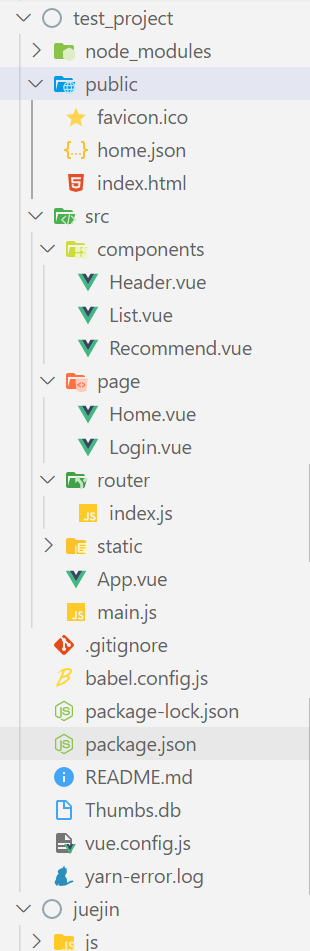
通过 vue-cli 脚手架工具, 初始化项目, 命名为test_project;
在 components 目录下创建 Header.vue 组件、 List.vue 组件、 Recommend.vue 组件;
在 src 目录先新建 page 文件夹, 在 page 文件夹下新建 Home.vue 组件;
img 文件夹(提供)、iconfont 文件夹(提供) 放在 static 目录下;
在public文件夹放json文件
Home.vue组件引入List.vue 组件、 Recommend.vue 组件,App.vue 组件中引入Header.vue 组件;
具体操作
安装vue-cli,我是用yarn安装的,需要提前安装yarn,也可以用npm安装,创建项目
yarn global add @vue/cli
//创建项目
vue create my-project
vsCode添加此项目,在有package.json的情况下,可以使用npm i或者cnpm i安装package.json中需要的包(cnpm是淘宝镜像,没有的话需要安装)
cnpm i
//或者 yarn serve
npm run serve
//安装axios包
yarn add axios
将文件放入指定文件夹,如下为相关文件
//home.json
{
"status" : "success" ,
"data" : {
"listInfo" : [
{
"id" : 1,
"imgUrl" : "//upload-images.jianshu.io/upload_images/15035171-da8ef5127e7628b0.png@c_1,w_640,h_402,x_0,y_0?imageMogr2/auto-orient/strip|imageView2/1/w/360/h/240" ,
"title" : "21句正能量的句子,让你在自律路上多点思考" ,
"desc" : "1、如果非要说成功有捷径,我想应该是每天做一点点有益小事,持续执行,保持自律状态。 2、当我们每天带着开天辟地的隆重感,去把平凡小事完成好。"
},
{
"id" : 2,
"imgUrl" : "//upload-images.jianshu.io/upload_images/12830911-487d64e0b633a495.jpg?imageMogr2/auto-orient/strip|imageView2/1/w/360/h/240" ,
"title" : "坚持跑步十四年,我一斤没瘦" ,
"desc" : "不知不觉,从2005年的春天开始跑步,到今年整整十四年了。 我从一开始一个人孤独的跑步,最多跑个五公里,到拖着仇先生一起跑,慢慢加长到十公里,直..."
},
{
"id" : 3,
"imgUrl" : "//upload-images.jianshu.io/upload_images/16039452-d910371f88cb26d3.jpg?imageMogr2/auto-orient/strip|imageView2/1/w/360/h/240" ,
"title" : "无聊翻到的小程序居然给我带来了现金收益?" ,
"desc" : "最近在家无聊,在翻微信的过程中,无意间发现了个小程序,是类似于知乎的,但又和知乎不一样,最主要的是,这个小程序居然可以给我转到一些外快?"
},
{
"id" : 4,
"imgUrl" : "//upload-images.jianshu.io/upload_images/15177263-cb5d496aa0d1deeb.jpg?imageMogr2/auto-orient/strip|imageView2/1/w/360/h/240" ,
"title" : "成为数据分析师,抢占互联网红利!" ,
"desc" : "师从硅谷名企,洞察数据秘密,成为互联网高薪人才!"
}
],
"recommendlist" : [
{
"id" : 1,
"imgUrl" : "http://cdn2.jianshu.io/assets/web/banner-s-club-aa8bdf19f8cf729a759da42e4a96f366.png"
},
{
"id" : 2,
"imgUrl" : "http://cdn2.jianshu.io/assets/web/banner-s-3-ddcc844ebdd8edca2d93b7ea5a8de79e.png"
},
{
"id" : 3,
"imgUrl" : "http://cdn2.jianshu.io/assets/web/banner-s-7-1a0222c91694a1f38e610be4bf9669be.png"
}
]
}
}
如下为文件夹放置示意图
Header.vue
此处需要注意的是iconfont的引入及使用,这边文件里是用的unicode
<template>
<header>
<div class="logo" >
<img src="../static/img/logo.png" alt />
</div>
<div class="middle mar" >
<span>首页</span>
<span>下载APP</span>
<span class="input" >
<input type ="text" placeholder="搜索" />
<span style="padding:0 10px;" class="iconfont" >&
</span>
</div>
<div class="mar" style="color:#ccc" >
<span>登录</span>
<span class="iconfont" >&
</div>
<div class="mar" >
<span style="border:1px solid orangered;padding:5px 20px;border-radius:20px;color:orangered" >注册</span>
<span class="iconfont" style="color:#fff;border:1px solid orangered;padding:11px 20px;border-radius:20px;background-color:orangered" >&
</div>
</header>
</template>
<script>
export default {};
</script>
<style scoped>
//引入iconfont
@import '//at.alicdn.com/t/font_1589357_wgxgrvh5n9c.css' ;
@import '../static/iconfont/iconfont.css' ;
header {
width: 100vw;
display: flex;
justify-content: space-around;
align-items: center;
height: 80px;
border-bottom: 1px solid
}
.logo img {
height: 80px;
}
.middle {
width: 500px;
display: flex;
}
.mar >* {
margin: 0 10px;
}
input {
height: 40px;
border: none;
text-indent: 1em;
flex: 1;
background-color: transparent;
}
.input {
width: 230px;
display: flex;
justify-content: space-between;
background-color:
align-items: center;
border-radius: 20px;
}
</style>
List.vue
<template>
<div>
<div
style="padding:20px 0;border-bottom:1px solid #eee;display:flex;justify-content:space-between;"
v-for="(item, index) in listInfo"
:key="index"
>
<div style="padding:0 5px;" >
<div style="font-weight:600;line-height:34px" >{{item.title}}</div>
<div style="color:#ccc;font-size:14px;line-height:24px;" >{{item.desc}}</div>
</div>
<div><img width="120px" style="border-radius:8px" :src="item.imgUrl" alt="" ></div>
</div>
</div>
</template>
<script>
export default {
props:{
listInfo:{
type :Array,
required:true
}
}
}
};
</script>
<style scoped>
</style>
Recommend.vue
<template>
<div>
<div style="margin:10px 0;opacity:0.8;" v-for="(item, index) in recommendlist" :key="index" >
<img width="320px" :src="item.imgUrl" alt />
</div>
</div>
</template>
<script>
export default {
props: {
recommendlist: {
type : Array,
required: true
}
}
};
</script>
<style scoped>
</style>
Home.vue引入List.vue和Recommend.vue组件,此处需要用axios引入json。
这里需要注意的是,静态的json文件需放在public文件夹,用axios.get('data.json')即可,不加public路径,或者放在其他文件夹,用require引入也可
<template>
<main>
<div class="left" >
<img style="border-radius:8px;" width="650px" src="../static/img/home.png" alt />
<List :listInfo='listInfo' ></List>
</div>
<div>
<Recommend :recommendlist='recommendlist' ></Recommend>
</div>
</main>
</template>
<script>
import List from "../components/List.vue" ;
import Recommend from "../components/Recommend.vue" ;
import axios from 'axios'
export default {
components: {
List,
Recommend
},
mounted 'home.json' ).then(res=>{
this.listInfo=res.data.data.listInfo
this.recommendlist=res.data.data.recommendlist
})
},
data return {
listInfo: [],
recommendlist:[]
}
},
};
</script>
<style scoped>
main{
width: 1050px;
margin: 10px auto;
display: flex;
justify-content: space-between;
}
.left{
width: 650px;
}
</style>
App.vue
<template>
<div id="app" >
<Header></Header>
<Home></Home>
</div>
</template>
<script>
import Header from './components/Header.vue'
import Home from './page/Home.vue'
export default {
name:'APP' ,
components:{
Header ,
Home
}
}
</script>
<style scoped>
*{
margin: 0;
padding: 0;
}
</style>
index.js
import Vue from 'vue'
import VueRouter from 'vue-router'
import Home from '../page/Home'
Vue.use(VueRouter)
Vue.use(Home)
let router=new VueRouter({
routes: [{
path: '/' ,
component: Home
}]
})
export default router
main.js
import Vue from 'vue'
import App from './App'
import router from './router/index.js'
Vue.use(App)
new Vue({
el:'#app' ,
router,
render:h=>h(App)
})
效果图
补充路由
懒加载
当打包构建应用时,JavaScript 包会变得非常大,影响页面加载。如果我们能把不同路由对应的组件分割成不同的代码块,然后当路由被访问的时候才加载对应组件,这样就更加高效了。
Vue中实现懒加载有如下两种方法
const Foo = () => import('./Foo.vue' )
const router = new VueRouter({
routes: [
{ path: '/foo' , component: Foo }
]
})
把组件按组分块:把某个路由下的所有组件都打包在同个异步块 (chunk) 中
const Foo = () => import(/* webpackChunkName: "group-foo" */ './Foo.vue' )
const Bar = () => import(/* webpackChunkName: "group-foo" */ './Bar.vue' )
const Baz = () => import(/* webpackChunkName: "group-foo" */ './Baz.vue' )
为了防止所有组件打包到App.js中导致文件过大,首屏加载缓慢,使用注释分组打包
let router=new VueRouter({
routes: [{
path: '/' ,
component:()=>import (/* webpackChunkName: "group-foo" */ '../page/Home' )
},{
path: '/login' ,
component: ()=>import (/* webpackChunkName: "group-foo" */ '../page/Login' )
}]
})
路由元信息
let router=new VueRouter({
routes: [{
path: '/' ,
meta:{title:'首页' },
component:()=>import (/* webpackChunkName: "group-foo" */ '../page/Home' )
},{
path: '/login' ,
meta:{title:'登录' },
component: ()=>import (/* webpackChunkName: "group-foo" */ '../page/Login' )
}]
})
导航守卫
通过跳转或取消的方式守卫导航
全局前置守卫 :路由跳转之前被拦截
router.beforeEach((to, from, next) => {
// if (×××) next()
})
router.afterEach((to, from) => {
  // ...
})
通过导航守卫制作头部的process进度条,通过判断有无原信息的title,控制切换网页的title
//App.vue
<template>
<div id="app" >
<div id="progress" ></div>
<Header></Header>
<router-view></router-view>
</div>
</template>
<script>
import Header from "./components/Header.vue" ;
export default {
components: {
Header
}
};
</script>
<style scoped>
* {
margin: 0;
padding: 0;
}
height: 5px;
background: red;
position: fixed;
top: 0;
left: 0;
animation: grow 1s infinite;
display: none;
}
@keyframes grow {
from {
width: 0px;
}
to {
width: 100%;
}
}
</style>
//router/index.js
router.beforeEach((to, from, next) => {
let pro =document.getElementById('progress' )
if (pro) pro.style.display='block'
//to代表去往的页面,若有元信息的title,则网页的title换成to.meta.title
if (to.meta&&to.meta.title) document.title=to.meta.title
console.log(to)
set Timeout(() => {
next()
}, 1000);
})
router.afterEach(() => {
// to and from are both route objects.
let pro =document.getElementById('progress' )
if (pro) pro.style.display='none'
})
小技巧
Vue中添加方法
import Vue from 'vue'
import axios from 'axios'
Vue.mixin({
methods: {
$get (url,data){
return axios(url,{params:data})
}
},
})
import axios from "axios" ;
Vue.prototype.$axios =axios
其他
@代表src文件夹,可以用它避免相对引用。
当要读取的时index命名的文件时,可以不写index,如下: import '@/mixin'
public放置静态资源,或者通过vue.config.js中的配置module.exports={
devServer:{
//设置端口号
port:9999,
//设置静态目录
contentBase:"static"
}
}
设置快捷路径可以通过webpack中的resolve.alias(详细可见官方文档 )或vue中的chainWebpack设置//webpack的resolve.alias,在vue中通过configureWebpack引入,
configureWebpack: {
resolve: {
alias : {
'&' : resolve('src/components' )
}
}
},
//vue中的chainWebpack设置
chainWebpack: config => {
config.resolve.alias
// key,value自行定义,比如.set('@assets' , resolve('src/assets' ))
.set('&' , resolve('src/components' ))
}
Vue的源码中有一段关于Vue.use的定义,从源码中我们可以发现vue首先判断这个插件是否被注册过,如果已经注册过就直接 return 这个插件。并且接收的plugin参数的限制是Function | Object两种类型。
如果我们传入一个对象,对象中包含install方法,那么我们就调用这个plugin的install方法并将整理好的数组当成参数传入install方法中。
如果我们传入的plugin就是一个函数,那么我们就直接调用这个函数并将整理好的数组当成参数传入。
Vue.js 官方提供的一些插件 (例如 vue-router) 在检测到 Vue 是可访问的全局变量时会自动调用 Vue.use()。然而在像 CommonJS 这样的模块环境中,你应该始终显式地调用 Vue.use()
function initUse (Vue) {
Vue.use = function (plugin) {
var installedPlugins = (this._installedPlugins || (this._installedPlugins = []));
if (installedPlugins.indexOf(plugin) > -1) {
return this
}
// additional parameters
var args = toArray(arguments, 1);
args.unshift(this);
if (typeof plugin.install === 'function' ) {
plugin.install.apply(plugin, args);
} else if (typeof plugin === 'function' ) {
plugin.apply(null, args);
}
installedPlugins.push(plugin);
return this
};
}