本页所使用的objc runtime 756.2,来自GITHUB
1.概念
1.1 objc_class 结构
前面探索了类的结构,知道了类的结构本质上是objc_class的结构体,而在 C 源码例, objc_class 结构体的结构如下:
struct objc_class : objc_object {
    // Class ISA; 				// 指向类的isa
    Class superclass; 		// 父类
    cache_t cache;    		// 缓存的方法列表         // formerly cache pointer and vtable
    class_data_bits_t bits;    // 缓存的属性和变量  // class_rw_t * plus custom rr/alloc flags
上一篇文章,具体分析了class_data_bits_t,那么上面的缓存cache_t 还没有展开学习,下面就继续进行讲解。
1.2 Cache_t 结构:
cache_t 是objc_class 的重要组成属性,它主要用来存储方法。
struct cache_t {
    struct bucket_t *_buckets;  // 缓存的方法列表
    mask_t _mask;               // 散列表的长度
    mask_t _occupied;           // 缓存过的方法数量
		******
}
bucket 的定义
顾名思义是桶 ,装水的桶,装奥特曼的桶……
在这里是一个hash表,计算公式是hash = sel 地址%mask,其中mask 是存放空间的大小,初始值是4。
通过源码查看,可以知道结构体如下:
struct bucket_t {
private:
    // IMP-first is better for arm64e ptrauth and no worse for arm64.
    // SEL-first is better for armv7* and i386 and x86_64.
#if __arm64__
    MethodCacheIMP _imp;			// 方法实现
    cache_key_t _key;					// 方法编号
#else
    cache_key_t _key;
    MethodCacheIMP _imp;
#endif
可以看到,这里缓存了MethodCacheIMP 方法,其中 MethodCacheIMP 是IMP的子类:
MethodCacheIMP ——对于方法实现
cache_key_t ——对应方法缓存编号
2. 实现
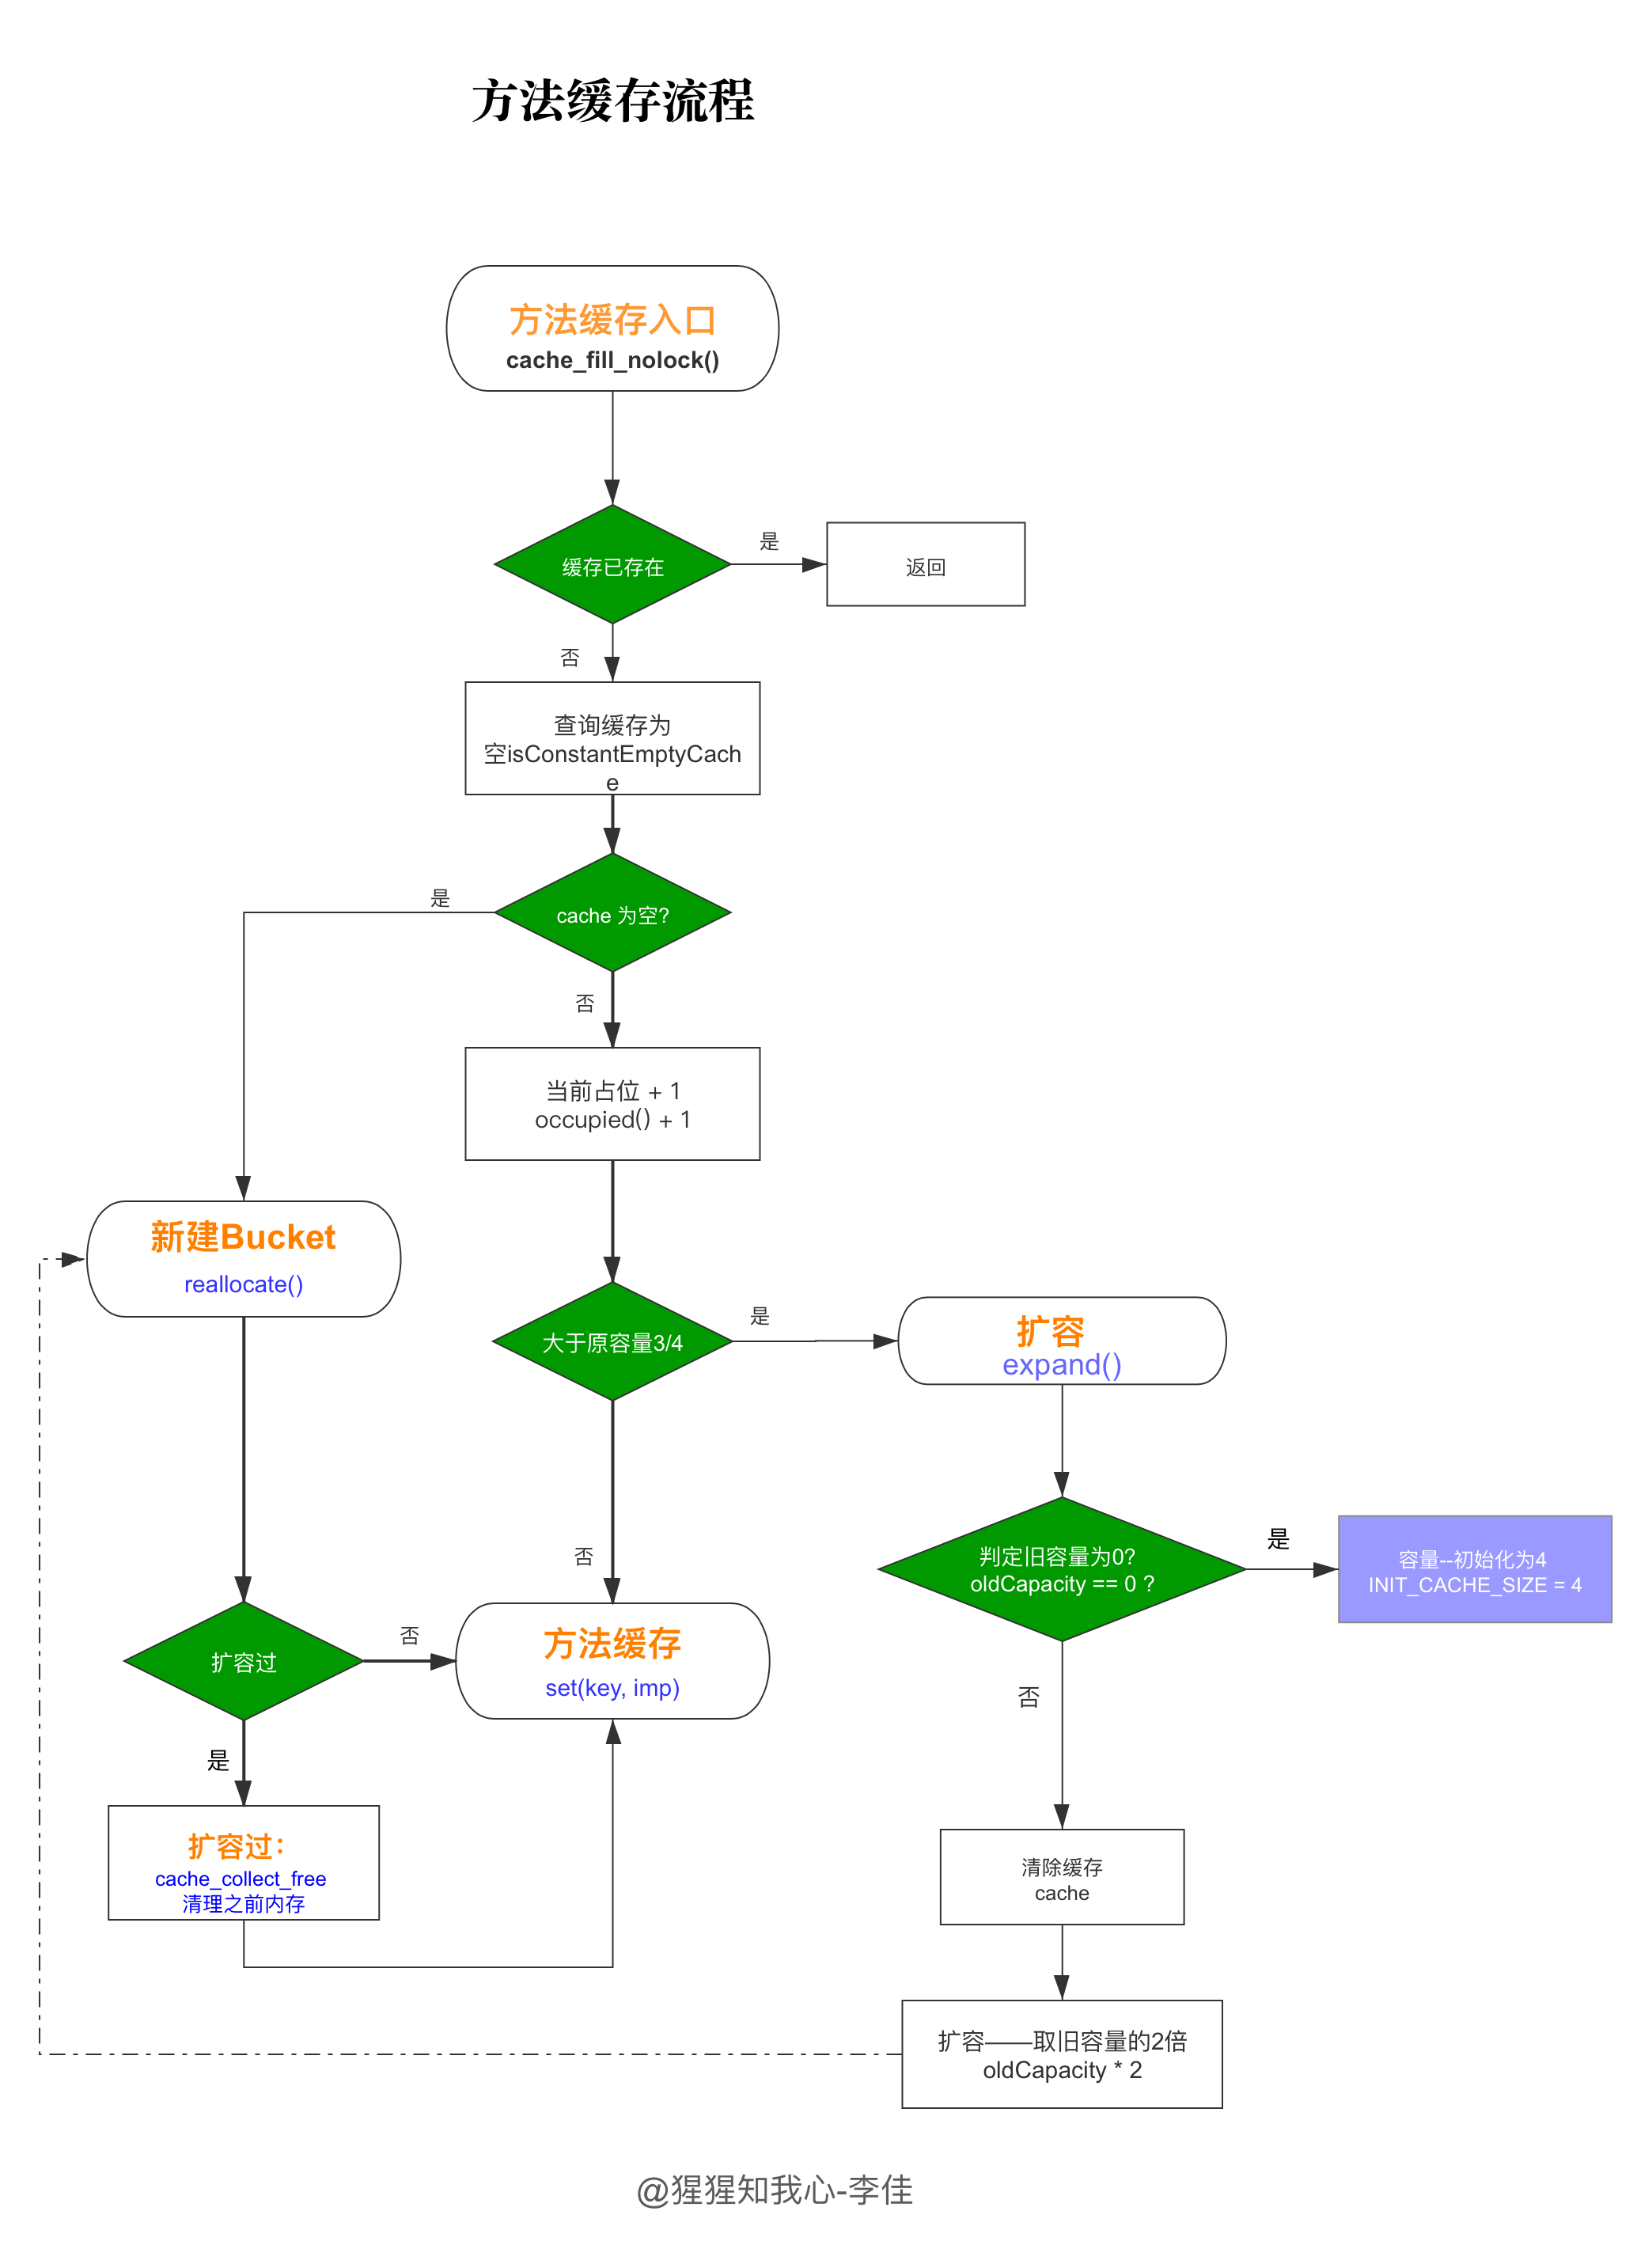
2.1方法缓存入口
- 入口 引起我们注意的是如下这段代码:
void cache_fill(Class cls, SEL sel, IMP imp, id receiver)
{
#if !DEBUG_TASK_THREADS
    mutex_locker_t lock(cacheUpdateLock);
    cache_fill_nolock(cls, sel, imp, receiver);
#else
    _collecting_in_critical();
    return;
#endif
}
代码解释:
cache_fill 方法的缓存写入操作
cache_fill_nolock 线程解锁后的缓存写入
- 断言保护 这里的方法cache_fill_nolock 就是我们的方法入口,为追求速度,执行的内容是无锁操作下的缓存填充,即对开辟的内存空间,进行方法写入,实现源码如下:
static void cache_fill_nolock(Class cls, SEL sel, IMP imp, id receiver)
{
    cacheUpdateLock.assertLocked();

    // Never cache before +initialize is done
    if (!cls->isInitialized()) return;

    // Make sure the entry wasn't added to the cache by some other thread
    // before we grabbed the cacheUpdateLock.
    if (cache_getImp(cls, sel)) return;

    cache_t *cache = getCache(cls);
    cache_key_t key = getKey(sel);
		****
代码解释:
- cacheUpdateLock.assertLocked() :这里对内存区域锁定进行了跳出断言
- if (!cls->isInitialized()) return; 对为初始化内存空间进行跳出断言
- if (cache_getImp(cls, sel)) 对缓存空间已有该方法跳出断言
2.2 检查容量
- 在检查容量之前,cache_t 做了两个操作:
- 将类的引用地址转化成了cache 结构体:
cache_t *cache = getCache(cls)- 将方法编号
sel转换成了整型,方便寻址cache_key_t key = getKey(sel)
-
容量为空检测
将方法缓存时,先确定是否为空对缓存。这里使用了
if (cache->isConstantEmptyCache()) {
        // Cache is read-only. Replace it.
        cache->reallocate(capacity, capacity ?: INIT_CACHE_SIZE);
    }
来判断空间是否为空,
isConstantEmptyCache这个函数更详细的操作如下:return occupied() == 0 && buckets() == emptyBucketsForCapacity(capacity(), false);即
occupied占位为空,而且容器桶 也无法从其他堆中空间共享空间,就必须重新开辟新的空间,开辟空间操作见 2.3。 -
扩容的条件:
扩容条件的操作为将当前容量 occupied + 1, 然后检查是否达到 3/4,超过则需要扩容;否则不需要扩容,直接进行缓存的写入,下面的代码足够明了的解释;
    // Use the cache as-is if it is less than 3/4 full
    mask_t newOccupied = cache->occupied() + 1;
    mask_t capacity = cache->capacity();
    if (cache->isConstantEmptyCache()) {
        // Cache is read-only. Replace it.
        cache->reallocate(capacity, capacity ?: INIT_CACHE_SIZE);
    }
    else if (newOccupied <= capacity / 4 * 3) {
        // Cache is less than 3/4 full. Use it as-is.
    }
    else {
        // Cache is too full. Expand it.
        cache->expand();
    }
代码详解:
mask_t newOccupied = cache->occupied() + 1
mask_t capacity = cache->capacity();
if (newOccupied <= capacity / 4 * 3)
这里的 newOccupied 是当前的占用容量+1, 与目前的总容量 capacity 的 3/4 来做比较,这里使用占位+1 后来做比较,目的是提前准备,防止内存溢出。
2.3 内存扩容
2.3.1 空间计算
扩容方法:
判断当前容量是否为空,若为空,就给初始化的内存为为4;
如果之前就有空间,则加倍。
void cache_t::expand()
{
    cacheUpdateLock.assertLocked();

    uint32_t oldCapacity = capacity();
    uint32_t newCapacity = oldCapacity ? oldCapacity*2 : INIT_CACHE_SIZE;

    if ((uint32_t)(mask_t)newCapacity != newCapacity) {
        // mask overflow - can't grow further
        // fixme this wastes one bit of mask
        newCapacity = oldCapacity;
    }

    reallocate(oldCapacity, newCapacity);
}
代码详解:
oldCapacity 定义了当前的容量
- 如果 oldCapacity 为空,则立刻开辟大小为4 的空间。
- 否则,给当前空间加倍,即 oldCapacity*2,并在新空间内进行缓存空间开辟 reallocate。
2.3.2 新建容器reallocate
新开内存空间的操作步骤:
- 确定是否可以释放旧空间
- 将开辟的空间和内存方法绑定,并将mask 和占位值occupied 归零。
void cache_t::reallocate(mask_t oldCapacity, mask_t newCapacity)
{
    bool freeOld = canBeFreed();

    bucket_t *oldBuckets = buckets();
    bucket_t *newBuckets = allocateBuckets(newCapacity);

    // Cache's old contents are not propagated.
    // This is thought to save cache memory at the cost of extra cache fills.
    // fixme re-measure this

    assert(newCapacity > 0);
    assert((uintptr_t)(mask_t)(newCapacity-1) == newCapacity-1);

    setBucketsAndMask(newBuckets, newCapacity - 1);

    if (freeOld) {
        cache_collect_free(oldBuckets, oldCapacity);
        cache_collect(false);
    }
}
代码讲解:
-
bool freeOld = canBeFreed() 决定了是否可以释放旧内存。
bool cache_t::canBeFreed()
{
    return !isConstantEmptyCache();
}
这里的
canBeFreed依赖于isConstantEmptyCache的取反,即需要之前方法缓存有占位,并且旧bucket 本身容量不为空。即以下源码里返回为空:
bool cache_t::isConstantEmptyCache() { return occupied() == 0 && buckets() == emptyBucketsForCapacity(capacity(), false); } 需要 occupied == 1, 以及 buckets() != emptyBucketsForCapacity(capacity(), false) -
setBucketsAndMask 用来初始化 新的bucket 和 occupied
newCapacity - 1 更新索引,用来查询散列表里的元素。
-
cache_collect_free 用来释放旧容量(oldCapacity)下的旧方法数据(oldBuckets)
2.4 缓存写入
2.4.1 查找缓存
通过 cache->find 查找对应的缓存,如果没有找到,就添加新缓存,在这之前将占位occupied 添加1 ,实现源码如下:
 static void cache_fill_nolock(Class cls, SEL sel, IMP imp, id receiver)
{
   ***
     // 找到对应的 bucket
    bucket_t *bucket = cache->find(key, receiver);
		if (bucket->key() == 0) cache->incrementOccupied();
    bucket->set(key, imp);
 }
void cache_t::incrementOccupied()
{
    _occupied++;		// 占位增加
}
2.4.2 未扩容过
找到之前的bucket,按照编号和方法,写入缓存:
bucket_t *bucket = cache->find(key, receiver);
bucket->set(key, imp);
2.4.3 缓存写入实现
void bucket_t::set(cache_key_t newKey, IMP newImp)
{
    assert(_key == 0  ||  _key == newKey);

    // objc_msgSend uses key and imp with no locks.
    // It is safe for objc_msgSend to see new imp but NULL key
    // (It will get a cache miss but not dispatch to the wrong place.)
    // It is unsafe for objc_msgSend to see old imp and new key.
    // Therefore we write new imp, wait a lot, then write new key.

    _imp = newImp;

    if (_key != newKey) {
        mega_barrier();
        _key = newKey;
    }
}
代码详解:
注释中写明了:
objc_msgSend 在无锁环境下使用key 和 imp 实现。
objc_msgSend 查看到新的imp 实现是安全的,除了空的key地址外。(可能会造成小的缓存丢失,但是并不会分发到错误的空间)
objc_msgSend 旧的imp 和新的key 是不安全的,因此我们先写新imp,等一会儿,再写新的 key
代码中的
mega_barrier就是 使用了阻塞,让方法先看到imp ,保证线程的安全。
3. 总结
3.1 梳理
cache_t 起源于 OC中的方法传递,也就是objc_msgSend 的实现。在类的方法传递时,为了追求,先去cache_t 中查找是否有缓存,如果有,可以直接调用,如果没有缓存,则需要对类进行一系列的内存空间确认,进行imp - key 的写入,并进行最终调用。
这一章节应该是目前分析最难的,花了大概三到四天弄明白,希望这艰难的一步能为以后的分析打好更好的基础。
3.2 流程图