

项目准备
新建github仓库。我自己是新建了两个git仓库,一个私有仓库personal-blog(名字随意)用于存放源码和原始文件;一个公有仓库用于挂载生成的静态文件,这个仓库的命名是要要去的,必须是[username].github.io,这是github page指定的仓库名字。(当然,也可以只新建一个公有github.io仓库,把源码和静态文件放不同的分支,按照个人喜好就好)。
在personal-blog仓库做hexo初始化操作,并下载自己喜欢的主题。这一部分的操作详见Hexo文档。此时的项目结构大致为:
.
├── node_modules
├── package-lock.json
├── package.json
├── _config.yml
├── scaffolds
├── source
└── themes
    └── [your-theme]
通常主题有自己的git管理,所以在我们的这个仓库中无法保存主题内部的文件内容,最后只有themes/[your-theme]这个空文件夹存在于我们的提交中。此时推荐把主题的仓库设置成我们仓库的submodule。
使用命令:
git submodule add https://github.com/[your-theme-url].git themes/[your-theme]
命令成功后,项目中会多一个.gitmodules文件,其内容大致是:
[submodule "themes/[your-theme]"]
	path = themes/[your-theme]
	url = https://github.com/[your-theme-url].git
构建密钥
由于我们需要action的runner向[username].github.io仓库推送生成的静态文件,所以需要让runner具有推送的权限。我们使用SSH的认证方式(如果你的github已经配置好了SSH,可以跳过这一步)。
使用命令:
ssh-keygen -t rsa -b 4096 -C "your_email@example.com"
此时会在~./ssh中生成id_rsa和id_rsa.pub。
将id_rsa-pub文件的内容复制,用其为github添加ssh:

完整的项目步骤参将生成新 SSH 密钥并添加。这部分不是本文的重点内容。
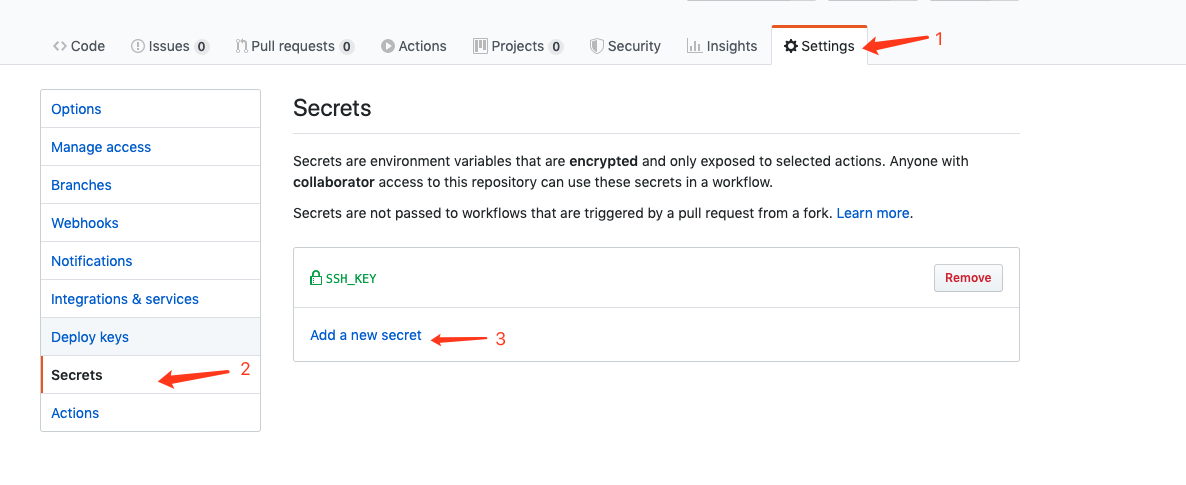
将id_rsa的文件内容复制,用其为action添加secret,并命名为SSH_KEY。
部署插件配置
这里推荐使用hexo-deployer-git用作博客部署,并在站点配置文件_config.yml添加以下配置:
deploy:
  type: git
  repo: git@github.com:[user-name]/[user-name].github.io.git
  branch: master
编辑action文件
前期准备工作到此已经告一段落。可以开始编写action配置,新建.github/workflows/deploy.yml文件。配置内容如下:
name: Hexo Deploy Automatically

on: [push]

jobs:
  deploy-blog:
    runs-on: ubuntu-latest

    steps:
      - name: Checkout Latest Version
        uses: actions/checkout@v2

      - name: Checkout Theme
        run: |
          git submodule init
          git submodule update

      - name: Setup Node Env
        uses: actions/setup-node@v1

      - name: Cache Node Dependencies
        id: cache
        uses: actions/cache@v1
        with:
          path: node_modules
          key: ${{runner.OS}}-npm-caches-${{ hashFiles('package-lock.json') }}

      - name: Install Dependencies
        if: steps.cache.outputs.cache-hit != 'true'
        run: npm install

      - name: Deploy
        env:
          SSH_KEY: ${{secrets.SSH_KEY}}
        run: |
          export TZ='Asia/Shanghai'

          mkdir -p ~/.ssh/
          echo "$SSH_KEY" > ~/.ssh/id_rsa
          chmod 600 ~/.ssh/id_rsa
          ssh-keyscan github.com >> ~/.ssh/known_hosts

          git config --global user.name '[user-name]'
          git config --global user.email '[user-email]'

          hexo clean
          hexo generate
          hexo deploy
action文件主要包括:
- action当检测到
push操作后就会执行 Checkout Latest Version用于拉取仓库的新的提交,Checkout Theme用于拉取主题仓库(这就是之前把主题仓库作为personal-blog的submodule的原因)Cache Node Dependencies用于加快构建速度- 在
Deploy步骤中:- 设置runner为中国时区
- 使用之前步骤新建的
secret用于runner生成ssh,保证runner能够顺利推送静态文件 - git基础配置
- hexo构建和部署
结语
至此,每当我们新写博客,并推送后,github action就能自动将新的博客构建并推送到github page。大家enjoy。
