

一、C-LODOP简介
某日,在划水中的我突然接到一个令我犯难的需求,由于公司仓库人员需要发货,所以提出需要在现有ERP系统中加一个按钮,点击一下这个按钮就可以打印出快递单,这让我这个从没有接触过“硬件”的我犯了难。经过我一下午的思索(百度),我发现了一个前端JS神器-
C-LODOP。
在C-LODOP官网首页我们可以看到
由于官网技术文档描述的很详细,具体细节我们就不带大家过了,总而言之,言而总之,这是一个非常厉害的插件。说白了就是啥都能打印,无所不能。当然,不仅是React基本上只要是JS都可以用。
二、C-LODOP安装
首先,我们来到C-LODOP下载中心
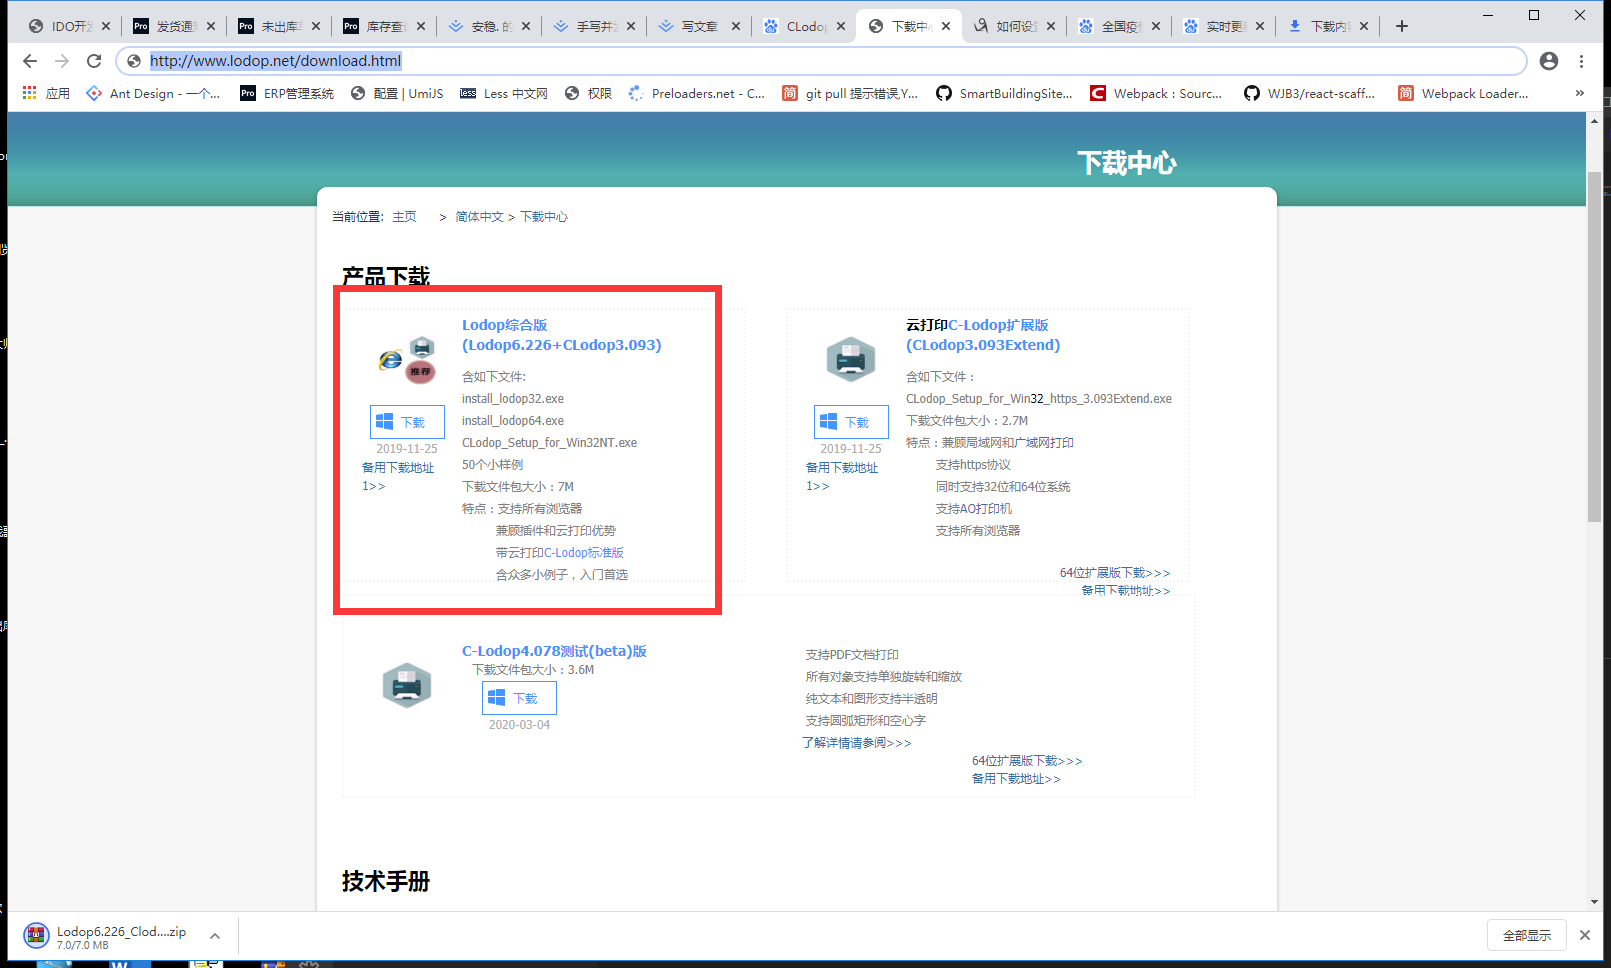
综合版本,这里基本上你所需要的这里都是有的,而且里面有各种丰富的例子供你参考。
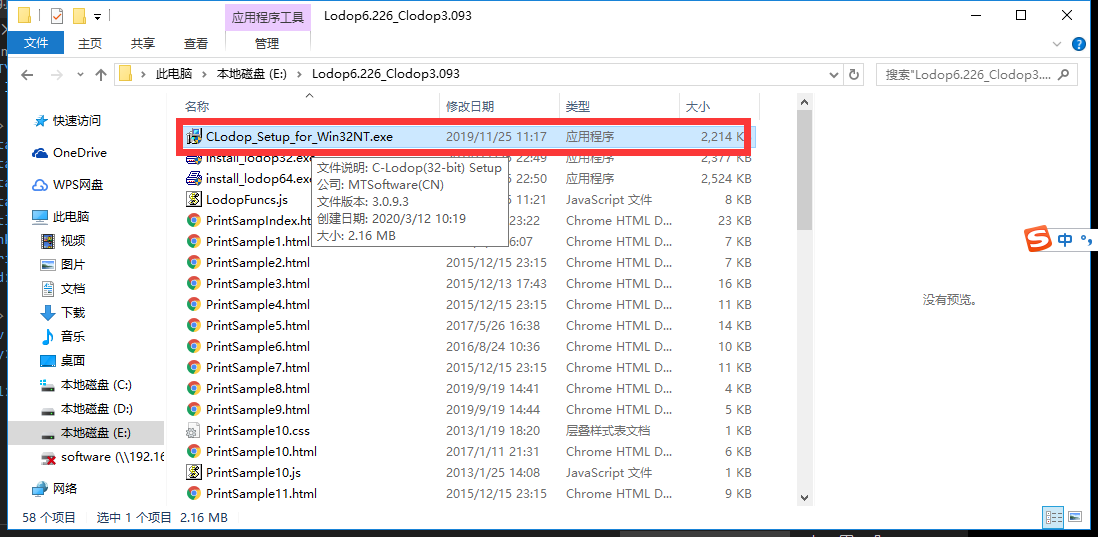
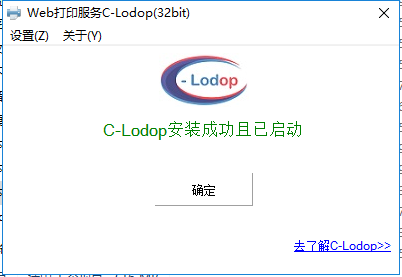
双击安装包的exe文件进行傻瓜式安装(提示:64位/32位均可)

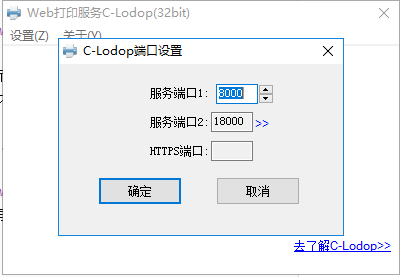
点击设置-》端口设置你可以在这里设置你的端口号,这里我们设置常用的8000
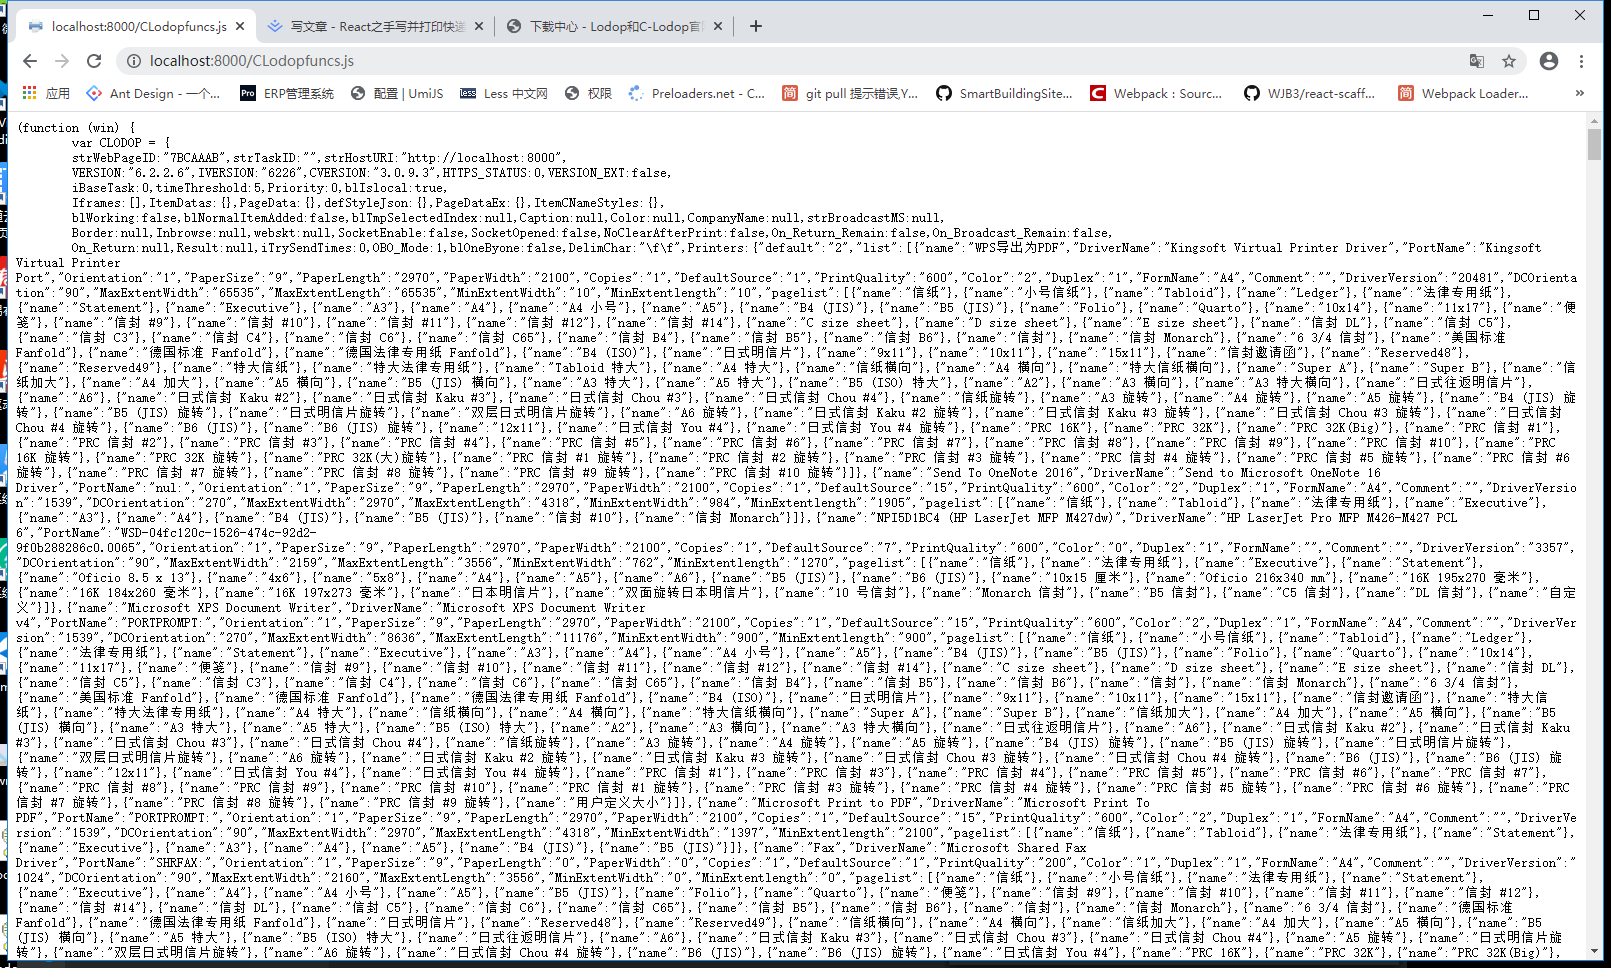
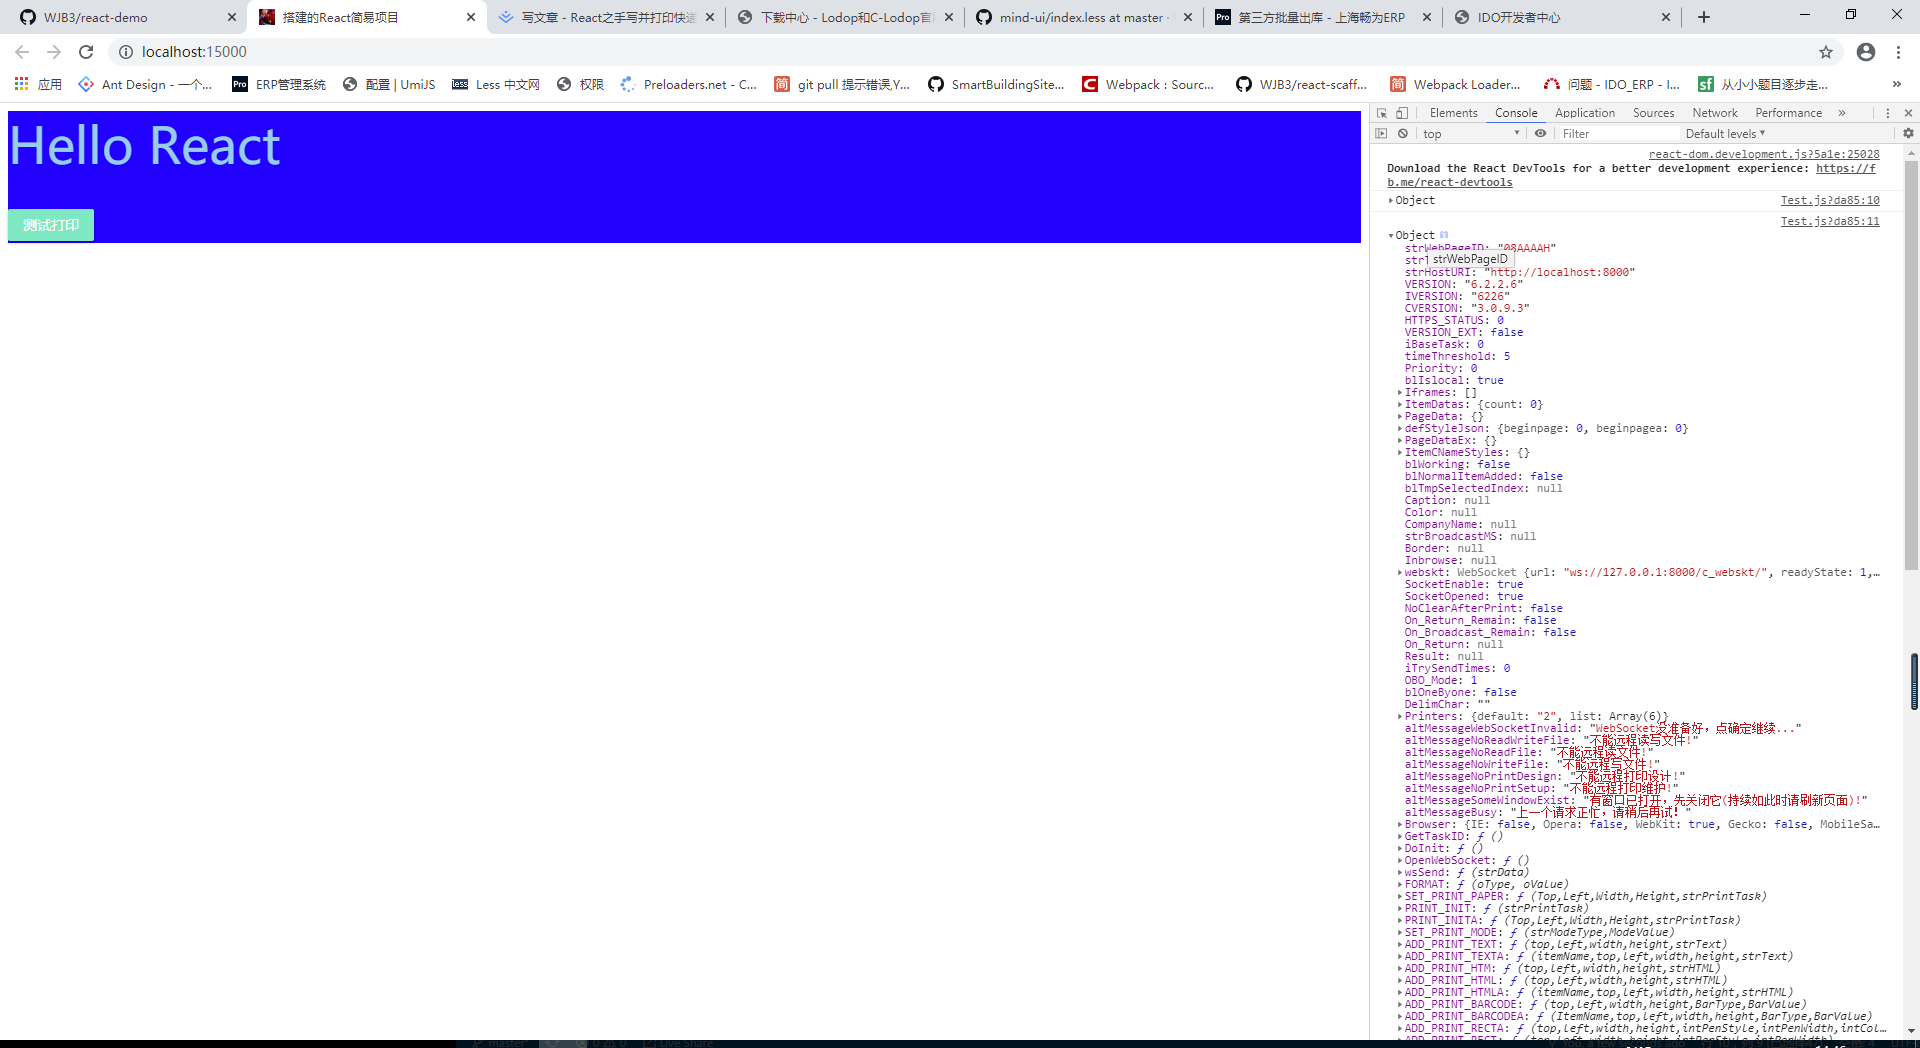
浏览器打开运行js,如果你打开像我这样显示,说明成功运行。
三、业务代码开发
首先我们需要准备一个vue/react开发环境,你可以使用create-react-app(react)/vue-cli(vue)来搭建自己的开发环境,由于作者习惯了使用自己搭建的开发环境,这里我们就使用自己搭建的开发环境。在这里我们也悉心的准备了react/vue的开发环境(如果想学习搭建webpack开发环境,可以参照我的另一篇文章搭建webpack4开发环境,这2套在开发环境中已经使用成熟,请大家放心使用。如果有任何问题可以直接联系我。
因为我们是在React中使用,所以我们就使用react的脚手架,拉取到本地执行命令yarn start。
我们只是测试使用,所以我们首先写一个button,再加点样式,既然是点击,再给一个点击事件。
<button style={buttonObj} onClick={this.handlePrint}>测试打印</button>

handlePrint=()=>{

}
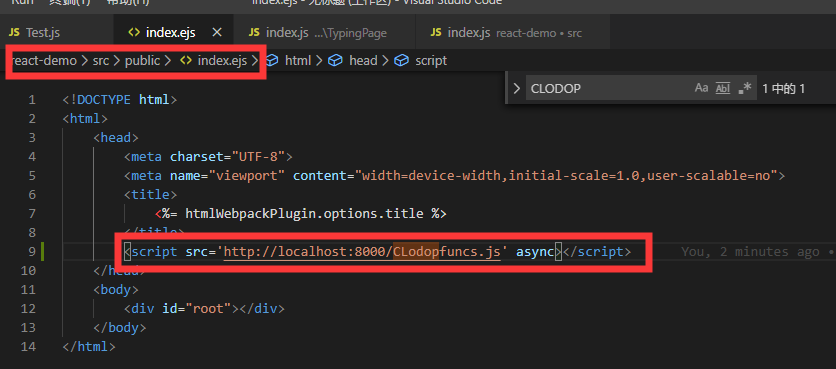
接下来只需要在方法里面写相对应的方法就好了。 首先如果使用c-lodop需要启动c-lodop程序,并设置对应的端口号。在下载后的文档中可以看到:
调用C-Lodop很简单,在页面head中 添加 如下路径的js文件,就可以向其发打印请求了,如下几个例子都可以在欢迎页面或Lodopfuncs.js这个样例文件里找到:
<script src='http://localhost:8000(tips:这里写程序对应的端口号即可)/CLodopfuncs.js'></script>
引入以后,在全局会得到一个CLODOP对象
我们在public->index.ejs下添加这段js,然后在生命周期函数里面打印看是否有效
componentDidMount(){
    console.log(CLODOP)
    console.log(LODOP)
}
Create_Printer_List
作用:建立打印机名单,并添加到当前页面某个
select标签元素中。即该对象可以在js拿到电脑中所有连接的电脑。并赋值到select标签中。
格式:
Create_Printer_List(oElement);//oElement就是标签节点,且目标对象必须是已存在的select
举例:
CLODOP.Create_Printer_List(document.getElementById('Select01'));
Create_PageSize_List
作用:获得目标打印机所拥有的纸张类型名单,并添加到当前页面某个
select标签对象元素中。即可以获取当前打印机的纸张类型。并赋值到select标签中。
格式:
Create_PageSize_List(oElement, iPrintIndex);//oElement就是标签节点,且目标对象必须是已存在的select。iPrintIndex为打印机对应select标签中的value值.目标打印机在windows系统内的序号 (操作系统对所添加打印机的顺序编号,从0开始)
举例:
CLODOP.Create_PageSize_List(document.getElementById('Select03'), 2);
SET_PRINTER_INDEXA
作用:指定需要打印的打印机
格式:
SET_PRINTER_INDEXA("oIndexOrName");//打印机名称或序号,字符或数字型。
举例:
LODOP.SET_PRINTER_INDEXA("Bullzip PDF Printer");
SET_PRINT_PAGESIZE
作用:设定纸张大小。
格式:
SET_PRINT_PAGESIZE(intOrient,PageWidth,PageHeight,strPageName)//1.intOrient:打印方向及纸张类型,数字型。2.PageWidth:设定自定义纸张宽度,整数或字符型,整数时缺省长度单位为0.1mm。3.PageHeight:固定纸张时设定纸张高;高度自适应时设定纸张底边的空白高。4.strPageName所选纸张类型名,字符型。不同打印机所支持的纸张可能不一样,这里的名称同操作系统内打印机属性中的纸张名称,支持操作系统内的自定义纸张。
举例:
LODOP.SET_PRINT_PAGESIZE(1,2100,2970,"");
设置纸张大小为:宽210mm*高297mm,纵向打印
ADD_PRINT_HTM
作用:增加超文本打印项,设定该打印项在纸张内的位置和区域大小,实现超文本控制打印。即将HTML输出打印。
格式:
ADD_PRINT_HTM(Top,Left,Width,Height,strHtmlContent)。//1.Top:打印项在纸张内的上边距,也就是在每张纸的上下起点位置,整数或字符型,整数时缺省长度单位为px。(相当于padding-top)。2.left:打印项在纸张内的左边距,也就是在每张纸的左右起点位置,整数或字符型,整数时缺省长度单位为px。(相当于padding-left)。3.Width:打印区域的宽度,整数或字符型,整数时缺省长度单位为px。4.Height:打印区域的高度,整数或字符型,整数时缺省长度单位为px。5.strHtmlContent:打印的html内容。
举例:
LODOP.ADD_PRINT_HTM(0,0, 300,100,"<hr><font size=5>hello </font>");
PREVIEW
作用:打印预览输出页。
格式:
PREVIEW()
举例:
LODOP.PREVIEW()//需要在建立打印页以后才能执行!
PRINT
作用:直接打印。
格式:
PRINT()
举例:LODOP.PRINT()
PRINT_DESIGN
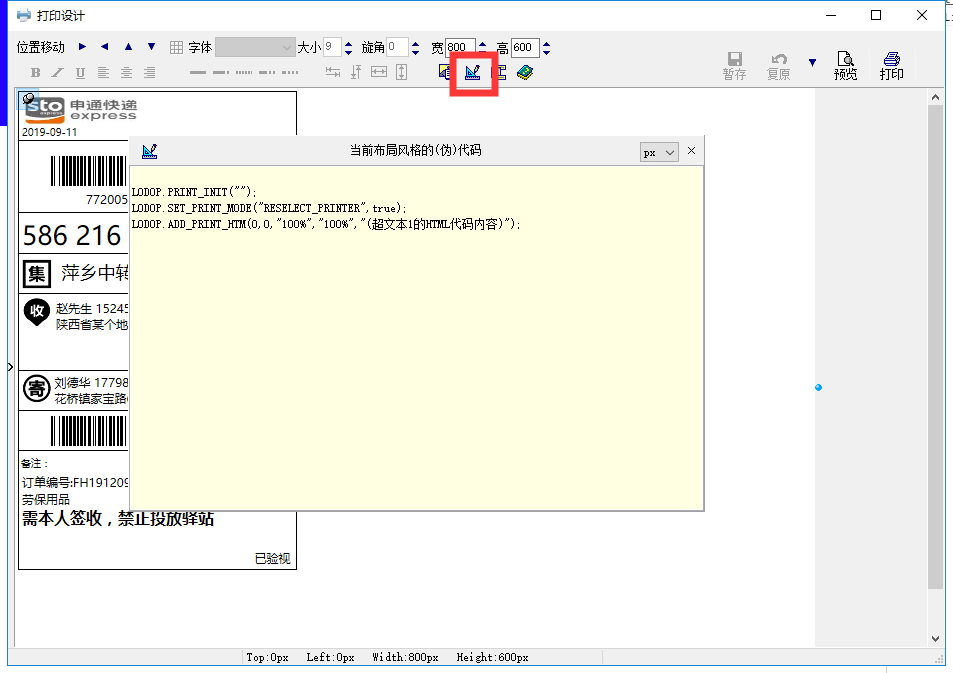
作用:对整页的打印布局和打印风格进行界面设计,它与打印维护的区别是具有打印项增删功能,目标使用者是软件开发者。(这个API极为重要,可以设计并生成代码)
格式:
PRINT_DESIGN()
举例:
LODOP.PRINT_DESIGN()
需要注意的是
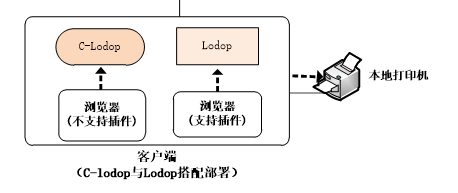
CLODOP和LODOP并不是同一个对象!!!
好了,接下来进行真正的开发咯! 首先,我们需要创造2个select框来选择打印机与纸张!
const selectObj={
            border: "1px solid #d9d9d9",
            padding: "4px 0"
}
//由于Clodop需要获取节点,所以我们通过ref获取便签的节点,value值我们也动态的赋值,便于更新view,change方法用于select框的选择
 <select style={selectObj} ref={ref => this.selectRefs = ref} value={this.state.printerValue} size="1" onChange={this.handleChangePrinter}></select>

 <select style={selectObj} ref={ref => this.pageRefs = ref} value={this.state.pageValue} size="1" onChange={this.handleChangePage}></select>

handleChangePrinter=()=>{
}
handleChangePage=()=>{
}
然后在构造函数初始化打印机和打印机纸张的value对应的state,生命周期中利用CLODOP的APICreate_Printer_List、Create_PageSize_List来创造打印机以及打印机的纸张
constructor(props){
        super(props);
        this.state={
            //由于初始化时我们需要创造打印机的纸张,所以我们需要打印机的value,
            //由于操作系统打印机的顺序是由0开始的所以我们初始化时设置0
            printerValue:0,
            pageValue:undefined
        }
}
componentDidMount(){
        if(typeof CLODOP!=="undefined" && typeof LODOP!=="undefined"){
            CLODOP.Create_Printer_List(this.selectRefs);
            CLODOP.Create_PageSize_List(this.pageRefs, this.state.printerValue);
        }
}
写到这里,你就可以在页面上看到
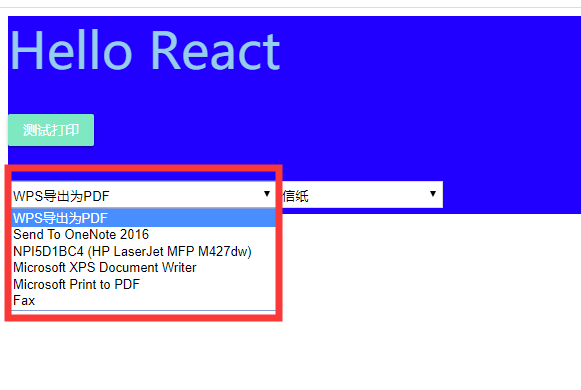
CLODOP.Create_PageSize_List(this.pageRefs, this.state.printerValue)所得到的,也就是根据第一个select框中的值得到的,那么如果你不想用这个打印机应该怎么办呢?
//在打印机select框的change事件中改变select受控组件的值,并且需要将打印纸张的value值设置为undefined,为什么呢?
//假设你在第一个打印机中选择了第十种打印纸张,然后你选择了第二个打印机,而第二个打印机只有2种纸张,如果不清除value的话,还是10择会影响程序
handleChangePrinter=(e)=>{
        this.setState({
            printerValue: e.target.value,
            pageValue: undefined
        }, () => {
            if (typeof CLODOP !== "undefined") {
                CLODOP.Create_PageSize_List(this.pageRefs, this.state.printerValue);
            }
        })
}
这下子你会发现打印纸张随着打印机的变化而变化了。这就达到了我们想要的效果。但是不仅需要选择打印机,打印肯定要选择打印纸张,不然程序不知道你选择哪种纸张,所以在打印机的change函数中写对应的逻辑。
handleChangePage=(e)=>{
    this.setState({
        pageValue: e.target.value
    })
}
当我们选择完打印机以及打印纸张后,下一步应该是点击打印出打印纸张,所以在button的click事件中我们写相应的代码。 首先新建我们的快递单HTML,这里我就不详细介绍了
//LogisticCode,MarkDestination,PackageName,Sender,Receiver,Onecode,OrderCode,Remark=""这些都是数据,直接放到html模板内即可,这里我们将这个封装成一个js文件,方便调用(由于部分字符违禁,代码不全,如有需要可以从github上拉取,文末有地址)
export function expressHtml(LogisticCode,MarkDestination,PackageName,Sender,Receiver,Onecode,OrderCode,Remark=""){
    return `<html style="overflow:hidden;"><head><style>.item{position:absolute;}</style></head><body style="position:relative;overflow:hidden;">
    <div class="item vline" style="left:1px;top:1px;height:479px;width:0;border-left:1px solid #000;"></div>
    <div class="item hline" style="left:1px;top:1px;width:278px;height:0;border-top:0.909091px solid #000"></div>
    <div class="item vline" style="left:279px;top:1px;height:479px;width:0;border-left:1px solid #000;"></div>
    <div class="item hline" style="left:2px;top:50px;width:278px;height:0;border-top:0.909091px solid #000"></div>
    <div class="item hline" style="left:1px;top:280px;width:278px;height:0;border-top:0.994318px solid #000"></div>
    <div class="item text" style="left:5px;top:35px;width:148.011364px;height:12.011364px;font-family:'微软雅黑';font-size:10px;font-weight:400;overflow:visible">2019-09-11</div>
    <div class="item text" style="left:68.9943px;top:100.98px;width:154.011364px;height:17.011364px;font-family:'微软雅黑';font-size:12px;font-weight:400;overflow:visible">${LogisticCode}</div>
    <div class="item hline" style="left:2px;top:122px;width:278px;height:0;border-top:0.994318px solid #000"></div>
    <div class="item hline" style="left:1px;top:163px;width:278px;height:0;border-top:0.994318px solid #000"></div>
    <div class="item hline" style="left:1px;top:203px;width:278px;height:0;border-top:0.994318px solid #000"></div>
    <div class="item hline" style="left:1px;top:479px;width:278px;height:0;border-top:0.994318px solid #000"></div>
    <div class="item text" style="left:39.9972px;top:348px;width:232.011364px;height:16.011364px;font-family:'微软雅黑';font-size:10px;font-weight:400;overflow:visible"></div>
    <div class="item text" style="left:164.5px;top:5px;width:65.011364px;height:19.011364px;font-family:'微软雅黑';font-size:13px;font-weight:800;overflow:visible;display:none">代收货款:</div>
    <div class="item text" style="left:164.5px;top:26px;width:61.011364px;height:20.011364px;font-family:'微软雅黑';font-size:14px;font-weight:400;overflow:visible;display:none"></div>
    <div class="item text" style="left:237.486px;top:460px;width:46.011364px;height:17.011364px;font-family:'微软雅
    <div class="item text" style="color:white;left:235.923px;top:6.96022px;width:0px;height:0px;font-family:'微软雅黑';font-size:15px;font-weight:900;overflow:visible;display:none">货到付款</div>
    <div class="item image" style="left: 34.4886px;top: 65.983px;width: 243px;height: 49px;">${Onecode}</div></body></html>
    `
}
首先引入这个js文件模板
import { expressHtml } from './ExpressHtml';
//封装通用函数,根据传入MODE不同调用LODOP对应不同的功能,一般来说数据都是后端通过快递鸟等平台接口调取的,为了方便测试我们这里采用模拟的假数据
demoPrint=(MODE,html)=>{//MODE对应着LODOP的预览、打印以及设计
const MarkDestination="586 216 ";
const LogisticCode="7720052644695844";
const PackageName="萍乡中转包";
const OrderCode="FH191209007";
const Sender={
Name: "刘德宝",
Mobile: "17798680131",
ProvinceName: "江苏省",
CityName: "苏州市",
ExpAreaName: "昆山市",
Address: "花桥镇家宝路608号 工业园H库"
}
const Receiver={
Name: "赵先生",
Mobile: "15245451110",
ProvinceName: "江西省",
CityName: "萍乡市",
ExpAreaName: "莲花县",
Address: "陕西省某个地方",
}
const Onecode=`<div style="font-size:0;position:relative;width:200px;height:30px;">
<div style="background-color:black;width:2px;height:30px;position:absolute;left:0px;top:0px;"> </div>
<div style="background-color:black;width:1px;height:30px;position:absolute;left:3px;top:0px;"> </div>
<div style="background-color:black;width:1px;height:30px;position:absolute;left:8px;top:0px;"> </div>
<div style="background-color:black;width:3px;height:30px;position:absolute;left:11px;top:0px;"> </div>
<div style="background-color:black;width:2px;height:30px;position:absolute;left:15px;top:0px;"> </div>
<div style="background-color:black;width:3px;height:30px;position:absolute;left:18px;top:0px;"> </div>
<div style="background-color:black;width:3px;height:30px;position:absolute;left:22px;top:0px;"> </div>
<div style="background-color:black;width:2px;height:30px;position:absolute;left:26px;top:0px;"> </div>
<div style="background-color:black;width:3px;height:30px;position:absolute;left:29px;top:0px;"> </div>
<div style="background-color:black;width:2px;height:30px;position:absolute;left:33px;top:0px;"> </div>
<div style="background-color:black;width:3px;height:30px;position:absolute;left:37px;top:0px;"> </div>
<div style="background-color:black;width:1px;height:30px;position:absolute;left:42px;top:0px;"> </div>
<div style="background-color:black;width:1px;height:30px;position:absolute;left:44px;top:0px;"> </div>
<div style="background-color:black;width:3px;height:30px;position:absolute;left:47px;top:0px;"> </div>
<div style="background-color:black;width:2px;height:30px;position:absolute;left:51px;top:0px;"> </div>
<div style="background-color:black;width:1px;height:30px;position:absolute;left:55px;top:0px;"> </div>
<div style="background-color:black;width:3px;height:30px;position:absolute;left:58px;top:0px;"> </div>
<div style="background-color:black;width:2px;height:30px;position:absolute;left:62px;top:0px;"> </div>
<div style="background-color:black;width:2px;height:30px;position:absolute;left:66px;top:0px;"> </div>
<div style="background-color:black;width:3px;height:30px;position:absolute;left:69px;top:0px;"> </div>
<div style="background-color:black;width:1px;height:30px;position:absolute;left:74px;top:0px;"> </div>
<div style="background-color:black;width:2px;height:30px;position:absolute;left:77px;top:0px;"> </div>
<div style="background-color:black;width:3px;height:30px;position:absolute;left:81px;top:0px;"> </div>
<div style="background-color:black;width:1px;height:30px;position:absolute;left:86px;top:0px;"> </div>
<div style="background-color:black;width:2px;height:30px;position:absolute;left:88px;top:0px;"> </div>
<div style="background-color:black;width:3px;height:30px;position:absolute;left:92px;top:0px;"> </div>
<div style="background-color:black;width:1px;height:30px;position:absolute;left:96px;top:0px;"> </div>
<div style="background-color:black;width:2px;height:30px;position:absolute;left:99px;top:0px;"> </div>
<div style="background-color:black;width:1px;height:30px;position:absolute;left:103px;top:0px;"> </div>
<div style="background-color:black;width:3px;height:30px;position:absolute;left:106px;top:0px;"> </div>
<div style="background-color:black;width:2px;height:30px;position:absolute;left:110px;top:0px;"> </div>
<div style="background-color:black;width:1px;height:30px;position:absolute;left:114px;top:0px;"> </div>
<div style="background-color:black;width:3px;height:30px;position:absolute;left:117px;top:0px;"> </div>
<div style="background-color:black;width:2px;height:30px;position:absolute;left:121px;top:0px;"> </div>
<div style="background-color:black;width:3px;height:30px;position:absolute;left:125px;top:0px;"> </div>
<div style="background-color:black;width:1px;height:30px;position:absolute;left:129px;top:0px;"> </div>
<div style="background-color:black;width:3px;height:30px;position:absolute;left:132px;top:0px;"> </div>
<div style="background-color:black;width:1px;height:30px;position:absolute;left:137px;top:0px;"> </div>
<div style="background-color:black;width:2px;height:30px;position:absolute;left:139px;top:0px;"> </div>
<div style="background-color:black;width:3px;height:30px;position:absolute;left:143px;top:0px;"> </div>
<div style="background-color:black;width:1px;height:30px;position:absolute;left:147px;top:0px;"> </div>
<div style="background-color:black;width:2px;height:30px;position:absolute;left:150px;top:0px;"> </div>
<div style="background-color:black;width:3px;height:30px;position:absolute;left:154px;top:0px;"> </div>
<div style="background-color:black;width:1px;height:30px;position:absolute;left:159px;top:0px;"> </div>
<div style="background-color:black;width:2px;height:30px;position:absolute;left:161px;top:0px;"> </div>
<div style="background-color:black;width:3px;height:30px;position:absolute;left:165px;top:0px;"> </div>
<div style="background-color:black;width:1px;height:30px;position:absolute;left:169px;top:0px;"> </div>
<div style="background-color:black;width:2px;height:30px;position:absolute;left:172px;top:0px;"> </div>
<div style="background-color:black;width:1px;height:30px;position:absolute;left:176px;top:0px;"> </div>
<div style="background-color:black;width:1px;height:30px;position:absolute;left:178px;top:0px;"> </div>
<div style="background-color:black;width:2px;height:30px;position:absolute;left:183px;top:0px;"> </div>
<div style="background-color:black;width:2px;height:30px;position:absolute;left:187px;top:0px;"> </div>
<div style="background-color:black;width:3px;height:30px;position:absolute;left:192px;top:0px;"> </div>
<div style="background-color:black;width:1px;height:30px;position:absolute;left:196px;top:0px;"> </div>
<div style="background-color:black;width:2px;height:30px;position:absolute;left:198px;top:0px;"> </div>
<div style="background-color:black;width:0px;height:30px;position:absolute;left:200px;top:0px;"> </div>
<div style="background-color:black;width:0px;height:30px;position:absolute;left:200px;top:0px;"> </div>
</div>`
const html = expressHtml(LogisticCode, MarkDestination, PackageName, Sender, Receiver, Onecode, OrderCode);
LODOP.SET_PRINTER_INDEXA(Number(printerValue));
LODOP.ADD_PRINT_HTM(0, 0, "100%", "100%", html);
if(MODE){
LODOP[MODE]();
}
}
然后我们在点击函数中,调用这个方法即可。
handlePrint=()=>{
    //const MODE="PREVIEW";
    //const MODE="PRINT_DESIGN";
    const MODE="PRINT";
    this.demoPrint(MODE)
}
下面展示三种模式下的区别
//PREVIEW模式

//PRINT_DESIGN模式
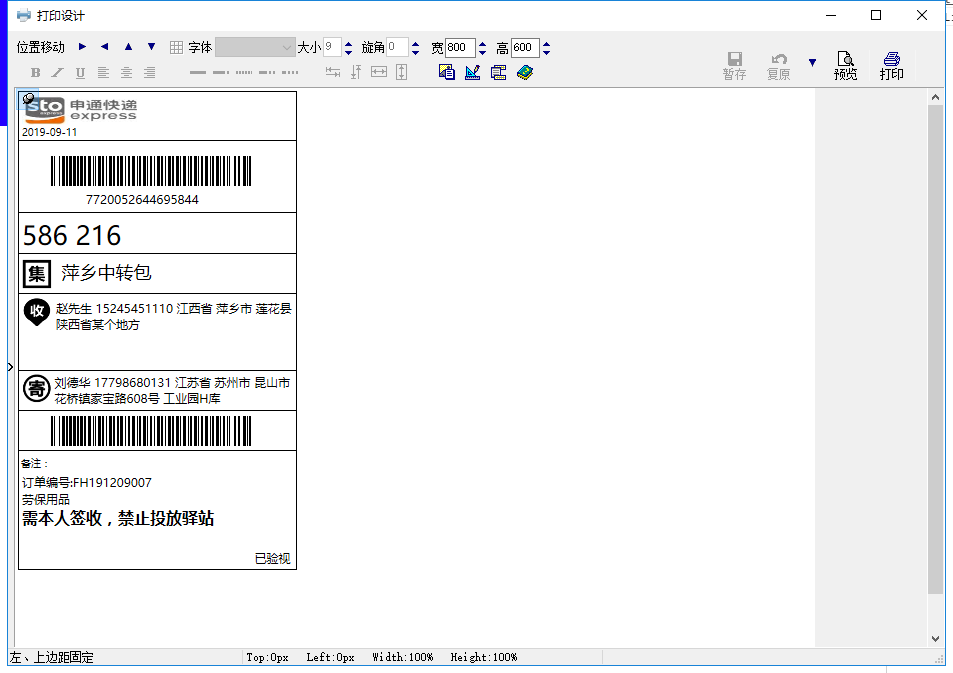
更厉害的是在设计的时候,程序可以自动生成建模代码,妈妈再也不用担心我写快递单了!具体步骤为
//PRINT模式
该模式下,如果已连接打印机,如果没问题的话直接就会生成快递单

四、总结
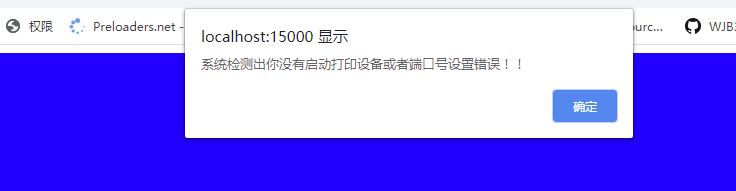
最后我们给代码增加一下兼容性处理,如果没有启动程序或者端口号错误,在打印的时候给一个提示框!
if(typeof CLODOP==="undefined"){
            alert("系统检测出你没有启动打印设备或者端口号设置错误!!");
            return;
}
至此,打印快递单的所有代码都已经完成了,本节的所有代码都上传到了github上供同学们查看下载。还附赠快递单的html哦!是不是非常超值呢!如果这篇文章对你有所帮助可以点赞哦!
