

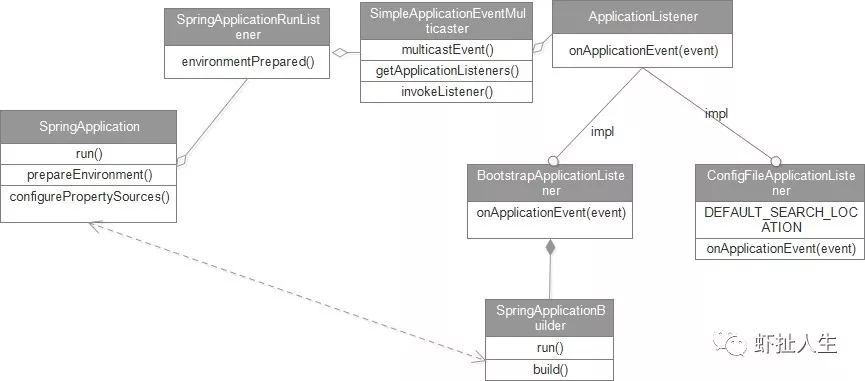
这篇文章主要说一说上一篇文章留下的问题 如果某个配置项存在于多个配置位置(环境变量、系统属性、命令行参数、内部配置文件,外部配置文件),那么会取哪一个配置中的值作为最终值呢? 阅读了一遍源代码,得出了如下一张类图,整个配置文件加载过程涉及到的类均在途中列举出来
private ConfigurableEnvironment prepareEnvironment(SpringApplicationRunListeners listeners,
		ApplicationArguments applicationArguments) {
	// Create and configure the environment
	//1、创建environment
	ConfigurableEnvironment environment = getOrCreateEnvironment();
	//2、配置envirnoment
	configureEnvironment(environment, applicationArguments.getSourceArgs());
	ConfigurationPropertySources.attach(environment);
	//3、监听器准备
	listeners.environmentPrepared(environment);
	bindToSpringApplication(environment);
	if (!this.isCustomEnvironment) {
		environment = new EnvironmentConverter(getClassLoader()).convertEnvironmentIfNecessary(environment,
				deduceEnvironmentClass());
	}
	ConfigurationPropertySources.attach(environment);
	return environment;
}
1 创建并配置加载environment
1.1 getOrCreateEnvironment().
实现environment创建,加载环境变量、系统属性,profile、命令行参数等
/**
*创建
*/
private ConfigurableEnvironment getOrCreateEnvironment() {
	if (this.environment != null) {
		return this.environment;
	}
	switch (this.webApplicationType) {
	case SERVLET: //servlet 模式,我们一般用的是这种模式
		return new StandardServletEnvironment();
	case REACTIVE: //reactive 模式
		return new StandardReactiveWebEnvironment();
	default:
		return new StandardEnvironment();
	}
}

/**
* 配置
*/
protected void configureEnvironment(ConfigurableEnvironment environment, String[] args) {
	if (this.addConversionService) {
		ConversionService conversionService = ApplicationConversionService.getSharedInstance();
		environment.setConversionService((ConfigurableConversionService) conversionService);
	}
	//配置propertysource
	configurePropertySources(environment, args);
	//配置profile
	configureProfiles(environment, args);
}
1.2 环境变量,系统属性加载 (StandardServletEnvironment的构造)
protected void customizePropertySources(MutablePropertySources propertySources) {
	propertySources.addLast(new StubPropertySource("servletConfigInitParams"));
	propertySources.addLast(new StubPropertySource("servletContextInitParams"));
	if (JndiLocatorDelegate.isDefaultJndiEnvironmentAvailable()) {
		propertySources.addLast(new JndiPropertySource("jndiProperties"));
	}

	super.customizePropertySources(propertySources);
}

//父类(StandardEnvironment )的实现
@Override
protected void customizePropertySources(MutablePropertySources propertySources) {
	propertySources.addLast(
			new PropertiesPropertySource(SYSTEM_PROPERTIES_PROPERTY_SOURCE_NAME, getSystemProperties()));
	propertySources.addLast(
			new SystemEnvironmentPropertySource(SYSTEM_ENVIRONMENT_PROPERTY_SOURCE_NAME, getSystemEnvironment()));
}
从上面的代码可以看出构建的servlet environment加载了 ServletConfigInitParams ServletContentInitParams(暂时为空) SystemProperties SystemEnvironment
1.3 配置 PropertySource
 /**
 * Add, remove or re-order any {@link PropertySource}s in this application's
 * environment.  添加、移除、重新排序 PropertySource
 * @param environment this application's environment
 * @param args arguments passed to the {@code run} method
 * @see #configureEnvironment(ConfigurableEnvironment, String[])
 */
protected void configurePropertySources(ConfigurableEnvironment environment, String[] args) {
	MutablePropertySources sources = environment.getPropertySources();
	if (this.defaultProperties != null && !this.defaultProperties.isEmpty()) {
		sources.addLast(new MapPropertySource("defaultProperties", this.defaultProperties));
	}

	//如果需要加载命令行参数(该值默认为true)且传入了参数,执行如下代码,
	if (this.addCommandLineProperties && args.length > 0) {
		String name = CommandLinePropertySource.COMMAND_LINE_PROPERTY_SOURCE_NAME;
		if (sources.contains(name)) {
			//合并命令行参数。
			PropertySource<?> source = sources.get(name);
			CompositePropertySource composite = new CompositePropertySource(name);
			composite.addPropertySource(
					new SimpleCommandLinePropertySource("springApplicationCommandLineArgs", args));
			composite.addPropertySource(source);
			sources.replace(name, composite);
		}
		else {
			//特别注意加载在第一位
			sources.addFirst(new SimpleCommandLinePropertySource(args));
		}
	}
}
到了这里,如果传入有参数,则此时顺序应该是 commandLineArgs, ServletConfigInitParams ServletContentInitParams(暂时为空) SystemProperties SystemEnvironment
1.4 加载 active profile
protected void configureProfiles(ConfigurableEnvironment environment, String[] args) {
	environment.getActiveProfiles(); // ensure they are initialized
	// But these ones should go first (last wins in a property key clash)
	Set<String> profiles = new LinkedHashSet<>(this.additionalProfiles);
	profiles.addAll(Arrays.asList(environment.getActiveProfiles()));
	environment.setActiveProfiles(StringUtils.toStringArray(profiles));
}
2 广播 ApplicationEnvironmentPreparedEvent
environmentPrepared(). 采用观察者模式,发布Event,通知listeners
3 具体通知方法委托SimpleApplicationEventMulticaster执行
@Override
public void multicastEvent(final ApplicationEvent event, @Nullable ResolvableType eventType) {
	ResolvableType type = (eventType != null ? eventType : resolveDefaultEventType(event));
	Executor executor = getTaskExecutor();
	//getApplicationListener为父类中的方法
	for (ApplicationListener<?> listener : getApplicationListeners(event, type)) {
		if (executor != null) {
		//线程池执行
			executor.execute(() -> invokeListener(listener, event));
		}
		else {
			invokeListener(listener, event);
		}
	}
}

//父类方法获取listener
//AbstractApplicationEventMulticaster.getApplicationListeners()
protected Collection<ApplicationListener<?>> getApplicationListeners(
		ApplicationEvent event, ResolvableType eventType) {

	//省略一些代码

	if (this.beanClassLoader == null ||
			(ClassUtils.isCacheSafe(event.getClass(), this.beanClassLoader) &&
					(sourceType == null || ClassUtils.isCacheSafe(sourceType, this.beanClassLoader)))) {
		// Fully synchronized building and caching of a ListenerRetriever
		synchronized (this.retrievalMutex) {
			retriever = this.retrieverCache.get(cacheKey);
			if (retriever != null) {
				return retriever.getApplicationListeners();
			}
			retriever = new ListenerRetriever(true);
			Collection<ApplicationListener<?>> listeners =

			//真正的去获取ApplicationListener

			retrieveApplicationListeners(eventType, sourceType, retriever);
			this.retrieverCache.put(cacheKey, retriever);
			return listeners;
		}
	}
	else {
		// No ListenerRetriever caching -> no synchronization necessary
		return retrieveApplicationListeners(eventType, sourceType, null);
	}
}

private Collection<ApplicationListener<?>> retrieveApplicationListeners(){
    //省略一些代码
    synchronized (this.retrievalMutex) {
         //最重要的一段代码, listener来自于这里
	     listeners = new LinkedHashSet<>(this.defaultRetriever.applicationListeners);
	     listenerBeans = new LinkedHashSet<>(this.defaultRetriever.applicationListenerBeans);
    }
}

//往defaultRetriever.applicatioinListeners中添加listener, 但是这个方法何时在哪里调用?
@Override
public void addApplicationListener(ApplicationListener<?> listener) {
	synchronized (this.retrievalMutex) {
		// Explicitly remove target for a proxy, if registered already,
		// in order to avoid double invocations of the same listener.
		Object singletonTarget = AopProxyUtils.getSingletonTarget(listener);
		if (singletonTarget instanceof ApplicationListener) {
			this.defaultRetriever.applicationListeners.remove(singletonTarget);
		}
		this.defaultRetriever.applicationListeners.add(listener);
		this.retrieverCache.clear();
	}
}
这里需要主要的是,要是一直从文章开始看代码,可能并不知道需要用到的listener从哪里来,我也调式了几遍源代码才发现,其实是在加载prepareEnvironment之前就已经加载。
3.1 获取applicationlistener,从spring.factories文件中读取。
//加载listener在这里,而我们一开始分析的入口在下面
SpringApplicationRunListeners listeners = getRunListeners(args);
listeners.starting();
try {
	ApplicationArguments applicationArguments = new DefaultApplicationArguments(args);
	//我们一开分析的入口在这里
	ConfigurableEnvironment environment = prepareEnvironment(listeners, applicationArguments);


private SpringApplicationRunListeners getRunListeners(String[] args) {
	Class<?>[] types = new Class<?>[] { SpringApplication.class, String[].class };
	return new SpringApplicationRunListeners(logger,
			getSpringFactoriesInstances(SpringApplicationRunListener.class, types, this, args));
}

//SpringApplicationRunListeners的构造
SpringApplicationRunListeners(Log log, Collection<? extends SpringApplicationRunListener> listeners) {
	this.log = log;
	this.listeners = new ArrayList<>(listeners);
}

/**
* 从spring.factories加载listener
*/
private <T> Collection<T> getSpringFactoriesInstances(Class<T> type, Class<?>[] parameterTypes, Object... args) {
	ClassLoader classLoader = getClassLoader();
	// Use names and ensure unique to protect against duplicates
	//先加载出名称
	Set<String> names = new LinkedHashSet<>(SpringFactoriesLoader.loadFactoryNames(type, classLoader));
	//构造
	List<T> instances = createSpringFactoriesInstances(type, parameterTypes, classLoader, args, names);
	AnnotationAwareOrderComparator.sort(instances);
	return instances;
}

//加载名称
public static List<String> loadFactoryNames(Class<?> factoryClass, @Nullable ClassLoader classLoader) {
	String factoryClassName = factoryClass.getName();
	return loadSpringFactories(classLoader).getOrDefault(factoryClassName, Collections.emptyList());
}

//加载SpringFactory,从spring.factories文件中读取
private static Map<String, List<String>> loadSpringFactories(@Nullable ClassLoader classLoader) {
	MultiValueMap<String, String> result = cache.get(classLoader);
	if (result != null) {
		return result;
	}

        // FACTORIES_RESOURCE_LOCATION = "META-INF/spring.factories";
	try {
		Enumeration<URL> urls = (classLoader != null ?
				classLoader.getResources(FACTORIES_RESOURCE_LOCATION) :
				ClassLoader.getSystemResources(FACTORIES_RESOURCE_LOCATION));
		result = new LinkedMultiValueMap<>();
		while (urls.hasMoreElements()) {
			URL url = urls.nextElement();
			UrlResource resource = new UrlResource(url);
			Properties properties = PropertiesLoaderUtils.loadProperties(resource);
			for (Map.Entry<?, ?> entry : properties.entrySet()) {
				String factoryClassName = ((String) entry.getKey()).trim();
				for (String factoryName : StringUtils.commaDelimitedListToStringArray((String) entry.getValue())) {
					result.add(factoryClassName, factoryName.trim());
				}
			}
		}
		cache.put(classLoader, result);
		return result;
	}
	catch (IOException ex) {
		throw new IllegalArgumentException("Unable to load factories from location [" +
				FACTORIES_RESOURCE_LOCATION + "]", ex);
	}
}
而其中有一个listener名叫 EventPublishingRunListener,他所实现的功能就是注册listener
public EventPublishingRunListener(SpringApplication application, String[] args) {
	this.application = application;
	this.args = args;
	this.initialMulticaster = new SimpleApplicationEventMulticaster();
	for (ApplicationListener<?> listener : application.getListeners()) {
		this.initialMulticaster.addApplicationListener(listener);
	}
}

// AbstractApplicationEventMulticaster中的方法
@Override
public void addApplicationListener(ApplicationListener<?> listener) {
	synchronized (this.retrievalMutex) {
		// Explicitly remove target for a proxy, if registered already,
		// in order to avoid double invocations of the same listener.
		Object singletonTarget = AopProxyUtils.getSingletonTarget(listener);
		if (singletonTarget instanceof ApplicationListener) {
			this.defaultRetriever.applicationListeners.remove(singletonTarget);
		}
		this.defaultRetriever.applicationListeners.add(listener);
		this.retrieverCache.clear();
	}
}
实际上在更早之前,SpringApplication的构造,上面这代码就有调用到,多数的listener都是在那个时候加载
public SpringApplication(ResourceLoader resourceLoader, Class<?>... primarySources) {
	this.resourceLoader = resourceLoader;
	Assert.notNull(primarySources, "PrimarySources must not be null");
	this.primarySources = new LinkedHashSet<>(Arrays.asList(primarySources));
	this.webApplicationType = WebApplicationType.deduceFromClasspath();
	setInitializers((Collection) getSpringFactoriesInstances(ApplicationContextInitializer.class));
	setListeners((Collection) getSpringFactoriesInstances(ApplicationListener.class));
	this.mainApplicationClass = deduceMainApplicationClass();
}
3.2 几个相关的Listener
主要讲几个和Spring cloud关系比较的listener,会涉及到Spring Cloud的启动
3.2.1 BootstrapApplicationListener
实现BootstrapContext构造初始化,加载spring cloud特定的类。默认从bootstrap中读取spring cloud相关配置
public void onApplicationEvent(ApplicationEnvironmentPreparedEvent event) {
	ConfigurableEnvironment environment = event.getEnvironment();
	if (!environment.getProperty("spring.cloud.bootstrap.enabled", Boolean.class,
			true)) {
		return;
	}
	//如果spring cloud已经初始化则不做处理
	// don't listen to events in a bootstrap context
	if (environment.getPropertySources().contains(BOOTSTRAP_PROPERTY_SOURCE_NAME)) {
		return;
	}
	ConfigurableApplicationContext context = null;
	//spring cloud配置文件读取,默认从bootstrap中获取
	String configName = environment
			.resolvePlaceholders("${spring.cloud.bootstrap.name:bootstrap}");
	for (ApplicationContextInitializer<?> initializer : event.getSpringApplication()
			.getInitializers()) {
		if (initializer instanceof ParentContextApplicationContextInitializer) {
			context = findBootstrapContext(
					(ParentContextApplicationContextInitializer) initializer,
					configName);
		}
	}
	if (context == null) {
	    //构造bootstrap context
		context = bootstrapServiceContext(environment, event.getSpringApplication(),
				configName);
		event.getSpringApplication()
				.addListeners(new CloseContextOnFailureApplicationListener(context));
	}

	apply(context, event.getSpringApplication(), environment);
}
3.2.1.1 构造spring cloud bootstrap
可以通过spring.cloud.bootstrap.location(环境变量、系统属性、命令行参数)来指定配置文件位置。
private ConfigurableApplicationContext bootstrapServiceContext(
		ConfigurableEnvironment environment, final SpringApplication application,
		String configName) {
	StandardEnvironment bootstrapEnvironment = new StandardEnvironment();
	MutablePropertySources bootstrapProperties = bootstrapEnvironment
			.getPropertySources();
	for (PropertySource<?> source : bootstrapProperties) {
		bootstrapProperties.remove(source.getName());
	}
	String configLocation = environment
			.resolvePlaceholders("${spring.cloud.bootstrap.location:}");
	Map<String, Object> bootstrapMap = new HashMap<>();
	bootstrapMap.put("spring.config.name", configName);
	// if an app (or test) uses spring.main.web-application-type=reactive, bootstrap
	// will fail
	// force the environment to use none, because if though it is set below in the
	// builder
	// the environment overrides it
	bootstrapMap.put("spring.main.web-application-type", "none");
	if (StringUtils.hasText(configLocation)) {
	//如果通过spring.cloud.bootstrap.location指定了配置文件路径
		bootstrapMap.put("spring.config.location", configLocation);
	}

	//将spring boot配置放在第一位
	bootstrapProperties.addFirst(
			new MapPropertySource(BOOTSTRAP_PROPERTY_SOURCE_NAME, bootstrapMap));
	for (PropertySource<?> source : environment.getPropertySources()) {
		if (source instanceof StubPropertySource) {
			continue;//(servlet相关的属于这里,会被排除)
		}
		//将其他类型的Property在bootstrap最后,意味着命令行参数都要排在bootstrap之后
		bootstrapProperties.addLast(source);
	}
	// TODO: is it possible or sensible to share a ResourceLoader?
	SpringApplicationBuilder builder = new SpringApplicationBuilder()
			.profiles(environment.getActiveProfiles()).bannerMode(Mode.OFF)
			.environment(bootstrapEnvironment)
			// Don't use the default properties in this builder
			.registerShutdownHook(false).logStartupInfo(false)
			.web(WebApplicationType.NONE);
	final SpringApplication builderApplication = builder.application();
	if (builderApplication.getMainApplicationClass() == null) {
		// gh_425:
		// SpringApplication cannot deduce the MainApplicationClass here
		// if it is booted from SpringBootServletInitializer due to the
		// absense of the "main" method in stackTraces.
		// But luckily this method's second parameter "application" here
		// carries the real MainApplicationClass which has been explicitly
		// set by SpringBootServletInitializer itself already.
		builder.main(application.getMainApplicationClass());
	}
	if (environment.getPropertySources().contains("refreshArgs")) {
		// If we are doing a context refresh, really we only want to refresh the
		// Environment, and there are some toxic listeners (like the
		// LoggingApplicationListener) that affect global static state, so we need a
		// way to switch those off.
		builderApplication
				.setListeners(filterListeners(builderApplication.getListeners()));
	}
	builder.sources(BootstrapImportSelectorConfiguration.class);
	//开始运行,将会加载上一篇文章讲到的外部的配置
	final ConfigurableApplicationContext context = builder.run();
	// gh-214 using spring.application.name=bootstrap to set the context id via
	// `ContextIdApplicationContextInitializer` prevents apps from getting the actual
	// spring.application.name
	// during the bootstrap phase.
	context.setId("bootstrap");
	// Make the bootstrap context a parent of the app context
	addAncestorInitializer(application, context);

	//移除bootstrap中配置的参数
	// It only has properties in it now that we don't want in the parent so remove
	// it (and it will be added back later)
	bootstrapProperties.remove(BOOTSTRAP_PROPERTY_SOURCE_NAME);
	//合并默认参数
	mergeDefaultProperties(environment.getPropertySources(), bootstrapProperties);
	return context;
}
3.2.2 ConfigFileApplicationListener (加载spring cloud专用的属性)
负责读取配置文件(bootstrap),如果指定了spring.config.location,则读取spring.config.location位置的配置文件,否则读取默认位置的配置文件。默认位置按照下图倒序读取。

3.3 prepareContext()
执行过程中将会调用到前一篇文章说到的prepareContext(),加载自定义的外部配置路径,比如zookeeper上
3.4 其他操作
完成bootstrap context构造
4 继续执行外部context操作。
ConfigFileApplicationListener 加载application文件
5 总结
全部看下来,确实有点搞晕了,需要慢慢的消化消化。
最终效果,大致是这样在 Srping Boot环境中
- 命令行参数(main方法中的args接收到的值)
- ServletConfigInitParam
- ServeltContextInitParam
- SystemProperties
- SystemEnvironment
- appliction
- bootstrap(zookeeper) (在Spring Cloud环境中则是 bootstrap中的内容排在第一,然后才是system properties等)
需要注意的是,实际上运行的时候,bootstrap(zookeekper)配置的内容会被首先使用,因为会先初始化spring cloud环境,初始化完成过后,会将这个配置文件中的内容追加到外部spring boot environment中
而bootstrap和application文件查找的中的优先级则为 file./config file./ classpath:config classpath:.
示例:
- resources 目录下有application.yml(或application.properties) 中配置server.port=5555
- resources 目录下有config子目录,其目录下有application.yml(或application.properties) 中配置server.port=4444
- resources 目录下有bootstrap.yml(或bootstrap.properties) 中配置server.port=7777
- resources 目录下有config子目录,其目录下有bootstrap.yml(或bootstrap.properties) 中配置server.port=6666
- 执行命令 java -jar -Dserver.port=3333 test.jar --server.port=2222
要想使用数值比较大的端口号,则需要去掉比起端口小的配置。
