IOS音视频(四十三)AVFoundation 之 Audio Session
IOS音视频(四十四)AVFoundation 之 Audio Queue Services
IOS音视频(四十六)离线在线语音识别方案
最近做了一个语音识别相关的研究,因为公司需要使用离线语音识别功能,为了兼顾性能和价格方面的问题,最终选择的方案是,在线时使用siri,离线使用百度语音识别方案。
封装了一个离线在线合成的SDK:语音识别SDK 这个Demo里面没有上传百度libBaiduSpeechSDK.a 文件,因为这个文件太大了超过了100M,无法上传到Git,需要自己从官方SDK下载替换到Demo中。
这里总结一下现有的几种离线语音识别方案
- 简易使用第三方SDK方案
| 方案 | 优点 | 缺点 | 价格 | 成功率 |
|---|---|---|---|---|
| 科大讯飞 | 成功率高95% | 价格贵,增加ipa包大小 | 可用买断或按流量,一台设备成本4元左右 | 成功率95%左右 |
| 百度AI | 成功率比较高90% ,价格便宜,离线识别免费 ,提供了自定义模型训练,训练后识别率提高较多 | 增加ipa包大小, 识别率不高,离线只支持命令词方式,支持的语音只有中文和英文,在线时会强制使用在线识别方式,超过免费流量后就要收费,如果欠费,什么都用不了;离线引擎使用至少需要连一次外网 | 离线命令词免费,在线识别按流量次数计算,1600元套餐包(200万次中文识别,5万次英文识别) | 在线识别成功率95%左右,离线识别基本上达不到90% |
| siri | 成功高,免费,原始自带,苹果系统自带,不会增加包大小 | 有局限性,要求IOS10以上系统才能使用siri api, IOS 系统13以上支持离线语音识别,但离线识别不支持中文识别,英文离线识别比百度的准确率高 | 完全免费 | 在线识别率跟科大讯飞差不多95%以上,离线英文识别也有90%左右 |
- 开源代码方案
| 方案 | 优点 | 缺点 | 说明 | 成功率 |
|---|---|---|---|---|
| KALDI开源框架 | KALDI是著名的开源自动语音识别(ASR)工具,这套工具提供了搭建目前工业界最常用的ASR模型的训练工具,同时也提供了其他一些子任务例如说话人验证(speaker verification)和语种识别(language recognition)的pipeline。KALDI目前由Daniel Povey维护,他之前在剑桥做ASR相关的研究,后来去了JHU开发KALDI,目前在北京小米总部作为语音的负责人。同时他也是另一个著名的ASR工具HTK的主要作者之一。 | |||
| CMU-Sphinx开源框架 | 功能包括按特定语法进行识别、唤醒词识别、n-gram识别等等,这款语音识别开源框架相比于Kaldi比较适合做开发,各种函数上的封装浅显易懂,解码部分的代码非常容易看懂,且除开PC平台,作者也考虑到了嵌入式平台,Android开发也很方便,已有对应的Demo,Wiki上有基于PocketSphinx的语音评测的例子,且实时性相比Kaldi好了很多。 | 相比于Kaldi,使用的是GMM-HMM框架,准确率上可能会差一些;其他杂项处理程序(如pitch提取等等)没有Kaldi多。 | ||
| HTK-Cambridage | 是C语音编写,支持win,linux,ios |
方案一:Siri语音识别
Siri语音识别简介
Siri语音识别用到的Api主要是SFSpeechRecognizer声音处理器,是IOS 10 才提供的api,所以只有IOS 10以上才能使用,从IOS10 到 IOS13 直接苹果只提供了在线识别方式,IOS13之后提供了离线识别方式。不过离线识别方式不支持中文模式,官方虽然说支持中文,但是实际测试发现中文离线识别根本无法识别。
Siri语音识别功能类介绍
- 引入系统库Speech
SFSpeechRecognizer声音处理器,这个类是语音识别的操作类,用于语音识别用户权限的申请,语言环境的设置,语音模式的设置以及向Apple服务发送语音识别的请求。 例如下面代码会根据传入的语言简称来返回一个声音处理器,如果不支持,怎会返回nil。更多细节可以查看官方文档。
SFSpeechRecognizer(locale: Locale(identifier: langugeSimple))
通过下面的方法来得到语音识别的结果:
open func recognitionTask(with request: SFSpeechRecognitionRequest, resultHandler: @escaping (SFSpeechRecognitionResult?, Error?) -> Void) -> SFSpeechRecognitionTask
AVAudioEngine专门用来处理声音的数据
 lazy var audioEngine: AVAudioEngine = {
        let audioEngine = AVAudioEngine()
        audioEngine.inputNode.installTap(onBus: 0, bufferSize: 1024, format: audioEngine.inputNode.outputFormat(forBus: 0)) { (buffer, audioTime) in
            // 为语音识别请求对象添加一个AudioPCMBuffer,来获取声音数据
            self.recognitionRequest.append(buffer)
        }
        return audioEngine
    }()
- SFSpeechAudioBufferRecognitionRequest语音识别器,通过音频流来创建语音识别请求。:
 // 语音识别器
    lazy var recognitionRequest: SFSpeechAudioBufferRecognitionRequest = {
        let recognitionRequest = SFSpeechAudioBufferRecognitionRequest()
        return recognitionRequest
    }()
- SFSpeechRecognitionTask语言识别任务管理器,启用和关闭都要使用这个管理进行。这个类是语音识别服务请求任务类,每一个语音识别请求都可以抽象为一个SFSpeechRecognitionTask实例,其中SFSpeechRecognitionTaskDelegate协议中约定了许多请求任务过程中的监听方法。
public enum SFSpeechRecognitionTaskState : Int {

    case starting // Speech processing (potentially including recording) has not yet begun

    case running // Speech processing (potentially including recording) is running

    case finishing // No more audio is being recorded, but more recognition results may arrive

    case canceling // No more recognition reuslts will arrive, but recording may not have stopped yet

    case completed // No more results will arrive, and recording is stopped.
}
此外还有一些重要的类:
SFSpeechRecognitionRequest:语音识别请求类,需要通过其子类来进行实例化。
SFSpeechURLRecognitionRequest:通过音频URL来创建语音识别请求。
SFSpeechRecognitionResult:语音识别请求结果类。
SFTranscription:语音转换后的信息类。
具体详情可以参考苹果官方文档,苹果提供了一个Swift版本的Demo:点击这里下载苹果官方demo
Siri语音识别功能集成
- OC 代码集成:
//
//  KSiriRecognizer.m
//  KSpeechRecognition
//
//  Created by yulu kong on 2020/4/3.
//  Copyright © 2020 yulu kong. All rights reserved.
//

#import "KSiriRecognizer.h"
#import <Speech/Speech.h>
#import "KHelper.h"
#import "KError.h"

@interface KSiriRecognizer () <SFSpeechRecognizerDelegate>

@property (nonatomic, strong) AVAudioEngine *audioEngine;
@property (nonatomic, strong) SFSpeechRecognizer *recognizer;

@property (nonatomic, assign) BOOL isAvaliable;

@property (nonatomic, strong, nullable) SFSpeechRecognitionTask *currentTask;
@property (nonatomic, strong, nullable) SFSpeechAudioBufferRecognitionRequest *request;

@end

@implementation KSiriRecognizer

+ (void)requestAuthorizationWithResultHandler:(KSiriAuthorizationResultHandler)resultHandler
{
    [SFSpeechRecognizer requestAuthorization:^(SFSpeechRecognizerAuthorizationStatus status) {
        resultHandler([KHelper convertSiriAuthorizationStatus:status]);
    }];
}

- (instancetype)initWithLanguage:(KLanguage)language
{
    if (self = [super initWithLanguage:language]) {
        NSLocale *local = [KHelper localForLanguage:language];
        _recognizer = [[SFSpeechRecognizer alloc] initWithLocale:local];
        _recognizer.delegate = self;
    }
    return self;
}

- (KAuthorizationStatus)authorizationStatus
{
    return [KHelper convertSiriAuthorizationStatus:[SFSpeechRecognizer authorizationStatus]];
}

- (void)startWithResultHandler:(KRecognitionResultHandler)resultHandler errorHandler: (KErrorHandler _Nullable)errorHandler
{
    if (_currentTask != nil) {
        NSLog(@"正在识别中,请稍候。");
        return;
    }

    if (self.authorizationStatus != KAuthorizationStatusAuthorized) {
        errorHandler([KError notAuthorizationError]);
        return;
    }

    if (!_isAvaliable) {
        NSString *message = [NSString stringWithFormat:@"%@语音识别器不可用", [KHelper nameForLanguage:self.language]];
        errorHandler([KError errorWithCode:-1 message:message]);
        return;
    }

    AVAudioSession *audioSession = AVAudioSession.sharedInstance;
    NSError *error = nil;
    [audioSession setCategory:AVAudioSessionCategoryRecord mode:AVAudioSessionModeMeasurement options: AVAudioSessionCategoryOptionDuckOthers error:&error];
    if (error != nil) {
        errorHandler(error);
        return;
    }

    __block typeof(self) weakSelf = self;
    _request = [[SFSpeechAudioBufferRecognitionRequest alloc] init];
    _request.shouldReportPartialResults = YES;

//启用离线识别的开关,这个属性只有IOS13以上才支持
#if __IPHONE_OS_VERSION_MAX_ALLOWED >= __IPHONE_13_0
     _request.requiresOnDeviceRecognition = self.forceOffline;
#else

#endif

    _currentTask = [self.recognizer recognitionTaskWithRequest:_request resultHandler:^(SFSpeechRecognitionResult *result, NSError *error) {

        if (error == nil) {
            [weakSelf stop];
            errorHandler(error);
            return;
        }

        if (result != nil && !result.isFinal) {
            resultHandler([[KRecognitionResult alloc] initWithText:result.bestTranscription.formattedString isFinal:NO]);
            return;
        }

        if (result.isFinal) {
            [weakSelf stop];
            resultHandler([[KRecognitionResult alloc] initWithText:result.bestTranscription.formattedString isFinal:YES]);
        }
    }];

    // Configure the microphone input.
    AVAudioFormat *recordingFormat = [_audioEngine.inputNode outputFormatForBus:0];
    [_audioEngine.inputNode installTapOnBus:0 bufferSize:1024 format:recordingFormat block:^(AVAudioPCMBuffer * buffer, AVAudioTime *when) {
        [weakSelf.request appendAudioPCMBuffer:buffer];
    }];

    [_audioEngine prepare];

    if (![_audioEngine startAndReturnError:&error]) {
        _currentTask = nil;
        errorHandler(error);
    }
}

- (void)stop {

    if (_currentTask == nil || !_isAvaliable) {
        return;
    }

    [_currentTask cancel];
    [_audioEngine stop];
    [_request endAudio];
    _currentTask = nil;
}


- (void)speechRecognizer:(SFSpeechRecognizer *)speechRecognizer availabilityDidChange:(BOOL)available
{
    _isAvaliable = available;
}

@end
- Swift5 代码集成:
//
//  JPSpeechRecognition.swift
//  JimuPro
//
//  Created by 孔雨露 on 2020/3/7.
//  Copyright © 2020 UBTech. All rights reserved.
//

import Foundation
import UIKit
import Speech

enum JPSpeechType: Int {
    case start
    case stop
    case finished
    case authDenied
}

typealias JPSpeechBlock = (_ speechType: JPSpeechType, _ finalText: String?) -> Void

@available(iOS 10.0, *)

class JPSpeechRecognition: NSObject {

    //private var parentVc: UIViewController!
    private var speechTask: SFSpeechRecognitionTask?
    // 声音处理器
    private var speechRecognizer: SFSpeechRecognizer?

    private var block: JPSpeechBlock?

    // 语音识别器
    var recognitionRequest: SFSpeechAudioBufferRecognitionRequest?


    lazy var audioEngine: AVAudioEngine = {
        let audioEngine = AVAudioEngine()
        audioEngine.inputNode.installTap(onBus: 0, bufferSize: 1024, format: audioEngine.inputNode.outputFormat(forBus: 0)) { (buffer, audioTime) in
            // 为语音识别请求对象添加一个AudioPCMBuffer,来获取声音数据
            if let recognitionRequest = self.recognitionRequest {
                recognitionRequest.append(buffer)
            }
        }
        return audioEngine
    }()


    func startSpeech(languge: String, speechBlock: @escaping JPSpeechBlock) {
        //parentVc = speechVc
        block = speechBlock
        setAudioActive()
        checkmicroPhoneAuthorization { (microStatus) in
            if microStatus {
                self.checkRecognizerAuthorization(recongStatus: { (recStatus) in
                    if recStatus {
                        //  初始化语音处理器的输入模式 语音处理器准备就绪(会为一些audioEngine启动时所必须的资源开辟内存)
                        self.audioEngine.prepare()
                        if (self.speechTask?.state == .running) {   // 如果当前进程状态是进行中
                            // 停止语音识别
                           self.stopDictating()
                        } else {   // 进程状态不在进行中
                            self.speechRecognizer = SFSpeechRecognizer(locale: Locale(identifier: languge))
                            guard (self.speechRecognizer != nil) else {
                                self.showAlert("抱歉,暂不支持当前地区使用语音输入")
                                return
                            }
                            self.setCallBack(type: .start, text: nil)
                            // 开启语音识别
                            self.startDictating()
                        }
                    } else {
                        self.showAlert("您已取消授权使用语音识别,如果需要使用语音识别功能,可以到设置中重新开启!")
                        self.setCallBack(type: .authDenied, text: nil)
                    }
                })
            } else {
                //麦克风没有授权
                self.showAlert("您已取消授权使用麦克风,如果需要使用语音识别功能,可以到设置中重新开启!")
                self.setCallBack(type: .authDenied, text: nil)
            }
        }
    }
}


@available(iOS 10.0, *)
extension JPSpeechRecognition: SFSpeechRecognitionTaskDelegate {

    //判断语音识别权限
    private func checkRecognizerAuthorization(recongStatus: @escaping (_ resType: Bool) -> Void) {
        let authorStatus = SFSpeechRecognizer.authorizationStatus()
        if authorStatus == .authorized {
            recongStatus(true)
        } else if authorStatus == .notDetermined {
            SFSpeechRecognizer.requestAuthorization { (status) in
                if status == .authorized {
                    recongStatus(true)
                } else {
                    recongStatus(false )
                }
            }
        } else {
            recongStatus(false)
        }
    }

    //检测麦克风
    private func checkmicroPhoneAuthorization(authoStatus: @escaping (_ resultStatus: Bool) -> Void) {
        let microPhoneStatus = AVCaptureDevice.authorizationStatus(for: .audio)

        if microPhoneStatus == .authorized {
            authoStatus(true)
        } else if microPhoneStatus == .notDetermined {
            AVCaptureDevice.requestAccess(for: .audio, completionHandler: {(res) in
                if res {
                    authoStatus(true)
                } else {
                    authoStatus(false)
                }
            })
        } else {
            authoStatus(false)
        }
    }

    //开始进行
    private func startDictating() {
        do {
            recognitionRequest = SFSpeechAudioBufferRecognitionRequest()   // recreates recognitionRequest object.
            guard let recognitionRequest = recognitionRequest else {
                fatalError("Unable to created a SFSpeechAudioBufferRecognitionRequest object")
            }
        //启用离线识别的开关,这个属性只有IOS13以上才支持
        // Keep speech recognition data on device
        if #available(iOS 13, *) {
            recognitionRequest.requiresOnDeviceRecognition = true
        }
            try audioEngine.start()
            speechTask = speechRecognizer!.recognitionTask(with: recognitionRequest) { (speechResult, error) in
                // 识别结果,识别后的操作
                if speechResult == nil {
                    return
                }
                self.setCallBack(type: .finished, text: speechResult!.bestTranscription.formattedString)
            }
        } catch  {
            print(error)
            self.setCallBack(type: .finished, text: nil)
        }
    }

    // 停止声音处理器,停止语音识别请求进程
    func stopDictating() {
        setCallBack(type: .stop, text: nil)

        audioEngine.stop()
        recognitionRequest?.endAudio()
        recognitionRequest = nil

        if audioEngine.inputNode.numberOfInputs > 0 {
            audioEngine.inputNode.removeTap(onBus: 0)
        }
        speechTask?.cancel()
    }

    private func setCallBack(type: JPSpeechType, text: String?) {
        if block != nil {
            block!(type, text)
        }
    }

    private func setAudioActive() {
        let audioSession = AVAudioSession.sharedInstance()

       do {

           try audioSession.setCategory(AVAudioSession.Category.playAndRecord,mode: .default)
           try audioSession.setMode(AVAudioSession.Mode.spokenAudio)

           try audioSession.setActive(true, options: .notifyOthersOnDeactivation)
           try audioSession.overrideOutputAudioPort(AVAudioSession.PortOverride.speaker)

       } catch  {
           debugPrint("Audio session initialization error: \(error.localizedDescription)")
       }
    }

    private func showAlert(_ message: String) {
//        let alertVC = UIAlertController(title: nil, message: message, preferredStyle: .alert)
//        let firstAction = UIAlertAction(title: "知道了", style: .default, handler: {(action) in
//        })
//        alertVC.addAction(firstAction)
//        parentVc.present(alertVC, animated: true, completion: nil)
        JMProgressHUD.showInfo(message)
    }
}
方案二:百度语音识别
百度语音识别简介
百度语音识别提供了很多功能,这里我简单介绍一下语音识别这块的。 百度语音识别有以下特点:
- 在线语音识别支持识别任意词,离线语音识别仅支持命令词识别(语法模式)
- 首次使用离线,SDK将会后台下载离线授权文件,成功后,授权文件有效期(三年)内无需联网。有效期即将结束后SDK将自动多次尝试联网更新证书)。
- 没有纯离线识别。只能离线识别固定短语
- 离线识别目前不支持任意语句。您可以预先定义好,下载bsg文件 yuyin.baidu.com/asr bds_easr_gramm.dat 文件件的内容替换成 自己定义的bsg 文件的内容 自定义短语越多效果越差,建议不超过100行
百度语音识别SDK集成步骤
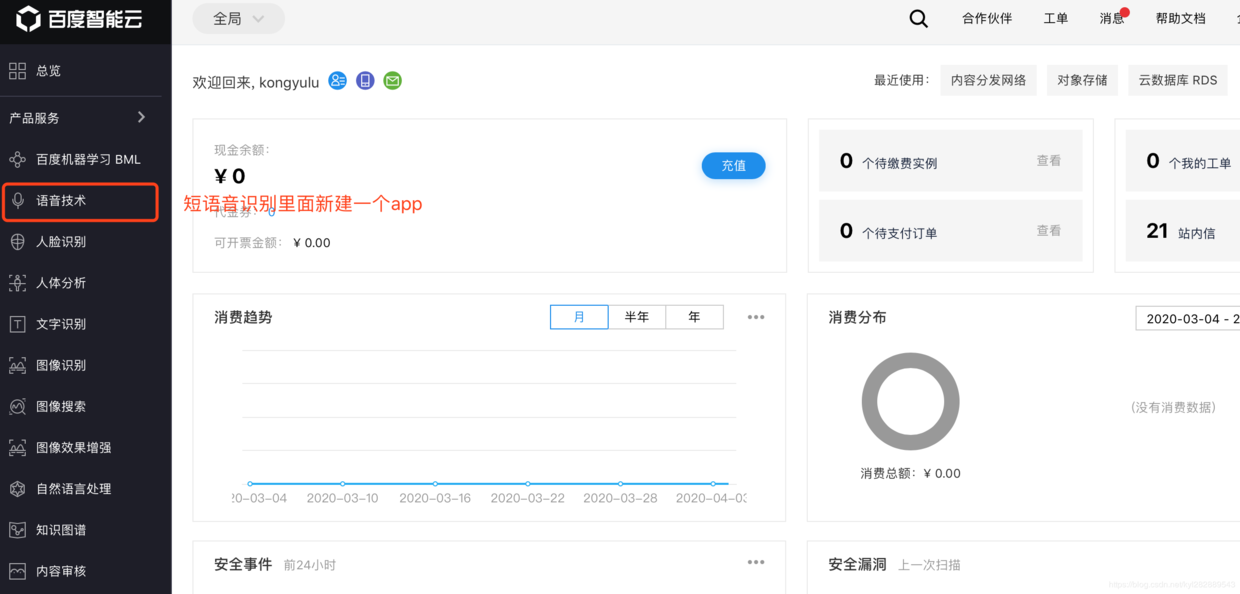
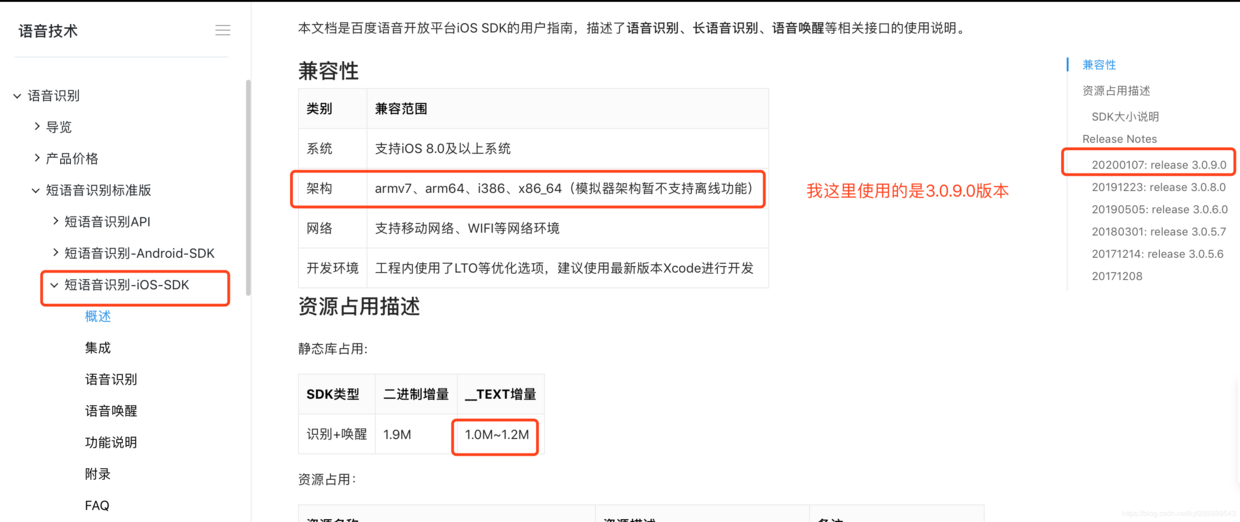
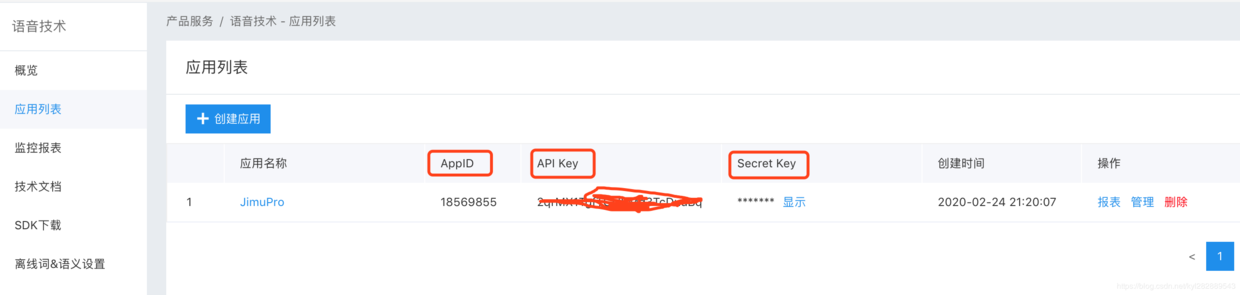
一。首先在百度语音开放平台注册,创建应用,生成API_KEY,SECRET_KEY和APP_ID 创建应用时的包名填工程的 Bundle identifier。百度语音识别注册地址点击这里
二,下载SDK,先打开官方demo运行看看, 替换创建应用生成的API_KEY,SECRET_KEY和APP_ID
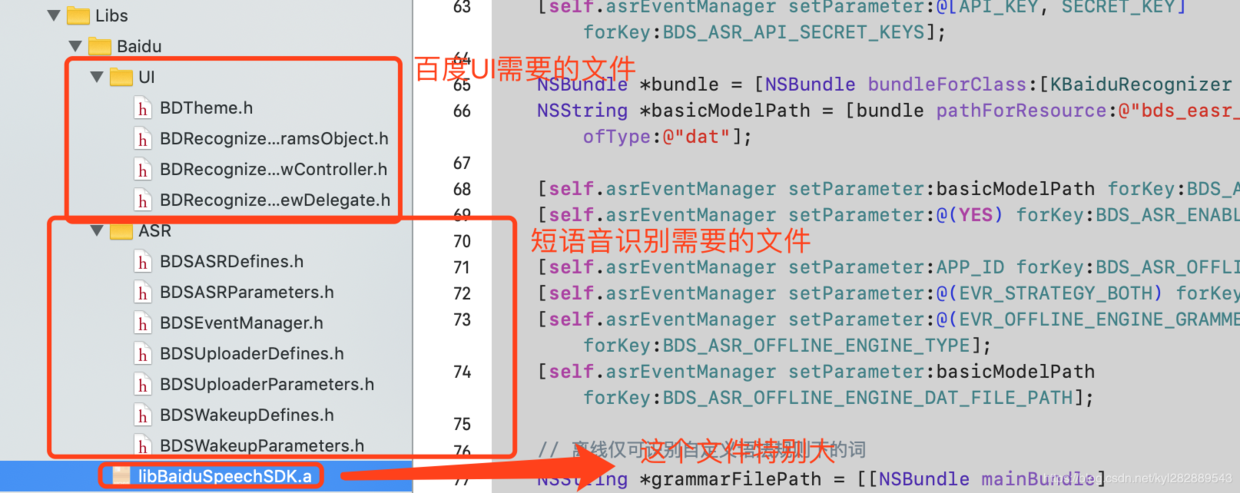
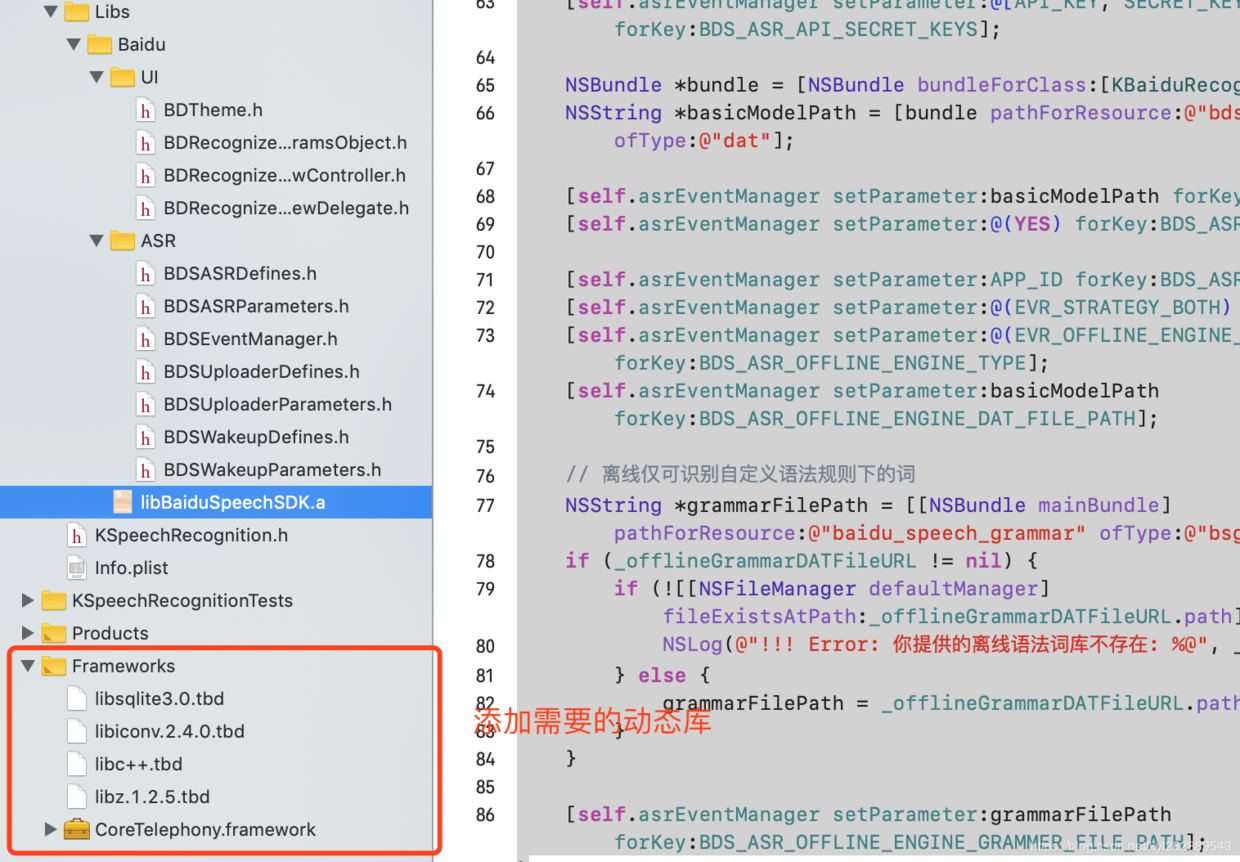
注意集成的资源包导入:
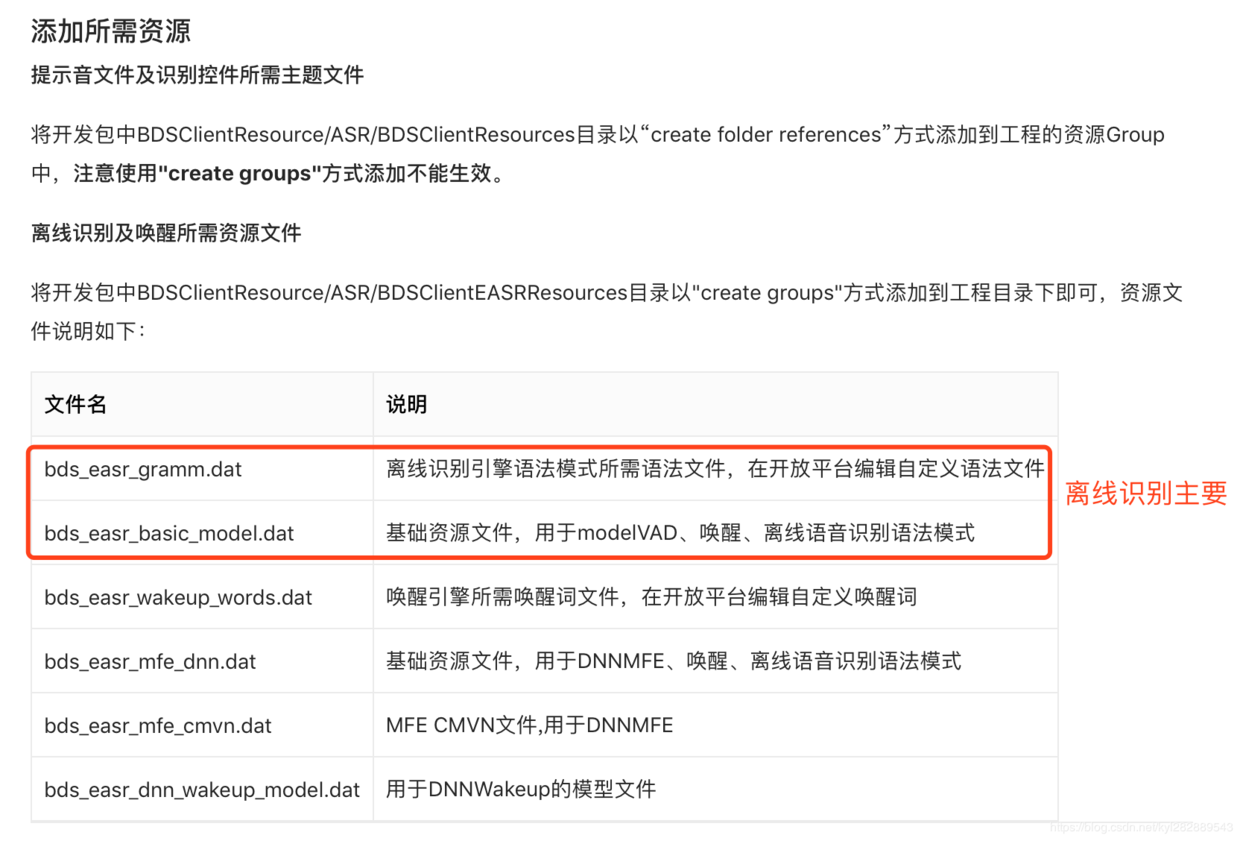
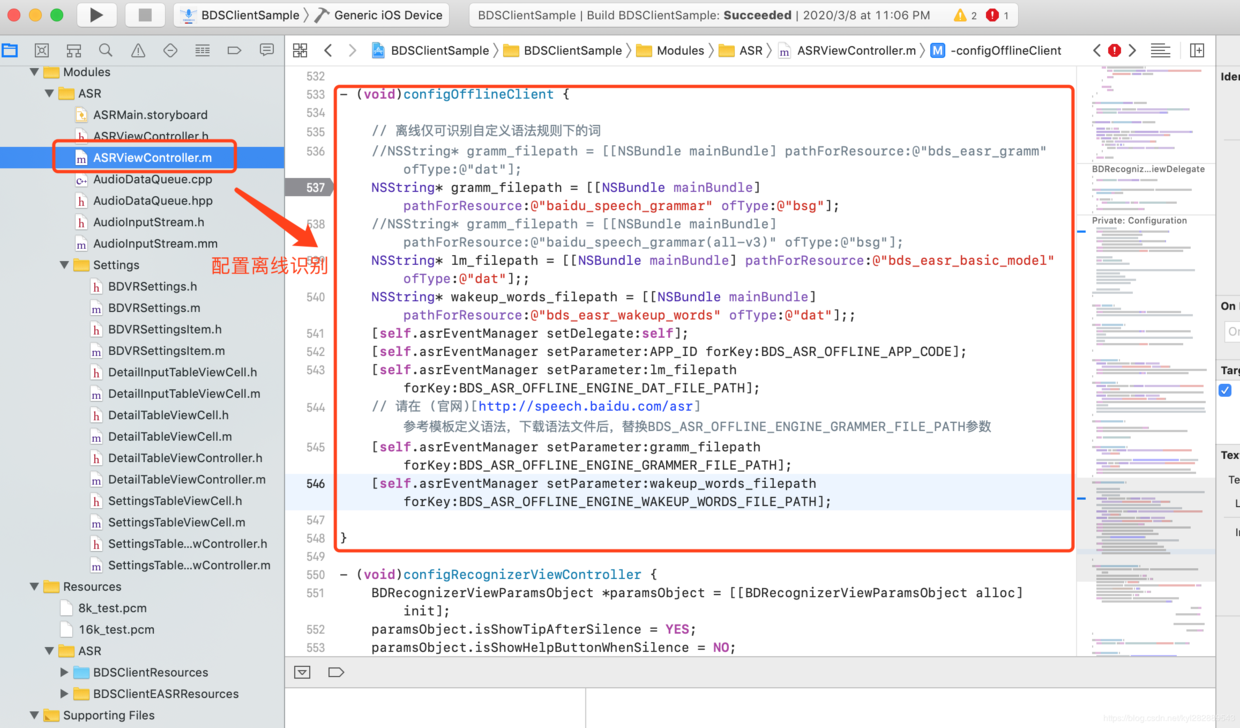
例如在上面提供的离线SDK中,我只用一个简单的类对百度SDK包装了一层,离线配置方法如下:
百度SDK 集成步骤如下:
-
将官方SDK中的如下文件拖入到自己的项目中:
-
添加必须要的系统框架,动态库:
-
封装自己的类,实现对百度API调用:
- 导入语音识别需要的头文件:
#import "BDSASRDefines.h"
#import "BDSASRParameters.h"
#import "BDSEventManager.h"
- 定义跟AppID绑定的 APP_ID, API_KEY, SECRET_KEY 相关信息,这个信息就是你在百度平台注册得到的
const NSString* APP_ID = @"18569855";
const NSString* API_KEY = @"2qrMX1TgfTGslRMd3TcDuuBq";
const NSString* SECRET_KEY = @"xatUjET5NLNDXYNghNCnejt28MGpRYP2";
- 初始化SDK,构建一个BDSEventManager对象,设置需要使用短语音服务:百度短语音productId = "1537"
- (instancetype)initWithLanguage:(KLanguage)language offlineGrammarDATFileURL:(NSURL * _Nullable)datFileURL {
    if (self = [super initWithLanguage:language]) {
        _offlineGrammarDATFileURL = [datFileURL copy];
        _asrEventManager = [BDSEventManager createEventManagerWithName:BDS_ASR_NAME];
        NSString *productId = [KHelper identifierForBaiduLanguage:language];
        [_asrEventManager setParameter:productId forKey:BDS_ASR_PRODUCT_ID];
    }
    return self;
}
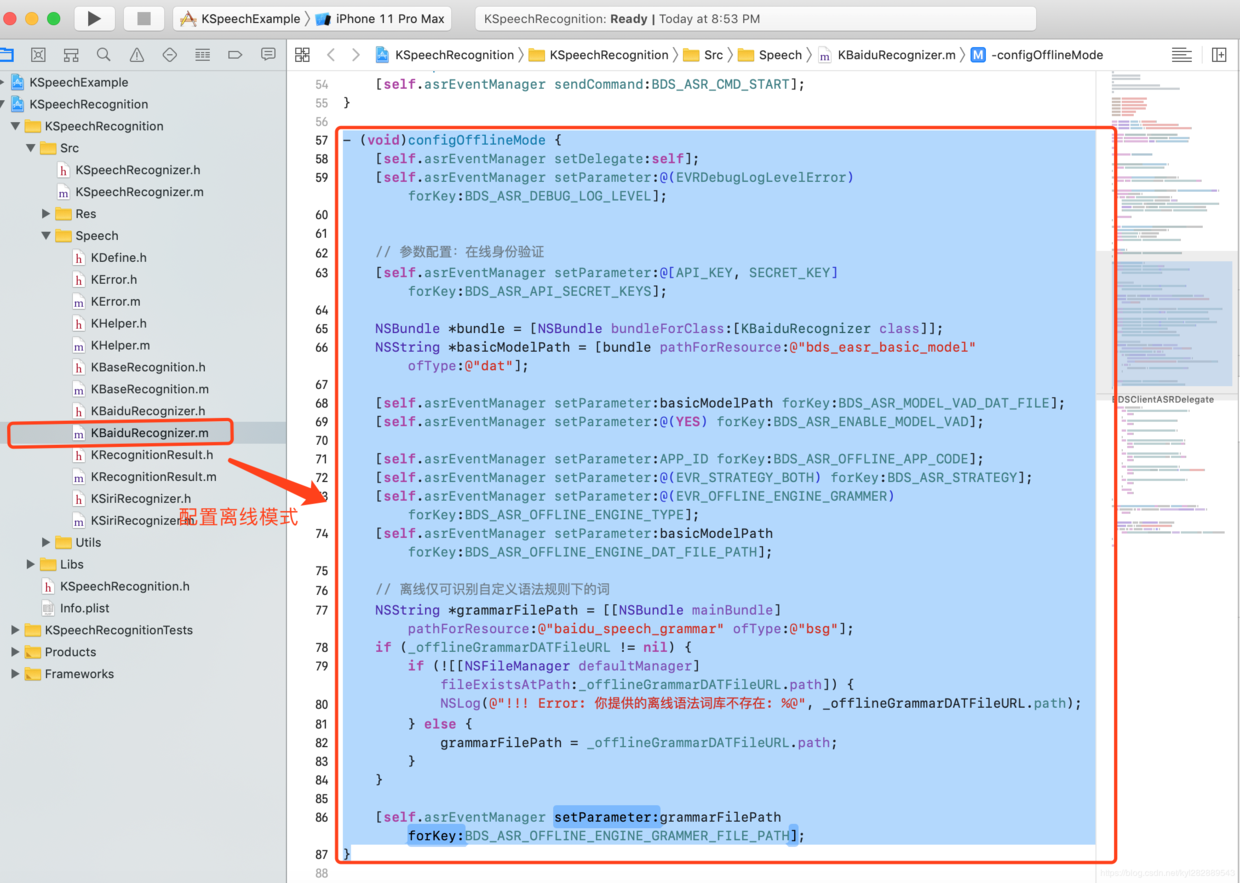
- 配置离线引擎和相关模型资源文件
- (void)configOfflineMode {
    [self.asrEventManager setDelegate:self];
    [self.asrEventManager setParameter:@(EVRDebugLogLevelError) forKey:BDS_ASR_DEBUG_LOG_LEVEL];


    // 参数配置:在线身份验证
    [self.asrEventManager setParameter:@[API_KEY, SECRET_KEY] forKey:BDS_ASR_API_SECRET_KEYS];

    NSBundle *bundle = [NSBundle bundleForClass:[KBaiduRecognizer class]];
    NSString *basicModelPath = [bundle pathForResource:@"bds_easr_basic_model" ofType:@"dat"];

    [self.asrEventManager setParameter:basicModelPath forKey:BDS_ASR_MODEL_VAD_DAT_FILE];
    [self.asrEventManager setParameter:@(YES) forKey:BDS_ASR_ENABLE_MODEL_VAD];

    [self.asrEventManager setParameter:APP_ID forKey:BDS_ASR_OFFLINE_APP_CODE];
    [self.asrEventManager setParameter:@(EVR_STRATEGY_BOTH) forKey:BDS_ASR_STRATEGY];
    [self.asrEventManager setParameter:@(EVR_OFFLINE_ENGINE_GRAMMER) forKey:BDS_ASR_OFFLINE_ENGINE_TYPE];
    [self.asrEventManager setParameter:basicModelPath forKey:BDS_ASR_OFFLINE_ENGINE_DAT_FILE_PATH];

    // 离线仅可识别自定义语法规则下的词
    NSString *grammarFilePath = [[NSBundle mainBundle] pathForResource:@"baidu_speech_grammar" ofType:@"bsg"];
    if (_offlineGrammarDATFileURL != nil) {
        if (![[NSFileManager defaultManager] fileExistsAtPath:_offlineGrammarDATFileURL.path]) {
            NSLog(@"!!! Error: 你提供的离线语法词库不存在: %@", _offlineGrammarDATFileURL.path);
        } else {
            grammarFilePath = _offlineGrammarDATFileURL.path;
        }
    }

    [self.asrEventManager setParameter:grammarFilePath forKey:BDS_ASR_OFFLINE_ENGINE_GRAMMER_FILE_PATH];
}
除了上面离线识别需要的简单设备外,还可以设置如下信息:
- 识别语言 @0 : @"普通话", @1 : @"粤语", @2 : @"英文", @3 : @"四川话"
//识别语言 @0 : @"普通话", @1 : @"粤语", @2 : @"英文", @3 : @"四川话"
    [self.asrEventManager setParameter:@(EVoiceRecognitionLanguageChinese) forKey:BDS_ASR_LANGUAGE];
- 采样率 @"自适应", @"8K", @"16K"
 //采样率 @"自适应", @"8K", @"16K"
    [self.asrEventManager setParameter:@(EVoiceRecognitionRecordSampleRateAuto) forKey:BDS_ASR_SAMPLE_RATE];
- 是否启用长语音识别
 //是否启用长语音识别
    [self.asrEventManager setParameter:@(YES) forKey:BDS_ASR_ENABLE_LONG_SPEECH];
      //开启提示音 @0 : @"关闭", @(EVRPlayToneAll) : @"开启"}
    //使用长语音必须关闭提示音
    [self.asrEventManager setParameter:@(0) forKey:BDS_ASR_PLAY_TONE];
  //开启端点检测 {@NO : @"关闭", @YES : @"开启"}  使用长语音必须开启本地VAD
    //端点检测,即自动检测音频输入的起始点和结束点。SDK默认开启VAD,检测到静音后自动停止识别。
    //如果需要自行控制识别结束需关闭VAD,请同时关闭服务端VAD与端上VAD
    //[self.asrEventManager setParameter:@(YES) forKey:BDS_ASR_ENABLE_LOCAL_VAD];
   // 关闭服务端VAD
    [self.asrEventManager setParameter:@(NO) forKey:BDS_ASR_ENABLE_EARLY_RETURN];
    // 关闭本地VAD
    [self.asrEventManager setParameter:@(NO) forKey:BDS_ASR_ENABLE_LOCAL_VAD];
    //打开的话配置端点检测(二选一)
- 配置 ModelVAD端点检测方式 检测更加精准,抗噪能力强,响应速度较慢
- (void)configModelVAD {
    NSString *modelVAD_filepath = [[NSBundle mainBundle] pathForResource:@"bds_easr_basic_model" ofType:@"dat"];
    //ModelVAD所需资源文件路径
    [self.asrEventManager setParameter:modelVAD_filepath forKey:BDS_ASR_MODEL_VAD_DAT_FILE];
}
- DNNMFE端点检测方式 提供基础检测功能,性能高,响应速度快
//DNNMFE端点检测方式 提供基础检测功能,性能高,响应速度快
- (void)configDNNMFE {
    //设置MFE模型文件
    NSString *mfe_dnn_filepath = [[NSBundle mainBundle] pathForResource:@"bds_easr_mfe_dnn" ofType:@"dat"];
    [self.asrEventManager setParameter:mfe_dnn_filepath forKey:BDS_ASR_MFE_DNN_DAT_FILE];
    //设置MFE CMVN文件路径
    NSString *cmvn_dnn_filepath = [[NSBundle mainBundle] pathForResource:@"bds_easr_mfe_cmvn" ofType:@"dat"];
    [self.asrEventManager setParameter:cmvn_dnn_filepath forKey:BDS_ASR_MFE_CMVN_DAT_FILE]
    //是否使用ModelVAD,打开需配置资源文件参数
    [self.asrEventManager setParameter:@(NO) forKey:BDS_ASR_ENABLE_MODEL_VAD];
    // MFE支持自定义静音时长
    //    [self.asrEventManager setParameter:@(500.f) forKey:BDS_ASR_MFE_MAX_SPEECH_PAUSE];
    //    [self.asrEventManager setParameter:@(500.f) forKey:BDS_ASR_MFE_MAX_WAIT_DURATION];
}
- 离在线并行配置
     // 参数设置:识别策略为离在线并行
        [self.asrEventManager setParameter:@(EVR_STRATEGY_BOTH) forKey:BDS_ASR_STRATEGY];
        // 参数设置:离线识别引擎类型 EVR_OFFLINE_ENGINE_INPUT 输入法模式  EVR_OFFLINE_ENGINE_GRAMMER 离线引    擎语法模式
        //离线语音识别仅支持命令词识别(语法模式)。
        //[self.asrEventManager setParameter:@(EVR_OFFLINE_ENGINE_INPUT) forKey:BDS_ASR_OFFLINE_ENGINE_TYPE];
        [self.asrEventManager setParameter:@(EVR_OFFLINE_ENGINE_GRAMMER) forKey:BDS_ASR_OFFLINE_ENGINE_TYPE];
        //并生成bsg文件。下载语法文件后,设置BDS_ASR_OFFLINE_ENGINE_GRAMMER_FILE_PATH参数
        NSString* gramm_filepath = [[NSBundle mainBundle] pathForResource:@"bds_easr_gramm" ofType:@"dat"];
        // 请在 (官网)[http://speech.baidu.com/asr] 参考模板定义语法,下载语法文件后,替换BDS_ASR_OFFLINE_ENGINE_GRAMMER_FILE_PATH参数
        [self.asrEventManager setParameter:gramm_filepath forKey:BDS_ASR_OFFLINE_ENGINE_GRAMMER_FILE_PATH];
        //离线识别资源文件路径
        NSString* lm_filepath = [[NSBundle mainBundle] pathForResource:@"bds_easr_basic_model" ofType:@"dat"];
        [self.asrEventManager setParameter:lm_filepath forKey:BDS_ASR_OFFLINE_ENGINE_DAT_FILE_PATH];
         //加载离线引擎
        [self.asrEventManager sendCommand:BDS_ASR_CMD_LOAD_ENGINE];
- 监听回调代理
#pragma mark -- 语音识别状态、录音数据等回调均在此代理中发生
- (void)VoiceRecognitionClientWorkStatus:(int)workStatus obj:(id)aObj{
    switch (workStatus) {
        case EVoiceRecognitionClientWorkStatusNewRecordData: {
            [self.fileHandler writeData:(NSData *)aObj];
            NSLog(@"录音数据回调");
            break;
        }

        case EVoiceRecognitionClientWorkStatusStartWorkIng: {
            NSLog(@"识别工作开始开始采集及处理数据");
            NSDictionary *logDic = [self parseLogToDic:aObj];
            [self printLogTextView:[NSString stringWithFormat:@"开始识别-log: %@\n", logDic]];
            break;
        }
        case EVoiceRecognitionClientWorkStatusStart: {
            NSLog(@"检测到用户开始说话");
            [self printLogTextView:@"检测到用户开始说话.\n"];
            break;
        }
        case EVoiceRecognitionClientWorkStatusEnd: {
            NSLog(@"用户说话完成,但服务器尚未返回结果");
            [self printLogTextView:@"用户说话完成,但服务器尚未返回结果.\n"];
            self.contentTextView.text = @"无识别结果";
            break;
        }
        case EVoiceRecognitionClientWorkStatusFlushData: {
            // 逐句显示。配合连续上屏的中间结果,可以进一步 升语音输入的体验
            //// 该状态值表示服务器返回了中间结果,如果想要将中间结果展示给用户(形成连续上屏的效果),
            // 可以利用与该状态同时返回的数据,每当接到新的该类消息应当清空显示区域的文字以免重复
            NSLog(@"逐句显示");
            [self printLogTextView:[NSString stringWithFormat:@"服务器返回了中间结 - %@.\n\n", [self getDescriptionForDic:aObj]]];

            self.contentTextView.text = @"";
            NSArray *contentArr = aObj[@"results_recognition"];
            NSString *contentStr = contentArr[0];
            self.contentTextView.text = contentStr;

            break;
        }
        case EVoiceRecognitionClientWorkStatusFinish: {
            //// 该状态值表示语音识别服务器返回了最终结果,结果以数组的形式保存在 aObj 对象中
            // 接受到该消息时应当清空显示区域的文字以免重复
            NSLog(@"返回了最终结果");
            /*
             "origin_result" =     {
             "corpus_no" = 6643061564690340286;
             "err_no" = 0;
             result =         {
             word =             (
             "\U597d\U7684"
             );
             };
             sn = "5EEAC770-DDD2-4D35-8ABF-F407276A7934";
             "voice_energy" = "29160.45703125";
             };
             "results_recognition" =     (
             "\U597d\U7684"
             );

             */

            [self printLogTextView:[NSString stringWithFormat:@"最终结果 - %@.\n", [self getDescriptionForDic:aObj]]];
            if (aObj) {

                //                NSArray *contentArr = aObj[@"results_recognition"];
                //                NSString *contentStr = contentArr[0];
                //                NSLog(@"contentStr = %@",contentStr);
                self.contentTextView.text =  [self getDescriptionForDic:aObj];

            }

            break;
        }
        case EVoiceRecognitionClientWorkStatusMeterLevel: {
            NSLog(@"当前音量回调");
            break;
        }
        case EVoiceRecognitionClientWorkStatusCancel: {
            NSLog(@"用户主动取消");
            [self printLogTextView:@"用户主动取消.\n"];

            break;
        }
        case EVoiceRecognitionClientWorkStatusError: {
            // 错误状态 没有语音输入
            NSLog(@"错误状态");
            NSError * error = (NSError *)aObj;

            if (error.code == 2228236) {
                ////离线引擎错误状态:
                //识别失败,无法识别。(语法模式下,可能为语音不在自定义的语法规则之下)
                 [self printLogTextView:[NSString stringWithFormat:@"错误状态 -语法模式下,可能为语音不在自定义的语法规则之下\n %@.\n", (NSError *)aObj]];
            }else if (error.code == 2228230){
                 [self printLogTextView:[NSString stringWithFormat:@"错误状态 -dat模型文件不可用,请设置 BDS_ASR_OFFLINE_ENGINE_DAT_FILE_PATH\n %@.\n", (NSError *)aObj]];
            }else if (error.code == 2228231){
                 [self printLogTextView:[NSString stringWithFormat:@"错误状态 -grammar文件无效,请设置 BDS_ASR_OFFLINE_ENGINE_GRAMMER_FILE_PATH\n %@.\n", (NSError *)aObj]];
            }else if (error.code == 2225219){
                [self printLogTextView:[NSString stringWithFormat:@"错误状态 -音频质量过低,无法识别\n %@.\n", (NSError *)aObj]];
            }else{
                [self printLogTextView:[NSString stringWithFormat:@"错误状态 - %@.\n", (NSError *)aObj]];
            }

            break;
        }
        case EVoiceRecognitionClientWorkStatusLoaded: {
            NSLog(@"离线引擎加载完成");
            [self printLogTextView:@"离线引擎加载完成.\n"];
            break;
        }
        case EVoiceRecognitionClientWorkStatusUnLoaded: {
            NSLog(@"离线引擎卸载完成");
            [self printLogTextView:@"离线引擎卸载完成.\n"];
            break;
        }
        case EVoiceRecognitionClientWorkStatusChunkThirdData: {
            NSLog(@"识别结果中的第三方数据");
            [self printLogTextView:[NSString stringWithFormat:@"识别结果中的第三方数据: %lu\n", (unsigned long)[(NSData *)aObj length]]];
            break;
        }
        case EVoiceRecognitionClientWorkStatusChunkNlu: {
            NSLog(@"别结果中的语义结果");
            NSString *nlu = [[NSString alloc] initWithData:(NSData *)aObj encoding:NSUTF8StringEncoding];
            [self printLogTextView:[NSString stringWithFormat:@"识别结果中的语义结果: %@\n", nlu]];
            NSLog(@"%@", nlu);
            break;
        }
        case EVoiceRecognitionClientWorkStatusChunkEnd: {
            NSLog(@"识别过程结束");
            [self printLogTextView:[NSString stringWithFormat:@"识别过程结束, sn: %@.\n", aObj]];

            break;
        }
        case EVoiceRecognitionClientWorkStatusFeedback: {
            NSLog(@"识别过程反馈的打点数据");
            NSDictionary *logDic = [self parseLogToDic:aObj];
            [self printLogTextView:[NSString stringWithFormat:@"识别过程反馈的打点数据: %@\n", logDic]];
            break;
        }
        case EVoiceRecognitionClientWorkStatusRecorderEnd: {
            //录音机关闭,页面跳转需检测此时间,规避状态条 (iOS)
            NSLog(@"录音机关闭");
            [self printLogTextView:@"录音机关闭.\n"];
            break;
        }
        case EVoiceRecognitionClientWorkStatusLongSpeechEnd: {
            NSLog(@"长语音结束状态");
            [self printLogTextView:@"长语音结束状态.\n"];

            break;
        }
        default:
            break;
    }

}
- 提供开始,停止识别方法
//开始识别
- (void) startWithResultHandler:(KRecognitionResultHandler)resultHandler errorHandler:(KErrorHandler)errorHandler {
    self.resultHandler = resultHandler;
    self.errorHandler = errorHandler;
    [self.asrEventManager sendCommand:BDS_ASR_CMD_START];
}

//停止识别
- (void)stop {
    [self.asrEventManager sendCommand:BDS_ASR_CMD_STOP];
}
- 完整封装代码如下:
//
//  KBaiduRecognizer.m
//  KSpeechRecognition
//
//  Created by yulu kong on 2020/4/3.
//  Copyright © 2020 yulu kong. All rights reserved.
//

#import "KBaiduRecognizer.h"
#import "BDSASRDefines.h"
#import "BDSASRParameters.h"
#import "BDSEventManager.h"
#import "KHelper.h"
#import "KError.h"

const NSString* APP_ID = @"18569855";
const NSString* API_KEY = @"2qrMX1TgfTGslRMd3TcDuuBq";
const NSString* SECRET_KEY = @"xatUjET5NLNDXYNghNCnejt28MGpRYP2";

@interface KBaiduRecognizer () <BDSClientASRDelegate>
@property (strong, nonatomic) BDSEventManager *asrEventManager;
@property (nonatomic, strong) NSURL *offlineGrammarDATFileURL;

@end

@implementation KBaiduRecognizer


- (KAuthorizationStatus)authorizationStatus {
    return KAuthorizationStatusAuthorized;
}

- (instancetype)initWithLanguage:(KLanguage)language {
    return [self initWithLanguage:language offlineGrammarDATFileURL:nil];
}

- (instancetype)initWithLanguage:(KLanguage)language offlineGrammarDATFileURL:(NSURL * _Nullable)datFileURL {
    if (self = [super initWithLanguage:language]) {
        _offlineGrammarDATFileURL = [datFileURL copy];
        // 创建语音识别对象
        _asrEventManager = [BDSEventManager createEventManagerWithName:BDS_ASR_NAME];
        NSString *productId = [KHelper identifierForBaiduLanguage:language];
        [_asrEventManager setParameter:productId forKey:BDS_ASR_PRODUCT_ID];
    }
    return self;
}

- (void) startWithResultHandler:(KRecognitionResultHandler)resultHandler errorHandler:(KErrorHandler)errorHandler {
    self.resultHandler = resultHandler;
    self.errorHandler = errorHandler;
    [self.asrEventManager sendCommand:BDS_ASR_CMD_START];
}

- (void)stop {
    [self.asrEventManager sendCommand:BDS_ASR_CMD_STOP];
}

- (void)configOfflineMode {
    // 设置语音识别代理
    [self.asrEventManager setDelegate:self];
    [self.asrEventManager setParameter:@(EVRDebugLogLevelError) forKey:BDS_ASR_DEBUG_LOG_LEVEL];


    // 参数配置:在线身份验证
    [self.asrEventManager setParameter:@[API_KEY, SECRET_KEY] forKey:BDS_ASR_API_SECRET_KEYS];

    NSBundle *bundle = [NSBundle bundleForClass:[KBaiduRecognizer class]];
    NSString *basicModelPath = [bundle pathForResource:@"bds_easr_basic_model" ofType:@"dat"];

    [self.asrEventManager setParameter:basicModelPath forKey:BDS_ASR_MODEL_VAD_DAT_FILE];
    [self.asrEventManager setParameter:@(YES) forKey:BDS_ASR_ENABLE_MODEL_VAD];

    //离线引擎身份验证 设置 APPID 离线授权所需APPCODE(APPID),如使用该方式进行正式授权,请移除临时授权文件
    [self.asrEventManager setParameter:APP_ID forKey:BDS_ASR_OFFLINE_APP_CODE];

    //识别策略 @0 : @"在线识别", @4 : @"离在线并行"
    [self.asrEventManager setParameter:@(EVR_STRATEGY_BOTH) forKey:BDS_ASR_STRATEGY];
    [self.asrEventManager setParameter:@(EVR_OFFLINE_ENGINE_GRAMMER) forKey:BDS_ASR_OFFLINE_ENGINE_TYPE];
    [self.asrEventManager setParameter:basicModelPath forKey:BDS_ASR_OFFLINE_ENGINE_DAT_FILE_PATH];

    // 离线仅可识别自定义语法规则下的词
    NSString *grammarFilePath = [[NSBundle mainBundle] pathForResource:@"baidu_speech_grammar" ofType:@"bsg"];
    if (_offlineGrammarDATFileURL != nil) {
        if (![[NSFileManager defaultManager] fileExistsAtPath:_offlineGrammarDATFileURL.path]) {
            NSLog(@"!!! Error: 你提供的离线语法词库不存在: %@", _offlineGrammarDATFileURL.path);
        } else {
            grammarFilePath = _offlineGrammarDATFileURL.path;
        }
    }

    [self.asrEventManager setParameter:grammarFilePath forKey:BDS_ASR_OFFLINE_ENGINE_GRAMMER_FILE_PATH];
}


// MARK: - BDSClientASRDelegate

- (void)VoiceRecognitionClientWorkStatus:(int)workStatus obj:(id)aObj {
    switch (workStatus) {
        case EVoiceRecognitionClientWorkStatusStartWorkIng: {
            break;
        }
        case EVoiceRecognitionClientWorkStatusStart:
            break;

        case EVoiceRecognitionClientWorkStatusEnd: {
            break;
        }
        case EVoiceRecognitionClientWorkStatusFlushData: {
            [self receiveRecognitionResult:aObj isFinal:NO];
            break;
        }
        case EVoiceRecognitionClientWorkStatusFinish: {
            [self receiveRecognitionResult:aObj isFinal:YES];
            break;
        }
        case EVoiceRecognitionClientWorkStatusError: {
            self.errorHandler([KError errorWithCode:-1 message:@"语音识别失败"]);
            break;
        }
        case EVoiceRecognitionClientWorkStatusRecorderEnd: {
            break;
        }
        default:
            break;
    }
}

- (void)receiveRecognitionResult:(id)resultInfo isFinal:(BOOL)isFinal {
    if (resultInfo == nil || ![resultInfo isKindOfClass:[NSDictionary class]]) {
        return;
    }

    NSDictionary *info = (NSDictionary *)resultInfo;
    NSString *text = info[@"results_recognition"];
    if (text != nil && [text length] > 0) {
        self.resultHandler([[KRecognitionResult alloc] initWithText:text isFinal:isFinal]);
    }
}

@end
方案三:使用开源框架
1. KALDI
kaldi源码下载:kaldi源码下载 安装git后运行
git clone https://github.com/kaldi-asr/kaldi.git kaldi-trunk --origin golden
速度过慢可以参考:github下载提速
通过http://git.oschina.net/离线下载的方式
git clone https://gitee.com/cocoon_zz/kaldi.git kaldi-trunk --origin golden
- Kaldi官网 kaldi-asr.org/doc/index.h… 包括一大堆原理和工具的使用说明,有什么问题请首先看这个。
- Kaldi Lecture www.danielpovey.com/kaldi-lectu… 相比于上一个会给一个更简略的原理、流程介绍。
- Kaldi中文翻译1 如果感觉英语读起来比较头疼的话建议搜一下这个来看看,是对官网上文件的翻译。这个文档来源于一个学习交流Kaldi的QQ群。
- Kaldi中文翻译2 shiweipku.gitbooks.io/chinese-doc…
KALDI简介
KALDI 简介
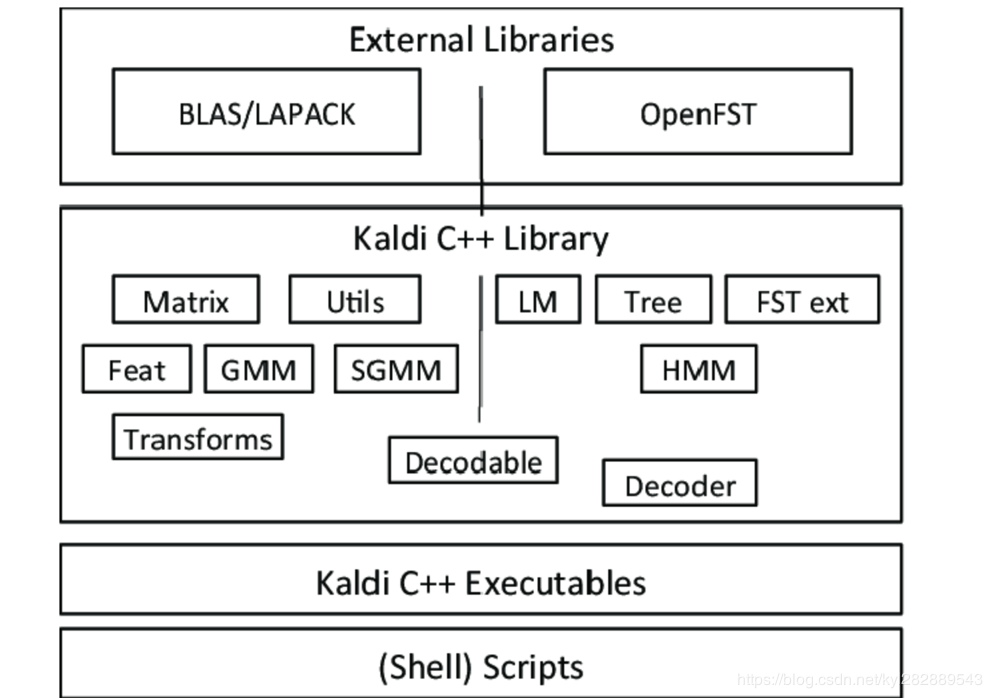
KALDI是著名的开源自动语音识别(ASR)工具,这套工具提供了搭建目前工业界最常用的ASR模型的训练工具,同时也提供了其他一些子任务例如说话人验证(speaker verification)和语种识别(language recognition)的pipeline。KALDI目前由Daniel Povey维护,他之前在剑桥做ASR相关的研究,后来去了JHU开发KALDI,目前在北京小米总部作为语音的负责人。同时他也是另一个著名的ASR工具HTK的主要作者之一。 KALDI之所以在ASR领域如此流行,是因为该工具提供了其他ASR工具不具备的可以在工业中使用的神经网络模型(DNN,TDNN,LSTM)。但是与其他基于Python接口的通用神经网络库(TensorFlow,PyTorch等)相比,KALDI提供的接口是一系列的命令行工具,这就需要学习者和使用者需要比较强的shell脚本能力。同时,KALDI为了简化搭建语音识别pipeline的过程,提供了大量的通用处理脚本,这些脚本主要是用shell,perl以及python写的,这里主要需要读懂shell和python脚本,perl脚本主要是一些文本处理工作,并且可以被python取代,因此学习的性价比并不高。整个KALDI工具箱的结构如下图所示。
可以看到KALDI的矩阵计算功能以及构图解码功能分别是基于BLAS/LAPACK/MKL和OpenFST这两个开源工具库的,在这些库的基础上,KALDI实现了Matrix,Utils,Feat,GMM,SGMM,Transforms,LM,Tree,FST ext,HMM,Decoder等工具,通过编译之后可以生成命令行工具,也就是图中的C++ Executables文件。最后KALDI提供的样例以及通用脚本展示了如何使用这些工具来搭建ASR Pipeline,是很好的学习材料。 除了KALDI本身提供的脚本,还有其官方网站的Documents也是很好的学习资料。当然,除了KALDI工具本身,ASR的原理也需要去学习,只有双管齐下,才能更好的掌握这个难度较高的领域。
KALDI 源码编译 安装
如何安装参考下载好的目录内INSTALL文件
This is the official Kaldi INSTALL. Look also at INSTALL.md for the git mirror installation.
[for native Windows install, see windows/INSTALL]

(1)
go to tools/  and follow INSTALL instructions there.

(2)
go to src/ and follow INSTALL instructions there.
出现问题首先查看各个目录下面的INSTALL文件,有些配置的问题(例如gcc的版本以及CUDA等)都可以查看该文档进行解决。
依赖文件编译
首先检查依赖项
cd extras
sudo bash check_dependencies.sh
注意make -j4可以多进程进行
cd kaldi-trunk/tools
make
配置Kaldi源码
cd ../src
#如果没有GPU请查阅configure,设置不使用CUDA
./configure --shared
编译Kaldi源码
make all
#注意在这里有可能关于CUDA的编译不成功,原因是configure脚本没有正确的找出CUDA的位置,需要手动编辑configure查找的路径,修改CUDA库的位置
测试安装是否成功
cd ../egs/yesno/s5
./run.sh
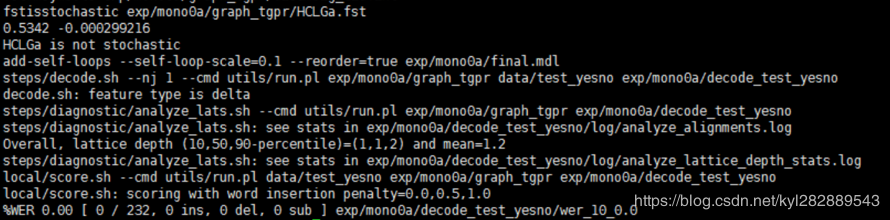
解码的结果放置在exp目录(export)下,例如我们查看一下 ~/kaldi-bak/egs/yesno/s5/exp/mono0a/log$ vim align.38.1.log

语音识别原理相关资料
语音识别的原理 www.zhihu.com/question/20…
HTK Book www.ee.columbia.edu/ln/LabROSA/…
如何用简单易懂的例子解释隐马尔可夫模型? www.zhihu.com/question/20…
kaldi一些文件解读
1:run.sh 总的运行文件,里面把其他运行文件都集成了。
{
执行顺序:run.sh >>> path.sh >>> directory(存放训练数据的目录) >>> mono-phone>>>triphone>>>lda_mllt>>>sat>>>quitck
data preparation:
1:generate text,wav.scp,utt2spk,spk2utt (将数据生成这些文件) (由local/data_prep.sh生成) text:包含每段发音的标注 sw02001-A_002736-002893 AND IS wav.scp: (extended-filename:实际的文件名) sw02001-A /home/dpovey/kaldi-trunk/tools/sph2pipe_v2.5/sph2pipe -f wav -p -c 1 /export/corpora3/LDC/LDC97S62/swb1/sw02001.sph | utt2spk: 指明某段发音是哪个人说的(注意一点,说话人编号并不需要与说话人实际的名字完全一致——只需要大概能够猜出来就行。) sw02001-A_000098-001156 2001-A spk2utt: ... (utt2spk和spk2utt文件中包含的信息是一样的) 2:produce MFCC features 3:prepare language stuff(build a large lexicon that invovles words in both the training and decoding.) 4:monophone单音素训练 5:tri1三音素训练(以单音素模型为输入训练上下文相关的三音素模型), trib2进行lda_mllt声学特征变换,trib3进行sat自然语言适应(运用基于特征空间的最大似然线性回归(fMLLR)进行说话人自适应训练),trib4做quick LDA-MLLT(Linear Discriminant Analysis – Maximum Likelihood Linear Transform), LDA根据降维特征向量建立HMM状态。MLLT根据LDA降维后的特征空间获得每一个说话人的唯一变换。MLLT实际上是说话人的归一化。 SAT(Speaker Adaptive Training)。SAT同样对说话人和噪声的归一化。 5:DNN }
2:cmd.sh 一般需要修改
export train_cmd=run.pl #将原来的queue.pl改为run.pl export decode_cmd="run.pl"#将原来的queue.pl改为run.pl这里的--mem 4G export mkgraph_cmd="run.pl"#将原来的queue.pl改为run.pl 这里的--mem 8G export cuda_cmd="run.pl" #将原来的queue.pl改为run.pl 这里去掉原来的--gpu 1(如果没有gpu)
3:path.sh (设置环境变量)
export KALDI_ROOT=
pwd/../../.. [ -fKALDI_ROOT/tools/env.sh export PATH=
KALDI_ROOT/tools/openfst/bin:
PATH [ ! -f
KALDI_ROOT/tools/config/common_path.sh is not present -> Exit!" && exit 1 .
KALDI_ROOT/tools/env.sh ] && . $KALDI_ROOT/tools/env.sh 这句话的意思是如果存在这个环境变量脚本就执行这个脚本,但是我没有在该路径下发现这个脚本。 然后是将本目录下的utils目录, kaldi根目录下的tools/openfst/bin目录 和 本目录加入到环境变量PATH中。 然后是判断如果在kaldi根目录下的tools/config/common_path.sh不存在,就打印提示缺少该文件,并且退出。
Kaldi训练脚本针对不同的语料库,需要重写数据准备部分,脚本一般放在conf、local文件夹里;
conf放置一些配置文件,如提取mfcc、filterbank等参数的配置,解码时的参数配置 (主要是配置频率,将系统采样频率与语料库的采样频率设置为一致)
local一般用来放置处理语料库的数据准备部分脚本 > 中文识别,应该准备:发音词典、音频文件对应的文本内容和一个基本可用的语言模型(解码时使用)
数据训练完后:
exp目录下:
final.mdl 训练出来的模型
graph_word目录下:
words.txt HCLG.fst 一个是字典,一个是有限状态机(fst:发音字典,输入是音素,输出是词)
kaldi编译成iOS静态库
编译脚本如下:
#!/bin/bash

if [ ! \( -x "./configure" \) ] ; then
    echo "This script must be run in the folder containing the \"configure\" script."
    exit 1
fi

export DEVROOT=`xcode-select --print-path`
export SDKROOT=$DEVROOT/Platforms/iPhoneOS.platform/Developer/SDKs/iPhoneOS.sdk

# Set up relevant environment variables
export CPPFLAGS="-I$SDKROOT/usr/include/c++/4.2.1/ -I$SDKROOT/usr/include/ -miphoneos-version-min=10.0 -arch arm64"
export CFLAGS="$CPPFLAGS -arch arm64 -pipe -no-cpp-precomp -isysroot $SDKROOT"
#export CXXFLAGS="$CFLAGS"
export CXXFLAGS="$CFLAGS  -std=c++11 -stdlib=libc++"

MODULES="online2 ivector nnet2 lat decoder feat transform gmm hmm tree matrix util base itf cudamatrix fstext"
INCLUDE_DIR=include/kaldi
mkdir -p $INCLUDE_DIR

echo "Copying include files"
LIBS=""
for m in $MODULES
do
  cd $m
  echo
  echo "BUILDING MODULE $m"
  echo
  if [[ -f Makefile ]]
  then
    make
    lib=$(ls *.a)  # this will fail (gracefully) for ift module since it only contains .h files
    LIBS+=" $m/$lib"
  fi

  echo "创建模块文件夹:$INCLUDE_DIR/$m"
  cd ..
  mkdir -p $INCLUDE_DIR/$m
  echo "拷贝文件到:$INCLUDE_DIR/$m/"
  cp -v $m/*h $INCLUDE_DIR/$m/
done

echo "LIBS: $LIBS"

LIBNAME="kaldi-ios.a"
libtool -static -o $LIBNAME $LIBS

cat >&2 << EOF

Build succeeded!

Library is in $LIBNAME
h files are in $INCLUDE_DIR

EOF
上面这个脚本只编译了支持arm64架构的静态库,在真机环境下测试,想支持其他的架构的,可以直接添加:
export CPPFLAGS="-I$SDKROOT/usr/include/c++/4.2.1/ -I$SDKROOT/usr/include/ -miphoneos-version-min=10.0 -arch arm64"
上面的脚本来自大神:长风浮云 他的简书地址:www.jianshu.com/p/faff2cd48… 他写了好多关于kaldi的相关博客,如果需要研究可以参考他的博客。
基于kaldi 源码编译的IOS 在线,离线语音识别Demo
这里引用他提供的IOS 在线和离线识别的两个demo:
2. CMUSphinx
CMUSphinx 官方资源导航:
-
优点
- 这款语音识别开源框架相比于Kaldi比较适合做开发,各种函数上的封装浅显易懂,解码部分的代码非常容易看懂,且除开PC平台,作者也考虑到了嵌入式平台,Android开发也很方便,已有对应的Demo,Wiki上有基于PocketSphinx的语音评测的例子,且实时性相比Kaldi好了很多。
- 由于适合开发,有很多基于它的各种开源程序、教育评测论文。
- 总的来说,从PocketSphinx来入门语音识别是一个不错的选择。
- 缺点
相比于Kaldi,使用的是GMM-HMM框架,准确率上可能会差一些;其他杂项处理程序(如pitch提取等等)没有Kaldi多。
- 语音识别CMUSphinx(1)Windows下安装:参考这篇文章:cmusphinx.github.io/wiki/tutori…
- android demo :cmusphinx.github.io/wiki/tutori…
Sphinx工具介绍
Pocketsphinx —用C语言编写的轻量级识别库,主要是进行识别的。
Sphinxbase — Pocketsphinx所需要的支持库,主要完成的是语音信号的特征提取;
Sphinx3 —为语音识别研究用C语言编写的解码器
Sphinx4 —为语音识别研究用JAVA语言编写的解码器
CMUclmtk —语言模型训练工具
Sphinxtrain —声学模型训练工具
下载网址:sourceforge.net/projects/cm…
Sphinx是由美国卡内基梅隆大学开发的大词汇量、非特定人、连续英语语音识别系统。Sphinx从开发之初就得到了CMU、DARPA等多个部门的资助和支持,后来逐步发展为开源项目。目前CMU Sphinx小组开发的下列译码器:
Sphinx-2采用半连续隐含马尔可夫模型(SCHMM)建模,采用的技术相对落后,使得识别精度要低于其它的译码器。
PocketSphinx是一个计算量和体积都很小的嵌入式语音识别引擎。在Sphinx-2的基础上针对嵌入式系统的需求修改、优化而来,是第一个开源面向嵌入式的中等词汇量连续语音识别项目。识别精度和Sphinx-2差不多。
Sphinx-3是CMU高水平的大词汇量语音识别系统,采用连续隐含马尔可夫模型CHMM建模。支持多种模式操作,高精度模式扁平译码器,由Sphinx3的最初版本优化而来;快速搜索模式树译码器。目前将这两种译码器融合在一起使用。
Sphinx-4是由JAVA语言编写的大词汇量语音识别系统,采用连续的隐含马尔可夫模型建模,和以前的版本相比,它在模块化、灵活性和算法方面做了改进,采用新的搜索策略,支持各种不同的语法和语言模型、听觉模型和特征流,创新的算法允许多种信息源合并成一种更符合实际语义的优雅的知识规则。由于完全采用JAVA语言开发,具有高度的可移植性,允许多线程技术和高度灵活的多线程接口。
3.
参考: www.jianshu.com/p/0f4a53450…