


最近利用腾讯云实时视音频 TRTC SDK,学习如何开发教育直播类 APP,其中有一个需求是各个直播场景下多会用到的,那就是:
如何实现多人同时在线直播画面
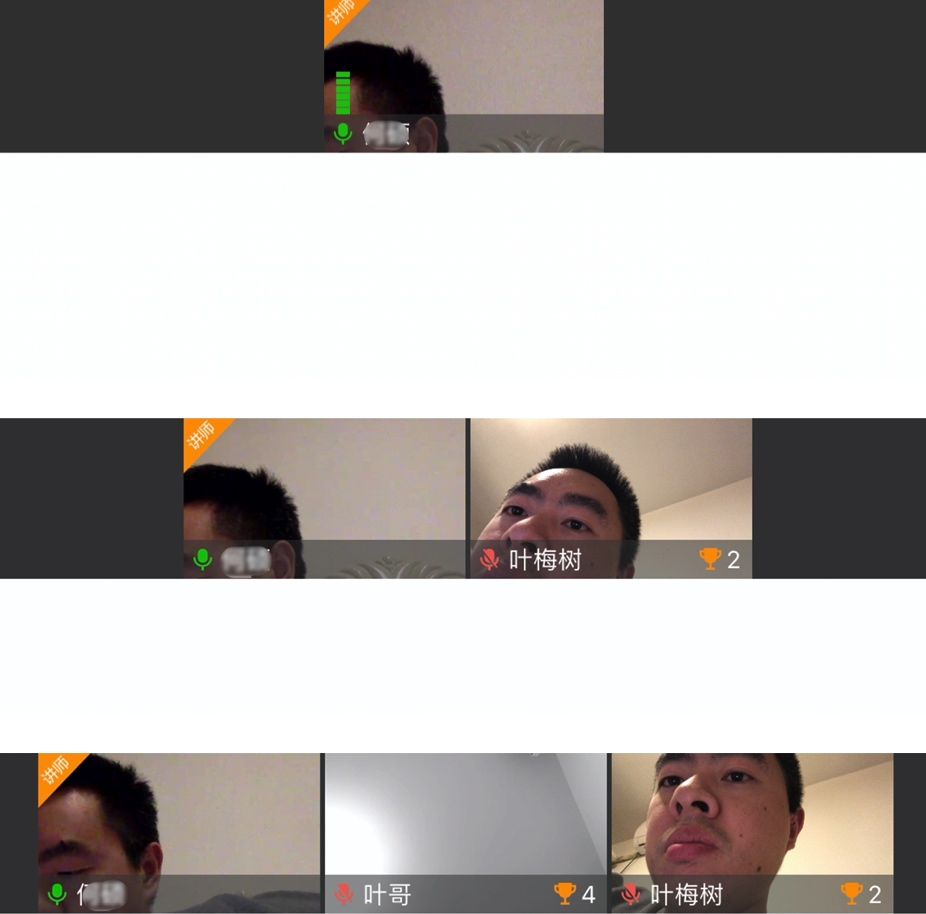
先放出效果图:


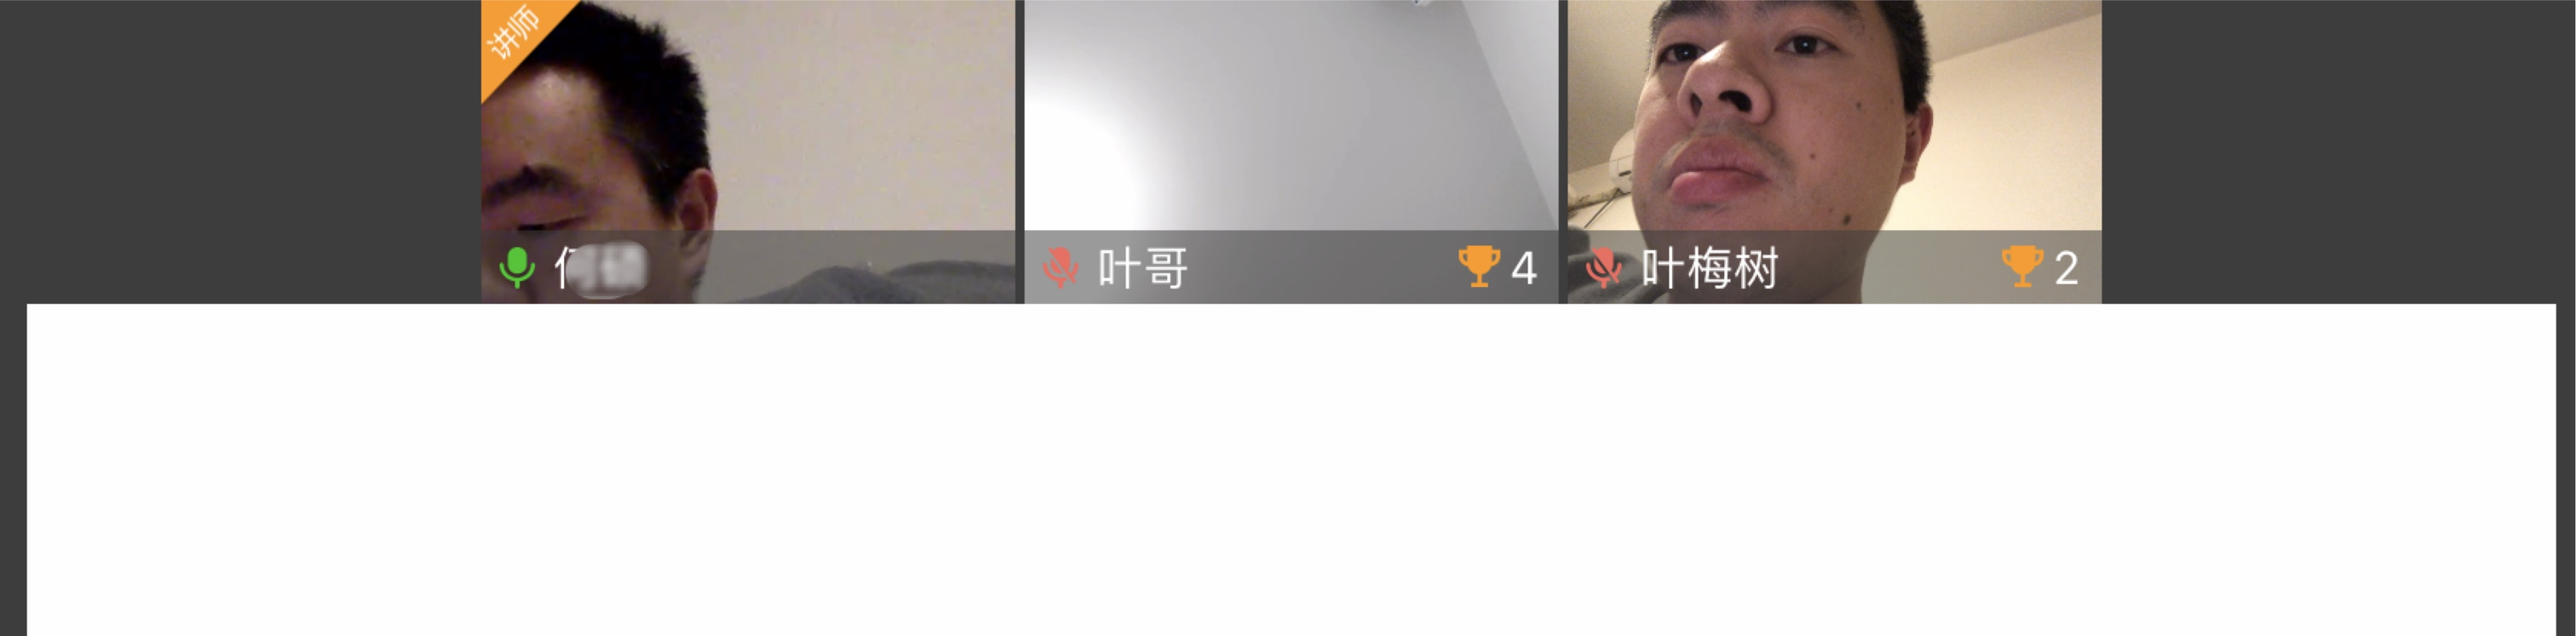
---「严肃脸」忽略画面上那张油腻的脸 ---
所以今天就来说一说如何利用 Texture CollectionNode 来完成这一功能的开发的。
学习 Texture,可参考 Texture 官网
在开始写作之前,还需要先介绍使用到的腾讯实时音视频 TRTC,通过 TRTC 能快速的将实时视频数据渲染到视图上,并不需要我们自己来考虑这是如何实现实时视音频直播互动的,从而可以让我们把重心放到我们自己的业务逻辑上。
腾讯实时音视频 TRTC
腾讯实时音视频(Tencent Real-Time Communication,TRTC)将腾讯 21 年来在网络与音视频技术上的深度积累,以多人音视频通话和低延时互动直播两大场景化方案,通过腾讯云服务向开发者开放,致力于帮助开发者快速搭建低成本、低延时、高品质的音视频互动解决方案。
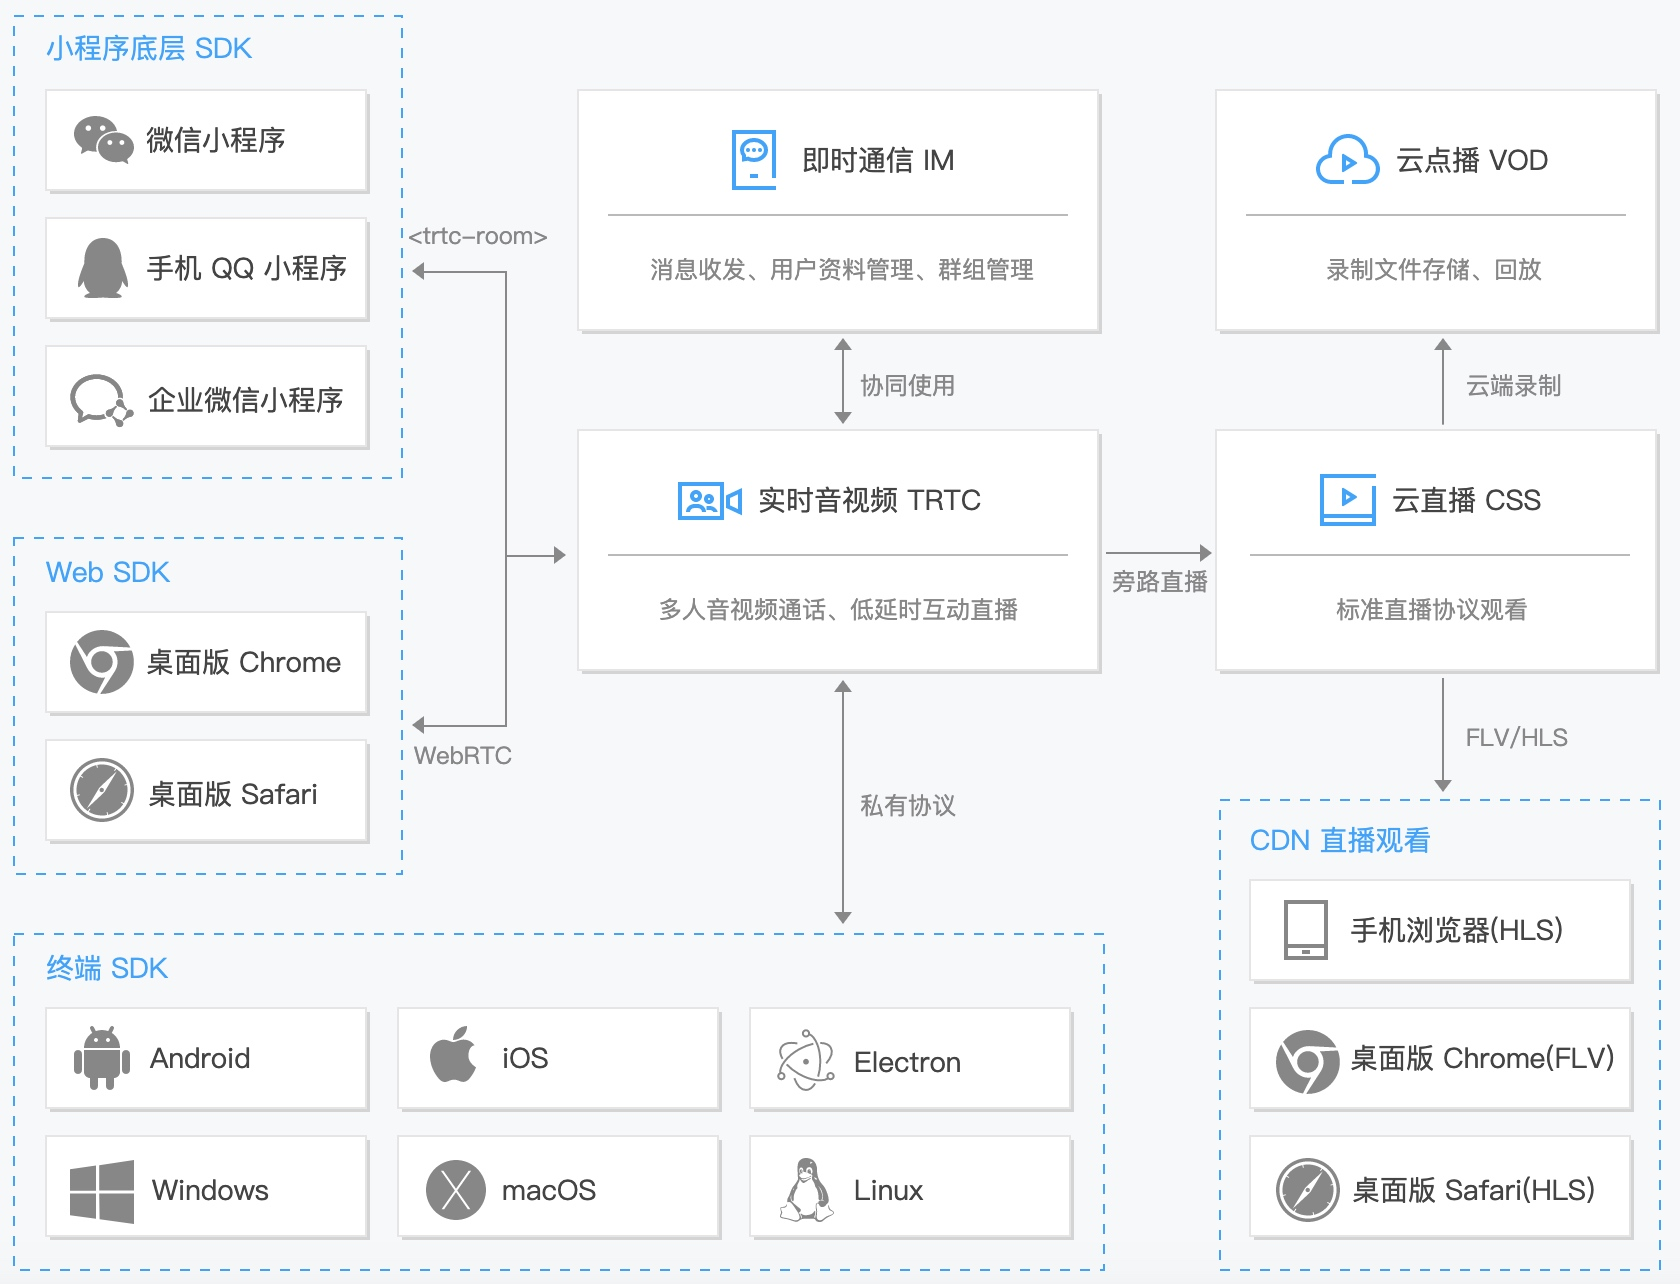
实时音视频 TRTC 主打全平台互通的多人音视频通话和低延时互动直播解决方案,提供小程序、Web、Android、iOS、Electron、Windows、macOS、Linux 等平台的 SDK 便于开发者快速集成并与实时音视频 TRTC 云服务后台连通。通过腾讯云不同产品间的相互联动,还能简单快速地将实时音视频 TRTC 与即时通信 IM、云直播 CSS、云点播 VOD 等云产品协同使用,扩展更多的业务场景。
实时音视频 TRTC 产品架构如下图所示:
在开发过程中,发现集成腾讯实时音视频 TRTC SDK 还是很快速的,在实时体验视频直播和语音直播延迟都在可接受范围内。目前我们使用的核心功能有:
具体介绍和使用,可直接参考官网 实时音视频 TRTC 产品详细信息
腾讯 Demo
首先,因为是使用腾讯提供的腾讯实时音视频 TRTC SDK,通过腾讯提供的配套 Demo,你会发现每个在台上直播的画面,都是一个个 UIView,然后再根据上台,或者下台的情况,动态去增加或移除直播画面 UIView,具体代码可以参考下:
@property (weak, nonatomic) IBOutlet UIView *renderViewContainer;

@property (nonatomic, strong) NSMutableArray *renderViews;

#pragma mark - Accessor
- (NSMutableArray *)renderViews
{
    if(!_renderViews){
        _renderViews = [NSMutableArray array];
    }
    return _renderViews;
}

#pragma mark - render view
- (void)updateRenderViewsLayout
{
    NSArray *rects = [self getRenderViewFrames];
    if(rects.count != self.renderViews.count){
        return;
    }
    for (int i = 0; i < self.renderViews.count; ++i) {
        UIView *view = self.renderViews[i];
        CGRect frame = [rects[i] CGRectValue];
        view.frame = frame;
        if(!view.superview){
            [self.renderViewContainer addSubview:view];
        }
    }
}

- (NSArray *)getRenderViewFrames
{
    CGFloat height = self.renderViewContainer.frame.size.height;
    CGFloat width = self.renderViewContainer.frame.size.width / 5;
    CGFloat xOffset = 0;
    NSMutableArray *array = [NSMutableArray array];
    for (int i = 0; i < self.renderViews.count; i++) {
        CGRect frame = CGRectMake(xOffset, 0, width, height);
        [array addObject:[NSValue valueWithCGRect:frame]];
        xOffset += width;
    }
    return array;
}

- (TICRenderView *)getRenderView:(NSString *)userId streamType:(TICStreamType)streamType
{
    for (TICRenderView *render in self.renderViews) {
        if([render.userId isEqualToString:userId] && render.streamType == streamType){
            return render;
        }
    }
    return nil;
}

#pragma mark - event listener
- (void)onTICUserVideoAvailable:(NSString *)userId available:(BOOL)available
{
    if(available){
        TICRenderView *render = [[TICRenderView alloc] init];
        render.userId = userId;
        render.streamType = TICStreamType_Main;
        [self.renderViewContainer addSubview:render];
        [self.renderViews addObject:render];
        [[[TICManager sharedInstance] getTRTCCloud] startRemoteView:userId view:render];
    }
    else{
        TICRenderView *render = [self getRenderView:userId streamType:TICStreamType_Main];
        [self.renderViews removeObject:render];
        [render removeFromSuperview];
        [[[TICManager sharedInstance] getTRTCCloud] stopRemoteView:userId];
    }
    [self updateRenderViewsLayout];
}

- (void)onTICUserSubStreamAvailable:(NSString *)userId available:(BOOL)available
{
    if(available){
        TICRenderView *render = [[TICRenderView alloc] init];
        render.userId = userId;
        render.streamType = TICStreamType_Sub;
        [self.renderViewContainer addSubview:render];
        [self.renderViews addObject:render];
        [[[TICManager sharedInstance] getTRTCCloud] startRemoteSubStreamView:userId view:render];
    }
    else{
        TICRenderView *render = [self getRenderView:userId streamType:TICStreamType_Sub];
        [self.renderViews removeObject:render];
        [render removeFromSuperview];
        [[[TICManager sharedInstance] getTRTCCloud] stopRemoteSubStreamView:userId];
    }
    [self updateRenderViewsLayout];
}
主要通过数组增加或者移除一个个 TICRenderView 来达到目标,我不知道腾讯 Demo 这么写的好处在哪,但给我的感觉代码不太舒服,虽然从代码字面上理解,这么写没问题,有人上台了,那就增加一个 UIView,移动 frame,嵌入数组中,放入 renderViewContainer,然后借助 腾讯实时音视频 TRTC SDK,把远端流或者本地流渲染到 UIView 上就好。
但,结合到我们具体的业务场景下,我们很直观的发现,每一个直播画面,不仅仅只有直播推流,它还包含有其他互动的东西和状态,如每个直播画面的上台用户昵称、是否有权限说话、是不是正在说话等等,所以每一个直播画面 UIView 更像一个个 UICollectionView 的 item。
所以我需要对这块代码进行改造,或者叫「重构」。
现在开始我们的主角登场:ASCollectionNode
ASCollectionNode
ASCollectionNode is equivalent to UIKit’s UICollectionView and can be used in place of any UICollectionView.
使用介绍可以直接看官网,只要用过 UICollectionView 对操作这个就很简单了,具体看官网链接
初始化
@interface ZJRendersView : UIView <ASCollectionDataSourceInterop, ASCollectionDelegate, ASCollectionViewLayoutInspecting>

@property (nonatomic, strong) ASCollectionNode *collectionNode;;
@property (nonatomic, strong) NSMutableDictionary<NSString*, NSMutableDictionary*> *onlineUsers;
创建一个键值对 NSMutableDictionary类型的数组onlineUsers用于保存上台用户信息。
- (instancetype)init {
    self = [super init];
    if (self) {
        _onlineUsers = [NSMutableDictionary new];
        UICollectionViewFlowLayout* flowLayout = [[UICollectionViewFlowLayout alloc] init];
        flowLayout.minimumInteritemSpacing = 0.1;
        flowLayout.minimumLineSpacing = 0.1;
        _collectionNode = [[ASCollectionNode alloc] initWithCollectionViewLayout:flowLayout];
        _collectionNode.dataSource = self;
        _collectionNode.delegate = self;
        _collectionNode.backgroundColor = UIColorClear;
        _collectionNode.layoutInspector = self;
        [self addSubnode:_collectionNode];
        [_collectionNode.view mas_makeConstraints:^(MASConstraintMaker *make) {
            make.left.mas_equalTo(self);
            make.top.mas_equalTo(self);
            make.right.mas_equalTo(self);
            make.bottom.mas_equalTo(self);
        }];
    }
    return self;
}
初始化比较简单,这里的布局主要用到的是 Masonry,可以省不少心思在布局上,因为是团队项目,所以我们尽可能的不用 storyboard,布局和 UIView 等都尽可能的用代码完成。
ASCollectionDataSource
#pragma mark - ASCollectionNode data source.

- (ASCellNodeBlock)collectionNode:(ASCollectionNode *)collectionNode nodeBlockForItemAtIndexPath:(NSIndexPath *)indexPath
{
    NSString* key = _keys[indexPath.item];
    NSDictionary *user = _onlineUsers[key];
    ASCellNode *(^cellNodeBlock)() = ^ASCellNode *() {
        return [[ZJRenderNode alloc] initWithHashID:key user:user];
    };

    return cellNodeBlock;
}

// The below 2 methods are required by ASCollectionViewLayoutInspecting, but ASCollectionLayout and its layout delegate are the ones that really determine the size ranges and directions
// TODO Remove these methods once a layout inspector is no longer required under ASCollectionLayout mode
- (ASSizeRange)collectionView:(ASCollectionView *)collectionView constrainedSizeForNodeAtIndexPath:(NSIndexPath *)indexPath
{
    return ASSizeRangeMake(CGSizeMake([UIScreen mainScreen].bounds.size.width / 7.0, self.bounds.size.height), CGSizeMake([UIScreen mainScreen].bounds.size.width / 7.0, self.bounds.size.height));
}

- (ASScrollDirection)scrollableDirections
{
    return ASScrollDirectionHorizontalDirections;
}

- (NSInteger)numberOfSectionsInCollectionNode:(ASCollectionNode *)collectionNode
{
    return 1;
}

- (NSInteger)collectionNode:(ASCollectionNode *)collectionNode numberOfItemsInSection:(NSInteger)section
{
    return _keys.count;
}
这里,根据我们业务的需要,整个上台的直播界面放在同一行上,也就是设置滚动方向为:ASScrollDirectionHorizontalDirections,一行显示:numberOfSectionsInCollectionNode 为 1。每个直播界面的大小一致,将整个手机横屏宽度 7 等分,CGSizeMake([UIScreen mainScreen].bounds.size.width / 7.0, self.bounds.size.height)
接下来就是如何做每个 item 的布局。
ZJRenderNode
就如下图所示,每个直播界面包含的元素挺多的,有讲师标记、用户名、语音音量条、获得的奖杯数等。
在之前的文章中有介绍过 ASButtonNode、ASAbsoluteLayoutSpec、ASInsetLayoutSpec。
我们今天来看看用到的其他的。
- (instancetype)init {
    self = [super init];
    if (self) {
        _backgroundNode = [[ASDisplayNode alloc] init];
        [self addSubnode:_backgroundNode];

        _bottomBackgroundNode = [[ASDisplayNode alloc] init];
        _bottomBackgroundNode.backgroundColor = [UIColorMakeWithHex(@"#3d3d3d") colorWithAlphaComponent:0.522];
        [self addSubnode:_bottomBackgroundNode];

        _nicknameNode = [[ASTextNode alloc] init];
        _nicknameNode.maximumNumberOfLines = 1;
        _nicknameNode.backgroundColor = [UIColorMakeWithHex(@"#3d3d3d") colorWithAlphaComponent:0];
        [_bottomBackgroundNode addSubnode:_nicknameNode];

        _permissionNode = [ASImageNode new];
        _permissionNode.image = UIImageMake(@"icon_permission");
        _permissionNode.backgroundColor = [UIColorMakeWithHex(@"#3d3d3d") colorWithAlphaComponent:0];
        [self addSubnode:_permissionNode];

        _microNode = [ASImageNode new];
        _microNode.backgroundColor = [UIColorMakeWithHex(@"#3d3d3d") colorWithAlphaComponent:0];
        [_bottomBackgroundNode addSubnode:_microNode];

        _zanNode = [[ASButtonNode alloc] init];
        [_zanNode setImage:UIImageMake(@"icon_zan") forState:UIControlStateNormal];
        [_zanNode setContentHorizontalAlignment:ASHorizontalAlignmentMiddle];
        [_zanNode setContentSpacing:2];
        _zanNode.backgroundColor = [UIColorMakeWithHex(@"#3d3d3d") colorWithAlphaComponent:0];
        _zanNode.hidden = YES;
        [_bottomBackgroundNode addSubnode:_zanNode];

        _volumnNode = [[ASDisplayNode alloc] init];
        _volumnNode.backgroundColor = [UIColorMakeWithHex(@"#3d3d3d") colorWithAlphaComponent:0];
        [self addSubnode:_volumnNode];

        _teacherIconNode = [ASImageNode new];
        _teacherIconNode.image = UIImageMake(@"icon_jiangshi");
        _teacherIconNode.backgroundColor = [UIColorMakeWithHex(@"#3d3d3d") colorWithAlphaComponent:0];
        [self insertSubnode:_teacherIconNode aboveSubnode:_volumnNode];

        [self updatePermission:user];
    }
    return self;
}
主要有三个布局需要思考。
第一个就是设置一个 backgroundNode 用来接受远端流和本地流的视频流的,显示直播画面。在我们的设计中,我们将视频流当做背景层,然后在之上去添加我们的其他元素。所以这里我们使用到了 ASBackgroundLayoutSpec。
ASBackgroundLayoutSpec
ASBackgroundLayoutSpec lays out a component (blue), stretching another component behind it as a backdrop (red).
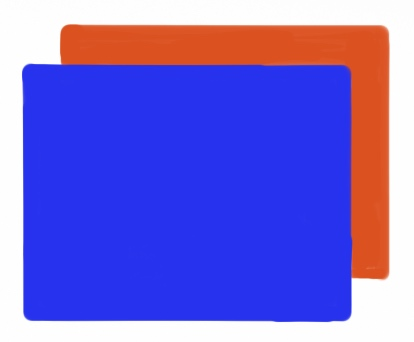
The background spec’s size is calculated from the child’s size. In the diagram below, the child is the blue layer. The child’s size is then passed as the constrainedSize to the background layout element (red layer). Thus, it is important that the child (blue layer) must have an intrinsic size or a size set on it.
ASInsetLayoutSpec* backgroundInsetLayoutSpec =  [ASInsetLayoutSpec
            insetLayoutSpecWithInsets:UIEdgeInsetsMake(0, 0, 0, 0)
                                child:_backgroundNode];

    return [ASBackgroundLayoutSpec backgroundLayoutSpecWithChild:contentSpec background:backgroundInsetLayoutSpec];
第二个是底部视图 bottomBackgroundNode 用来布局麦克风按钮、昵称、点赞等信息,这一块布局我们用 Masonry 来做约束。
dispatch_async(dispatch_get_main_queue(), ^{
    // 更新音频
    NSString* voiceIcon = [_user[@"voice"] boolValue] ? @"icon_microphone_good" : @"icon_microphone_bad";
    _microNode.image = UIImageMake(voiceIcon);

    if ([_key isEqualToString:_my_key]) {
        // 更新自己的音频状态
        if ([_user[@"voice"] boolValue]) {
            [[[TICManager sharedInstance] getTRTCCloud] startLocalAudio];
        } else {
            [[[TICManager sharedInstance] getTRTCCloud] stopLocalAudio];
        }
        [[[TICManager sharedInstance] getTRTCCloud] muteLocalAudio:![_user[@"voice"] boolValue]];
    }

    // 更新点赞
    if (_user && [_user[@"zan"] intValue] > 0) {
        _zanNode.hidden = NO;
        [_zanNode setTitle:_user[@"zan"] withFont:UIFontMake(10) withColor:UIColor.ZJ_tintColor forState:UIControlStateNormal];
    }

    // 用户昵称信息
    if (_user[@"nickname"] != nil) {
        NSString *nickname = [_user[@"nickname"] stringValue].length > 7 ? [[_user[@"nickname"] stringValue] substringWithRange:NSMakeRange(0, 7)] : [_user[@"nickname"] stringValue];
        _nicknameNode.attributedText = [[NSAttributedString alloc] initWithString:nickname attributes:@{
                NSFontAttributeName : UIFontMake(10),
                NSForegroundColorAttributeName: UIColor.ZJ_tintColor,
        }];
    }
    _teacherIconNode.hidden = ![_user[@"isteacher"] boolValue];

    _permissionNode.hidden = [_user[@"isteacher"] boolValue] || ![_user[@"board"] boolValue];

    [_permissionNode.view mas_updateConstraints:^(MASConstraintMaker *make) {
        make.top.mas_equalTo(self.view.mas_top).offset(4);
        make.right.mas_equalTo(self.view.mas_right).offset(-4);
        make.width.mas_equalTo(11);
        make.height.mas_equalTo(10);
    }];

    [_microNode.view mas_updateConstraints:^(MASConstraintMaker *make) {
        make.centerY.mas_equalTo(_bottomBackgroundNode.view.mas_centerY);
        make.left.mas_equalTo(_bottomBackgroundNode.view).offset(4);
        make.width.mas_equalTo(7.5);
        make.height.mas_equalTo(9);
    }];

    [_zanNode.view mas_updateConstraints:^(MASConstraintMaker *make) {
        make.centerY.mas_equalTo(_bottomBackgroundNode.view.mas_centerY);
        make.right.mas_equalTo(_bottomBackgroundNode.view.mas_right).offset(-4);
        make.width.mas_equalTo(18);
        make.height.mas_equalTo(13.5);
    }];

    CGSize size = [_nicknameNode calculateSizeThatFits:CGSizeMake(20, 16)];
    [_nicknameNode.view mas_updateConstraints:^(MASConstraintMaker *make) {
        make.left.mas_equalTo(self.microNode.view.mas_right).offset(4);
        make.centerY.mas_equalTo(_bottomBackgroundNode.view.mas_centerY);
        make.right.mas_equalTo(_zanNode.view.mas_left);
        make.height.mas_equalTo(size.height);
    }];
});
当自己的麦克风没邀请打开([_user[@"voice"] boolValue]),则关闭本地音频:
[[[TICManager sharedInstance] getTRTCCloud] stopLocalAudio];
否则打开本地音频:
[[[TICManager sharedInstance] getTRTCCloud] startLocalAudio];

// 同时注意禁止或者放开推流
[[[TICManager sharedInstance] getTRTCCloud] muteLocalAudio:![_user[@"voice"] boolValue]];
整个底部布局都使用 Masonry 来约束布局,保证这几个控件是垂直居中对齐的:
make.centerY.mas_equalTo(_bottomBackgroundNode.view.mas_centerY);
这里需要注意的是
_nicknameNode布局,因为需要先计算这个布局的大小,然后才能去布局。这里的布局需要再主线程执行:
dispatch_async(dispatch_get_main_queue(), ^{});
第三个是我们语音音量条的布局
[_volumnNode.view mas_updateConstraints:^(MASConstraintMaker *make) {
    make.left.equalTo(self.view.mas_left).offset(5);
    make.bottom.mas_equalTo(_bottomBackgroundNode.view.mas_top);
    make.height.mas_equalTo(30);
    make.width.mas_equalTo(5.5);
}];

for (NSUInteger i = 0; i < 10; i++) {
    ASImageNode *itemView = [[ASImageNode alloc] init];
    itemView.image = UIImageMake(@"icon_voiced");
    [itemView setHidden:YES];
    [_volumnNode addSubnode:itemView];
    [_renderNodes addObject:itemView];
    [_renderViews addObject:itemView.view];
}
[_renderViews mas_distributeViewsAlongAxis:MASAxisTypeVertical withFixedSpacing:0.5 leadSpacing:0 tailSpacing:0];

[_renderViews mas_updateConstraints:^(MASConstraintMaker *make) {
    //垂直方向可以设置水平居中
    make.centerX.mas_equalTo(self.volumnNode.view.mas_centerX);
    make.width.mas_equalTo(5.5);
    make.height.mas_equalTo(2.5);
}];
我们把音量 10 等分,每个用 ASImageNode 表示,然后纵向叠加在一起。这里我们使用 mas_distributeViewsAlongAxis 垂直布局,空隙占用 0.5。每一个音量占用 2.5 高度,整个布局高度控制在 30,刚好占满 volumnNode 布局。
完整布局
NSMutableArray *mainStackContent = [[NSMutableArray alloc] init];
    if ([_user[@"isteacher"] boolValue]) {
        _teacherIconNode.style.preferredSize = CGSizeMake(22, 22.5);
        _teacherIconNode.style.layoutPosition = CGPointMake(0, 0);
        UIEdgeInsets insets = UIEdgeInsetsMake(0, 0, 0, 0);
        ASInsetLayoutSpec *teacherIconSpec = [ASInsetLayoutSpec insetLayoutSpecWithInsets:insets child:_teacherIconNode];
        [mainStackContent addObject:teacherIconSpec];
    }
    _volumnNode.style.preferredSize = CGSizeMake(8.5, 50);
    _volumnNode.style.layoutPosition = CGPointMake(5, 20);

    _bottomBackgroundNode.style.preferredSize = CGSizeMake(constrainedSize.max.width, 16);
    _bottomBackgroundNode.style.layoutPosition = CGPointMake(0, constrainedSize.max.height - 16);

    [mainStackContent addObject:_volumnNode];
    [mainStackContent addObject:_bottomBackgroundNode];

    ASAbsoluteLayoutSpec *contentSpec = [ASAbsoluteLayoutSpec absoluteLayoutSpecWithChildren:mainStackContent];

    ASInsetLayoutSpec* backgroundInsetLayoutSpec =  [ASInsetLayoutSpec
            insetLayoutSpecWithInsets:UIEdgeInsetsMake(0, 0, 0, 0)
                                child:_backgroundNode];

    return [ASBackgroundLayoutSpec backgroundLayoutSpecWithChild:contentSpec background:backgroundInsetLayoutSpec];
因为布局结构简单,而且定位清晰,所以我们采用了 ASAbsoluteLayoutSpec,这个在上一篇文章有介绍,这里就不做更多介绍了。
结合 TRTC
有了 ASCollectionNode 布局,接下来就是结合 TRTC 完成推流和上下台逻辑。
初始化 TRTC
// Podfile
use_frameworks!
pod 'TEduBoard_iOS','2.4.6.1'
pod 'TXIMSDK_iOS','4.6.101'
pod 'TXLiteAVSDK_TRTC','6.9.8341'
根据腾讯云提供的教育解决方案 TIC 的说明,推荐安装以上三个插件 (白板功能、IM 聊天、腾讯实时视音频 TRTC)。
在 AppDelegate 初始化:
[[TICManager sharedInstance] init:sdkAppid callback:^(TICModule module, int code, NSString *desc) {
    if(code == 0){
        [[TICManager sharedInstance] addStatusListener:self];
    }
}];
直接引入官方 Demo 提供代码,在根据业务需要去扩展,本文没对他们做二次处理,方便跟随官网插件更新迭代。
注:官方提供的连接插件是
CocoaAsyncSocket,可参考网站 robbiehanson/CocoaAsyncSocket
接下来就是登录「房间」了。
[[TICManager sharedInstance] login:userId userSig:userSig callback:^(TICModule module, int code, NSString *desc) {
    if(code == 0){
        [JMLoadingHUD hide];
        [QMUITips showSucceed:@"登录成功" inView:[[UIApplication sharedApplication] keyWindow] hideAfterDelay:3];
        ZJClassRoomViewController *classRoom = [ZJClassRoomViewController new];
        TICClassroomOption *option = [[TICClassroomOption alloc] init];
        option.classId = (UInt32) [json[@"room"][@"id"] intValue];
        classRoom.option = option;
        [ws.navigationController pushViewController:classRoom animated:YES];
    }
    else{
        [JMLoadingHUD hide];
        [[JMToast sharedToast] showDialogWithMsg:[NSString stringWithFormat:@"登录失败: %d,%@",code, desc]];
    }
}];
这里 userSig 需要配合后台去生成,参考生成规则和接口文档。
[[TICManager sharedInstance] addMessageListener:self];
[[TICManager sharedInstance] addEventListener:self];
__weak typeof(self) ws = self;
[[TICManager sharedInstance] joinClassroom:option callback:^(TICModule module, int code, NSString *desc) {
    if(code == 0) {
//            [JMLoadingHUD hide];
        [QMUITips showSucceed:@"课堂准备完毕" inView:[[UIApplication sharedApplication] keyWindow] hideAfterDelay:3];
        //其它业务代码
        // ...
        //
    } else {
        [[JMToast sharedToast] showDialogWithMsg:[NSString stringWithFormat:@"加入课堂失败: %d,%@",code, desc]];
        if(code == 10015){
            [[JMToast sharedToast] showDialogWithMsg:@"课堂不存在,请\"创建课堂\""];
        }
        else {
            [[JMToast sharedToast] showDialogWithMsg:[NSString stringWithFormat:@"加入课堂失败:%d %@", code, desc]];
        }
        [JMLoadingHUD hide];
    }
}];
这里进入课堂,主要是初始化白板、加入 IM 群等逻辑,参考腾讯提供的 Demo:
- (void)joinClassroom:(TICClassroomOption *)option callback:(TICCallback)callback
{
    _option = option;
    _enterCallback = callback;

    //白板初始化
    __weak typeof(self) ws = self;
    void (^createBoard)(void) = ^(void){
        TEduBoardAuthParam *authParam = [[TEduBoardAuthParam alloc] init];
        authParam.sdkAppId = ws.sdkAppId;
        authParam.userId = ws.userId;
        authParam.userSig = ws.userSig;
        TEduBoardInitParam *initParam = option.boardInitParam;
        if(!initParam){
            initParam = [[TEduBoardInitParam alloc] init];
        }
        [ws report:TIC_REPORT_INIT_BOARD_START];
        ws.boardController = [[TEduBoardController alloc] initWithAuthParam:authParam roomId:ws.option.classId initParam:initParam];
        [ws.boardController addDelegate:ws];
        if(option.boardDelegate){
            [ws.boardController addDelegate:option.boardDelegate];
        }
    };

    [self report:TIC_REPORT_JOIN_GROUP_START];
    //IM进房
    void (^succ)(void) = ^{
        [ws report:TIC_REPORT_JOIN_GROUP_END];
        createBoard();
    };

    void (^fail)(int, NSString*) = ^(int code, NSString *msg){
        [ws report:TIC_REPORT_JOIN_GROUP_END code:code msg:msg];
        TICBLOCK_SAFE_RUN(callback, TICMODULE_IMSDK, code, msg);
    };

    [self joinIMGroup:[@(_option.classId) stringValue] succ:^{
        if(ws.option.compatSaas){
            NSString *chatGroup = [self getChatGroup];
            [self joinIMGroup:chatGroup succ:^{
                succ();
            } fail:^(int code, NSString *msg) {
                fail(code, msg);
            }];
        }
        else{
            succ();
        }
    } fail:^(int code, NSString *msg) {
        fail(code, msg);
    }];
};
白板
白板是教育直播的一个核心功能,讲师或者用户可以根据授权,参与白板操作和交流:
UIView *boardView = [[[TICManager sharedInstance] getBoardController] getBoardRenderView];

// 默认不能操作白板
[[[TICManager sharedInstance] getBoardController] setDrawEnable:NO];
boardView.frame = self.boardBackgroudView.bounds;
[self.boardBackgroudView addSubview:boardView];
[[[TICManager sharedInstance] getBoardController] addDelegate:self];
在实际业务场景下需要用到白板的一些功能:
/**
 * @brief 设置要使用的白板工具
 * @param type                 要设置的白板工具
*/
- (void)onSelectToolType:(int)toolType
{
    [[[TICManager sharedInstance] getBoardController] setToolType:(TEduBoardToolType)toolType];
}

/**
 * @brief 设置画笔颜色
 * @param color             要设置的画笔颜色
 *
 * 画笔颜色用于所有涂鸦绘制
*/
- (void)onSelectBrushColor:(UIColor *)color
{
    [[[TICManager sharedInstance] getBoardController] setBrushColor:color];
}

/**
 * @brief 设置画笔粗细
 * @param thin                 要设置的画笔粗细
 *
 * 画笔粗细用于所有涂鸦绘制,实际像素值取值(thin * 白板的高度 / 10000)px,如果结果小于1px,则涂鸦的线条会比较虚
*/
- (void)onBrushThinChanged:(float)thin
{
    [[[TICManager sharedInstance] getBoardController] setBrushThin:thin];
}

/**
 * @brief 设置文本颜色
 * @param color             要设置的文本颜色
*/
- (void)onSelectTextColor:(UIColor *)color
{
    [[[TICManager sharedInstance] getBoardController] setTextColor:color];
}

/**
 * @brief 设置当前白板页的背景色
 * @param color             要设置的背景色
 *
 * 白板页创建以后的默认背景色由 SetDefaultBackgroundColor 接口设定
*/
- (void)onSelectBackgroundColor:(UIColor *)color
{
    [[[TICManager sharedInstance] getBoardController] setBackgroundColor:color];
}

/**
 * @brief 设置文本大小
 * @param size                 要设置的文本大小
 *
 * 实际像素值取值(size * 白板的高度 / 10000)px
*/
- (void)onTextSizeChanged:(float)thin
{
    [[[TICManager sharedInstance] getBoardController] setTextSize:thin];
}

/**
 * @brief 设置白板是否允许涂鸦
 * @param enable             是否允许涂鸦,true 表示白板可以涂鸦,false 表示白板不能涂鸦
 *
 * 白板创建后默认为允许涂鸦状态
*/
- (void)onDrawStateChanged:(BOOL)state
{
    [[[TICManager sharedInstance] getBoardController] setDrawEnable:state];
}

/**
 * @brief 设置白板是否开启数据同步
 * @param enable    是否开启
 *
 * 白板创建后默认开启数据同步,关闭数据同步,本地的所有白板操作不会同步到远端和服务器
*/
- (void)onSyncDataChanged:(BOOL)state
{
    [[[TICManager sharedInstance] getBoardController] setDataSyncEnable:state];
}

/**
 * @brief 设置当前白板页的背景 H5 页面
 * @param url                要设置的背景 H5 页面 URL
 *
 * 该接口与 SetBackgroundImage 接口互斥
*/
- (void)onSetBackgroundH5:(NSString *)url
{
    [[[TICManager sharedInstance] getBoardController] setBackgroundH5:url];
}

/**
 * @brief 设置文本样式
 * @param style             要设置的文本样式
*/
- (void)onSetTextStyle:(int)style
{
    [[[TICManager sharedInstance] getBoardController] setTextStyle:(TEduBoardTextStyle)style];
}

/**
 * @brief 撤销当前白板页上一次动作
*/
- (void)onUndo
{
    [[[TICManager sharedInstance] getBoardController] undo];
}

/**
 * @brief 重做当前白板页上一次撤销
*/
- (void)onRedo
{
    [[[TICManager sharedInstance] getBoardController] redo];
}

/**
 * @brief 清除涂鸦,同时清空背景色以及背景图片
 */
- (void)onClear
{
    [[[TICManager sharedInstance] getBoardController] clear];
}

/**
 * @brief 清除涂鸦
 */
- (void)onClearDraw
{
    [[[TICManager sharedInstance] getBoardController] clearDraws];
}

/**
 * @brief 重置白板
 *
 * 调用该接口后将会删除所有的白板页和文件
*/
- (void)onReset
{
    [[[TICManager sharedInstance] getBoardController] reset];
}

/**
 * @brief 设置当前白板页的背景图片
 * @param url                 要设置的背景图片 URL,编码格式为 UTF8
 * @param mode                要使用的图片填充对齐模式
 *
 * 当URL是一个有效的本地文件地址时,该文件会被自动上传到 COS
*/
- (void)onSetBackgroundImage:(NSString *)path
{
    [[[TICManager sharedInstance] getBoardController] setBackgroundImage:path mode:TEDU_BOARD_IMAGE_FIT_MODE_CENTER];
}
视频推流和拉流
当远端流有推流过来时,会触发我们的消息事件:
/**
 * userId对应的远端主路(即摄像头)画面的状态通知
 * @param userId    用户标识
 * @param available 画面是否开启
 **/
- (void)onTICUserVideoAvailable:(NSString *)userId available:(BOOL)available
{
    NSLog(@"onTICUserVideoAvailable userId: %@, available = %d", userId, available);
    [self.rendersView onTICUserVideoAvailable:userId available:available];
}
对应的我们操作,接受或者停止接受远端流:
- (void)onTICUserVideoAvailable:(NSString *)userId available:(BOOL)available {
    [[[TICManager sharedInstance] getTRTCCloud] muteRemoteVideoStream:userId mute:!available];
}
当我们服务器推送我们说有用户上台时,我们先增加一个 ASCollectionNode item,即在我们的 ZJRenderNode 做打开和关闭流的开关操作:
- (void)updateVideoStatus:(bool)available {
    dispatch_async(dispatch_get_main_queue(), ^{
        if ([_key isEqualToString:_key]) {
            if (available) {
                NSLog(@"startLocalPreview:");
                [[[TICManager sharedInstance] getTRTCCloud] startLocalPreview:YES view:_backgroundNode.view];
            } else {
                NSLog(@"stopLocalPreview:");
                [[[TICManager sharedInstance] getTRTCCloud] stopLocalPreview];
            }
        } else {
            if (available) {
                [[[TICManager sharedInstance] getTRTCCloud] startRemoteView:_hash_id view:_backgroundNode.view];
            } else {
                [[[TICManager sharedInstance] getTRTCCloud] stopRemoteView:_hash_id];
            }
        }
    });
}
最后在拿到服务器推送时,如果下台名单里包含自己,则直接关闭自己的本地流推送:
// 自己下台,停止推送视音频和操作白板
if ([key isEqualToString:_my_key]) {
    // 停止本地视频推流
    [[[TICManager sharedInstance] getTRTCCloud] stopLocalPreview];
    // 停止本地音频推流
    [[[TICManager sharedInstance] getTRTCCloud] stopLocalAudio];
    // 停止操作白板权限
    [[[TICManager sharedInstance] getBoardController] setDrawEnable:NO];
}
音频音量操作
// 硬件设备事件回调
- (void)onUserVoiceVolume:(NSArray<TRTCVolumeInfo *> *)userVolumes totalVolume:(NSInteger)totalVolume {
    [self.rendersView onUserVoiceVolume:userVolumes totalVolume:totalVolume];
}

// ZJRendersView.m
- (void)onUserVoiceVolume:(NSArray<TRTCVolumeInfo *> *)userVolumes totalVolume:(NSInteger)totalVolume {
    for (TRTCVolumeInfo *info in userVolumes) {
        if (keys[info.userId]) {
            ZJRenderNode *node = [_collectionNode nodeForItemAtIndexPath:keys[info.userId]];
            [node updateVolumn:(info.volume / 10)];
        }
    }
}

// ZJRenderNode
// 更新音量 UI,通过 hidden 属性值来设置音量的变化
- (void)updateVolumn:(NSUInteger)count {
    dispatch_async(dispatch_get_main_queue(), ^{
        NSUInteger i = 0;
        for (i = 0; i < 10 - count; ++i) {
            [_renderNodes[i] setHidden:YES];
        }

        for (NSUInteger j = i; j < 10; ++j) {
            [_renderNodes[j] setHidden:NO];
        }
    });
}
总结
至此,我们的核心功能就算开发完成了,这里缺少的 IM 那一块,可以结合上一篇的文章聊天界面设计来动手试试。
结合 ASCollectionNode 和腾讯云实时视音频 TRTC SDK 完成一个教育类多人上台互动直播从体验和直播效果来看,腾讯云实时视音频能力还是很不错的。连开着多人直播一点都不卡,延迟在几百毫秒可接受范围内,值得大家推荐使用。
