前言
RocketMQ 作为一款优秀的分布式消息中间件,可以为业务方提供高性能低延迟的稳定可靠的消息服务。其核心优势是可靠的消费存储、消息发送的高性能和低延迟、强大的消息堆积能力和消息处理能力。
从存储方式来看,主要有几个方面:
- 文件系统
- 分布式KV存储
- 关系型数据库
从效率上来讲,文件系统高于KV存储,KV存储又高于关系型数据库。因为直接操作文件系统肯定是最快的,那么业界主流的消息队列中间件,如RocketMQ 、RabbitMQ 、kafka 都是采用文件系统的方式来存储消息。
今天,我们就从它的存储文件入手,来探索一下 RocketMQ 消息存储的机制。
一、CommitLog
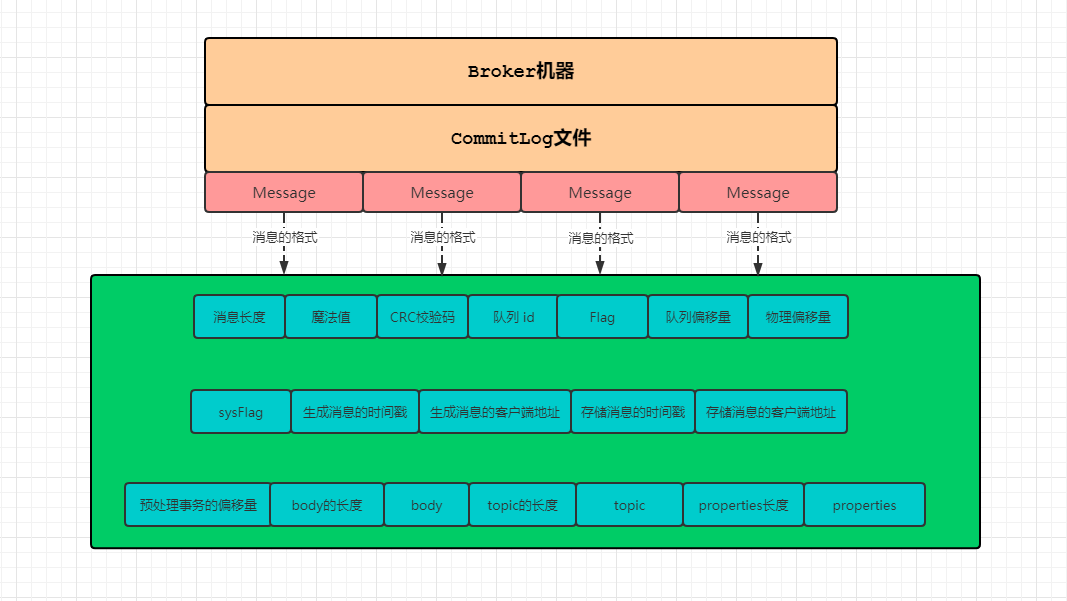
CommitLog,消息存储文件,所有主题的消息都存储在 CommitLog 文件中。
我们的业务系统向 RocketMQ 发送一条消息,不管在中间经历了多么复杂的流程,最终这条消息会被持久化到CommitLog文件。
我们知道,一台Broker服务器只有一个CommitLog文件(组),RocketMQ会将所有主题的消息存储在同一个文件中,这个文件中就存储着一条条Message,每条Message都会按照顺序写入。
也许有时候,你会希望看看这个 CommitLog 文件中,存储的内容到底长什么样子?
1、消息发送
当然,我们需要先往 CommitLog 文件中写入一些内容,所以先来看一个消息发送的例子。
public static void main(String[] args) throws Exception {
    MQProducer producer = getProducer();
    for (int i = 0;i<10;i++){
        Message message = new Message();
        message.setTopic("topic"+i);
        message.setBody(("清幽之地的博客").getBytes());
        SendResult sendResult = producer.send(message);
    }
    producer.shutdown();
}
我们向10个不同的主题中发送消息,如果只有一台Broker机器,它们会保存到同一个CommitLog文件中。此时,这个文件的位置处于 C:/Users/shiqizhen/store/commitlog/00000000000000000000。
2、读取文件内容
这个文件我们不能直接打开,因为它是一个二进制文件,所以我们需要通过程序来读取它的字节数组。
public static ByteBuffer read(String path)throws Exception{
    File file = new File(path);
    FileInputStream fin = new FileInputStream(file);
    byte[] bytes = new byte[(int)file.length()];
    fin.read(bytes);
    ByteBuffer buffer = ByteBuffer.wrap(bytes);
    return buffer;
}
如上代码,可以通过传入文件的路径,读取该文件所有的内容。为了方便下一步操作,我们把读取到的字节数组转换为java.nio.ByteBuffer对象。
3、解析
在解析之前,我们需要弄明白两件事:
- 消息的格式,即一条消息包含哪些字段;
- 每个字段所占的字节大小。
在上面的图中,我们已经看到了消息的格式,包含了19个字段。关于字节大小,有的是 4 字节,有的是 8 字节,我们不再一一赘述,直接看代码。
/**
 * commitlog 文件解析
 * @param byteBuffer
 * @return
 * @throws Exception
 */
public static MessageExt decodeCommitLog(ByteBuffer byteBuffer)throws Exception {

	MessageExt msgExt = new MessageExt();

	// 1 TOTALSIZE
	int storeSize = byteBuffer.getInt();
	msgExt.setStoreSize(storeSize);

	if (storeSize<=0){
	    return null;
	}

	// 2 MAGICCODE
	byteBuffer.getInt();

	// 3 BODYCRC
	int bodyCRC = byteBuffer.getInt();
	msgExt.setBodyCRC(bodyCRC);

	// 4 QUEUEID
	int queueId = byteBuffer.getInt();
	msgExt.setQueueId(queueId);

	// 5 FLAG
	int flag = byteBuffer.getInt();
	msgExt.setFlag(flag);

	// 6 QUEUEOFFSET
	long queueOffset = byteBuffer.getLong();
	msgExt.setQueueOffset(queueOffset);

	// 7 PHYSICALOFFSET
	long physicOffset = byteBuffer.getLong();
	msgExt.setCommitLogOffset(physicOffset);

	// 8 SYSFLAG
	int sysFlag = byteBuffer.getInt();
	msgExt.setSysFlag(sysFlag);

	// 9 BORNTIMESTAMP
	long bornTimeStamp = byteBuffer.getLong();
	msgExt.setBornTimestamp(bornTimeStamp);

	// 10 BORNHOST
	int bornhostIPLength = (sysFlag & MessageSysFlag.BORNHOST_V6_FLAG) == 0 ? 4 : 16;
	byte[] bornHost = new byte[bornhostIPLength];
	byteBuffer.get(bornHost, 0, bornhostIPLength);
	int port = byteBuffer.getInt();
	msgExt.setBornHost(new InetSocketAddress(InetAddress.getByAddress(bornHost), port));

	// 11 STORETIMESTAMP
	long storeTimestamp = byteBuffer.getLong();
	msgExt.setStoreTimestamp(storeTimestamp);

	// 12 STOREHOST
	int storehostIPLength = (sysFlag & MessageSysFlag.STOREHOSTADDRESS_V6_FLAG) == 0 ? 4 : 16;
	byte[] storeHost = new byte[storehostIPLength];
	byteBuffer.get(storeHost, 0, storehostIPLength);
	port = byteBuffer.getInt();
	msgExt.setStoreHost(new InetSocketAddress(InetAddress.getByAddress(storeHost), port));

	// 13 RECONSUMETIMES
	int reconsumeTimes = byteBuffer.getInt();
	msgExt.setReconsumeTimes(reconsumeTimes);

	// 14 Prepared Transaction Offset
	long preparedTransactionOffset = byteBuffer.getLong();
	msgExt.setPreparedTransactionOffset(preparedTransactionOffset);

	// 15 BODY
	int bodyLen = byteBuffer.getInt();
	if (bodyLen > 0) {
	    byte[] body = new byte[bodyLen];
	    byteBuffer.get(body);
	    msgExt.setBody(body);
	}

	// 16 TOPIC
	byte topicLen = byteBuffer.get();
	byte[] topic = new byte[(int) topicLen];
	byteBuffer.get(topic);
	msgExt.setTopic(new String(topic, CHARSET_UTF8));

	// 17 properties
	short propertiesLength = byteBuffer.getShort();
	if (propertiesLength > 0) {
	    byte[] properties = new byte[propertiesLength];
	    byteBuffer.get(properties);
	    String propertiesString = new String(properties, CHARSET_UTF8);
	    Map<String, String> map = string2messageProperties(propertiesString);
	}
	int msgIDLength = storehostIPLength + 4 + 8;
	ByteBuffer byteBufferMsgId = ByteBuffer.allocate(msgIDLength);
	String msgId = createMessageId(byteBufferMsgId, msgExt.getStoreHostBytes(), msgExt.getCommitLogOffset());
	msgExt.setMsgId(msgId);

	return msgExt;
}
4、输出消息内容
public static void main(String[] args) throws Exception {
    String filePath = "C:\\Users\\shiqizhen\\store\\commitlog\\00000000000000000000";
    ByteBuffer buffer = read(filePath);
    List<MessageExt> messageList = new ArrayList<>();
    while (true){
        MessageExt message = decodeCommitLog(buffer);
        if (message==null){
            break;
        }
        messageList.add(message);
    }
    for (MessageExt ms:messageList) {
        System.out.println("主题:"+ms.getTopic()+" 消息:"+
            new String(ms.getBody())+"队列ID:"+ms.getQueueId()+" 存储地址:"+ms.getStoreHost());
    }
}
运行这段代码,我们就可以直接看到CommitLog文件中的内容:
主题:topic0 消息:清幽之地的博客 队列ID:1 存储地址:/192.168.44.1:10911
主题:topic1 消息:清幽之地的博客 队列ID:0 存储地址:/192.168.44.1:10911
主题:topic2 消息:清幽之地的博客 队列ID:1 存储地址:/192.168.44.1:10911
主题:topic3 消息:清幽之地的博客 队列ID:0 存储地址:/192.168.44.1:10911
主题:topic4 消息:清幽之地的博客 队列ID:3 存储地址:/192.168.44.1:10911
主题:topic5 消息:清幽之地的博客 队列ID:1 存储地址:/192.168.44.1:10911
主题:topic6 消息:清幽之地的博客 队列ID:2 存储地址:/192.168.44.1:10911
主题:topic7 消息:清幽之地的博客 队列ID:3 存储地址:/192.168.44.1:10911
主题:topic8 消息:清幽之地的博客 队列ID:2 存储地址:/192.168.44.1:10911
主题:topic9 消息:清幽之地的博客 队列ID:0 存储地址:/192.168.44.1:10911
不用过多的文字描述,通过上面这些代码,相信你对CommitLog文件就有了更进一步的了解。
此时,我们再考虑另外一个问题:
CommitLog 文件保存了所有主题的消息,但我们消费时,更多的是订阅某一个主题进行消费。RocketMQ是怎么样进行高效的检索消息的呢 ?
二、ConsumeQueue
为了解决上面那个问题,RocketMQ引入了ConsumeQueue消费队列文件。
在继续往下说ConsumeQueue之前,我们必须先了解到另外一个概念,即MessageQueue。
1、MessageQueue
我们知道,在发送消息的时候,要指定一个Topic。那么,在创建Topic的时候,有一个很重要的参数MessageQueue。简单来说,就是你这个Topic对应了多少个队列,也就是几个MessageQueue,默认是4个。那它的作用是什么呢 ?
它是一个数据分片的机制。比如我们的Topic里面有100条数据,该Topic默认是4个队列,那么每个队列中大约25条数据。
然后,这些MessageQueue是和Broker绑定在一起的,就是说每个MessageQueue都可能处于不同的Broker机器上,这取决于你的队列数量和Broker集群。
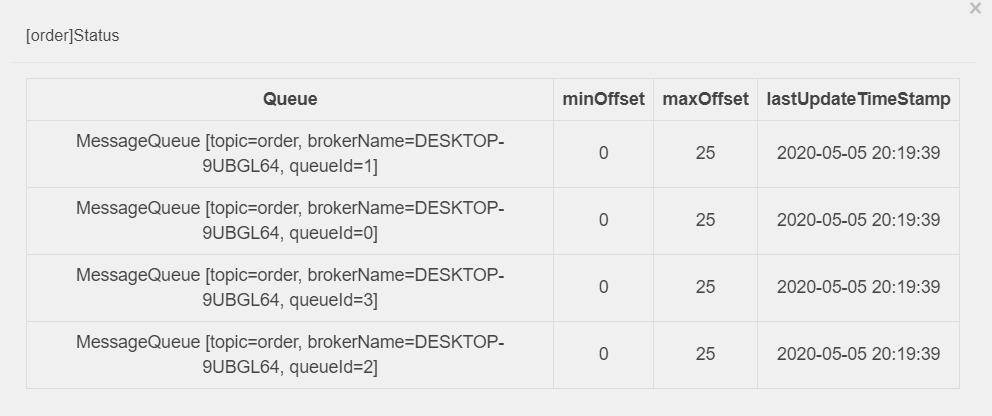
我们来看上面的图片,Topic名称为order的主题,一共有4个MessageQueue,每个里面都有25条数据。因为在笔者的本地环境只有一个Broker,所以它们的brokerName都是指向同一台机器。
既然MessageQueue是多个,那么在消息发送的时候,势必要通过某种方式选择一个队列。默认的情况下,就是通过轮询来获取一个消息队列。
public MessageQueue selectOneMessageQueue() {
    int index = this.sendWhichQueue.getAndIncrement();
    int pos = Math.abs(index) % this.messageQueueList.size();
    if (pos < 0)
        pos = 0;
    return this.messageQueueList.get(pos);
}
当然,RocketMQ还有一个故障延迟机制,在选择消息队列的时候会复杂一些,我们今天先不讨论。
2、ConsumeQueue
说完了MessageQueue,我们接着来看ConsumerQueue。上面我们说,它是为了高效检索主题消息的。
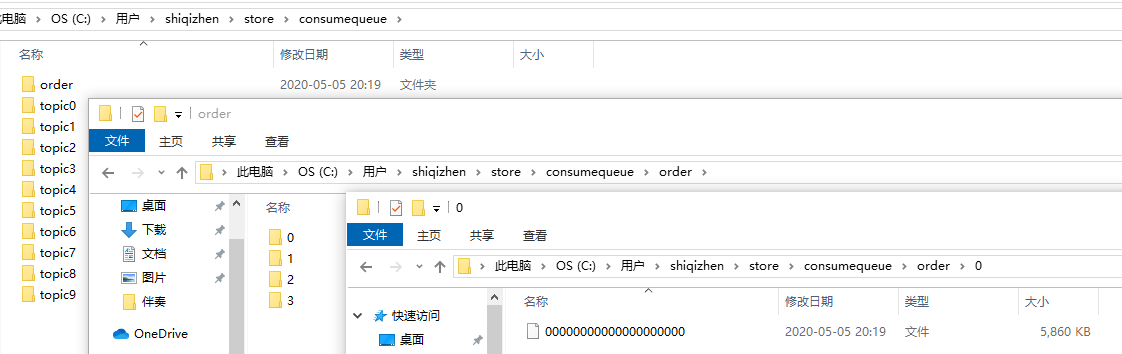
ConsumerQueue也是一组组文件,它的位置在C:/Users/shiqizhen/store/consumequeue。该目录下面是以Topic命名的文件夹,然后再下一级是以MessageQueue队列ID命名的文件夹,最后才是一个或多个文件。
这样分层之后,RocketMQ至少可以得到以下几个讯息:
- 先通过主题名称,可以定位到具体的文件夹;
- 然后根据消息队列ID找到具体的文件;
- 最后根据文件内容,找到具体的消息。
那么,这个文件里面存储的又是什么内容呢 ?
3、解析文件
为了加速ConsumerQueue的检索速度和节省磁盘空间,文件中不会存储消息的全量消息。其存储的格式如下:
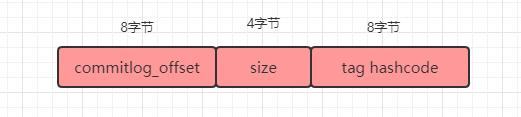
同样的,我们先写一段代码,按照这个格式输出一下ConsumerQueue文件的内容。
public static void main(String[] args)throws Exception {
    String path = "C:\\Users\\shiqizhen\\store\\consumequeue\\order\\0\\00000000000000000000";
    ByteBuffer buffer = read(path);
    while (true){
        long offset = buffer.getLong();
        long size = buffer.getInt();
        long code = buffer.getLong();
        if (size==0){
            break;
        }
        System.out.println("消息长度:"+size+" 消息偏移量:" +offset);
    }
    System.out.println("--------------------------");
}
在前面,我们已经向order这个主题中写了100条数据,所以在这里它的order#messagequeue#0里面有25条记录。
消息长度:173 消息偏移量:2003
消息长度:173 消息偏移量:2695
消息长度:173 消息偏移量:3387
消息长度:173 消息偏移量:4079
消息长度:173 消息偏移量:4771
消息长度:173 消息偏移量:5463
消息长度:173 消息偏移量:6155
消息长度:173 消息偏移量:6847
消息长度:173 消息偏移量:7539
消息长度:173 消息偏移量:8231
消息长度:173 消息偏移量:8923
消息长度:173 消息偏移量:9615
消息长度:173 消息偏移量:10307
消息长度:173 消息偏移量:10999
消息长度:173 消息偏移量:11691
消息长度:173 消息偏移量:12383
消息长度:173 消息偏移量:13075
消息长度:173 消息偏移量:13767
消息长度:173 消息偏移量:14459
消息长度:173 消息偏移量:15151
消息长度:173 消息偏移量:15843
消息长度:173 消息偏移量:16535
消息长度:173 消息偏移量:17227
消息长度:173 消息偏移量:17919
消息长度:173 消息偏移量:18611
--------------------------
细心的朋友,肯定发现了。上面输出的结果中,消息偏移量的差值等于 = 消息长度 * 队列长度。
4、查询消息
现在我们通过ConsumerQueue已经知道了消息的长度和偏移量,那么查找消息就比较容易了。
public static MessageExt getMessageByOffset(ByteBuffer commitLog,long offset,int size) throws Exception {
    ByteBuffer slice = commitLog.slice();
    slice.position((int)offset);
    slice.limit((int) (offset+size));
    MessageExt message = CommitLogTest.decodeCommitLog(slice);
    return message;
}
然后,我们可以依靠这种方法,来实现通过ConsumerQueue获取消息的具体内容。
public static void main(String[] args) throws Exception {

	//consumerqueue根目录
	String consumerPath = "C:\\Users\\shiqizhen\\store\\consumequeue";
	//commitlog目录
	String commitLogPath = "C:\\Users\\shiqizhen\\store\\commitlog\\00000000000000000000";
	//读取commitlog文件内容
	ByteBuffer commitLogBuffer = CommitLogTest.read(commitLogPath);

	//遍历consumerqueue目录下的所有文件
	File file = new File(consumerPath);
	File[] files = file.listFiles();
	for (File f:files) {
		if (f.isDirectory()){
			File[] listFiles = f.listFiles();
			for (File queuePath:listFiles) {
				String path = queuePath+"/00000000000000000000";
				//读取consumerqueue文件内容
				ByteBuffer buffer = CommitLogTest.read(path);
				while (true){
					//读取消息偏移量和消息长度
					long offset = (int) buffer.getLong();
					int size = buffer.getInt();
					long code = buffer.getLong();
					if (size==0){
						break;
					}
					//根据偏移量和消息长度,在commitloh文件中读取消息内容
					MessageExt message = getMessageByOffset(commitLogBuffer,offset,size);
					if (message!=null){
						System.out.println("消息主题:"+message.getTopic()+" MessageQueue:"+
							message.getQueueId()+" 消息体:"+new String(message.getBody()));
					}
				}
			}
		}
	}
}
运行这段代码,就可以得到之前测试样例中,10个主题的所有消息。
消息主题:topic0 MessageQueue:1 消息体:清幽之地的博客
消息主题:topic1 MessageQueue:0 消息体:清幽之地的博客
消息主题:topic2 MessageQueue:1 消息体:清幽之地的博客
消息主题:topic3 MessageQueue:0 消息体:清幽之地的博客
消息主题:topic4 MessageQueue:3 消息体:清幽之地的博客
消息主题:topic5 MessageQueue:1 消息体:清幽之地的博客
消息主题:topic6 MessageQueue:2 消息体:清幽之地的博客
消息主题:topic7 MessageQueue:3 消息体:清幽之地的博客
消息主题:topic8 MessageQueue:2 消息体:清幽之地的博客
消息主题:topic9 MessageQueue:0 消息体:清幽之地的博客
5、消费消息
消息消费的时候,其查找消息的过程也是差不多的。不过值得注意的一点是,ConsumerQueue文件和CommitLog文件可能都是多个的,所以会有一个定位文件的过程,我们来看源码。
首先,根据消费进度来查找对应的ConsumerQueue,获取其文件内容。
public SelectMappedBufferResult getIndexBuffer(final long startIndex) {
    //ConsumerQueue文件大小
    int mappedFileSize = this.mappedFileSize;
    //根据消费进度,找到在consumerqueue文件里的偏移量
    long offset = startIndex * CQ_STORE_UNIT_SIZE;
    if (offset >= this.getMinLogicOffset()) {
        //返回ConsumerQueue映射文件
        MappedFile mappedFile = this.mappedFileQueue.findMappedFileByOffset(offset);
        if (mappedFile != null) {
            //返回文件里的某一块内容
            SelectMappedBufferResult result = mappedFile.selectMappedBuffer((int) (offset % mappedFileSize));
            return result;
        }
    }
    return null;
}
然后拿到消息在CommitLog文件中的偏移量和消息长度,获取消息。
public SelectMappedBufferResult getMessage(final long offset, final int size) {
    //commitlog文件大小
    int mappedFileSize = this.defaultMessageStore.getMessageStoreConfig().getMappedFileSizeCommitLog();
    //根据消息偏移量,定位到具体的commitlog文件
    MappedFile mappedFile = this.mappedFileQueue.findMappedFileByOffset(offset, offset == 0);
    if (mappedFile != null) {
        //根据消息偏移量和长度,获取消息内容
        int pos = (int) (offset % mappedFileSize);
        return mappedFile.selectMappedBuffer(pos, size);
    }
    return null;
}
6、通过 Message Id 查询
上面我们看到了通过消息偏移量来查找消息的方式,但RocketMQ还提供了其他几种方式可以查询消息。
- 通过Message Key 查询;
- 通过Unique Key查询;
- 通过Message Id查询。
在这里,Message Key和Unique Key都是在消息发送之前,由客户端生成的。我们可以自己设置,也可以由客户端自动生成,Message Id是在Broker端存储消息的时候生成。
Message Id总共 16 字节,包含消息存储主机地址和在CommitLog文件中的偏移量offset。有源码为证:
/**
 * 创建消息ID
 * @param input
 * @param addr      Broker服务器地址
 * @param offset    正在存储的消息,在Commitlog中的偏移量
 * @return
 */
public static String createMessageId(final ByteBuffer input, final ByteBuffer addr, final long offset) {
    input.flip();
    int msgIDLength = addr.limit() == 8 ? 16 : 28;
    input.limit(msgIDLength);
    input.put(addr);
    input.putLong(offset);
    return UtilAll.bytes2string(input.array());
}
当我们根据Message Id向Broker查询消息时,首先会通过一个decodeMessageId方法,将Broker地址和消息的偏移量解析出来。
public static MessageId decodeMessageId(final String msgId) throws Exception {
    SocketAddress address;
    long offset;
    int ipLength = msgId.length() == 32 ? 4 * 2 : 16 * 2;
    byte[] ip = UtilAll.string2bytes(msgId.substring(0, ipLength));
    byte[] port = UtilAll.string2bytes(msgId.substring(ipLength, ipLength + 8));
    ByteBuffer bb = ByteBuffer.wrap(port);
    int portInt = bb.getInt(0);
    //解析出来Broker地址
    address = new InetSocketAddress(InetAddress.getByAddress(ip), portInt);
    //偏移量
    byte[] data = UtilAll.string2bytes(msgId.substring(ipLength + 8, ipLength + 8 + 16));
    bb = ByteBuffer.wrap(data);
    offset = bb.getLong(0);
    return new MessageId(address, offset);
}
所以通过Message Id查询消息的时候,实际上还是直接从特定Broker上的CommitLog指定位置进行查询,属于精确查询。
这个也没问题,但是如果通过 Message Key 和 Unique Key 查询的时候,RocketMQ 又是怎么做的呢?
三、Index
1、index索引文件
ConsumerQueue消息消费队列是专门为消息订阅构建的索引文件,提高根据主题与消息队列检索消息的速度。
另外,RocketMQ引入Hash索引机制,为消息建立索引,它的键就是Message Key 和 Unique Key。
那么,我们先看看index索引文件的结构:

为了便于理解,我们还是以代码的方式,来解析这个文件。
public static void main(String[] args) throws Exception {

    //index索引文件的路径
    String path = "C:\\Users\\shiqizhen\\store\\index\\20200506224547616";
    ByteBuffer buffer = CommitLogTest.read(path);
    //该索引文件中包含消息的最小存储时间
    long beginTimestamp = buffer.getLong();
    //该索引文件中包含消息的最大存储时间
    long endTimestamp = buffer.getLong();
    //该索引文件中包含消息的最大物理偏移量(commitlog文件偏移量)
    long beginPhyOffset = buffer.getLong();
    //该索引文件中包含消息的最大物理偏移量(commitlog文件偏移量)
    long endPhyOffset = buffer.getLong();
    //hashslot个数
    int hashSlotCount = buffer.getInt();
    //Index条目列表当前已使用的个数
    int indexCount = buffer.getInt();

    //500万个hash槽,每个槽占4个字节,存储的是index索引
    for (int i=0;i<5000000;i++){
        buffer.getInt();
    }
    //2000万个index条目
    for (int j=0;j<20000000;j++){
        //消息key的hashcode
        int hashcode = buffer.getInt();
        //消息对应的偏移量
        long offset = buffer.getLong();
        //消息存储时间和第一条消息的差值
        int timedif = buffer.getInt();
        //该条目的上一条记录的index索引
        int pre_no = buffer.getInt();
    }
    System.out.println(buffer.position()==buffer.capacity());
}
我们看最后输出的结果为true,则证明解析的过程无误。
2、构建索引
我们发送的消息体中,包含Message Key 或 Unique Key,那么就会给它们每一个都构建索引。
这里重点有两个:
- 根据消息Key计算Hash槽的位置;
- 根据Hash槽的数量和Index索引来计算Index条目的起始位置。
将当前 Index条目 的索引值,写在Hash槽absSlotPos位置上;将Index条目的具体信息(hashcode/消息偏移量/时间差值/hash槽的值),从起始偏移量absIndexPos开始,顺序按字节写入。
public boolean putKey(final String key, final long phyOffset, final long storeTimestamp) {
    if (this.indexHeader.getIndexCount() < this.indexNum) {
        //计算key的hash
        int keyHash = indexKeyHashMethod(key);
        //计算hash槽的坐标
        int slotPos = keyHash % this.hashSlotNum;
        int absSlotPos = IndexHeader.INDEX_HEADER_SIZE + slotPos * hashSlotSize;
        //计算时间差值
        long timeDiff = storeTimestamp - this.indexHeader.getBeginTimestamp();
        timeDiff = timeDiff / 1000;
        //计算INDEX条目的起始偏移量
        int absIndexPos =
            IndexHeader.INDEX_HEADER_SIZE + this.hashSlotNum * hashSlotSize
                + this.indexHeader.getIndexCount() * indexSize;
        //依次写入hashcode、消息偏移量、时间戳、hash槽的值
        this.mappedByteBuffer.putInt(absIndexPos, keyHash);
        this.mappedByteBuffer.putLong(absIndexPos + 4, phyOffset);
        this.mappedByteBuffer.putInt(absIndexPos + 4 + 8, (int) timeDiff);
        this.mappedByteBuffer.putInt(absIndexPos + 4 + 8 + 4, slotValue);
        //将当前INDEX中包含的条目数量写入HASH槽
        this.mappedByteBuffer.putInt(absSlotPos, this.indexHeader.getIndexCount());
        return true;
    }
    return false;
}
这样构建完Index索引之后,根据Message Key 或 Unique Key查询消息就简单了。
比如我们通过RocketMQ客户端工具,根据Unique Key来查询消息。
adminImpl.queryMessageByUniqKey("order", "FD88E3AB24F6980059FDC9C3620464741BCC18B4AAC220FDFE890007");
在Broker端,通过Unique Key来计算Hash槽的位置,从而找到Index索引数据。从Index索引中拿到消息的物理偏移量,最后根据消息物理偏移量,直接到CommitLog文件中去找就可以了。
总结
本文探讨了RocketMQ中消息存储和消息查找的基本思路。源码中间过程都很复杂,但是通过这种自下而上的方式,直接从文件入手,剖析它们的文件结构,从而梳理清楚它们的关系和作用,希望能对朋友们产生积极作用。
原创不易,客官们点个赞再走嘛,这将是笔者持续写作的动力~