前言
在面试中,OkHttp作为我们基本属于必用的第三方库来说,也是一个非常重要的考点,所以对其原理的掌握也会让我们的能力得到一定的提升。
OkHttp官网地址:square.github.io/okhttp/
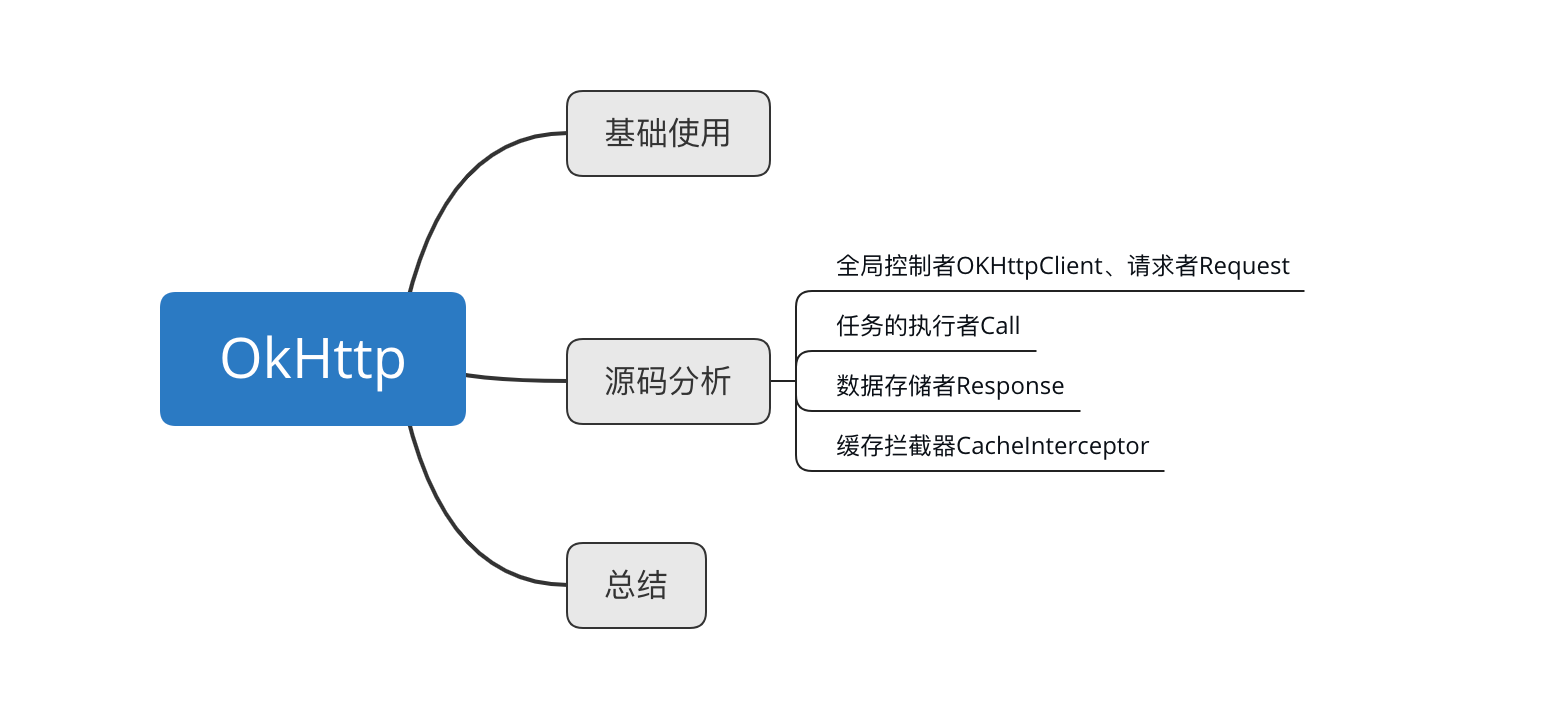
基本使用
先一段引入关于OkHttp的使用,这是直接拉取了官网挂着的使用方法。因为在一般的使用过程中,后台可能会通过比较带有的session或者cookie来判断当前用户是否和缓存的用户相同,所以一般一个项目整体使用单例模式来创建OkHttpClient的对象。
OkHttpClient client = new OkHttpClient();

String run(String url) throws IOException {
  Request request = new Request.Builder()
      .url(url)
      .build();

  try (Response response = client.newCall(request).execute()) {
    return response.body().string();
  }
}
源码解析
OkHttpClient client = new OkHttpClient.Builder().build();
Request request = new Request.Builder()
                .url(url)
                .build();

Call call = client.newCall(request);
call.enqueue(new Callback() {
        @Override
        public void onFailure(Call call, IOException e) {

        }

        @Override
        public void onResponse(Call call, Response response) throws IOException {

        }
});
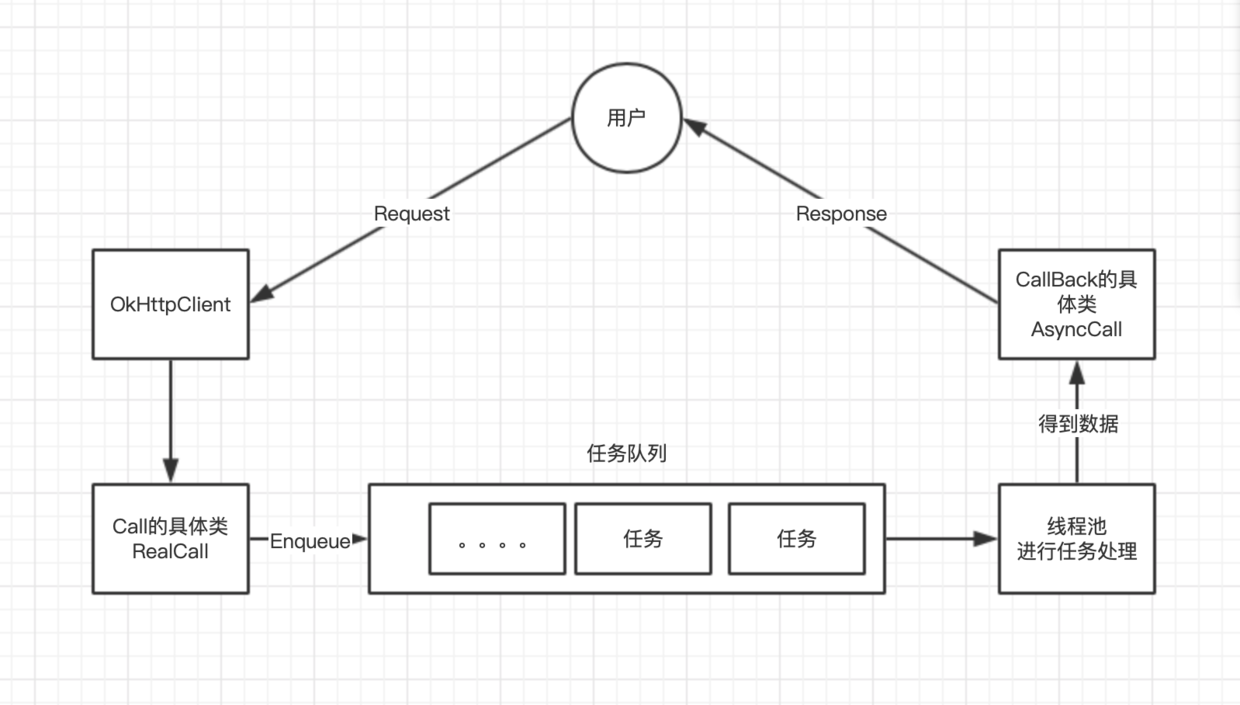
这是我们的在okhttp中使用的方法,整个项目的解析将围绕下面5个类进行。
- OkHttpClient: 全局管理者
- Request: 请求体
- Call: 请求发起者
- Callback: 数据接收通道
- Response: 响应数据体
OkHttpClient、Request
首先是OkHttpClient和Request。
为什么这两个一起讲解呢?因为两个构造方式相同OkHttpClient是一个全局掌控者,Request是一个请求体的封装。
public final class Request {
  final HttpUrl url; // 路径
  final String method; // 请求方式
  final Headers headers; // 请求头
  final @Nullable RequestBody body; // 请求体
  final Object tag;
}

public class OkHttpClient implements Cloneable, Call.Factory, WebSocket.Factory {
  final Dispatcher dispatcher; // 分发器
  final @Nullable Proxy proxy; //代理
  final List<Protocol> protocols; //协议
  final List<ConnectionSpec> connectionSpecs; //传输层版本和连接协议
  final List<Interceptor> interceptors; // 拦截器
  final List<Interceptor> networkInterceptors; // 网络拦截器
  final EventListener.Factory eventListenerFactory;
  final ProxySelector proxySelector; //代理选择
  final CookieJar cookieJar; //cookie
  final @Nullable Cache cache; //缓存
  final @Nullable InternalCache internalCache; //内部缓存
  final SocketFactory socketFactory; //socket 工厂
  final @Nullable SSLSocketFactory sslSocketFactory; //安全套接层socket 工厂,用于HTTPS
  final @Nullable CertificateChainCleaner certificateChainCleaner;  // 验证确认响应证书 适用 HTTPS 请求连接的主机名。
  final HostnameVerifier hostnameVerifier; // 主机名字确认
  final CertificatePinner certificatePinner; // 证书链
  final Authenticator proxyAuthenticator; // 代理身份验证
  final Authenticator authenticator; // 本地身份验证
  final ConnectionPool connectionPool; // 连接池,复用连接
  final Dns dns; // 域名
  final boolean followSslRedirects; // 安全套接层重定向
  final boolean followRedirects; // 本地重定向
  final boolean retryOnConnectionFailure; // 重试连接失败
  final int connectTimeout; // 连接超时
  final int readTimeout; // read 超时
  final int writeTimeout;  // write 超时
  final int pingInterval;
}
能看到OkHttpClient的内部元素很多,但是我们很多时间并不会进行直接的使用,是因为他自己已经做了很多层的封装,另外他们这种创建对象的模式又称为建造者设计模式。
internal constructor(okHttpClient: OkHttpClient) : this() {
      this.dispatcher = okHttpClient.dispatcher
      this.connectionPool = okHttpClient.connectionPool
      this.interceptors += okHttpClient.interceptors
      // 。。。。。
    }
对建造者设计模式做一个比较通俗的介绍,就是将我们草稿图上的数据应用到真实的场景中去。
val client = OkHttpClient.Builder().build()
// 调用Builder()的builder()函数
// 最后是创建了OkHttpClient对象,我们原本的数据是存储在OkHttpClient的Builder中
fun build(): OkHttpClient = OkHttpClient(this)
但是说了这么久,还是有一个问题啊,我没看到他对数据进行了使用啊??别着急,现在我们进入我们的使用环节了。
Call:任务的执行者
接下来就是Call这个类,根据模版写法,我们知道需要将封装好的Request请求体数据塞入OkHttpClient中返回的就是一个Call。
@Override public Call newCall(Request request) {
    return RealCall.newRealCall(this, request, false /* for web socket */);
}
通过进入newCall()方法,我们知道返回的数据其实是实现Call的接口一个具体类RealCall,具体操作我们不用知道,我们只用知道返回的一个具体类是什么就可以了,因为往后的操作都是围绕一个具体的东西展开的。
在看模版的下一句话call.enqueue(...),进入函数,我们可以看到下述的函数。
  override fun enqueue(responseCallback: Callback) {
    synchronized(this) {
      check(!executed) { "Already Executed" }
      // 一个Call只能进行一次的执行操作
      executed = true
    }
    callStart()
    client.dispatcher.enqueue(AsyncCall(responseCallback)) // 1 -->
  }
其他都还好,直接看到上述最后一行代码,因为我们需要将任务发布出去,并且拿到数据,那么自然需要一个分发器了和一个接收回馈数据的通道了,这显然就是我们上文中OkHttpClient中所看到的dispatcher和我们在外部定义好的Callback ==> responseCallback。
internal fun enqueue(call: AsyncCall) {
    // 使用同步机制对请求数据进行控制
    synchronized(this) {
      readyAsyncCalls.add(call)

      // 个人理解:对同一个host发起多个请求是为了加快查询速度,减少资源浪费
      // 他会从正在执行运行的Call中先进行查找,再从准备执行的Call中查找
      if (!call.call.forWebSocket) {
        val existingCall = findExistingCallWithHost(call.host)
        if (existingCall != null) call.reuseCallsPerHostFrom(existingCall)
      }
    }
    promoteAndExecute() // 1 ==>
  }
// 1 ==>
private fun promoteAndExecute(): Boolean {
    this.assertThreadDoesntHoldLock()

    val executableCalls = mutableListOf<AsyncCall>()
    val isRunning: Boolean
    synchronized(this) {
      val i = readyAsyncCalls.iterator()
      // 将准备队列中的数据进行处理
      while (i.hasNext()) {
        val asyncCall = i.next()

        // 正在运行的请求数量不能大于64个
        if (runningAsyncCalls.size >= this.maxRequests) break // Max capacity.
        // 可以存在的host数量为5个
        if (asyncCall.callsPerHost.get() >= this.maxRequestsPerHost) continue // Host max capacity.

        i.remove()
        asyncCall.callsPerHost.incrementAndGet()
        // 将要运行的放入运行队列中
        executableCalls.add(asyncCall)
        runningAsyncCalls.add(asyncCall)
      }
      // 用于判断当前队列中的是否还有请求正在进行中
      isRunning = runningCallsCount() > 0
    }
    // 对每一个进入了运行队列中的请求进行正式运行
    for (i in 0 until executableCalls.size) {
      val asyncCall = executableCalls[i]
      asyncCall.executeOn(executorService)
    }
    return isRunning
  }
想来对整个的处理过程已经有一个比较详细的讲解了,但是我们还是没有看到数据的返回操作,甚至说具体的运行,不过我们能够注意到一个中途意外冒出的变量executorService,这个变量是从哪里来的呢?
溯源我们能够发现,他在Dispatcher中就已经有过了初始化操作。
@get:JvmName("executorService") val executorService: ExecutorService
    get() {
      if (executorServiceOrNull == null) {
        executorServiceOrNull = ThreadPoolExecutor(0, Int.MAX_VALUE, 60, TimeUnit.SECONDS,
            SynchronousQueue(), threadFactory("$okHttpName Dispatcher", false))
      }
      return executorServiceOrNull!!
    }
一看到要说ThreadPoolExecutor,哦哦哦哦!线程池,但是和什么线程池长得特别像呢?进入已经定义好的Executors类中查找,能够查找到如下的代码段:
public static ExecutorService newCachedThreadPool() {
        return new ThreadPoolExecutor(0, Integer.MAX_VALUE,
                                      60L, TimeUnit.SECONDS,
                                      new SynchronousQueue<Runnable>());
    }
是不是有点像呢?那好,我们就认定了它是我们的CachedThreadPool线程池。
ok!fine!用的线程池来进行异步操作,那肯定就是说明里面有一个线程了,那这个线程是啥,我们是否心里有点数呢?如果没有,也没啥关系,下面我们将继续引出。
fun executeOn(executorService: ExecutorService) {
      client.dispatcher.assertThreadDoesntHoldLock()

      var success = false
      try {
        executorService.execute(this) // (1)
        success = true
      } catch (e: RejectedExecutionException) {
        val ioException = InterruptedIOException("executor rejected")
        ioException.initCause(e)
        noMoreExchanges(ioException)
        responseCallback.onFailure(this@RealCall, ioException) // (2)
      } finally {
        if (!success) {
          client.dispatcher.finished(this) // (3)
        }
      }
    }
那接下来就又不是什么大问题了,主要就看到我们的注释1、2、3。
executorService.execute(this):对于线程池而言运行的显然是线程,而this几就是我们的AsyncCall,通过对AsyncCall的观察我们也是能够得知它是继承了Runnable的,所以异步进行的操作来源我们也已经清楚了。responseCallback.onFailure(),也就是通过我们传入的Callback接收数据的错误反馈。client.dispatcher.finished(this):为什么需要这个呢?其实他原本有这样的一段英文注释,This call is no longer running!,也就是说明这个函数是为了通知Dispatcher我们的AsyncCall已经完成了运行。
又开始有问题了吧,看着就着急。咋就没看到responseCallback()的onResponse方法的使用呢???
那我们做一个猜测吧,其实我看了一下基本也是正解了。我们的不是Runnable嘛,而数据是放在线程池中run()来运行的,那么onResponse()方法的出现应该是在run()的这个函数中了。接下来我们继续收看代码
override fun run() {
      threadName("OkHttp ${redactedUrl()}") {
        var signalledCallback = false
        timeout.enter()
        try {
          val response = getResponseWithInterceptorChain() // (1)
          signalledCallback = true
          responseCallback.onResponse(this@RealCall, response) //(2)
        } catch (e: IOException) {
            // 。。。。。
            responseCallback.onFailure(this@RealCall, e)
        } catch (t: Throwable) {
            // 。。。。。
            responseCallback.onFailure(this@RealCall, e)
        } finally {
          client.dispatcher.finished(this)
        }
      }
    }
在这里的注释(2)中,我们很幸运的看到了onResponse()的方法调用了。好那接下来就是下一个问题了,Response是从哪里来的????

Response的诞生
上面不是写着嘛??getResponseWithInterceptorChain()这个函数里来的呗。哇哦!!没错了,那它是怎么来的? 🤔🤔🤔
又要看代码了,好烦好烦。。。
internal fun getResponseWithInterceptorChain(): Response {
    // Build a full stack of interceptors.
    val interceptors = mutableListOf<Interceptor>()
    // 对应着我们刚开始自定义的拦截器
    interceptors += client.interceptors
    interceptors += RetryAndFollowUpInterceptor(client)
    interceptors += BridgeInterceptor(client.cookieJar)
    interceptors += CacheInterceptor(client.cache)
    interceptors += ConnectInterceptor
    // 我们之前上面也出现过forWebSocket这个flag
    // 其实它是okhttp为了长连接而准备的
    if (!forWebSocket) {
      interceptors += client.networkInterceptors
    }
    interceptors += CallServerInterceptor(forWebSocket)

    val chain = RealInterceptorChain(
        call = this,
        interceptors = interceptors,
        index = 0,
        exchange = null,
        request = originalRequest,
        connectTimeoutMillis = client.connectTimeoutMillis,
        readTimeoutMillis = client.readTimeoutMillis,
        writeTimeoutMillis = client.writeTimeoutMillis
    )

    val response = chain.proceed(originalRequest)
    return response
  }
为了尽量让代码简洁明了,我截取了一些关键代码,以供参考。
其实他就是通过一堆的拦截器来获取数据的,但是显然这里不是终点站,因为我们看到的return中就还是一个函数,说明答案还在这个函数中。通过观察我们很容易得知,这个的操作的具体类是一个叫做RealInterceptorChain的类。
override fun proceed(request: Request): Response {
    // 不断调用下一个拦截器对相应的数据进行返回
    val next = copy(index = index + 1, request = request)
    val interceptor = interceptors[index]

    val response = interceptor.intercept(next)

    return response
  }
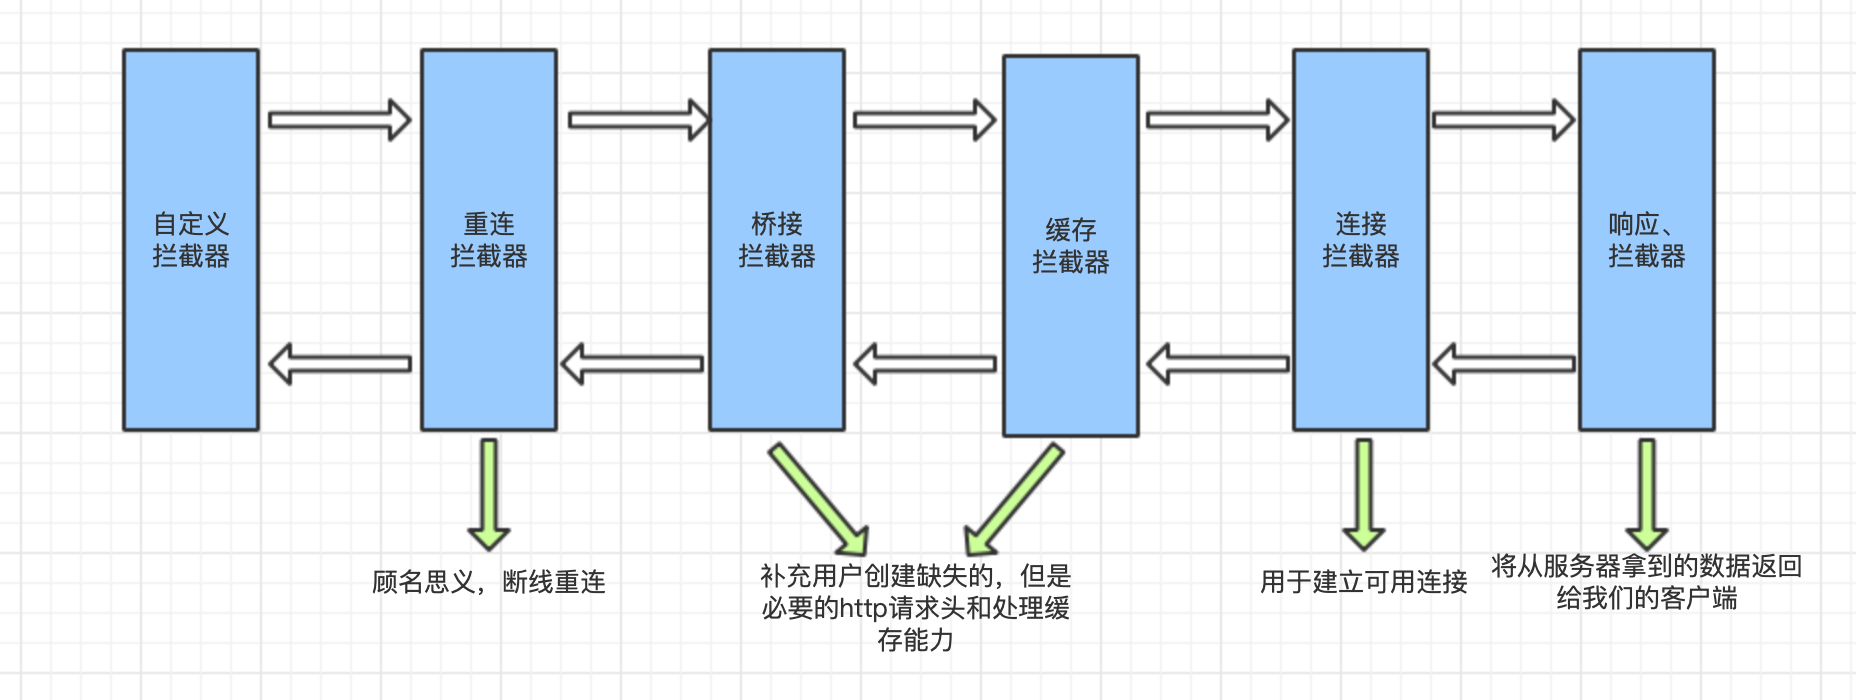
Response,当然这个数据你需要注意,并不一定是成功的数据,一般来说数据成功的获取都需要走到我们的响应拦截器之后才能真正的成功。
CacheInterceptor缓存拦截器的源码解读
这里我们需要重点讲解一下CacheInterceptor这个类,我们截取他的intercept()方法,因为里面涉及了我们面试时可能会频繁使用的响应码
override fun intercept(chain: Interceptor.Chain): Response {
    // 依据我们传入的request得到cache中缓存的response
    val cacheCandidate = cache?.get(chain.request())

    val now = System.currentTimeMillis()
    // 获取当前的这个请求是网络请求、数据缓存的状况
    val strategy = CacheStrategy.Factory(now, chain.request(), cacheCandidate).compute()
    val networkRequest = strategy.networkRequest
    val cacheResponse = strategy.cacheResponse

    cache?.trackResponse(strategy)

    if (cacheCandidate != null && cacheResponse == null) {
      // The cache candidate wasn't applicable. Close it.
      cacheCandidate.body?.closeQuietly()
    }

    // 本地查询到的网络请求和缓存数据皆为空的情况下
    // 爆HTTP_GATEWAY_TIMEOUT,网关超时的错误
    if (networkRequest == null && cacheResponse == null) {
      return Response.Builder()
          .request(chain.request())
          .protocol(Protocol.HTTP_1_1)
          .code(HTTP_GATEWAY_TIMEOUT)
          .message("Unsatisfiable Request (only-if-cached)")
          .body(EMPTY_RESPONSE)
          .sentRequestAtMillis(-1L)
          .receivedResponseAtMillis(System.currentTimeMillis())
          .build()
    }

    // 没有网络情况下,直接使用我们本地的数据缓存
    if (networkRequest == null) {
      return cacheResponse!!.newBuilder()
          .cacheResponse(stripBody(cacheResponse))
          .build()
    }
    // 调动责任链中下一轮的拦截器,来获取数据
    var networkResponse: Response? = null
    try {
      networkResponse = chain.proceed(networkRequest)
    } finally {
      // If we're crashing on I/O or otherwise, don't leak the cache body.
      if (networkResponse == null && cacheCandidate != null) {
        cacheCandidate.body?.closeQuietly()
      }
    }

    // 观察我们本地是否存在数据缓存
    if (cacheResponse != null) {
      // HTTP_NOT_MODIFIED:304,说明我们本地的缓存是最新的
      // 没有必要将数据从服务器拉取进行更新了
      if (networkResponse?.code == HTTP_NOT_MODIFIED) {
        val response = cacheResponse.newBuilder()
            .headers(combine(cacheResponse.headers, networkResponse.headers))
            .sentRequestAtMillis(networkResponse.sentRequestAtMillis)
            .receivedResponseAtMillis(networkResponse.receivedResponseAtMillis)
            .cacheResponse(stripBody(cacheResponse))
            .networkResponse(stripBody(networkResponse))
            .build()

        networkResponse.body!!.close()

        // Update the cache after combining headers but before stripping the
        // Content-Encoding header (as performed by initContentStream()).
        cache!!.trackConditionalCacheHit()
        cache.update(cacheResponse, response)
        return response
      } else {
        cacheResponse.body?.closeQuietly()
      }
    }

    val response = networkResponse!!.newBuilder()
        .cacheResponse(stripBody(cacheResponse))
        .networkResponse(stripBody(networkResponse))
        .build()
    // 更新我们本地的缓存数据
    if (cache != null) {
      if (response.promisesBody() && CacheStrategy.isCacheable(response, networkRequest)) {
        // Offer this request to the cache.
        val cacheRequest = cache.put(response)
        return cacheWritingResponse(cacheRequest, response)
      }

      if (HttpMethod.invalidatesCache(networkRequest.method)) {
        try {
          cache.remove(networkRequest)
        } catch (_: IOException) {
          // The cache cannot be written.
        }
      }
    }

    return response
  }
总结
最后我们通过一张图来完成对整个OkHttp的工作流程梳理。