

服务器上部署的RocketMq进程一般称之为Broker,Broker会接收Producer的消息,持久化到本地,然后push给Consumer,通常使用集群部署,主从之间会有数据同步。
Broker与NameSever
Broker 会向所有 NameSever 注册自己(包含topic信息),并保持心跳连接。
-
连接
单个broker和所有nameserver保持长连接
-
心跳
心跳间隔:每隔30秒(此时间无法更改)向所有nameserver发送心跳,心跳包含了自身的topic配置信息。 心跳超时:nameserver每隔10秒钟(此时间无法更改),扫描所有还存活的broker连接,若某个连接2分钟内(当前时间与最后更新时间差值超过2分钟,此时间无法更改)没有发送心跳数据,则断开连接。
-
断开
时机:broker挂掉;心跳超时导致nameserver主动关闭连接
动作:一旦连接断开,nameserver会立即感知,更新topc与队列的对应关系,但不会通知生产者和消费者
Broker启动都干了啥
Broker 是通过 mqbroker 这种脚本命令来启动的,最终脚本里一定会启动一个JVM进程,jvm进程里会执行一个main class的代码,也就是 BrokerStartup.main()。
public static void main(String[] args) {
        //构建BrokerController
        start(createBrokerController(args));
    }

    public static BrokerController start(BrokerController controller) {
        try {
            //启动
            controller.start();
            //...省略代码

            log.info(tip);
            System.out.printf("%s%n", tip);
            return controller;
        } catch (Throwable e) {
            e.printStackTrace();
            System.exit(-1);
        }

        return null;
    }
代码很清晰,首先看下构建 BrokerController 的代码:
public static BrokerController createBrokerController(String[] args) {
        System.setProperty(RemotingCommand.REMOTING_VERSION_KEY, Integer.toString(MQVersion.CURRENT_VERSION));

        try {
            //解析命令行参数
            //PackageConflictDetect.detectFastjson();
            Options options = ServerUtil.buildCommandlineOptions(new Options());
            commandLine = ServerUtil.parseCmdLine("mqbroker", args, buildCommandlineOptions(options),
                new PosixParser());
            if (null == commandLine) {
                System.exit(-1);
            }

            final BrokerConfig brokerConfig = new BrokerConfig();
            //netty服务器配置,与生产者通信
            final NettyServerConfig nettyServerConfig = new NettyServerConfig();
            //netty客户端配置,与NameSever通信
            final NettyClientConfig nettyClientConfig = new NettyClientConfig();

            nettyClientConfig.setUseTLS(Boolean.parseBoolean(System.getProperty(TLS_ENABLE,
                String.valueOf(TlsSystemConfig.tlsMode == TlsMode.ENFORCING))));
            nettyServerConfig.setListenPort(10911);
            final MessageStoreConfig messageStoreConfig = new MessageStoreConfig();

            //如果是从节点
            if (BrokerRole.SLAVE == messageStoreConfig.getBrokerRole()) {
                int ratio = messageStoreConfig.getAccessMessageInMemoryMaxRatio() - 10;
                messageStoreConfig.setAccessMessageInMemoryMaxRatio(ratio);
            }
            //解析命令行中 -c 的参数
            if (commandLine.hasOption('c')) {
                String file = commandLine.getOptionValue('c');
                if (file != null) {
                    configFile = file;
                    InputStream in = new BufferedInputStream(new FileInputStream(file));
                    properties = new Properties();
                    properties.load(in);

                    properties2SystemEnv(properties);
                    MixAll.properties2Object(properties, brokerConfig);
                    //...代码省略
                }
            }

            MixAll.properties2Object(ServerUtil.commandLine2Properties(commandLine), brokerConfig);

            if (null == brokerConfig.getRocketmqHome()) {
                System.out.printf("Please set the %s variable in your environment to match the location of the RocketMQ installation", MixAll.ROCKETMQ_HOME_ENV);
                System.exit(-2);
            }

            //获取nameSever地址
            String namesrvAddr = brokerConfig.getNamesrvAddr();
            if (null != namesrvAddr) {
                try {
                    String[] addrArray = namesrvAddr.split(";");
                    for (String addr : addrArray) {
                        //设置地址
                        RemotingUtil.string2SocketAddress(addr);
                    }
                } catch (Exception e) {
                    System.out.printf(
                        "The Name Server Address[%s] illegal, please set it as follows, \"127.0.0.1:9876;192.168.0.1:9876\"%n",
                        namesrvAddr);
                    System.exit(-3);
                }
            }

            //主从设置
            switch (messageStoreConfig.getBrokerRole()) {
                case ASYNC_MASTER:
                case SYNC_MASTER:
                    brokerConfig.setBrokerId(MixAll.MASTER_ID);
                    break;
                case SLAVE:
                    if (brokerConfig.getBrokerId() <= 0) {
                        System.out.printf("Slave's brokerId must be > 0");
                        System.exit(-3);
                    }

                    break;
                default:
                    break;
            }

            //是否选择 dleger技术
            if (messageStoreConfig.isEnableDLegerCommitLog()) {
                brokerConfig.setBrokerId(-1);
            }

            messageStoreConfig.setHaListenPort(nettyServerConfig.getListenPort() + 1);

            //...代码省略

            final BrokerController controller = new BrokerController(
                brokerConfig,
                nettyServerConfig,
                nettyClientConfig,
                messageStoreConfig);
            // remember all configs to prevent discard
            controller.getConfiguration().registerConfig(properties);

            //初始化
            boolean initResult = controller.initialize();
            if (!initResult) {
                controller.shutdown();
                System.exit(-3);
            }

            //jvm关闭的勾子函数
            Runtime.getRuntime().addShutdownHook(new Thread(new Runnable() {
                private volatile boolean hasShutdown = false;
                private AtomicInteger shutdownTimes = new AtomicInteger(0);

                @Override
                public void run() {
                    synchronized (this) {
                        log.info("Shutdown hook was invoked, {}", this.shutdownTimes.incrementAndGet());
                        if (!this.hasShutdown) {
                            this.hasShutdown = true;
                            long beginTime = System.currentTimeMillis();
                            controller.shutdown();
                            long consumingTimeTotal = System.currentTimeMillis() - beginTime;
                            log.info("Shutdown hook over, consuming total time(ms): {}", consumingTimeTotal);
                        }
                    }
                }
            }, "ShutdownHook"));

            return controller;
        } catch (Throwable e) {
            e.printStackTrace();
            System.exit(-1);
        }

        return null;
    }
这里代码我们主要看整个流程干了什么,不用太深纠: 其实就是解析命令行的参数到各个config里,然后 new 一个 BrokerController 把这些conig 都放进去,然后对 BrokerController 进行初始化。
接着看初始化的代码 controller.initialize():
public boolean initialize() throws CloneNotSupportedException {
        //从磁盘加载配置文件
        boolean result = this.topicConfigManager.load();
        result = result && this.consumerOffsetManager.load();
        result = result && this.subscriptionGroupManager.load();
        result = result && this.consumerFilterManager.load();

        if (result) {
            try {
                //创建消息存储管理组件
                this.messageStore =
                    new DefaultMessageStore(this.messageStoreConfig, this.brokerStatsManager, this.messageArrivingListener,
                        this.brokerConfig);
                //是否开启dleger技术
                if (messageStoreConfig.isEnableDLegerCommitLog()) {
                    DLedgerRoleChangeHandler roleChangeHandler = new DLedgerRoleChangeHandler(this, (DefaultMessageStore) messageStore);
                    ((DLedgerCommitLog)((DefaultMessageStore) messageStore).getCommitLog()).getdLedgerServer().getdLedgerLeaderElector().addRoleChangeHandler(roleChangeHandler);
                }
                //broker的统计组件
                this.brokerStats = new BrokerStats((DefaultMessageStore) this.messageStore);
                //load plugin
                MessageStorePluginContext context = new MessageStorePluginContext(messageStoreConfig, brokerStatsManager, messageArrivingListener, brokerConfig);
                this.messageStore = MessageStoreFactory.build(context, this.messageStore);
                this.messageStore.getDispatcherList().addFirst(new CommitLogDispatcherCalcBitMap(this.brokerConfig, this.consumerFilterManager));
            } catch (IOException e) {
                result = false;
                log.error("Failed to initialize", e);
            }
        }

        result = result && this.messageStore.load();

        if (result) {
            //构建netty服务端
            this.remotingServer = new NettyRemotingServer(this.nettyServerConfig, this.clientHousekeepingService);
            NettyServerConfig fastConfig = (NettyServerConfig) this.nettyServerConfig.clone();
            fastConfig.setListenPort(nettyServerConfig.getListenPort() - 2);
            this.fastRemotingServer = new NettyRemotingServer(fastConfig, this.clientHousekeepingService);
            //创建各种线程池
            this.sendMessageExecutor = new BrokerFixedThreadPoolExecutor(
                this.brokerConfig.getSendMessageThreadPoolNums(),
                this.brokerConfig.getSendMessageThreadPoolNums(),
                1000 * 60,
                TimeUnit.MILLISECONDS,
                this.sendThreadPoolQueue,
                new ThreadFactoryImpl("SendMessageThread_"));
            //pull消息的线程池
            this.pullMessageExecutor = new BrokerFixedThreadPoolExecutor(...);
            this.replyMessageExecutor = new BrokerFixedThreadPoolExecutor(...);

            //...省略代码
            //心跳处理的线程池
            this.heartbeatExecutor = new BrokerFixedThreadPoolExecutor(
                this.brokerConfig.getHeartbeatThreadPoolNums(),
                this.brokerConfig.getHeartbeatThreadPoolNums(),
                1000 * 60,
                TimeUnit.MILLISECONDS,
                this.heartbeatThreadPoolQueue,
                new ThreadFactoryImpl("HeartbeatThread_", true));

            this.registerProcessor();

            //各种后台定时任务
            final long initialDelay = UtilAll.computeNextMorningTimeMillis() - System.currentTimeMillis();
            final long period = 1000 * 60 * 60 * 24;
            //检查broker的状态
            this.scheduledExecutorService.scheduleAtFixedRate(new Runnable() {
                @Override
                public void run() {
                    try {
                        BrokerController.this.getBrokerStats().record();
                    } catch (Throwable e) {
                        log.error("schedule record error.", e);
                    }
                }
            }, initialDelay, period, TimeUnit.MILLISECONDS);

            //consumerOffset
            this.scheduledExecutorService.scheduleAtFixedRate(new Runnable() {
                @Override
                public void run() {
                    try {
                        BrokerController.this.consumerOffsetManager.persist();
                    } catch (Throwable e) {
                        log.error("schedule persist consumerOffset error.", e);
                    }
                }
            }, 1000 * 10, this.brokerConfig.getFlushConsumerOffsetInterval(), TimeUnit.MILLISECONDS);

            //...省略代码

            //设置nameSever地址列表
            if (this.brokerConfig.getNamesrvAddr() != null) {
                this.brokerOuterAPI.updateNameServerAddressList(this.brokerConfig.getNamesrvAddr());
                log.info("Set user specified name server address: {}", this.brokerConfig.getNamesrvAddr());
            } else if (this.brokerConfig.isFetchNamesrvAddrByAddressServer()) {
                this.scheduledExecutorService.scheduleAtFixedRate(new Runnable() {
                    //支持通过请求加载namesever地址
                    @Override
                    public void run() {
                        try {
                            BrokerController.this.brokerOuterAPI.fetchNameServerAddr();
                        } catch (Throwable e) {
                            log.error("ScheduledTask fetchNameServerAddr exception", e);
                        }
                    }
                }, 1000 * 10, 1000 * 60 * 2, TimeUnit.MILLISECONDS);
            }

            //dleger技术
            if (!messageStoreConfig.isEnableDLegerCommitLog()) {
                if (BrokerRole.SLAVE == this.messageStoreConfig.getBrokerRole()) {
                    if (this.messageStoreConfig.getHaMasterAddress() != null && this.messageStoreConfig.getHaMasterAddress().length() >= 6) {
                        this.messageStore.updateHaMasterAddress(this.messageStoreConfig.getHaMasterAddress());
                        this.updateMasterHAServerAddrPeriodically = false;
                    } else {
                        this.updateMasterHAServerAddrPeriodically = true;
                    }
                } else {
                    this.scheduledExecutorService.scheduleAtFixedRate(new Runnable() {
                        @Override
                        public void run() {
                            try {
                                BrokerController.this.printMasterAndSlaveDiff();
                            } catch (Throwable e) {
                                log.error("schedule printMasterAndSlaveDiff error.", e);
                            }
                        }
                    }, 1000 * 10, 1000 * 60, TimeUnit.MILLISECONDS);
                }
            }

            //...省略代码
            //事务
            initialTransaction();
            initialAcl();
            initialRpcHooks();
        }
        return result;
    }
这里的代码比较清晰,我们就看主流程。
-
首先从磁盘load配置文件
-
创建消息存储组件
DefaultMessageStore -
构建netty服务器
-
创建各种线程池(接收消息、心跳检测等)
-
创建各种后台定时任务。
初始化完成之后,接下来看起动的代码 controller.start();:
public void start() throws Exception {
        //启动消息存储组件
        if (this.messageStore != null) {
            this.messageStore.start();
        }
        //启动netty服务器
        if (this.remotingServer != null) {
            this.remotingServer.start();
        }
        if (this.fastRemotingServer != null) {
            this.fastRemotingServer.start();
        }

        if (this.fileWatchService != null) {
            this.fileWatchService.start();
        }
        //对外通信组件,例如给namesever发心跳
        if (this.brokerOuterAPI != null) {
            this.brokerOuterAPI.start();
        }

        if (this.pullRequestHoldService != null) {
            this.pullRequestHoldService.start();
        }

        if (this.clientHousekeepingService != null) {
            this.clientHousekeepingService.start();
        }

        if (this.filterServerManager != null) {
            this.filterServerManager.start();
        }

        if (!messageStoreConfig.isEnableDLegerCommitLog()) {
            startProcessorByHa(messageStoreConfig.getBrokerRole());
            handleSlaveSynchronize(messageStoreConfig.getBrokerRole());
            this.registerBrokerAll(true, false, true);
        }

        //定时任务去namesever中注册,即是注册也是心跳,30s一次
        this.scheduledExecutorService.scheduleAtFixedRate(new Runnable() {

            @Override
            public void run() {
                try {
                    BrokerController.this.registerBrokerAll(true, false, brokerConfig.isForceRegister());
                } catch (Throwable e) {
                    log.error("registerBrokerAll Exception", e);
                }
            }
        }, 1000 * 10, Math.max(10000, Math.min(brokerConfig.getRegisterNameServerPeriod(), 60000)), TimeUnit.MILLISECONDS);

        if (this.brokerStatsManager != null) {
            this.brokerStatsManager.start();
        }

        if (this.brokerFastFailure != null) {
            this.brokerFastFailure.start();
        }


    }
这段代码其实只要知道,BrokerController 启动时,把相关的功能组件都启动了,开启了netty服务,还启动了一个定时任务去nameSever注册,这几点就可以了。
大致流程如下:
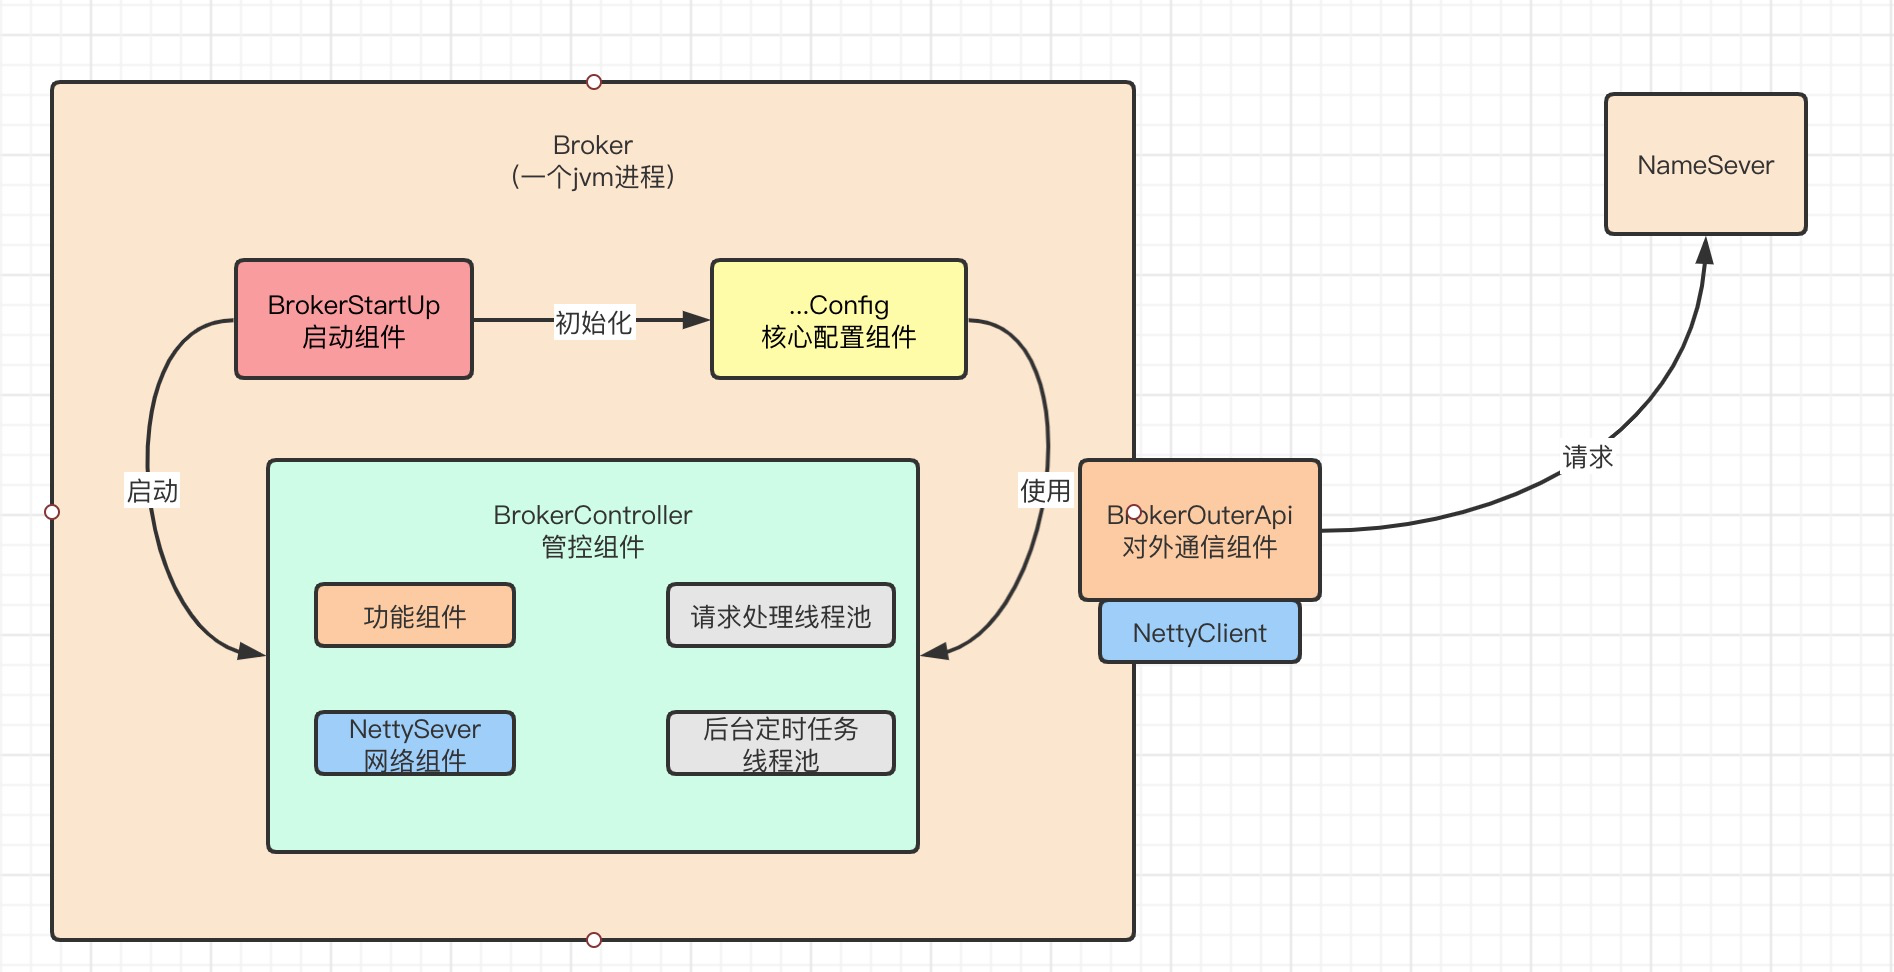
总流程:
- 构建controller
- 初始化controller
- 启动controller
Broker是怎么把自己注册到NameSever的
在Broker启动时,会有一个后台定时任务,去调用BrokerController.this.registerBrokerAll(true, false, brokerConfig.isForceRegister());方法,进行注册。
public synchronized void registerBrokerAll(final boolean checkOrderConfig, boolean oneway, boolean forceRegister) {
        TopicConfigSerializeWrapper topicConfigWrapper = this.getTopicConfigManager().buildTopicConfigSerializeWrapper();
        //封装topic信息
        if (!PermName.isWriteable(this.getBrokerConfig().getBrokerPermission())
            || !PermName.isReadable(this.getBrokerConfig().getBrokerPermission())) {
            ConcurrentHashMap<String, TopicConfig> topicConfigTable = new ConcurrentHashMap<String, TopicConfig>();
            for (TopicConfig topicConfig : topicConfigWrapper.getTopicConfigTable().values()) {
                TopicConfig tmp =
                    new TopicConfig(topicConfig.getTopicName(), topicConfig.getReadQueueNums(), topicConfig.getWriteQueueNums(),
                        this.brokerConfig.getBrokerPermission());
                topicConfigTable.put(topicConfig.getTopicName(), tmp);
            }
            topicConfigWrapper.setTopicConfigTable(topicConfigTable);
        }
        //判断是否需要注册
        if (forceRegister || needRegister(this.brokerConfig.getBrokerClusterName(),
            this.getBrokerAddr(),
            this.brokerConfig.getBrokerName(),
            this.brokerConfig.getBrokerId(),
            this.brokerConfig.getRegisterBrokerTimeoutMills())) {
            //注册
            doRegisterBrokerAll(checkOrderConfig, oneway, topicConfigWrapper);
        }
    }
这段代码没什么逻辑,我们看真正注册的代码doRegisterBrokerAll(checkOrderConfig, oneway, topicConfigWrapper)
private void doRegisterBrokerAll(boolean checkOrderConfig, boolean oneway,
        TopicConfigSerializeWrapper topicConfigWrapper) {
        //把自己注册给所有Broker
        List<RegisterBrokerResult> registerBrokerResultList = this.brokerOuterAPI.registerBrokerAll(
            this.brokerConfig.getBrokerClusterName(),
            this.getBrokerAddr(),
            this.brokerConfig.getBrokerName(),
            this.brokerConfig.getBrokerId(),
            this.getHAServerAddr(),
            topicConfigWrapper,
            this.filterServerManager.buildNewFilterServerList(),
            oneway,
            this.brokerConfig.getRegisterBrokerTimeoutMills(),
            this.brokerConfig.isCompressedRegister());

        //如果注册结果大于0
        if (registerBrokerResultList.size() > 0) {
            RegisterBrokerResult registerBrokerResult = registerBrokerResultList.get(0);
            if (registerBrokerResult != null) {
                if (this.updateMasterHAServerAddrPeriodically && registerBrokerResult.getHaServerAddr() != null) {
                    this.messageStore.updateHaMasterAddress(registerBrokerResult.getHaServerAddr());
                }

                this.slaveSynchronize.setMasterAddr(registerBrokerResult.getMasterAddr());

                if (checkOrderConfig) {
                    this.getTopicConfigManager().updateOrderTopicConfig(registerBrokerResult.getKvTable());
                }
            }
        }
    }
这里调用了 brokerOuterAPI 这个组件的 方法,我们继续深入下去
public List<RegisterBrokerResult> registerBrokerAll(
        final String clusterName,
        final String brokerAddr,
        final String brokerName,
        final long brokerId,
        final String haServerAddr,
        final TopicConfigSerializeWrapper topicConfigWrapper,
        final List<String> filterServerList,
        final boolean oneway,
        final int timeoutMills,
        final boolean compressed) {

        final List<RegisterBrokerResult> registerBrokerResultList = Lists.newArrayList();
        //获取namesever地址
        List<String> nameServerAddressList = this.remotingClient.getNameServerAddressList();
        if (nameServerAddressList != null && nameServerAddressList.size() > 0) {
            //请求头,把broker的信息存入请求头
            final RegisterBrokerRequestHeader requestHeader = new RegisterBrokerRequestHeader();
            requestHeader.setBrokerAddr(brokerAddr);
            requestHeader.setBrokerId(brokerId);
            requestHeader.setBrokerName(brokerName);
            requestHeader.setClusterName(clusterName);
            requestHeader.setHaServerAddr(haServerAddr);
            requestHeader.setCompressed(compressed);
            //请求体
            RegisterBrokerBody requestBody = new RegisterBrokerBody();
            requestBody.setTopicConfigSerializeWrapper(topicConfigWrapper);
            requestBody.setFilterServerList(filterServerList);
            final byte[] body = requestBody.encode(compressed);
            final int bodyCrc32 = UtilAll.crc32(body);
            requestHeader.setBodyCrc32(bodyCrc32);
            //所有nameSever都注册成功了再返回
            final CountDownLatch countDownLatch = new CountDownLatch(nameServerAddressList.size());
            for (final String namesrvAddr : nameServerAddressList) {
                brokerOuterExecutor.execute(new Runnable() {
                    @Override
                    public void run() {
                        try {
                            //注册
                            RegisterBrokerResult result = registerBroker(namesrvAddr,oneway, timeoutMills,requestHeader,body);
                            if (result != null) {
                                registerBrokerResultList.add(result);
                            }

                            log.info("register broker[{}]to name server {} OK", brokerId, namesrvAddr);
                        } catch (Exception e) {
                            log.warn("registerBroker Exception, {}", namesrvAddr, e);
                        } finally {
                            countDownLatch.countDown();
                        }
                    }
                });
            }

            try {
                countDownLatch.await(timeoutMills, TimeUnit.MILLISECONDS);
            } catch (InterruptedException e) {
            }
        }

        return registerBrokerResultList;
    }
这里也没什么逻辑,就是封装请求,继续看真正请求的方法
//BrokerOuterAPI.java

private RegisterBrokerResult registerBroker(
        final String namesrvAddr,
        final boolean oneway,
        final int timeoutMills,
        final RegisterBrokerRequestHeader requestHeader,
        final byte[] body
    ) throws RemotingCommandException, MQBrokerException, RemotingConnectException, RemotingSendRequestException, RemotingTimeoutException,
        InterruptedException {
        //封装请求
        RemotingCommand request = RemotingCommand.createRequestCommand(RequestCode.REGISTER_BROKER, requestHeader);
        request.setBody(body);

        //不用等待注册结果就返回
        if (oneway) {
            try {
                this.remotingClient.invokeOneway(namesrvAddr, request, timeoutMills);
            } catch (RemotingTooMuchRequestException e) {
                // Ignore
            }
            return null;
        }

        //通过nettyClient发送请求
        RemotingCommand response = this.remotingClient.invokeSync(namesrvAddr, request, timeoutMills);
        assert response != null;
        //处理返回结果
        switch (response.getCode()) {
            case ResponseCode.SUCCESS: {
                RegisterBrokerResponseHeader responseHeader =
                    (RegisterBrokerResponseHeader) response.decodeCommandCustomHeader(RegisterBrokerResponseHeader.class);
                RegisterBrokerResult result = new RegisterBrokerResult();
                result.setMasterAddr(responseHeader.getMasterAddr());
                result.setHaServerAddr(responseHeader.getHaServerAddr());
                if (response.getBody() != null) {
                    result.setKvTable(KVTable.decode(response.getBody(), KVTable.class));
                }
                return result;
            }
            default:
                break;
        }

        throw new MQBrokerException(response.getCode(), response.getRemark());
    }
到这里,Broker向NameSever注册自己的流程基本结束了, 最终调用了remotingClient.invokeSync方法去发送请求,再往下面就不跟了,感兴趣的朋友可以自己深入一下。
大概就是先通过netty.bootstrap.connect()方法建立通信连接
调用netty.channel.writeAndFlush()方法进行请求
把topic信息放入请求体中,把Broker信息放入请求头中
Broker是怎么接收生产者的消息并存储的
CommitLog
Broker 接收消息到存储 commitLog 的代码入口是:
org.apache.rocketmq.remoting.netty.NettyRemotingAbstract#processRequestCommand
->
    org.apache.rocketmq.broker.processor.SendMessageProcessor#asyncProcessRequest(ChannelHandlerContext, RemotingCommand)
Broker 接收消息到存储 commitLog 的大致流程如下:
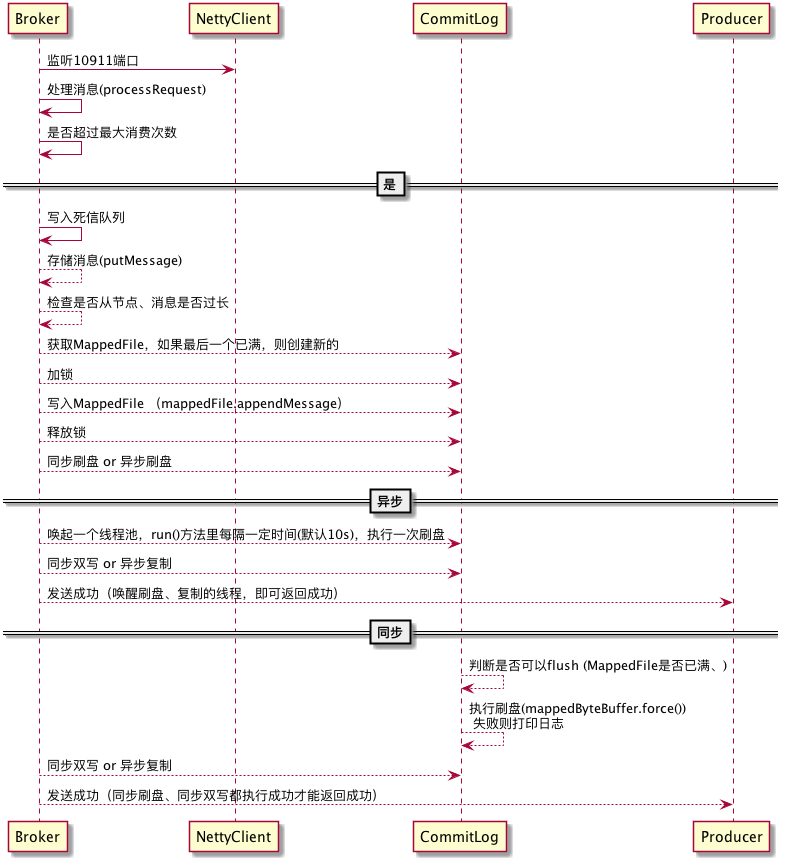
刷盘的实现原理
RocketMq是通过 CountDownLatch 和 CompletableFuture 来实现同步刷盘的。
它会有一个主线程和一个刷盘线程:

CountDownLatch 唤醒一个异步刷盘线程,每隔一定时间执行一次(最大间隔10s),只不过异步刷盘的主线程不需要等待刷盘结果,可以直接返回。PS:为什么同步刷盘也要使用
CountDownLatch新开一个线程,而不是直接使用同步方法呢?猜测是因为IO是个耗时操作,CountDownLatch.await(time)可以用来控制超时。
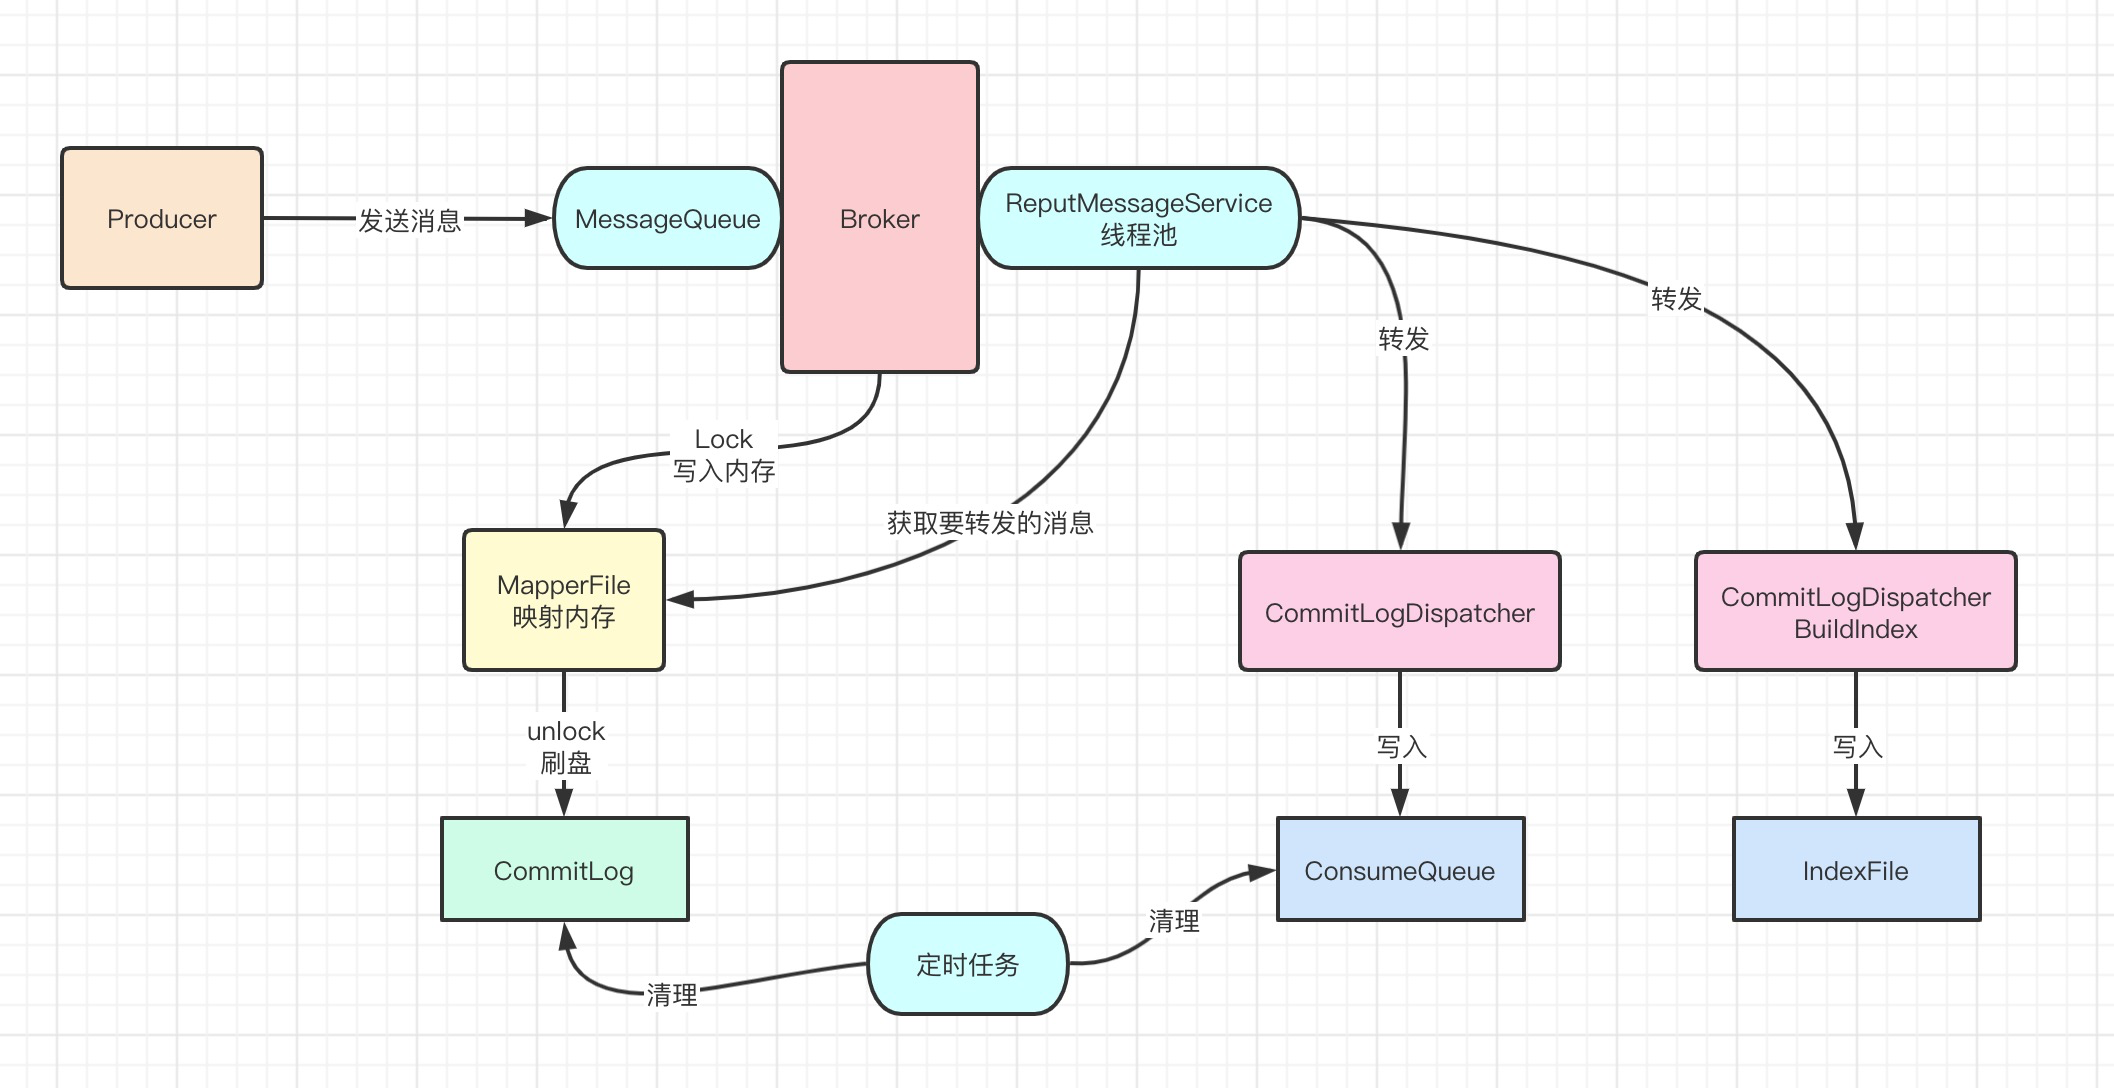
ConsumeQueue 和 IndexFile
上面的流程只是存入 commitLog ,Broker 还要把消息存入ConsumeQueue和IndexFile。
实际上,Broker启动时会开启一个线程,即ReputMessageService,它会把CommitLog更新事件转发出去,然后让任务处理器去更新ConsumeQueue和IndexFile。
Broker是怎么清理磁盘上的数据的
由于 Broker 的数据是存储在磁盘上的,那么就会有一个问题,如果数据越来越多,万一磁盘满了怎么办呢?
其实 Broker 会启动一个后台线程,扫描磁盘文件,超过72小时的就会被删除,也就是说RocketMq默认只会保存3天的数据。
删除条件
-
凌晨4点
-
磁盘使用率超过85%
可以写入,但是会立刻出发删除任务
-
磁盘使用率超过90%
不能写入,立刻删除
遍历文件,当一个文件超过72小时都没修改过,则删除
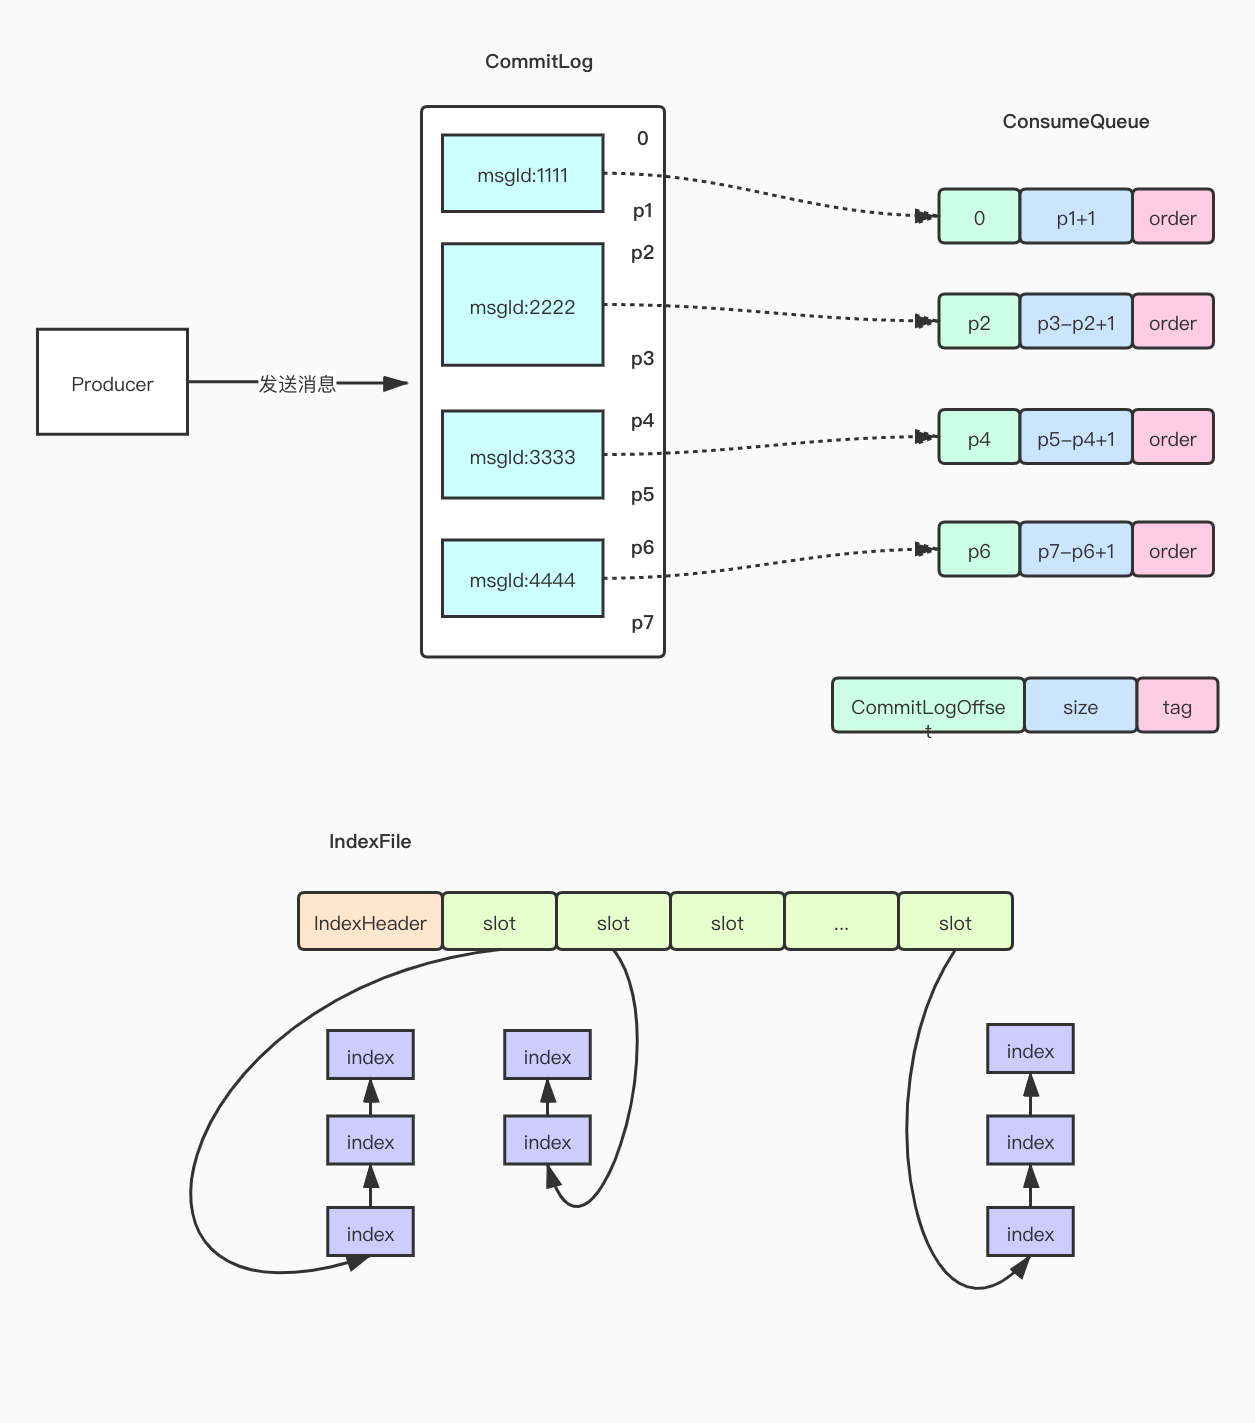
存储结构
Broker的存储结构总共分为3部分:CommitLog、ConsumeQueue、IndexFile
CommitLog 是存储消息的磁盘文件,大小为1GB,满了就新建一个。
ConsumeQueue 是消息逻辑队列,相当于字典目录,用来指定消息在 CommitLog 中的位置。
IndexFile 是索引文件,可以通过Message Key 和 MessageId 来查询指定的消息内容。
整个slotTable+indexLinkedList可以理解成java的HashMap。每当放一个新的消息的index进来,首先取MessageKey的hashCode,然后用hashCode对slot总数取模,得到应该放到哪个slot中,slot总数系统默认500W个。只要是取hash就必然面临hash冲突的问题,跟HashMap一样,IndexFile也是使用一个链表结构来解决hash冲突。只是这里跟HashMap稍微有点区别的地方是,slot中放的是最新index的指针。这个是因为一般查询的时候肯定是优先查最近的消息。
每个slot中放的指针值是索引在indexFile中的偏移量,如上图,每个索引大小是20字节,所以根据当前索引是这个文件中的第几个(偏移量),就很容易定位到索引的位置。然后每个索引都保存了跟它同一个slot的前一个索引的位置,以此类推形成一个链表的结构。
Broker是怎么响应consumer的拉取请求的
-
Broker 先通过 topic + queueId 去获取
ConsumeQueue,然后通过ConsumeQueue中的offset从CommitLog中利用MappedFile获取消息。 -
然后对获取消息的结果进行处理,如果拉取到消息,就返回消息响应 Consumer 的请求。
-
如果拉取不到消息,则把请求挂起,等待后台定时任务去处理请求。
Broker异常情况下怎么保证数据可靠性
异常情况:
1. Broker 正常关闭
2. Broker 异常 Crash
3. OS Crash
4. 机器掉电,但是能立即恢复供电情况。
5. 机器无法开机(可能是cpu、主板、内存等关键设备损坏)
6. 磁盘设备损坏。
1-4 种情况都属于硬件资源可立即恢复情况,RocketMQ在这四种情况下能保证消息不丢,或者丢失少量数据(依赖刷盘方式是同步还是异步)。
5-6 属于单点故障,且无法恢复,一旦发生,在此单点上的消息全部丢失。RocketMQ 在这两种情况下,通过异步复制,可保证99%的消息不丢,但是仍然会有极少量的消息可能丢失。通过同步双写技术可以完全避免单点,同步双写势必会影响性能,适合对消息可靠性要求极高的场合,例如与Money相关的应用。
