基本每个开发者都需要考虑逻辑复用的问题,否则你的项目中将充斥着大量的重复代码。那么 React 是怎么复用组件逻辑的呢?本文将一一介绍 React 复用组件逻辑的几种方法,希望你读完之后能够有所收获。如果你对这些内容已经非常清楚,那么略过本文即可。
我已尽量对文中的代码和内容进行了校验,但是因为自身知识水平限制,难免有错误,欢迎在评论区指正。
1. Mixins
Mixins 事实上是 React.createClass 的产物了。当然,如果你曾经在低版本的 react 中使用过 Mixins,例如 react-timer-mixin, react-addons-pure-render-mixin,那么你可能知道,在 React 的新版本中我们其实还是可以使用 mixin,虽然 React.createClass 已经被移除了,但是仍然可以使用第三方库 create-react-class,来继续使用 mixin。甚至,ES6 写法的组件,也同样有方式去使用 mixin。当然啦,这不是本文讨论的重点,就不多做介绍了,如果你维护的老项目在升级的过程中遇到这类问题,可以与我探讨。
新的项目中基本不会出现 Mixins,但是如果你们公司还有一些老项目要维护,其中可能就应用了 Mixins,因此稍微花点时间,了解下 Mixins 的使用方法和原理,还是有必要的。倘若你完全没有这方面的需求,那么跳过本节亦是可以的。
Mixins 的使用
React 15.3.0 版本中增加了 PureComponent。而在此之前,或者如果你使用的是 React.createClass 的方式创建组件,那么想要同样的功能,就是使用 react-addons-pure-render-mixin,例如:
//下面代码在新版React中可正常运行,因为现在已经无法使用 `React.createClass`,我就不使用 `React.createClass` 来写了。

const createReactClass = require('create-react-class');
const PureRenderMixin = require('react-addons-pure-render-mixin');

const MyDialog = createReactClass({
    displayName: 'MyDialog',
    mixins: [PureRenderMixin],
    //other code
    render() {
        return (
            <div>
                {/* other code */}
            </div>
        )
    }
});
首先,需要注意,mixins 的值是一个数组,如果有多个 Mixins,那么只需要依次放在数组中即可,例如: mixins: [PureRenderMixin, TimerMixin]。
Mixins 的原理
Mixins 的原理可以简单理解为将一个 mixin 对象上的方法增加到组件上。类似于 $.extend 方法,不过 React 还进行了一些其它的处理,例如:除了生命周期函数外,不同的 mixins 中是不允许有相同的属性的,并且也不能和组件中的属性和方法同名,否则会抛出异常。另外即使是生命周期函数,constructor 、render 和 shouldComponentUpdate 也是不允许重复的。
而如 compoentDidMount 的生命周期,会依次调用 Mixins,然后再调用组件中定义的 compoentDidMount。
例如,上面的 PureRenderMixin 提供的对象中,有一个 shouldComponentUpdate 方法,即是将这个方法增加到了 MyDialog 上,此时 MyDialog 中不能再定义 shouldComponentUpdate,否则会抛出异常。
//react-addons-pure-render-mixin 源码
var shallowEqual = require('fbjs/lib/shallowEqual');

module.exports = {
  shouldComponentUpdate: function(nextProps, nextState) {
    return (
      !shallowEqual(this.props, nextProps) ||
      !shallowEqual(this.state, nextState)
    );
  },
};
Mixins 的缺点
-
Mixins引入了隐式的依赖关系。例如,每个
mixin依赖于其他的mixin,那么修改其中一个就可能破坏另一个。 -
Mixins会导致名称冲突如果两个
mixin中存在同名方法,就会抛出异常。另外,假设你引入了一个第三方的mixin,该mixin上的方法和你组件的方法名发生冲突,你就不得不对方法进行重命名。 -
Mixins会导致越来越复杂mixin开始的时候是简单的,但是随着时间的推移,容易变得越来越复杂。例如,一个组件需要一些状态来跟踪鼠标悬停,为了保持逻辑的可重用性,将handleMouseEnter()、handleMouseLeave()和isHovering()提取到HoverMixin()中。然后其他人可能需要实现一个提示框,他们不想复制
HoverMixin()的逻辑,于是他们创建了一个使用HoverMixin的TooltipMixin,TooltipMixin在它的componentDidUpdate中读取HoverMixin()提供的isHovering()来决定显示或隐藏提示框。几个月之后,有人想将提示框的方向设置为可配置的。为了避免代码重复,他们将
getTooltipOptions()方法增加到了TooltipMixin中。结果过了段时间,你需要再同一个组件中显示多个提示框,提示框不再是悬停时显示了,或者一些其他的功能,你需要解耦HoverMixin()和TooltipMixin。另外,如果很多组件使用了某个mixin,mixin中新增的功能都会被添加到所有组件中,事实上很多组件完全不需要这些新功能。渐渐地,封装的边界被侵蚀了,由于很难更改或移除现有的mixin,它们变得越来越抽象,直到没有人理解它们是如何工作的。
React 官方认为在 React 代码库中,Mixin 是不必要的,也是有问题的。推荐开发者使用高阶组件来进行组件逻辑的复用。
2. HOC
React 官方文档对 HOC 进行了如下的定义:高阶组件(HOC)是 React 中用于复用组件逻辑的一种高级技巧。HOC 自身不是 React API 的一部分,它是一种基于 React 的组合特性而形成的设计模式。
简而言之,高阶组件就是一个函数,它接受一个组件为参数,返回一个新组件。
高阶组件的定义形如下面这样:
//接受一个组件 WrappedComponent 作为参数,返回一个新组件 Proxy
function withXXX(WrappedComponent) {
    return class Proxy extends React.Component {
        render() {
            return <WrappedComponent {...this.props}>
        }
    }
}
开发项目时,当你发现不同的组件有相似的逻辑,或者发现自己在写重复代码的时候,这时候就需要考虑组件复用的问题了。
这里我以一个实际开发的例子来说明,近期各大APP都在适配暗黑模式,而暗黑模式下的背景色、字体颜色等等和正常模式肯定是不一样的。那么就需要监听暗黑模式开启关闭事件,每个UI组件都需要根据当前的模式来设置样式。
每个组件都去监听事件变化来 setState 肯定是不可能的,因为会造成多次渲染。
这里我们需要借助 context API 来做,我以新的 Context API 为例。如果使用老的 context API 实现该功能,需要使用发布订阅模式来做,最后利用 react-native / react-dom 提供的 unstable_batchedUpdates 来统一更新,避免多次渲染的问题(老的 context API 在值发生变化时,如果组件中 shouldComponentUpdate 返回了 false,那么它的子孙组件就不会重新渲染了)。
顺便多说一句,很多新的API出来的时候,不要急着在项目中使用,比如新的 Context API,如果你的 react 版本是 16.3.1, react-dom 版本是16.3.3,你会发现,当你的子组件是函数组件时,即是用 Context.Consumer 的形式时,你是能获取到 context 上的值,而你的组件是个类组件时,你根本拿不到 context 上的值。
同样的 React.forwardRef 在该版本食用时,某种情况下也有多次渲染的bug。都是血和泪的教训,不多说了,继续暗黑模式这个需求。
我的想法是将当前的模式(假设值为 light / dark)挂载到 context 上。其它组件直接从 context 上获取即可。不过我们知道的是,新版的 ContextAPI 函数组件和类组件,获取 context 的方法是不一致的。而且一个项目中有非常多的组件,每个组件都进行一次这样的操作,也是重复的工作量。于是,高阶组件就派上用场啦(PS:React16.8 版本中提供了 useContext 的 Hook,用起来很方便)
当然,这里我使用高阶组件还有一个原因,就是我们的项目中还包含老的 context API (不要问我为什么不直接重构下,牵扯的人员太多了,没法随便改),新老 context API 在一个项目中是可以共存的,不过我们不能在同一个组件中同时使用。所以如果一个组件中已经使用的旧的 context API,要想从新的 context API 上获取值,也需要使用高阶组件来处理它。
于是,我编写了一个 withColorTheme 的高阶组件的雏形(这里也可以认为 withColorTheme 是一个返回高阶组件的高阶函数):
import ThemeContext from './context';
function withColorTheme(options={}) {
    return function(WrappedComponent) {
        return class ProxyComponent extends React.Component {
            static contextType = ThemeContext;
            render() {
                return (<WrappedComponent {...this.props} colortheme={this.context}/>)
            }
        }
    }
}
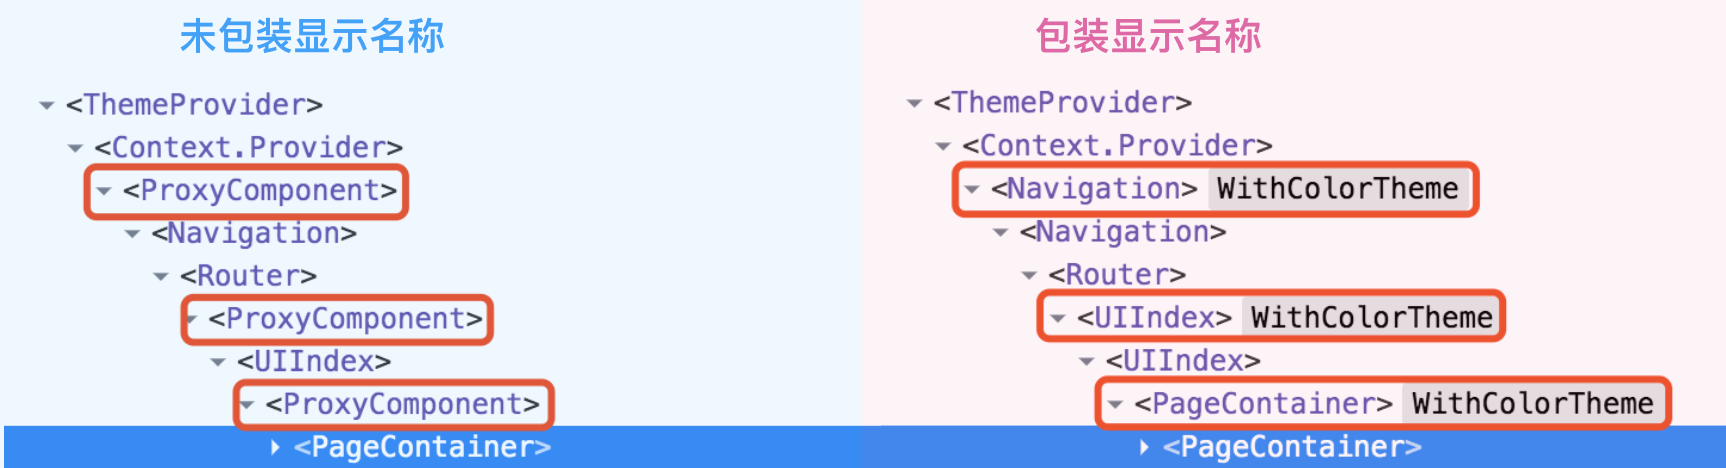
包装显示名称
上面这个雏形存在几个问题,首先,我们没有为 ProxyComponent 包装显示名称,因此,为其加上:
import ThemeContext from './context';

function withColorTheme(options={}) {
    return function(WrappedComponent) {
        class ProxyComponent extends React.Component {
            static contextType = ThemeContext;
            render() {
                return (<WrappedComponent {...this.props} colortheme={this.context}/>)
            }
        }
    }
    function getDisplayName(WrappedComponent) {
        return WrappedComponent.displayName || WrappedComponent.name || 'Component';
    }
    const displayName = `WithColorTheme(${getDisplayName(WrappedComponent)})`;
    ProxyComponent.displayName = displayName;
    return ProxyComponent;
}
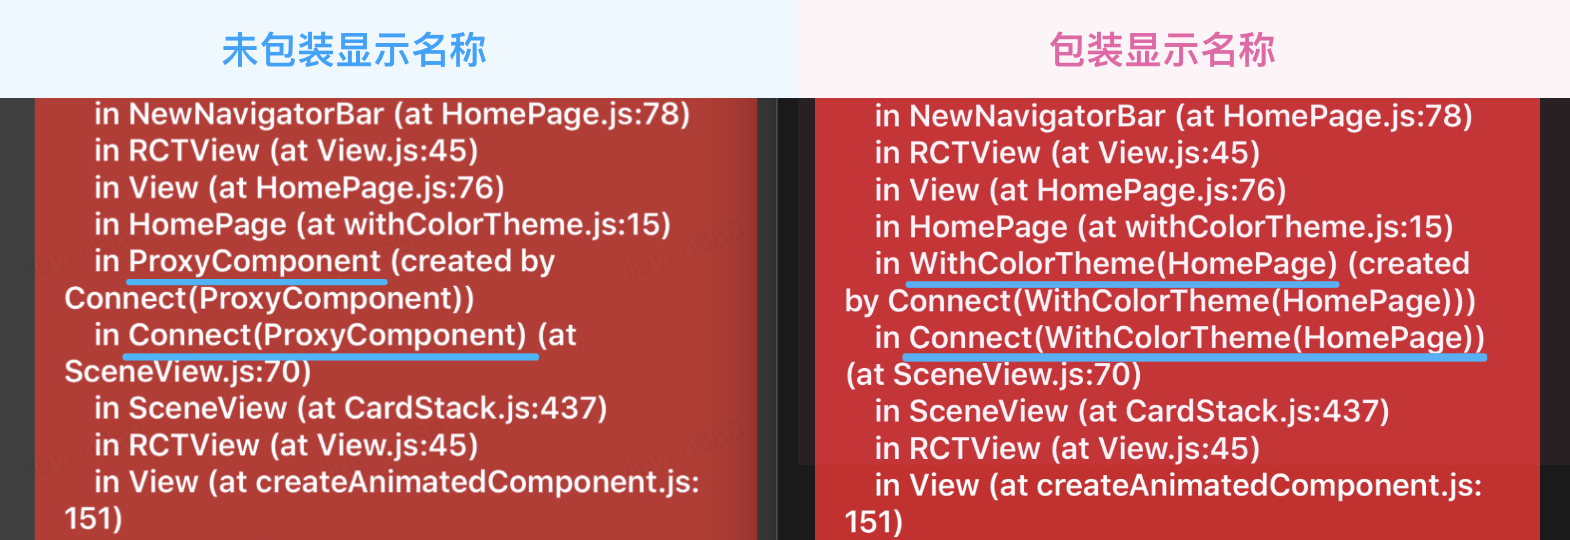
我们来看一下,不包装显示名称和包装显示名称的区别:
React Developer Tools 中调试
ReactNative的红屏报错
复制静态方法
众所周知,使用 HOC 包装组件,需要复制静态方法,如果你的 HOC 仅仅是某几个组件使用,没有静态方法需要拷贝,或者需要拷贝的静态方法是确定的,那么你手动处理一下也可以。
因为 withColorTheme 这个高阶组件,最终是要提供给很多业务使用的,无法限制别人的组件写法,因此这里我们必须将其写得通用一些。
hoist-non-react-statics 这个依赖可以帮助我们自动拷贝非 React 的静态方法,这里有一点需要注意,它只会帮助你拷贝非 React 的静态方法,而非被包装组件的所有静态方法。我第一次使用这个依赖的时候,没有仔细看,以为是将 WrappedComponent 上所有的静态方法都拷贝到 ProxyComponent。然后就遇到了 XXX.propsTypes.style undefined is not an object 的红屏报错(ReactNative调试)。因为我没有手动拷贝 propTypes,错误的以为 hoist-non-react-statics 会帮我处理了。
hoist-non-react-statics 的源码非常短,有兴趣的话,可以看一下,我当前使用的 3.3.2 版本。
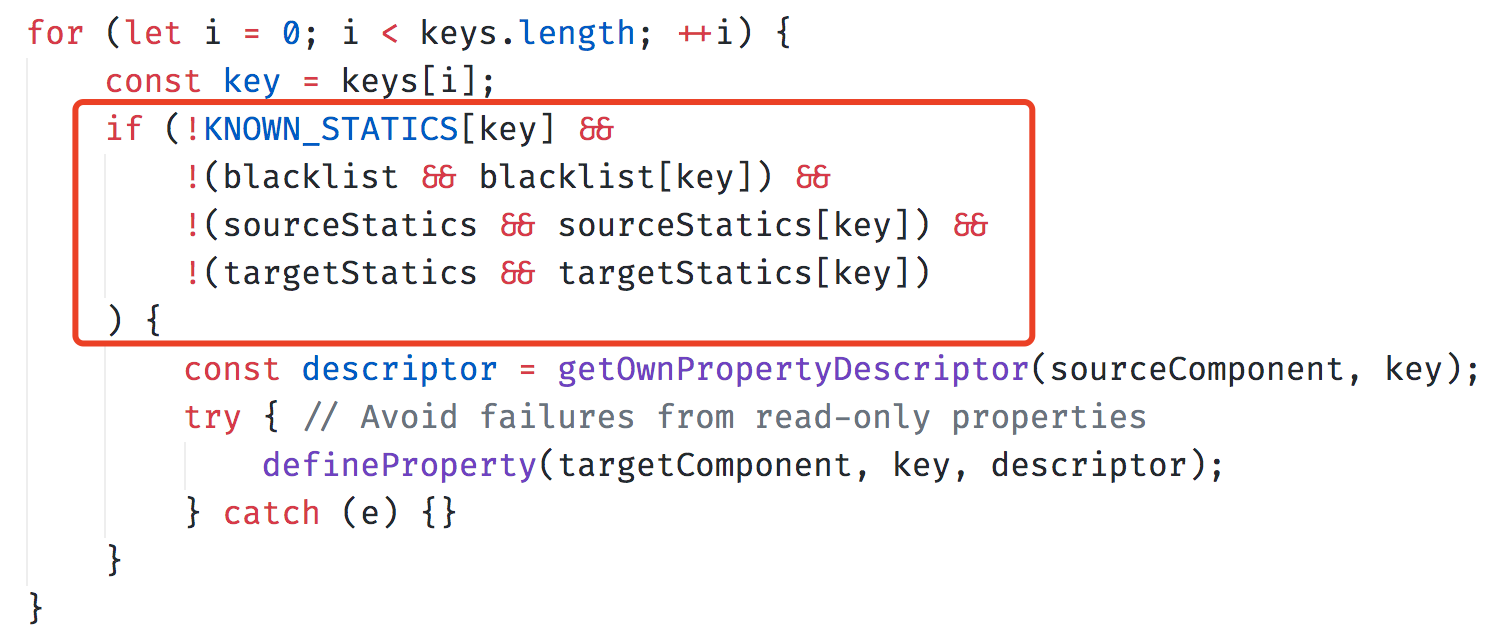
因此,诸如 childContextTypes、contextType、contextTypes、defaultProps、displayName、getDefaultProps、getDerivedStateFromError、getDerivedStateFromProps
mixins、propTypes、type 等不会被拷贝,其实也比较容易理解,因为 ProxyComponent 中可能也需要设置这些,不能简单去覆盖。
import ThemeContext from './context';
import hoistNonReactStatics from 'hoist-non-react-statics';
function withColorTheme(options={}) {
    return function(WrappedComponent) {
        class ProxyComponent extends React.Component {
            static contextType = ThemeContext;
            render() {
                return (<WrappedComponent {...this.props} colortheme={this.context}/>)
            }
        }
    }
    function getDisplayName(WrappedComponent) {
        return WrappedComponent.displayName || WrappedComponent.name || 'Component';
    }
   const displayName = `WithColorTheme(${getDisplayName(WrappedComponent)})`;
    ProxyComponent.displayName = displayName;
    ProxyComponent.WrappedComponent = WrappedComponent;
    ProxyComponent.propTypes = WrappedComponent.propTypes;
    //contextType contextTypes 和 childContextTypes 因为我这里不需要,就不拷贝了
    return ProxyComponent;
}
现在似乎差不多了,不过呢,HOC 还有一个问题,就是 ref 传递的问题。如果不经过任何处理,我们通过 ref 拿到的是 ProxyComponent 的实例,而不是原本想要获取的 WrappedComponent 的实例。
ref 传递
虽然我们已经用无关的 props 进行了透传,但是 key 和 ref 不是普通的 prop,React 会对它进行特别处理。
所以这里我们需要对 ref 特别处理一下。如果你的 reac-dom 是 16.4.2 或者你的 react-native 版本是 0.59.9 以上,那么可以放心的使用 React.forwardRef 进行 ref 转发,这样使用起来也是最方便的。
使用 React.forwardRef 转发
import ThemeContext from './context';
import hoistNonReactStatics from 'hoist-non-react-statics';
function withColorTheme(options={}) {
    return function(WrappedComponent) {
        class ProxyComponent extends React.Component {
            static contextType = ThemeContext;
            render() {
                const { forwardRef, ...wrapperProps } = this.props;
                return <WrappedComponent {...wrapperProps} ref={forwardRef} colorTheme={ this.context } />
            }
        }
    }
    function getDisplayName(WrappedComponent) {
        return WrappedComponent.displayName || WrappedComponent.name || 'Component';
    }
    const displayName = `WithColorTheme(${getDisplayName(WrappedComponent)})`;
    ProxyComponent.displayName = displayName;
    ProxyComponent.WrappedComponent = WrappedComponent;
    ProxyComponent.propTypes = WrappedComponent.propTypes;
    //contextType contextTypes 和 childContextTypes 因为我这里不需要,就不拷贝了
    if (options.forwardRef) {
        let forwarded = React.forwardRef((props, ref) => (
            <ProxyComponent {...props} forwardRef={ref} />
        ));
        forwarded.displayName = displayName;
        forwarded.WrappedComponent = WrappedComponent;
        forwarded.propTypes = WrappedComponent.propTypes;
        return hoistNonReactStatics(forwarded, WrappedComponent);
    } else {
        return hoistNonReactStatics(ProxyComponent, WrappedComponent);
    }
}
假设,我们对 TextInput 进行了装饰,如 export default withColorTheme({forwardRef: true})(TextInput)。
使用: <TextInput ref={v => this.textInput = v}>
如果要获取 WrappedComponent 的实例,直接通过 this.textInput 即可,和未使用 withColorTheme 装饰前一样获取。
通过方法调用
getWrappedInstance
import ThemeContext from './context';
import hoistNonReactStatics from 'hoist-non-react-statics';
function withColorTheme(options={}) {
    return function(WrappedComponent) {
        class ProxyComponent extends React.Component {
            static contextType = ThemeContext;

            getWrappedInstance = () => {
                if (options.forwardRef) {
                    return this.wrappedInstance;
                }
            }

            setWrappedInstance = (ref) => {
                this.wrappedInstance = ref;
            }

            render() {
                const { forwardRef, ...wrapperProps } = this.props;
                let props = {
                    ...this.props
                };

                if (options.forwardRef) {
                    props.ref = this.setWrappedInstance;
                }
                return <WrappedComponent {...props} colorTheme={ this.context } />
            }
        }
    }

    function getDisplayName(WrappedComponent) {
        return WrappedComponent.displayName || WrappedComponent.name || 'Component';
    }

    const displayName = `WithColorTheme(${getDisplayName(WrappedComponent)})`;
    ProxyComponent.displayName = displayName;
    ProxyComponent.WrappedComponent = WrappedComponent;
    ProxyComponent.propTypes = WrappedComponent.propTypes;
    //contextType contextTypes 和 childContextTypes 因为我这里不需要,就不拷贝了
    if (options.forwardRef) {
        let forwarded = React.forwardRef((props, ref) => (
            <ProxyComponent {...props} forwardRef={ref} />
        ));
        forwarded.displayName = displayName;
        forwarded.WrappedComponent = WrappedComponent;
        forwarded.propTypes = WrappedComponent.propTypes;
        return hoistNonReactStatics(forwarded, WrappedComponent);
    } else {
        return hoistNonReactStatics(ProxyComponent, WrappedComponent);
    }
}
同样的,我们对 TextInput 进行了装饰,如 export default withColorTheme({forwardRef: true})(TextInput)。
使用: <TextInput ref={v => this.textInput = v}>
如果要获取 WrappedComponent 的实例,那么需要通过 this.textInput.getWrappedInstance() 获取被包装组件 TextInput 的实例。
最大化可组合
我先说一下,为什么我将它设计为下面这样:
function withColorTheme(options={}) {
    function(WrappedComponent) {

    }
}
而不是像这样:
function withColorTheme(WrappedComponent, options={}) {
}
主要是使用装饰器语法比较方便,而且很多业务中也使用了 react-redux:
@connect(mapStateToProps, mapDispatchToProps)
@withColorTheme()
export default class TextInput extends Component {
    render() {}
}
这样设计,可以不破坏原本的代码结构。否则的话,原本使用装饰器语法的业务改起来就有点麻烦。
回归到最大化可组合,看看官方文档怎么说:
像 connect(react-redux 提供) 函数返回的单参数 HOC 具有签名 Component => Component。输出类型与输入类型相同的函数很容易组合在一起。
// ... 你可以编写组合工具函数
// compose(f, g, h) 等同于 (...args) => f(g(h(...args)))
const enhance = compose(
  // 这些都是单参数的 HOC
  withRouter,
  connect(commentSelector)
)
const EnhancedComponent = enhance(WrappedComponent)
compose 的源码可以看下 redux 的实现,代码很短。
再复杂化一下就是:
withRouter(connect(commentSelector)(withColorTheme(options)(WrappedComponent)));
我们的 enhance 可以编写为:
const enhance = compose(
  withRouter,
  connect(commentSelector),
  withColorTheme(options)
)
const EnhancedComponent = enhance(WrappedComponent)
如果我们是写成 XXX(WrappedComponent, options) 的形式的话,那么上面的代码将变成:
const EnhancedComponent = withRouter(connect(withColorTheme(WrappedComponent, options), commentSelector))
试想一下,如果还有更多的 HOC 要使用,这个代码会变成什么样子?
HOC的约定和注意事项
约定
- 将不相关的
props传递给被包裹的组件(HOC应透传与自身无关的props) - 最大化可组合性
- 包装显示名称以便轻松调试
注意事项
- 不要在
render方法中使用HOC
React 的 diff 算法(称为协调)使用组件标识来确定它是应该更新现有子树还是将其丢弃并挂载新子树。 如果从 render 返回的组件与前一个渲染中的组件相同(===),则 React 通过将子树与新子树进行区分来递归更新子树。 如果它们不相等,则完全卸载前一个子树。
这不仅仅是性能问题 —— 重新挂载组件会导致该组件及其所有子组件的状态丢失。
如果在组件之外创建 HOC,这样一来组件只会创建一次。因此,每次 render 时都会是同一个组件。
- 务必复制静态方法
Refs不会被传递(需要额外处理)
3. 反向继承
React 官方文档上有这样一段描述: HOC 不会修改传入的组件,也不会使用继承来复制其行为。相反,HOC 通过将组件包装在容器组件中来组成新组件。HOC 是纯函数,没有副作用。
因此呢,我觉得反向继承不是 React 推崇的方式,这里我们可以做一下了解,某些场景下也有可能会用到。
反向继承
function withColor(WrappedComponent) {
    class ProxyComponent extends WrappedComponent {
        //注意 ProxyComponent 会覆盖 WrappedComponent 的同名函数,包括 state 和 props
        render() {
            //React.cloneElement(super.render(), { style: { color:'red' }})
            return super.render();
        }
    }
    return ProxyComponent;
}
和上一节不同,反向继承不会增加组件的层级,并且也不会有静态属性拷贝和 refs 丢失的问题。可以利用它来做渲染劫持,不过我目前没有什么必须要使用反向继承的场景。
虽然它没有静态属性和 refs的问题,也不会增加层级,但是它也不是那么好用,会覆盖同名属性和方法这点就让人很无奈。另外虽然可以修改渲染结果,但是不好注入 props。
4. render props
首先, render props 是指一种在 React 组件之间使用一个值为函数的 prop 共享代码的简单技术。
具有 render prop 的组件接受一个函数,该函数返回一个 React 元素并调用它而不是实现自己的渲染逻辑。
<Route
    {...rest}
    render={routeProps => (
        <FadeIn>
            <Component {...routeProps} />
        </FadeIn>
    )}
/>
ReactNative 的开发者,其实 render props 的技术使用的很多,例如,FlatList 组件:
import React, {Component} from 'react';
import {
    FlatList,
    View,
    Text,
    TouchableHighlight
} from 'react-native';

class MyList extends Component {
    data = [{ key: 1, title: 'Hello' }, { key: 2, title: 'World' }]
    render() {
        return (
            <FlatList
                style={{marginTop: 60}}
                data={this.data}
                renderItem={({ item, index }) => {
                    return (
                        <TouchableHighlight
                            onPress={() => { alert(item.title) }}
                        >
                            <Text>{item.title}</Text>
                        </TouchableHighlight>
                    )
                }}
                ListHeaderComponent={() => {
                    return (<Text>以下是一个List</Text>)
                }}
                ListFooterComponent={() => {
                   return <Text>没有更多数据</Text>
                }}
            />
        )
    }
}
例如: FlatList 的 renderItem、ListHeaderComponent 就是render prop。
注意,render prop 是因为模式才被称为 render prop ,你不一定要用名为 render 的 prop 来使用这种模式。render prop 是一个用于告知组件需要渲染什么内容的函数 prop。
其实,我们在封装组件的时候,也经常会应用到这个技术,例如我们封装一个轮播图组件,但是每个页面的样式是不一致的,我们可以提供一个基础样式,但是也要允许自定义,否则就没有通用价值了:
//提供一个 renderPage 的 prop
class Swiper extends React.PureComponent {
    getPages() {
        if(typeof renderPage === 'function') {
            return this.props.renderPage(XX,XXX)
        }
    }
    render() {
        const pages = typeof renderPage === 'function' ? this.props.renderPage(XX,XXX) : XXXX;
        return (
            <View>
                <Animated.View>
                    {pages}
                </Animated.View>
            </View>
        )
    }
}
注意事项
Render Props和React.PureComponent一起使用时要小心
如果在 render 方法里创建函数,那么 render props,会抵消使用 React.PureComponent 带来的优势。因为浅比较 props 的时候总会得到 false,并且在这种情况下每一个 render 对于 render prop 将会生成一个新的值。
import React from 'react';
import { View } from 'react-native';
import Swiper from 'XXX';
class MySwiper extends React.Component {
    render() {
        return (
            <Swiper
                renderPage={(pageDate, pageIndex) => {
                    return (
                        <View></View>
                    )
                }}
            />
        )
    }
}
这里应该比较好理解,这样写,renderPage 每次都会生成一个新的值,很多 React 性能优化上也会提及到这一点。我们可以将 renderPage 的函数定义为实例方法,如下:
import React from 'react';
import { View } from 'react-native';
import Swiper from 'XXX';
class MySwiper extends React.Component {
    renderPage(pageDate, pageIndex) {
        return (
            <View></View>
        )
    }
    render() {
        return (
            <Swiper
                renderPage={this.renderPage}
            />
        )
    }
}
如果你无法静态定义 prop,则 <Swiper> 应该扩展 React.Component,因为也没有浅比较的必要了,就不要浪费时间去比较了。
5. Hooks
Hook 是 React 16.8 的新增特性,它可以让你在不编写 class 的情况下使用 state 以及其他的 React 特性。HOC 和 render props 虽然都可以
React 已经内置了一些 Hooks,如: useState、useEffect、useContext、useReducer、useCallback、useMemo、useRef 等 Hook,如果你还不清楚这些 Hook,那么可以优先阅读一下官方文档。
我们主要是将如何利用 Hooks 来进行组件逻辑复用。假设,我们有这样一个需求,在开发环境下,每次渲染时,打印出组件的 props。
import React, {useEffect} from 'react';

export default function useLogger(componentName,...params) {
    useEffect(() => {
        if(process.env.NODE_ENV === 'development') {
            console.log(componentName, ...params);
        }
    });
}
使用时:
import React, { useState } from 'react';
import useLogger from './useLogger';

export default function Counter(props) {
    let [count, setCount] = useState(0);
    useLogger('Counter', props);
    return (
        <div>
            <button onClick={() => setCount(count + 1)}>+</button>
            <p>{`${props.title}, ${count}`}</p>
        </div>
    )
}
另外,官方文档自定义 Hook 章节也一步一步演示了如何利用 Hook 来进行逻辑复用。我因为版本限制,还没有在项目中应用 Hook ,虽然文档已经看过多次。读到这里,一般都会有一个疑问,那就是 Hook 是否会替代 render props 和 HOC,关于这一点,官方也给出了答案:
通常,render props 和高阶组件只渲染一个子节点。我们认为让 Hook 来服务这个使用场景更加简单。这两种模式仍有用武之地,例如,FlatList 组件的 renderItem 等属性,或者是 一个可见的容器组件或许会有它自己的 DOM 结构。但在大部分场景下,Hook 足够了,并且能够帮助减少嵌套。
HOC 最最最讨厌的一点就是层级嵌套了,如果项目是基于新版本进行开发,那么需要逻辑复用时,优先考虑 Hook,如果无法实现需求,那么再使用 render props 和 HOC 来解决。
参考链接
最后,如果方便的话,点个Star鼓励: github.com/YvetteLau/B…