

我们平时在开发web项目的时候,都是将开发好的项目打包后放到一个应用服务器中。然后运行应用服务器就能够在浏览器看到我们的项目界面。那么你有没有想过脱离了服务器要如何来运行一个web服务呢?
HTTP请求
发送一个http的请求是很简单的,在浏览器上输入指定的域名+端口就可以发送一个http请求,重要的是这个请求我们如何来接收呢?
在JDK的net包下又一个Socket对象,这个对象可以监听指定端口下的请求,我们通过这个对象来构建一个监听请求的类;
public static void main(String[] args) throws Exception {
    ServerSocket serverSocket = new ServerSocket(8080);
    System.out.println("start...");
    while (!serverSocket.isClosed()) {
        Socket request = serverSocket.accept();

        // 接收数据、打印
        InputStream inputStream = request.getInputStream();
        BufferedReader reader = new BufferedReader(new InputStreamReader(inputStream, "utf-8"));
        String msg = null;
        while ((msg = reader.readLine()) != null) {
            if (msg.length() == 0) {
                break;
            }
            System.out.println(msg);
        }
    serverSocket.close();
    }
}
启动服务,在浏览器上键入localhost:8080后可以在console收到请求信息:
GET / HTTP/1.1
Host: localhost:8080
Connection: keep-alive
Cache-Control: max-age=0
Upgrade-Insecure-Requests: 1
User-Agent: Mozilla/5.0 (Macintosh; Intel Mac OS X 10_14_5) AppleWebKit/537.36 (KHTML, like Gecko) Chrome/81.0.4044.138 Safari/537.36
Accept: text/html,application/xhtml+xml,application/xml;q=0.9,image/webp,image/apng,*/*;q=0.8,application/signed-exchange;v=b3;q=0.9
Sec-Fetch-Site: none
Sec-Fetch-Mode: navigate
Sec-Fetch-User: ?1
Sec-Fetch-Dest: document
Accept-Encoding: gzip, deflate, br
Accept-Language: zh-CN,zh;q=0.9
Cookie: Idea-8cb78c43=9b475474-958c-49fb-ae69-b2f398d91346
可以看到一个简单的请求,浏览器也会封装大量的信息传递给服务端。服务端也好似通过解析这些请求对不同的请求进行各种不同的处理。
GTTP请求的内容遵循定义好的HTTP请求头的格式:
GET / HTTP/1.1           //请求方法 url http版本
Connection: keep-alive   //请求头
                         //空行
user=lisi                //请求数据,get请求直接带在请求上,post请求写在这里
客户端接收到请求数据后进行解析,比如解析请求方法将请求转发给不同的类或者方法处理(Servlet中的doGet和doPost),解析url然后转发给不同的处理类处理(Springmvc中的controller)。
HTTP 响应
HTTP的响应也是有着固定的格式的,大体上来说是由三个部分组成的:HTTP版本、状态码等,响应头以及响应数据正文。实际上在响应头和响应正文之间还有这一个空行。
HTTP/1.1 200 OK //http版本 状态码 状态码描述
content-type: text/html //响应头,可能有多行
                        //空行
hello world!          //响应数据正文
如果想要浏览器能够读懂我们传给它的数据,就必须按照响应数据格式来。按照这样的格式我们对上面的代码进行修改,添加响应数据后如下:
ServerSocket serverSocket = new ServerSocket(8080);
while (!serverSocket.isClosed()) {
    Socket request = serverSocket.accept();
    System.out.println("收到新连接 : " + request.toString());
    try {
        // 接收数据、打印
        InputStream inputStream = request.getInputStream();
        BufferedReader reader = new BufferedReader(new InputStreamReader(inputStream, "utf-8"));
        String msg;
        while ((msg = reader.readLine()) != null) {
            if (msg.length() == 0) {
                break;
            }
            System.out.println(msg);
        }

        System.out.println("收到数据,来自:"+ request.toString());
        // 响应结果 200
        OutputStream outputStream = request.getOutputStream();
        outputStream.write("HTTP/1.1 200 OK\r\n".getBytes());
        outputStream.write("Content-Length: 11\r\n\r\n".getBytes());
        outputStream.write("Hello World".getBytes());
        outputStream.flush();
    } catch (IOException e) {
        e.printStackTrace();
    } finally {
        try {
            request.close();
        } catch (IOException e) {
            e.printStackTrace();
        }
    }
}
serverSocket.close();
启动程序后,在浏览器上访问http://127.0.0.1:8080得到结果:
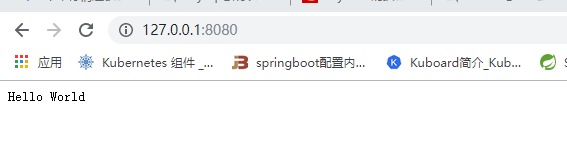
现在我们可以直接从浏览器上看到我们的响应消息了,但是目前能够传输的只有文字消息,这肯定是不行的,我们必须要支持更多的其他格式的信息,比如图片,文件等等。
响应状态
HTTP中定义了大量的状态来描述响应的结果,这个我们可以直接在响应头中进行设置,比如将响应头中的200改成404,这样浏览器就会将这次请求描述乘一次失败的请求:
sb.append("HTTP/1.1 404 ERROR\r\n");
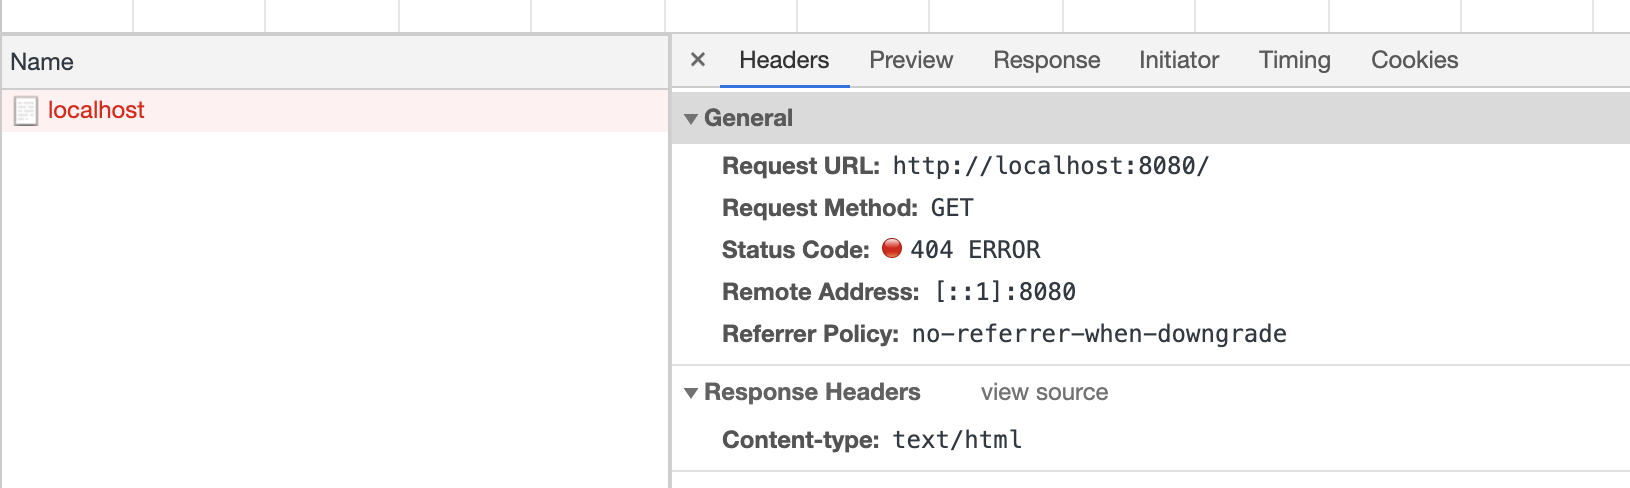
通过修改响应的状态码浏览器就会做出不同的反应。
MIME
HTTP的状态都是由响应头进行控制,我们可以通过响应头来定制需要的响应结果。而设置响应内容格式有Content-type头来设置。
HTTP响应的数据是无法确定的,可能是文本,可能是图片也可能是其他的文件,所以需要一个统一的规范来规定内容的格式。在HTTP中采用MIME协议来规范正文的数据格式。
在HTTP的请求头和响应头中都有Content-type这么一项,用于指定数据部分的MIME类型。MIME中的各种格式对应关系看这里:MIME
设置Content-type
HTML
现在我们来设置以html的格式进行响应,响应的内容为<h2>this is a test page</h2>.
如果没有设置响应头content-type结果如下。

现在添加html格式的响应头:
sb.append("Content-type: text/html\r\n");
sb.append("\r\n");
sb.append("<h2>this is a test page</h2>");
重新启动程序,在浏览器访问得到结果:
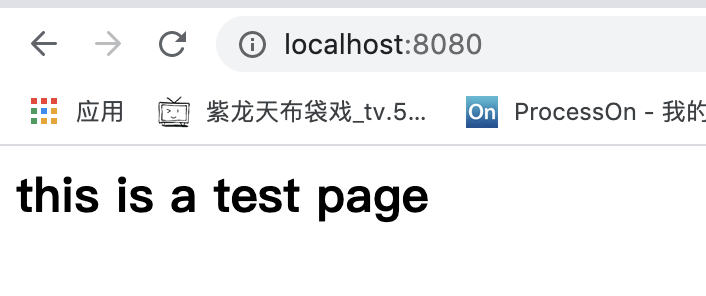
已经是经过浏览器渲染过的格式了。
文件下载
做过文件下载的都知道如果我们需要在web端实现文件下载的功能,那就必须要设置一个响应头和文件名后通过流返回给浏览器才能做到文件下载。
实际上这就是MIME协议的作用,设置好相应的响应头,浏览器就会根据头信息作相应的处理。
//文件下载代码
// 响应结果 200
File file = new File("E:\\单机Kubernetes的安装.md");
StringBuilder sb = new StringBuilder();
sb.append("HTTP/1.1 200 OK\r\n");
//设置下载的响应头和文件名
sb.append("Content-type: appllication/octet-stream\r\n");
sb.append("Content-Disposition: attachment;filename=" + file.getName());
sb.append("\r\n");

OutputStream outputStream = request.getOutputStream();
outputStream.write(sb.toString().getBytes());
FileInputStream fis = new FileInputStream(file);
byte[] bytes = new byte[1024];
int index = 0;
while((index = fis.read(bytes)) != -1){
    outputStream.write(bytes, 0, index);
}
outputStream.flush();
启动程序后在浏览器访问:
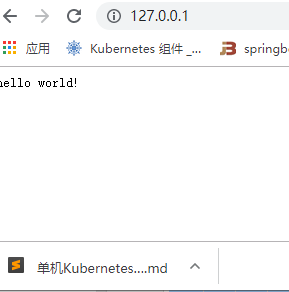
可以看到文件已经下载到了浏览器的指定目录下了。
同理可以通过设置其他的MIME类型来使得浏览器作出不同的响应。
NIO版
上面的代码是由Socket实现的,缺点在于其是基于BIO的,这样当一个请求过来的时候就需要创建一个线程进行处理,这样当请求很多的时候很快就会将服务资源耗尽。下面我们用nio对上面的代码进行改写:
public static void main(String[] args) throws Exception {
    ServerSocketChannel serverSocketChannel = ServerSocketChannel.open();
    serverSocketChannel.configureBlocking(false); // 设置为非阻塞模式

    Selector selector = Selector.open();
    // 注册accept事件
    SelectionKey selectionKey = serverSocketChannel.register(selector, 0);
    selectionKey.interestOps(SelectionKey.OP_ACCEPT);

    serverSocketChannel.socket().bind(new InetSocketAddress(8080)); // 绑定端口
    System.out.println("启动成功");

    while (true) {
        selector.select();// 阻塞,直到事件通知才会返回

        Set<SelectionKey> selectionKeys = selector.selectedKeys();
        Iterator<SelectionKey> iterator = selectionKeys.iterator();
        while (iterator.hasNext()) {
            SelectionKey key = iterator.next();
            iterator.remove();

            if (key.isAcceptable()) {
                SocketChannel socketChannel = ((ServerSocketChannel) key.channel()).accept();
                socketChannel.configureBlocking(false);
                socketChannel.register(selector, SelectionKey.OP_READ);
               System.out.println("收到新连接:" + socketChannel);
            } else if (key.isReadable()) {
                try {
                    SocketChannel socketChannel = (SocketChannel) key.channel();

                    ByteBuffer requestBuffer = ByteBuffer.allocate(1024);
                    while (socketChannel.isOpen() && socketChannel.read(requestBuffer) != -1){
                        // 长连接情况下,需要手动判断数据有没有读取结束 (此处做一个简单的判断: 超过0字节就认为请求结束了)
                        if (requestBuffer.position() > 0) break;
                    }
                    if (requestBuffer.position() == 0) continue; // 如果没数据了, 则不继续后面的处理
                    requestBuffer.flip();
                    byte[] content = new byte[requestBuffer.remaining()];
                    requestBuffer.get(content);
                    System.out.println(new String(content));
                    System.out.println("收到数据,来自:" + socketChannel.getRemoteAddress());

                    // TODO 这里做一些业务操作 比如从数据库读数据返回等

                    // 响应给浏览器
                    StringBuilder sb = new StringBuilder();
                    sb.append("HTTP/1.1 200 OK\r\n");
                    sb.append("Content-type: text/html\r\n");
                    sb.append("\r\n");
                    sb.append("<h2>this is a test page</h2>");
                    ByteBuffer buffer = ByteBuffer.wrap(sb.toString().getBytes());
                    while (buffer.hasRemaining()) {
                        socketChannel.write(buffer);
                    }
                } catch (Exception e) {
                    e.printStackTrace();
                    key.cancel();
                }
            }
        }
    }
}
参考资料
Tomcat与java web 开发技术详解-孙卫琴-第二版
