

本文以授权个人公众号「鸿洋」原创首发。
1.概述
在Android开发过程中,我们基本每天都在写各种各样的xml布局文件,然后app会在运行时,将我们的布局文件转化成View显示在界面上。
这个转化,主要就是解析xml布局文件,然后根据xml的中每个View标签,将:
- 标签名-> View的名称
- 各种属性 -> AttributeSet对象
然后反射调用View两个参数的构造方法。
这也是为什么,我们在自定义控件的时候,如果需要在xml使用,需要复写其两参的构造函数。
这个设计确实极具扩展性,但是也引入了一定的性能问题。
可以很明显的看到xml文件到View这个过程中,涉及到一些耗时操作:
- io 操作,xml解析;
- 反射;
尤其是真实项目中,一些页面布局元素非常多,那么整个页面几十个控件可能都需要去反射生成。
所以很多时候,一些核心页面,为了提升构建速度,我们会考虑直接用代码生成,来替代xml写法,这样做带来一个最大的问题就是可维护性急剧下降。
在既想要可维护性又想要运行时效率的情况下,很多开发者想到,xml毕竟是非常有规律的文件,我们可以在编译时解析成View,运行时直接拿到View,就能避免IO操作以及反射操作了。
确实,想法非常完美,github上也有一个由掌阅发布的开源库:
x2c的想法非常好,基本上彻底解决了我上面提出的两个耗时问题,但是引入了新的问题,就是兼容性和稳定性。
而且x2c生成代码使用了apt,apt一个都是针对本module去做一些事情,涉及到复杂的module间依赖,就会遇到很多问题,x2c在apt这方面应该也做了很多处理,但是这些处理在遇到很多项目在编译期做各种编译优化的时候,就会摩擦出一些火花。
本文也会涉及到apt,因为不涉及资源,也遇到一些问题,下文会说。
当然如果能够引入x2c,并可自维护的情况下,其实是挺好的,我非常支持这个方案,就是有一定风险。
注:本文不讨论到底哪个方案牛逼,博客更多的还是为了学习,重点还是吸收每个方案包含的知识点,扩充自己的可用知识库。
2.退一步
刚才我们说了,完全托管xml->View这一过程具有一定的风险,那么我们是否可退一步来看这个问题呢?
既然xml文件到View这个过程中,涉及到两个耗时点:
- io 操作,xml解析;
- 反射;
xml解析我们不太好干涉,这种看起来风险就高的东西还是交给Google自己吧,而且底层还涉及到有一些xmlblock的缓存逻辑。
那只剩下一个反射操作了,这是个软柿子吗?
我们有办法去除发射逻辑吗?
当然有,大家肯定都再熟悉不过了。
如果关注本号,我们在16年就写过:
通过setFactory,我们不仅能够控制View的生成,甚至可以把一个View变成另一个View,比如文中,我们把TextView变成了Button。
后续换肤、黑白化一些方案都基于此。
也就说我们现在可以:
运行时,接管某个View的生成,即针对单个View我们可以去除反射的逻辑了
类似代码:
if ("LinearLayout".equals(name)){
    View view = new LinearLayout(context, attrs);
    return view;
}
但是,一般线上的项目都非常大,可能有各种各样的自定义View,类似上面的if else,怎么写呢?
先收集起来,然后手写?
怎么收集项目中用到的所有的View的呢?
假设我们收集到了,手写的话,项目一般都是增量的,后续新增的View怎么办呢?
可以看到我们面临两个问题:
- 如何收集项目中在xml中使用到的View;
- 如何保证写出的View生成代码,能够兼容项目的正常迭代;
3. 确定方案
到这里目标已经确定了。
在 xml -> View的过程中,去除反射相关逻辑
来说说我们面临的两个问题如何解决:
1. 如何收集项目中在xml中使用到的View;
收集所有在xml中用到的View,有个简单的想法,我们可以解析项目中所有的layout.xml文件,不过项目中layout.xml文件每个模块都有,而且有些依赖的aar,还需要解压太难了。
细想一下,我们apk在生成过程中,资源应该需要merger吧,是不是解析某个Task merger后的产物即可。
确实有,后面详细实施会提到。
下面看第二个问题:
2. 如何保证写出的View生成代码,能够兼容项目的正常迭代;
我们已经能够收集到所使用的,所有的View列表了,那么针对这种:
if ("LinearLayout".equals(name)){
    View view = new LinearLayout(context, attrs);
    return view;
}
有规律又简单的逻辑,完全可以在编译时生成一个代码类,完成相关转化代码生成,这里选择了apt。
有了xml -> View转化逻辑的代码类,最后只要在运行时,利用LayoutFactory注入即可。
3. 找一个稳妥的注入逻辑
大家都知道我们的View生成相关逻辑在LayoutInflater下面的代码中:
View createViewFromTag(View parent, String name, Context context, AttributeSet attrs,
        boolean ignoreThemeAttr) {
  	 // ...
    View view;
    if (mFactory2 != null) {
        view = mFactory2.onCreateView(parent, name, context, attrs);
    } else if (mFactory != null) {
        view = mFactory.onCreateView(name, context, attrs);
    } else {
        view = null;
    }

    if (view == null && mPrivateFactory != null) {
        view = mPrivateFactory.onCreateView(parent, name, context, attrs);
    }

    if (view == null) {
        final Object lastContext = mConstructorArgs[0];
        mConstructorArgs[0] = context;
        try {
            if (-1 == name.indexOf('.')) {
                view = onCreateView(parent, name, attrs);
            } else {
                view = createView(name, null, attrs);
            }
        } finally {
            mConstructorArgs[0] = lastContext;
        }
    }

    return view;

}
View经过mFactory2,mFactory,mPrivateFactory,如果还不能完成构建,后面等它的就是反射了。
而前两个factory,support包一般扩展功能会用,例如 TextView-> AppCompatTextView。
我们考虑利用mPrivateFactory,利用mPrivateFactory的好处就是,在目前的版本中mPrivateFactory就是Activity,所以我们只要复写Activivity的onCreateView即可:
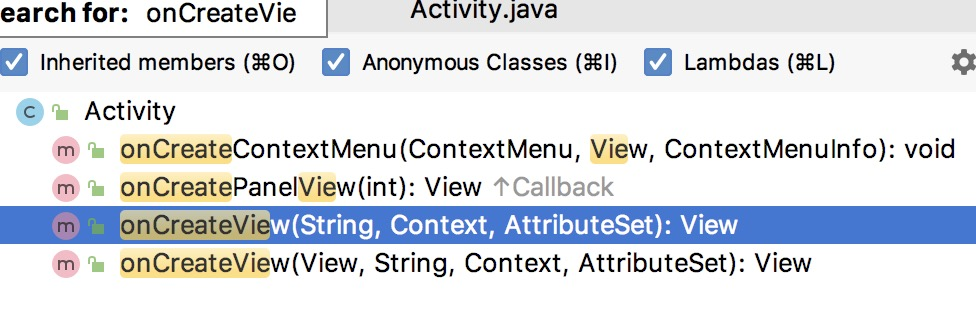
这样完全不需要hook,也不干涉appcompat相关生成逻辑,可谓是0风险了。
4. 开始实施
1. 获取项目中使用的控件名列表
我新建了一个项目,随便写了一些自定义控件叫MyMainView1,MyMainView,MyMainView3,MyMainView4都在layout文件中声明了,就不贴布局文件了。
之前我们说了,我们要在apk的构建过程中去寻找合适的注入点完成这个事情。
那么apk过程中,什么时候会merge资源呢?
我们打印下构建过程中所有的task,输入命令:
./gradlew app:assembleDebug --console=plain
输出:
>Task :app:preBuild UP-TO-DATE
> Task :app:preDebugBuild UP-TO-DATE
> Task :app:checkDebugManifest UP-TO-DATE
> Task :app:generateDebugBuildConfig UP-TO-DATE
> Task :app:javaPreCompileDebug UP-TO-DATE
> Task :app:mainApkListPersistenceDebug UP-TO-DATE
> Task :app:generateDebugResValues UP-TO-DATE
> Task :app:createDebugCompatibleScreenManifests UP-TO-DATE
> Task :app:mergeDebugShaders UP-TO-DATE
> Task :app:compileDebugShaders UP-TO-DATE
> Task :app:generateDebugAssets UP-TO-DATE
> Task :app:compileDebugAidl NO-SOURCE
> Task :app:compileDebugRenderscript NO-SOURCE
> Task :app:generateDebugResources UP-TO-DATE
> Task :app:mergeDebugResources UP-TO-DATE
> Task :app:processDebugManifest UP-TO-DATE
> Task :app:processDebugResources UP-TO-DATE
> Task :app:compileDebugJavaWithJavac UP-TO-DATE
> Task :app:compileDebugSources UP-TO-DATE
> Task :app:mergeDebugAssets UP-TO-DATE
> Task :app:processDebugJavaRes NO-SOURCE
> Task :app:mergeDebugJavaResource UP-TO-DATE
> Task :app:transformClassesWithDexBuilderForDebug UP-TO-DATE
> Task :app:checkDebugDuplicateClasses UP-TO-DATE
> Task :app:validateSigningDebug UP-TO-DATE
> Task :app:mergeExtDexDebug UP-TO-DATE
> Task :app:mergeDexDebug UP-TO-DATE
> Task :app:signingConfigWriterDebug UP-TO-DATE
> Task :app:mergeDebugJniLibFolders UP-TO-DATE
> Task :app:mergeDebugNativeLibs UP-TO-DATE
> Task :app:stripDebugDebugSymbols UP-TO-DATE
> Task :app:packageDebug UP-TO-DATE
> Task :app:assembleDebug UP-TO-DATE
哪个最像呢? 一眼看有个叫:mergeDebugResources的Task,就它了。
与build目录对应,也有个mergeDebugResources的目录:
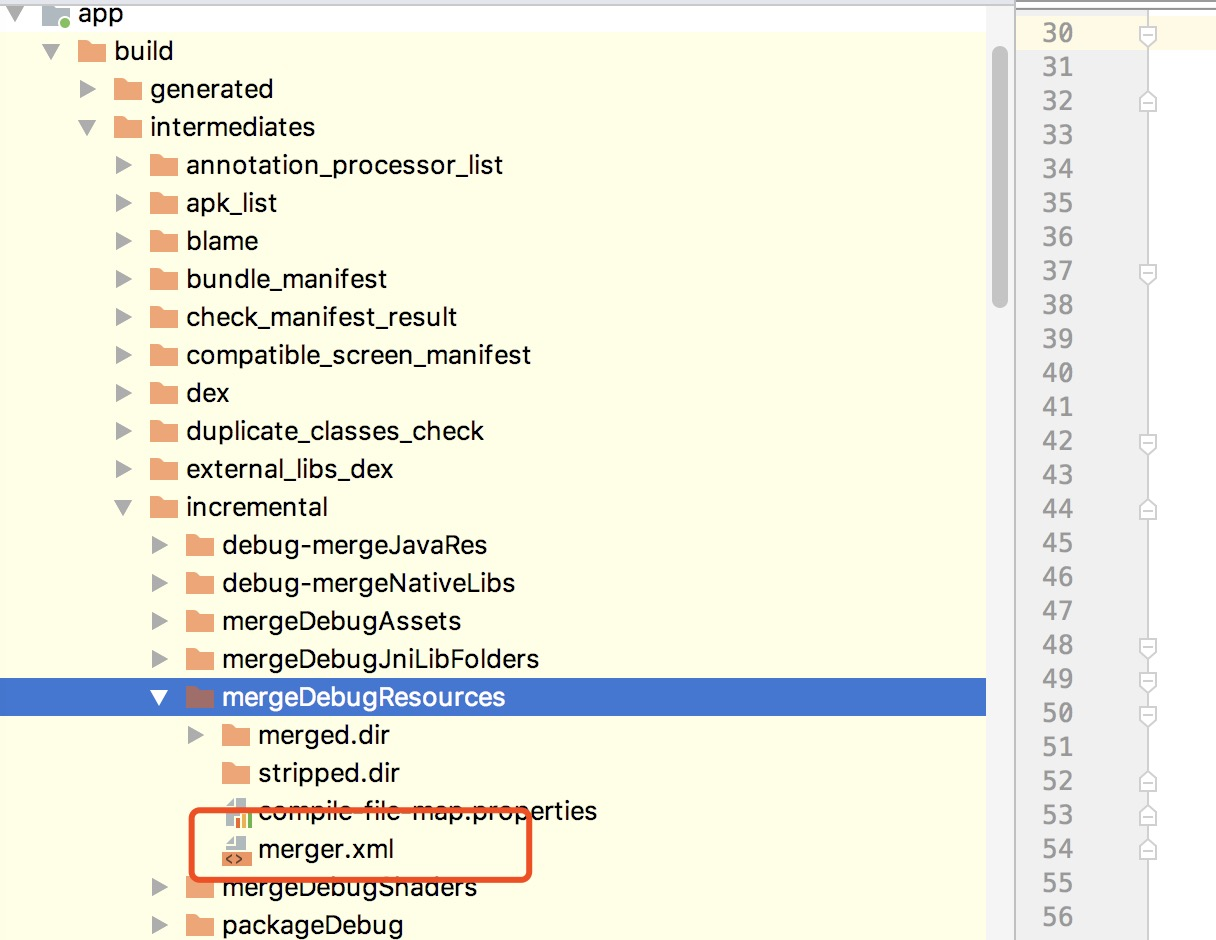
注意里面有个merger.xml,其中就包含了整个项目所有资源合并后的内容。
我们打开看一眼:
重点关注里面的type=layout的相关标签。
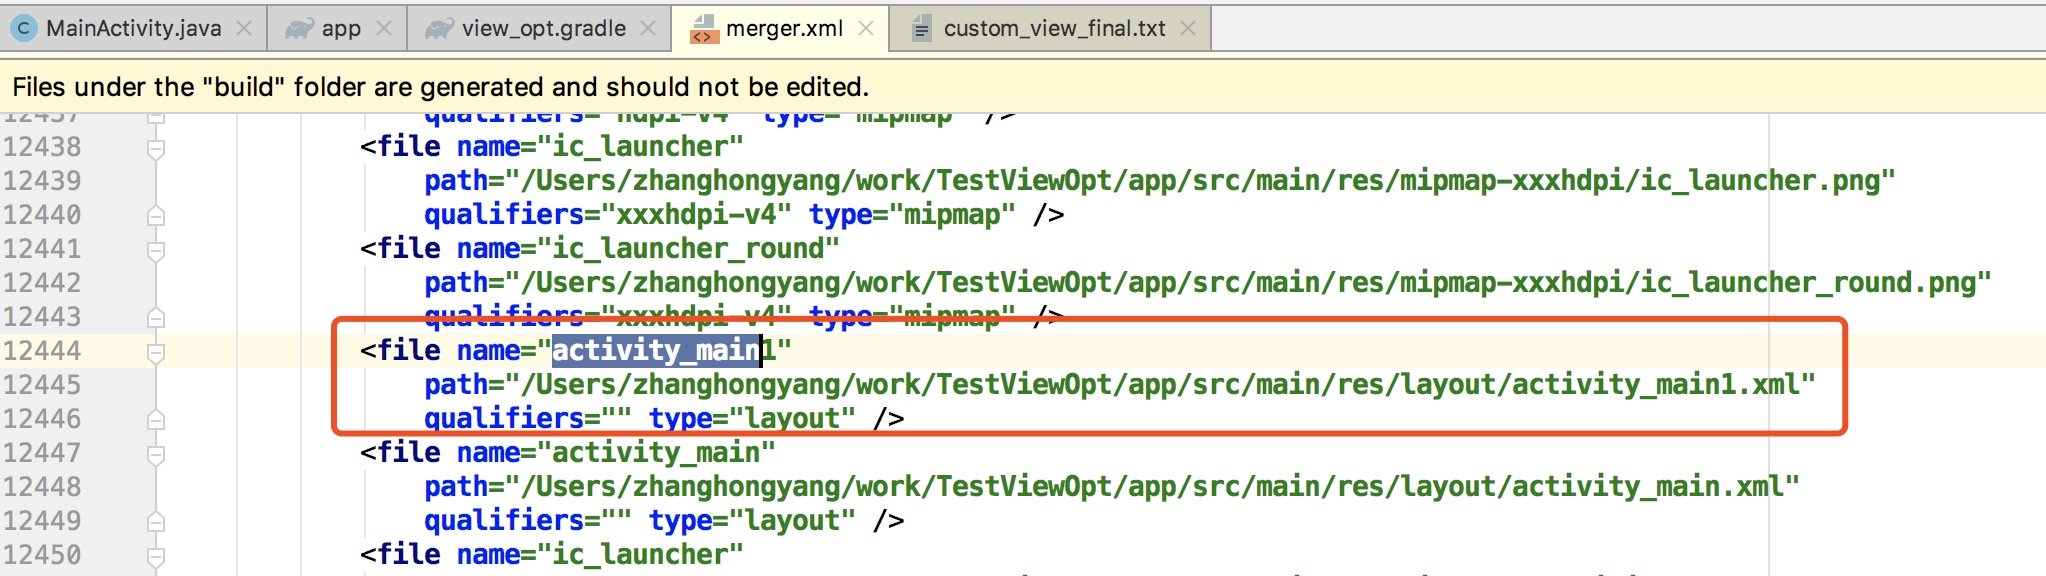
<file name="activity_main1"
                path="/Users/zhanghongyang/work/TestViewOpt/app/src/main/res/layout/activity_main1.xml"
                qualifiers="" type="layout" />
可以看到包含了我们layout文件的路劲,那么我们只要解析这个merger.xml,然后找到里面所有type=layout的标签,再解析出layout文件的实际路劲,再解析对应的layout xml就能拿到控件名了。
对了,这个任务要注入到mergeDebugResources后面执行。
怎么注入一个任务呢?
非常简单:
project.afterEvaluate {
    def mergeDebugResourcesTask = project.tasks.findByName("mergeDebugResources")
    if (mergeDebugResourcesTask != null) {
        def resParseDebugTask = project.tasks.create("ResParseDebugTask", ResParseTask.class)
        resParseDebugTask.isDebug = true
        mergeDebugResourcesTask.finalizedBy(resParseDebugTask);
    }

}
根目录:view_opt.gradle
我们首先找到mergeDebugResources这个task,再其之后,注入一个ResParseTask的任务。
然后在ResParseTask中完成文件解析:
class ResParseTask extends DefaultTask {
File viewNameListFile
boolean isDebug
HashSet<String> viewSet = new HashSet<>()
// 自己根据输出几个添加
List<String> ignoreViewNameList = Arrays.asList("include", "fragment", "merge", "view","DateTimeView")
@TaskAction
void doTask() {
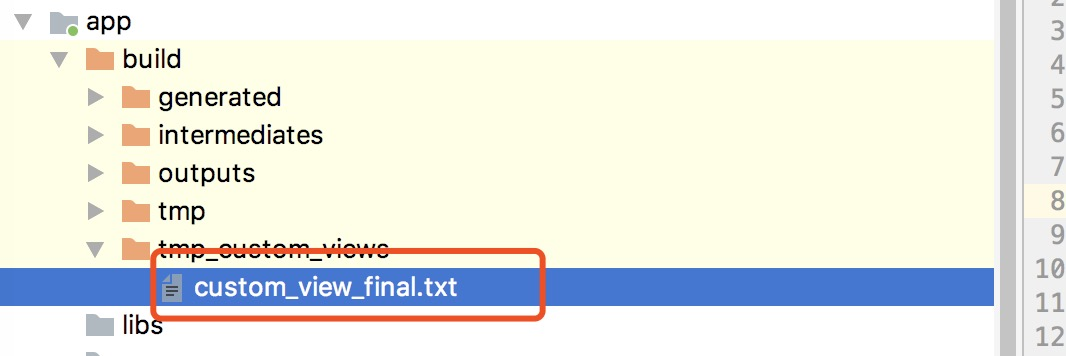
File distDir = new File(project.buildDir, "tmp_custom_views")
if (!distDir.exists()) {
distDir.mkdirs()
}
viewNameListFile = new File(distDir, "custom_view_final.txt")
if (viewNameListFile.exists()) {
viewNameListFile.delete()
}
viewNameListFile.createNewFile()
viewSet.clear()
viewSet.addAll(ignoreViewNameList)
try {
File resMergeFile = new File(project.buildDir, "/intermediates/incremental/merge" + (isDebug ? "Debug" : "Release") + "Resources/merger.xml")
println("resMergeFile: ${resMergeFile.getAbsolutePath()} === ${resMergeFile.exists()}")
if (!resMergeFile.exists()) {
return
}
XmlSlurper slurper = new XmlSlurper()
GPathResult result = slurper.parse(resMergeFile)
if (result.children() != null) {
result.childNodes().forEachRemaining({ o ->
if (o instanceof Node) {
parseNode(o)
}
})
}
} catch (Throwable e) {
e.printStackTrace()
}
}
void parseNode(Node node) {
if (node == null) {
return
}
if (node.name() == "file" && node.attributes.get("type") == "layout") {
String layoutPath = node.attributes.get("path")
try {
XmlSlurper slurper = new XmlSlurper()
GPathResult result = slurper.parse(layoutPath)
String viewName = result.name();
if (viewSet.add(viewName)) {
viewNameListFile.append("${viewName}\n")
}
if (result.children() != null) {
result.childNodes().forEachRemaining({ o ->
if (o instanceof Node) {
parseLayoutNode(o)
}
})
}
} catch (Throwable e) {
e.printStackTrace();
}
} else {
node.childNodes().forEachRemaining({ o ->
if (o instanceof Node) {
parseNode(o)
}
})
}
}
void parseLayoutNode(Node node) {
if (node == null) {
return
}
String viewName = node.name()
if (viewSet.add(viewName)) {
viewNameListFile.append("${viewName}\n")
}
if (node.childNodes().size() <= 0) {
return
}
node.childNodes().forEachRemaining({ o ->
if (o instanceof Node) {
parseLayoutNode(o)
}
})
}
}
根目录:view_opt.gradle
代码很简单,主要就是解析merger.xml,找到所有的layout文件,然后解析xml,最后输出到build目录中。
代码我们都写在view_opt.gradle,位于项目的根目录,在app的build.gradle中apply即可:
apply from: rootProject.file('view_opt.gradle')
然后我们再次运行assembleDebug,输出:
注意,上面我们还有个ignoreViewNameList对象,我们过滤了一些特殊标签,例如:"include", "fragment", "merge", "view",你可以根据输出结果自行添加。
输出结果为:
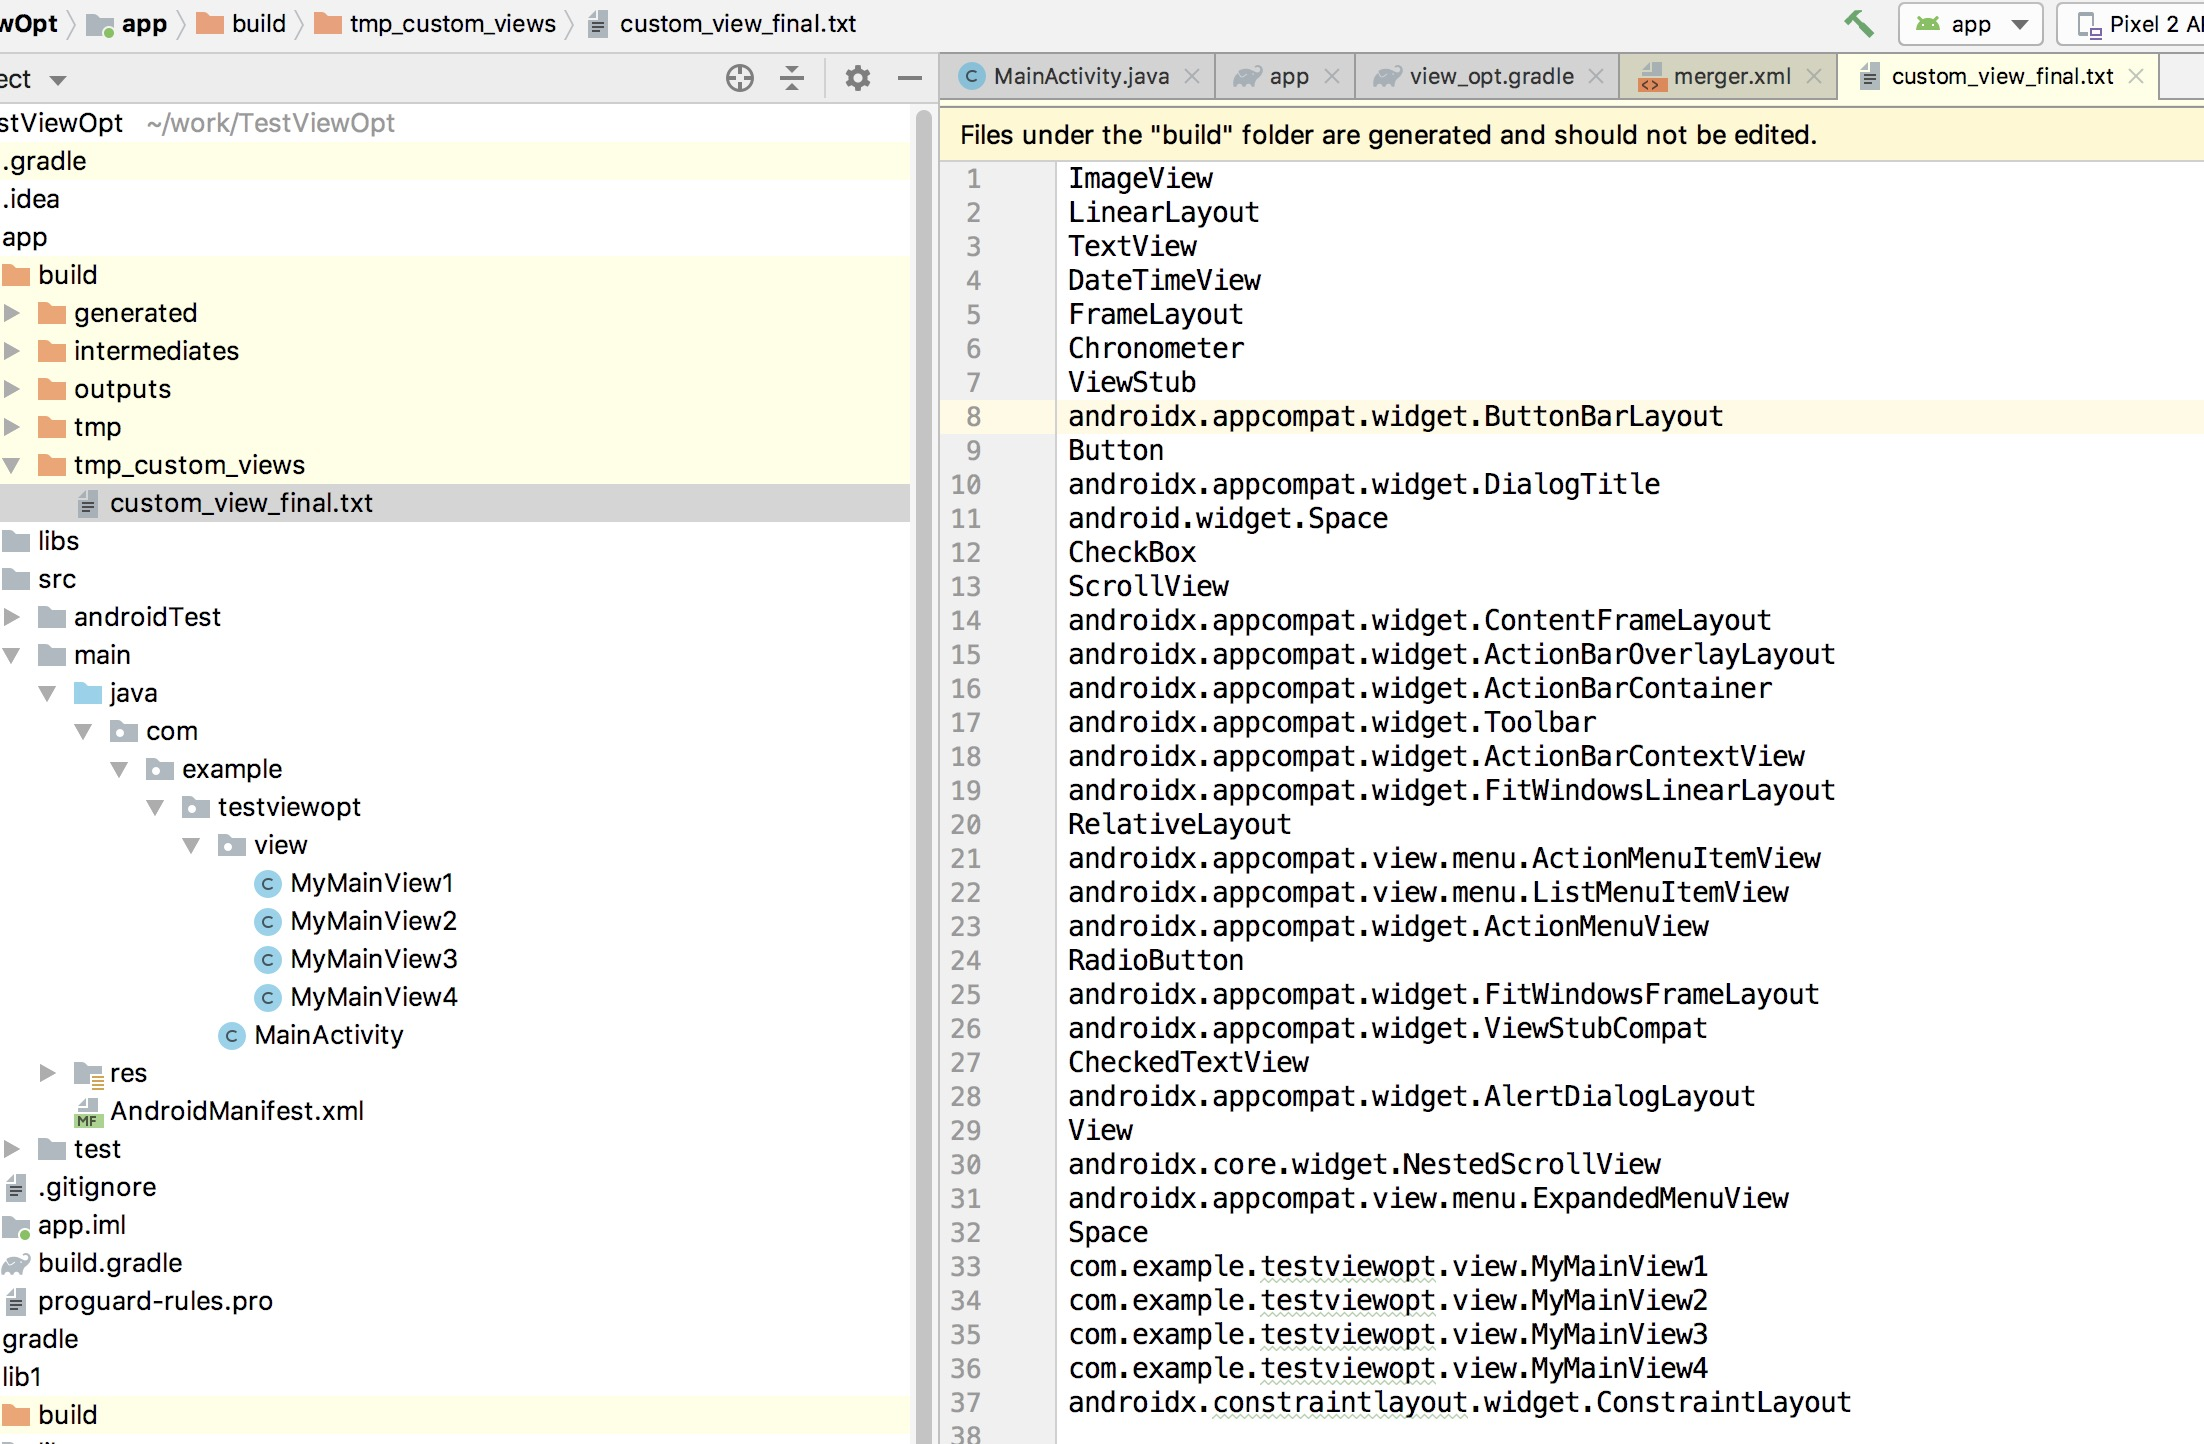
可以看到是去重后的View的名称。
这里提一下,有很多同学看到写gradle脚本就感觉恐惧,其实很简单,你就当写Java就行了,不熟悉的语法就用Java写就好了,没什么特殊的。
到这里我们就有了所有使用到的View的名称。
2. apt 生成代理类
有了所有用到的View的名称,接下来我们利用apt生成一个代理类,以及代理方法。
要用到apt,那么我们需要新建3个模块:
- ViewOptAnnotation: 存放注解;
- ViewOptProcessor:放注解处理器相关代码;
- ViewOptApi:放相关使用API的。
关于Apt的相关基础知识就不提了哈,这块知识太杂了,大家自己查阅下,后面我把demo传到github大家自己看。
我们就直接看我们最核心的Processor类了:
@AutoService(Processor.class)
public class ViewCreatorProcessor extends AbstractProcessor {

    private Messager mMessager;


    @Override
    public synchronized void init(ProcessingEnvironment processingEnvironment) {
        super.init(processingEnvironment);
        mMessager = processingEnv.getMessager();
    }

    @Override
    public boolean process(Set<? extends TypeElement> set, RoundEnvironment roundEnvironment) {

        Set<? extends Element> classElements = roundEnvironment.getElementsAnnotatedWith(ViewOptHost.class);

        for (Element element : classElements) {
            TypeElement classElement = (TypeElement) element;
            ViewCreatorClassGenerator viewCreatorClassGenerator = new ViewCreatorClassGenerator(processingEnv, classElement, mMessager);
            viewCreatorClassGenerator.getJavaClassFile();
            break;
        }
        return true;

    }

    @Override
    public Set<String> getSupportedAnnotationTypes() {
        Set<String> types = new LinkedHashSet<>();
        types.add(ViewOptHost.class.getCanonicalName());
        return types;
    }

}
核心方法就是process了,直接交给了ViewCreatorClassGenerator去生成我们的Java类了。
看之前我们思考下我们的逻辑,其实我们这个代理类非常简单,我们只要构建好我们的类名,方法名,方法内部,根据View名称的列表去写swicth就可以了。
看代码:
定义类名:
public ViewCreatorClassGenerator(ProcessingEnvironment processingEnv, TypeElement classElement, Messager messager) {
mProcessingEnv = processingEnv;
mMessager = messager;
mTypeElement = classElement;
PackageElement packageElement = processingEnv.getElementUtils().getPackageOf(classElement);
String packageName = packageElement.getQualifiedName().toString();
//classname
String className = ClassValidator.getClassName(classElement, packageName);
mPackageName = packageName;
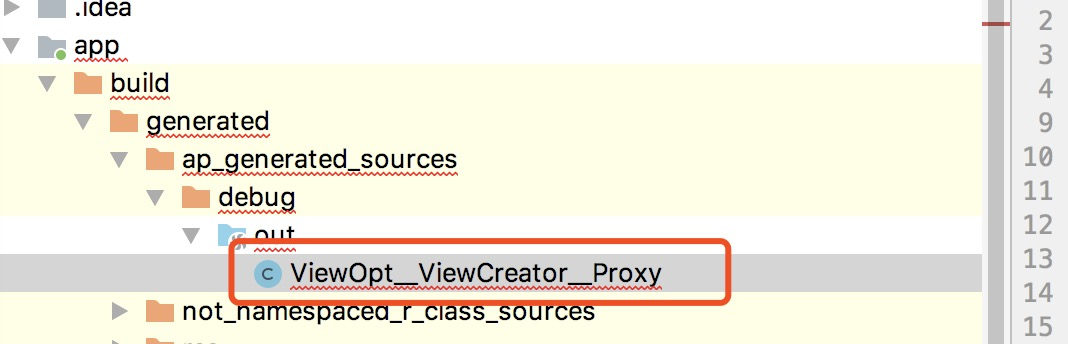
mClassName = className + "__ViewCreator__Proxy";
}
我们类名就是使用注解的类名后拼接__ViewCreator__Proxy。
生成类主体结构:
public void getJavaClassFile() {

    Writer writer = null;
    try {
        JavaFileObject jfo = mProcessingEnv.getFiler().createSourceFile(
                mClassName,
                mTypeElement);

        String classPath = jfo.toUri().getPath();

        String buildDirStr = "/app/build/";
        String buildDirFullPath = classPath.substring(0, classPath.indexOf(buildDirStr) + buildDirStr.length());
        File customViewFile = new File(buildDirFullPath + "tmp_custom_views/custom_view_final.txt");

        HashSet<String> customViewClassNameSet = new HashSet<>();
        putClassListData(customViewClassNameSet, customViewFile);

        String generateClassInfoStr = generateClassInfoStr(customViewClassNameSet);

        writer = jfo.openWriter();
        writer.write(generateClassInfoStr);
        writer.flush();

        mMessager.printMessage(Diagnostic.Kind.NOTE, "generate file path : " + classPath);

    } catch (Exception e) {
        e.printStackTrace();
    } finally {
        if (writer != null) {
            try {
                writer.close();
            } catch (IOException e) {
                // ignore
            }
        }
    }
}
这里首先我们读取了,我们刚才生成的tmp_custom_views/custom_view_final.txt,存放到了一个hashSet中。
然后交给了generateClassInfoStr方法:
private String generateClassInfoStr(HashSet<String> customViewClassNameSet) {

    StringBuilder builder = new StringBuilder();
    builder.append("// Generated code. Do not modify!\n");
    builder.append("package ").append(mPackageName).append(";\n\n");
    builder.append("import com.zhy.demo.viewopt.*;\n");
    builder.append("import android.content.Context;\n");
    builder.append("import android.util.AttributeSet;\n");
    builder.append("import android.view.View;\n");


    builder.append('\n');

    builder.append("public class ").append(mClassName).append(" implements " + sProxyInterfaceName);
    builder.append(" {\n");

    generateMethodStr(builder, customViewClassNameSet);
    builder.append('\n');

    builder.append("}\n");
    return builder.toString();

}
可以看到这里其实就是拼接了类的主体结构。
详细的方法生成逻辑:
private void generateMethodStr(StringBuilder builder, HashSet<String> customViewClassNameSet) {

    builder.append("@Override\n ");
    builder.append("public View createView(String name, Context context, AttributeSet attrs ) {\n");


    builder.append("switch(name)");
    builder.append("{\n"); // switch start

    for (String className : customViewClassNameSet) {
        if (className == null || className.trim().length() == 0) {
            continue;
        }
        builder.append("case \"" + className + "\" :\n");
        builder.append("return new " + className + "(context,attrs);\n");
    }

    builder.append("}\n"); //switch end

    builder.append("return null;\n");
    builder.append("  }\n"); // method end

}
一个for循环就搞定了。
我们现在运行下:
会在项目的如下目录生成代理类:
类内容:
// Generated code. Do not modify!
package com.zhy.demo.viewopt;

import com.zhy.demo.viewopt.*;

import android.content.Context;
import android.util.AttributeSet;
import android.view.View;

public class ViewOpt__ViewCreator__Proxy implements IViewCreator {
    @Override
    public View createView(String name, Context context, AttributeSet attrs) {
        switch (name) {
            case "androidx.appcompat.widget.FitWindowsLinearLayout":
                return new androidx.appcompat.widget.FitWindowsLinearLayout(context, attrs);
            case "androidx.appcompat.widget.AlertDialogLayout":
                return new androidx.appcompat.widget.AlertDialogLayout(context, attrs);
            case "androidx.core.widget.NestedScrollView":
                return new androidx.core.widget.NestedScrollView(context, attrs);
            case "android.widget.Space":
                return new android.widget.Space(context, attrs);
            case "androidx.appcompat.widget.DialogTitle":
                return new androidx.appcompat.widget.DialogTitle(context, attrs);
            case "androidx.appcompat.widget.ButtonBarLayout":
                return new androidx.appcompat.widget.ButtonBarLayout(context, attrs);
            case "androidx.appcompat.widget.ActionMenuView":
                return new androidx.appcompat.widget.ActionMenuView(context, attrs);
            case "androidx.appcompat.view.menu.ExpandedMenuView":
                return new androidx.appcompat.view.menu.ExpandedMenuView(context, attrs);
            case "Button":
                return new Button(context, attrs);
            case "androidx.appcompat.widget.ActionBarContainer":
                return new androidx.appcompat.widget.ActionBarContainer(context, attrs);
            case "TextView":
                return new TextView(context, attrs);
            case "ImageView":
                return new ImageView(context, attrs);
            case "Space":
                return new Space(context, attrs);
            case "androidx.appcompat.widget.FitWindowsFrameLayout":
                return new androidx.appcompat.widget.FitWindowsFrameLayout(context, attrs);
            case "androidx.appcompat.widget.ContentFrameLayout":
                return new androidx.appcompat.widget.ContentFrameLayout(context, attrs);
            case "CheckedTextView":
                return new CheckedTextView(context, attrs);
            case "DateTimeView":
                return new DateTimeView(context, attrs);
            case "androidx.appcompat.widget.ActionBarOverlayLayout":
                return new androidx.appcompat.widget.ActionBarOverlayLayout(context, attrs);
            case "androidx.appcompat.view.menu.ListMenuItemView":
                return new androidx.appcompat.view.menu.ListMenuItemView(context, attrs);
            case "androidx.appcompat.widget.ViewStubCompat":
                return new androidx.appcompat.widget.ViewStubCompat(context, attrs);
            case "RadioButton":
                return new RadioButton(context, attrs);
            case "com.example.testviewopt.view.MyMainView4":
                return new com.example.testviewopt.view.MyMainView4(context, attrs);
            case "com.example.testviewopt.view.MyMainView3":
                return new com.example.testviewopt.view.MyMainView3(context, attrs);
            case "View":
                return new View(context, attrs);
            case "com.example.testviewopt.view.MyMainView2":
                return new com.example.testviewopt.view.MyMainView2(context, attrs);
            case "androidx.appcompat.widget.ActionBarContextView":
                return new androidx.appcompat.widget.ActionBarContextView(context, attrs);
            case "com.example.testviewopt.view.MyMainView1":
                return new com.example.testviewopt.view.MyMainView1(context, attrs);
            case "ViewStub":
                return new ViewStub(context, attrs);
            case "ScrollView":
                return new ScrollView(context, attrs);
            case "Chronometer":
                return new Chronometer(context, attrs);
            case "androidx.constraintlayout.widget.ConstraintLayout":
                return new androidx.constraintlayout.widget.ConstraintLayout(context, attrs);
            case "CheckBox":
                return new CheckBox(context, attrs);
            case "androidx.appcompat.view.menu.ActionMenuItemView":
                return new androidx.appcompat.view.menu.ActionMenuItemView(context, attrs);
            case "FrameLayout":
                return new FrameLayout(context, attrs);
            case "RelativeLayout":
                return new RelativeLayout(context, attrs);
            case "androidx.appcompat.widget.Toolbar":
                return new androidx.appcompat.widget.Toolbar(context, attrs);
            case "LinearLayout":
                return new LinearLayout(context, attrs);
        }
        return null;
    }

}
看起来很完美...
不过目前是报错状态,报什么错呢?
错误: 找不到符号
return new Button(context,attrs);
           ^
  符号:   类 Button
  位置: 类 ViewOpt__ViewCreator__Proxy
我们注意到这些系统控件没有导包。
比如Button,应该是:android.widget.Button。
那么我们可以选择
import android.widget.*
不过有个问题,你会发现,android的View并不是都在android.widget下,例如View在android.view下,WebView在android.webkit下面。
所以我们要把这三个包都导入。
这个时候,你会不会有疑问,系统也只能通过xml拿到TextView,他咋知道是android.widget.LinearLayout还是android.view.LinearLayout?
难不成一个个尝试反射?
是的,你没猜错,LayoutInflater运行时的对象为:PhoneLayoutInflater,你看源码就知道了:
public class PhoneLayoutInflater extends LayoutInflater {
    private static final String[] sClassPrefixList = {
        "android.widget.",
        "android.webkit.",
        "android.app."
    };


    public PhoneLayoutInflater(Context context) {
        super(context);
    }

    protected PhoneLayoutInflater(LayoutInflater original, Context newContext) {
        super(original, newContext);
    }


    @Override protected View onCreateView(String name, AttributeSet attrs) throws ClassNotFoundException {
        for (String prefix : sClassPrefixList) {
            try {
                View view = createView(name, prefix, attrs);
                if (view != null) {
                    return view;
                }
            } catch (ClassNotFoundException e) {
                // In this case we want to let the base class take a crack
                // at it.
            }
        }

        return super.onCreateView(name, attrs);
    }

    public LayoutInflater cloneInContext(Context newContext) {
        return new PhoneLayoutInflater(this, newContext);
    }
}
循环拼接前缀遍历...
不过怎么没看到android.view.这个前缀,嗯,在super.onCreateView里面:
#LayoutInflater
protected View onCreateView(String name, AttributeSet attrs)
        throws ClassNotFoundException {
    return createView(name, "android.view.", attrs);
}
ok,这个时候,你可能还会遇到一些系统hide View找不到的情况,主要是因为你本地的android.jar里面没有那些hide View对应的class,所以编译不过,这种极少数,你可以选择在刚才过滤的List里面添加一下。
好了,到这里我们的代理类:
ViewOpt__ViewCreator__Proxy
生成了。
3. 编写生成View的代码
@ViewOptHost
public class ViewOpt {

    private static volatile IViewCreator sIViewCreator;

    static {
        try {
            String ifsName = ViewOpt.class.getName();
            String proxyClassName = String.format("%s__ViewCreator__Proxy", ifsName);
            Class proxyClass = Class.forName(proxyClassName);
            Object proxyInstance = proxyClass.newInstance();
            if (proxyInstance instanceof IViewCreator) {
                sIViewCreator = (IViewCreator) proxyInstance;
            }
        } catch (Throwable e) {
            e.printStackTrace();
        }
    }

    public static View createView(String name, Context context, AttributeSet attrs) {


        try {
            if (sIViewCreator != null) {
                View view = sIViewCreator.createView(name, context, attrs);
                if (view != null) {
                    Log.d("lmj", name + " 拦截生成");
                }
                return view;
            }
        } catch (Throwable ex) {
            ex.printStackTrace();
        }

        return null;
    }

}
其实就是反射我们刚才的生成的代理类对象,拿到它的实例。
然后强转为IViewCreator对象,这样我们后续直接 sIViewCreator.createView 调用就可以了。
这里大家有没有看到一个知识点:
就是为什么apt生成的代理类,总会让它去继承某个类或者实现每个接口?
这样在后续调用代码的时候就不需要反射了。
有了生成View的逻辑,然后注入到mPrivaryFactory就可以了,其实就是我们的Activity,找到你项目中的BaseActivity:
public class BaseActivity extends AppCompatActivity {

    @Override
    public View onCreateView(View parent, String name, Context context, AttributeSet attrs) {
        View view = ViewOpt.createView(name, context, attrs);
        if (view != null) {
            return view;
        }
        return super.onCreateView(parent, name, context, attrs);
    }
}
流程结束。
运行下,可以看下log:
2020-05-31 18:07:26.300 31454-31454/? D/lmj: LinearLayout 拦截生成
2020-05-31 18:07:26.300 31454-31454/? D/lmj: ViewStub 拦截生成
2020-05-31 18:07:26.300 31454-31454/? D/lmj: FrameLayout 拦截生成
2020-05-31 18:07:26.305 31454-31454/? D/lmj: androidx.appcompat.widget.ActionBarOverlayLayout 拦截生成
2020-05-31 18:07:26.306 31454-31454/? D/lmj: androidx.appcompat.widget.ContentFrameLayout 拦截生成
2020-05-31 18:07:26.311 31454-31454/? D/lmj: androidx.appcompat.widget.ActionBarContainer 拦截生成
2020-05-31 18:07:26.318 31454-31454/? D/lmj: androidx.appcompat.widget.Toolbar 拦截生成
2020-05-31 18:07:26.321 31454-31454/? D/lmj: androidx.appcompat.widget.ActionBarContextView 拦截生成
2020-05-31 18:07:26.347 31454-31454/? D/lmj: androidx.constraintlayout.widget.ConstraintLayout 拦截生成
对应的布局:
<androidx.constraintlayout.widget.ConstraintLayout xmlns:android="http://schemas.android.com/apk/res/android"
    xmlns:app="http://schemas.android.com/apk/res-auto"
    xmlns:tools="http://schemas.android.com/tools"
    android:layout_width="match_parent"
    android:layout_height="match_parent"
    tools:context=".MainActivity">

    <TextView
        android:layout_width="wrap_content"
        android:layout_height="wrap_content"
        android:text="Hello World!"
        app:layout_constraintBottom_toBottomOf="parent"
        app:layout_constraintLeft_toLeftOf="parent"
        app:layout_constraintRight_toRightOf="parent"
        app:layout_constraintTop_toTopOf="parent" />

</androidx.constraintlayout.widget.ConstraintLayout>
有没有很奇怪...
哪来的LinearLayout,ViewStub这些?
其实就是我们Activity的decorView对应的布局文件里面的。
为啥没有TextView?
因为TextView并support库拦截了,生成了AppcompatTextView,也是new的,早不需要走反射逻辑了。
ok,初步完工。
5. 一个潜在的问题
经过gradle,apt,以及对于LayoutInflater流程的了解,我们把相关知识拼接在一起,完成了这次布局优化。
是不是还挺有成就感的。
不过,如果大家有对apt特别熟悉的,应该会发现一个潜在的问题。
什么问题呢?
我们现在新建两个library的module,让:
app implementation lib1
lib1 implementation lib2
在lib2里面写个自定义控件。
我们在lib2中自定义一个控件Lib2View,然后在lib2的layout中引用。
lib2的xml:
<androidx.constraintlayout.widget.ConstraintLayout xmlns:android="http://schemas.android.com/apk/res/android"
    xmlns:app="http://schemas.android.com/apk/res-auto"
    xmlns:tools="http://schemas.android.com/tools"
    android:layout_width="match_parent"
    android:layout_height="match_parent"
    tools:context=".Lib2Activity">

    <com.example.lib2.Lib2View
        android:layout_width="match_parent"
        android:layout_height="match_parent"></com.example.lib2.Lib2View>

</androidx.constraintlayout.widget.ConstraintLayout>
然后我们再次执行app:assembleDebug:
你会发现,报错了:
ViewOpt__ViewCreator__Proxy.java:47: 错误: 找不到符号
return new com.example.lib2.Lib2View(context,attrs);
                           ^
  符号:   类 Lib2View
  位置: 程序包 com.example.lib2
错误的原因是,虽然我们收集到了Lib2View,也生成了相关方法,代码我们访问不到这个类。

为什么访问不到呢?
因为我们用了implementation,再看一眼:
app implementation lib1
lib1 implementation lib2
implementation隔离了app对lib2的类引用,虽然打包后大家都能正常访问,但是在编译期间是访问不到的。
这就是我说的apt存在的问题,apt主要是针对单个module的,对于这种多module并不是很合适。
所以,如果用Transfrom来做相关类生成,就不会有类似问题。
但是,博客我都写到这了,你让我换方案?
如果我们改成api,或者之前的compile,都能编译通过。
那么能不能在打包到时候,把implementation动态的换成api呢?
经过一顿对gradle API的摸索,发现是支持的:
project.afterEvaluate {
    android.libraryVariants.all { variant ->
        def variantName = variant.name
        def depSet = new HashSet()
        tasks.all {
            if ("assemble${variantName.capitalize()}".equalsIgnoreCase(it.name)) {
                project.configurations.each { conf ->
                    if (conf.name == "implementation") {
                        conf.dependencies.each { dep ->
                            depSet.add(dep)
                            project.dependencies.add("api", dep)
                        }
                        depSet.each {
                            conf.dependencies.remove(it)
                        }
                    }
                }
            }
        }
    }
}
我们可以将implementation,添加到api中。
将上述脚本apply到你的library的build.gradle中即可。
还留了一些问题
文中我们是以assembleDebug来演示的,那么release打包怎么办呢?
release只需要修改一个地方,就是merger.xml,不在mergeDebugResources下了,而在mergeReleaseResources下面了。
其次因为你的代理类需要反射,注意keep相关类就好了。
这个我就不特别帮大家处理了,如果release你搞不定,我建议你别实施这个方案了,先学习文章中相关知识点吧。
6. Google也在做类似的事情
看来Google也意识到layout构建的耗时了。
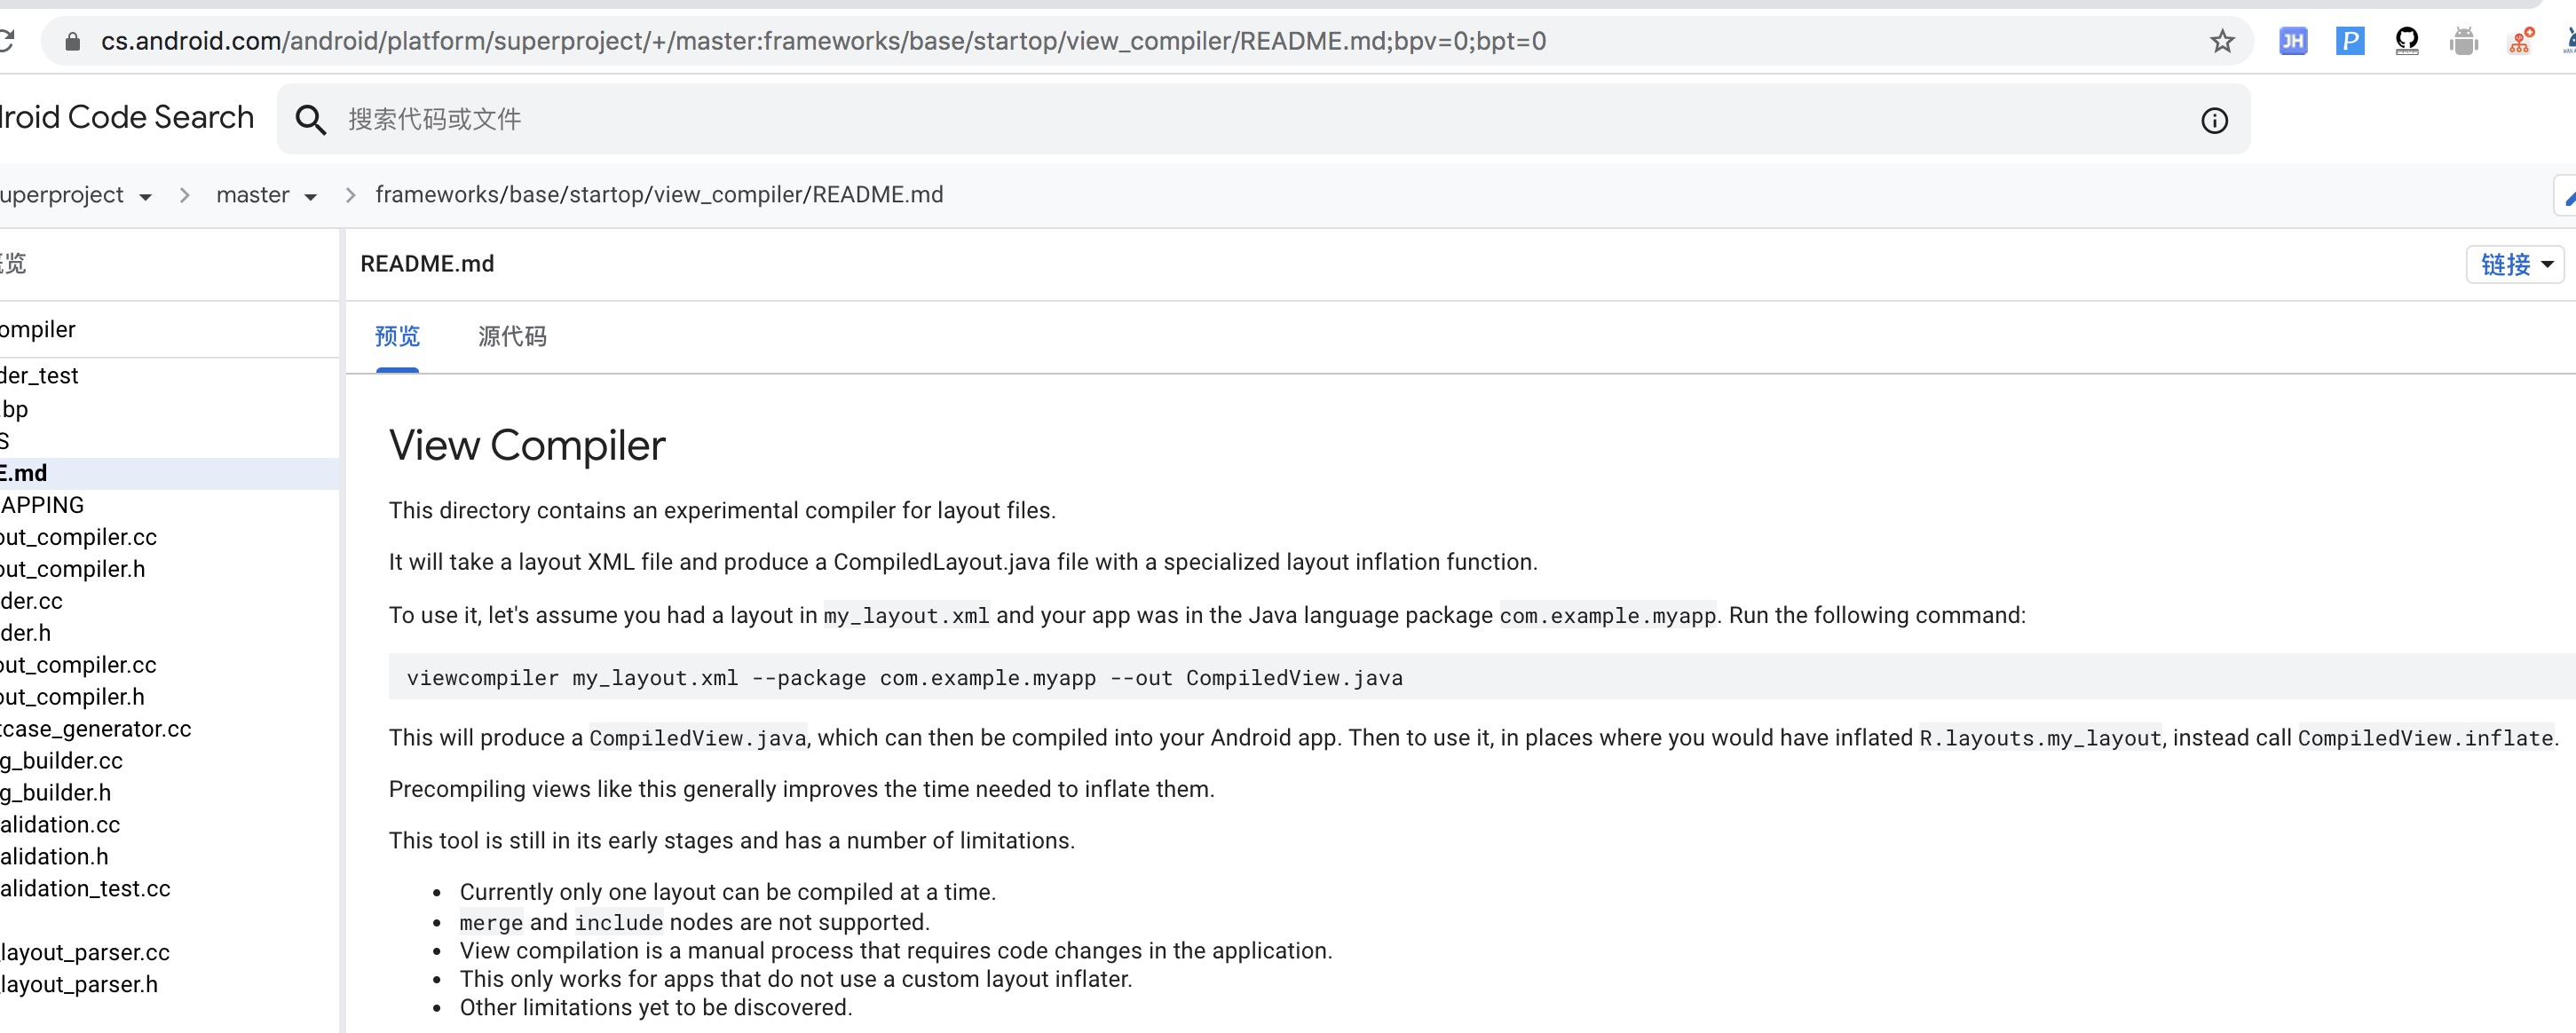
可以看到Google在做View Compiler的相关事情,不过目前尚未开启,对应到运行时源码中,应该是:
public View inflate(@LayoutRes int resource, @Nullable ViewGroup root, boolean attachToRoot) {
    final Resources res = getContext().getResources();
    if (DEBUG) {
        Log.d(TAG, "INFLATING from resource: \"" + res.getResourceName(resource) + "\" ("
              + Integer.toHexString(resource) + ")");
    }

    View view = tryInflatePrecompiled(resource, res, root, attachToRoot);
    if (view != null) {
        return view;
    }
    XmlResourceParser parser = res.getLayout(resource);
    try {
        return inflate(parser, root, attachToRoot);
    } finally {
        parser.close();
    }
}
可以看到inflate中多了一个tryInflatePrecompiled方法,看起来是可以直接给一个layout id,返回一个构建好的View。
期待后续该方案上线。
7. 总结
最近推送了非常多的性能优化的文案,大家也吐槽都不是实战,感觉像理论。
于是花了一点时间分享一个View构建这一块的优化给大家,可以看到就这么点功能,其实我们涉及到了:
- gradle 构建相关知识;
- apt 相关知识;
- LayooutFactory相关知识;
虽然我们遇到了一些挫折,比如文章最后说到的apt生成的类,无法访问非传递依赖模块中的类,不过我们还是解决了。
有时候遇到问题,我就安慰自己:
感觉又能学到一点东西了
没什么一直顺利的事情,正确面对问题,只有不断的遇到问题、解决问题,才能成长。
另外,建议大家日常积累知识点,不要看到文章,发现自己不熟悉就不想看,看到自己其实早就清楚的,看的津津有味...
demo地址: github.com/hongyangAnd…
