

本文以
csdnsynchexo迁移到deno实现进行一步步探索说明。
csdnsynchexo是一个爬取 csdn 博客内容生成 hexo 源文件内容的简单工具,正常版本使用 nodejs 实现,。最近 node 之父 ry 大神的 deno 也发布了 1.0,就想实践一下,从 node 版本迁移升级到 deno。本文主要记录一个 nodejs 应用迁移到 deno 需要做哪些工作,还涉及到一些非常基础的 deno 概念。如果你熟悉 nodejs,阅读本文的难度几乎为 0
迁移后项目github地址
安装deno
文档中有很多方式,我们按需选择即可。这里我直接选择mac的脚本安装形式。执行一个脚本然后按照提示设置环境变量即可
curl -fsSL https://deno.land/x/install/install.sh | sh
# 根据提示设置环境变量
# add the directory to your $HOME/.zshrc (or similar)
export DENO_INSTALL="/Users/name/.deno"
export PATH="$DENO_INSTALL/bin:$PATH"
安装deno vscode 插件
这个插件的作用如下:
区别于node中的ts, deno中引入文件必须以
.ts结尾(有详细后缀),而在node环境下是不需要的,这个插件能解决这个问题,会提示你需要加后缀
deno可以引入远程文件路径,这个插件可以根据路径下载下来的文件,自动推断对应包的类型(依赖了DENO_INSTALL和PATH环境变量)
vscode商店直接搜索安装即可。地址
我这里遇到了一个问题:安装好这个插件后,vscode还是会出现找不到Deno的报错(issue不少人也遇到了这个问题,如果无问题,则忽略后面),应该是缺少对应 Deno 的声明文件。这里直接用npm i typescript-deno-plugin把deno的声明文件安装下来(或者手动将声明文件拷贝一份)。
# 还是用了node和npm...
npm install --save-dev typescript-deno-plugin typescript
第三方依赖模块的迁移
既然deno和node都是执行的 ts/js代码,那么其实只要解决了第三方包和 api 问题,逻辑都一样直接用的,那么本项目的第三方依赖如下,只要解决了这些依赖的问题就可以了
{
    "dependencies": {
        "cheerio": "^1.0.0-rc.2",
        "commander": "^2.19.0",
        "filenamify": "^4.1.0",
        "node-fetch": "^2.1.2",
        "sitdown": "^1.1.6"
    }
}
(deno实现了w3c api标准,已经了内置了fetch,所以我们的node-fetch不再需要了)
模块迁移指南参考
按照官方推荐,Deno项目中建议用一个deps.ts文件来统一管理所有依赖,别的地方直接从deps.ts统一引入,例如本项目的deps.ts如下
export { default as cheerio } from "https://dev.jspm.io/cheerio";
export { default as sitdown } from "https://dev.jspm.io/sitdown";
export { default as Command } from "https://deno.land/x/denomander/mod.ts";
export * as fs from "https://deno.land/std/node/fs.ts";
export * as path from "https://deno.land/std/node/path.ts";
export { default as filenamify } from "https://dev.jspm.io/filenamify";
那么问题来了,这些模块如何找呢。模块迁移指南中也有大概的介绍,这里简单描述下
1、首先推荐到pika中去寻找这个模块,如果搜出来能直接用,不会报红,表明可以完美在 deno 中使用,直接用pika中的模块链接在deps.ts中引入即可。pika中都自带了.d.ts类型文件,配合deno vscode插件就能实现类型的推断
例如这里的cheerio就直接在deno中使用

2、如果这个模块在pika中不支持(或者pika抽风..好像很多模块莫名奇妙 404 或者 502),则用https://dev.jspm.io/模块名的地址引入,这些引入一般是没有 ts 声明文件的,可能需要手动引入下对应库的声明文件或者直接添加@ts-ignore忽略掉对应的 ts。(dev.jspm.io中的模块可能用了某些 deno 不支持的 api?..需要判断了)
// cheerio是通过dev.jspm.io引入的,无类型文件
// @ts-ignore
const $ = cheerio.load(html, {
    decodeEntities: true,
});
3、如果 1、2 找不到,则谷歌搜索deno 对应模块名看有没有合适的替代方案了。例如本项目,就是用denomander代替 node 的commander
由于 deno 自带了typescript支持,我们无需ts-node、tsc等命令即可直接执行ts文件了
node 原生 api 的迁移
对于node的原生模块,deno提供了对应的兼容包(它们存在于 deno 标准库的node包下),例如fs、path等。但是兼容是不完全的,例如缺失某些 api(fs里面不提供流式操作)、一些node原生包也没支持。所以能做的就是尽量使用Denoapi 实现,实在不行就用node包下的看看。我这个项目迁移基本满足了需求...

csdnsynchexo有不少调用fs的文件操作,主要是创建文件、写文件。
Deno把所有的 api 都放在了Deno这个命名空间下了...Deno使用await实现异步,全局顶层可以直接使用await了
简单举例..
// node中判断文件是否存在
import fs from "fs";
export const fsExistsSync = (way: string): boolean => {
    try {
        fs.accessSync(way, fs.constants.W_OK);
    } catch (e) {
        return false;
    }
    return true;
};
// 对应的deno api实现
export const fsExistsSync = (way: string): boolean => {
    try {
        Deno.statSync(way);
    } catch (e) {
        return false;
    }
    return true;
};
// 生成文件,写文件操作
const writeStream = fs.createWriteStream(
    path.join(output, `./${filenamify(title)}.md`),
    "utf8"
);
writeStream.write(`title: ${title}\n`);
writeStream.close();

// deno
const file = Deno.createSync(path.join(output, `./${filenamify(title)}.md`));
const encoder = new TextEncoder();
Deno.writeSync(file.rid, encoder.encode(`title: ${title}\n`));
Deno.close(file.rid);
path.join好像没有对应实现,我们直接使用标准库std下的node的path即可
其实没啥难度...到 deno 文档找一遍有没有类似的 api 即可
执行程序
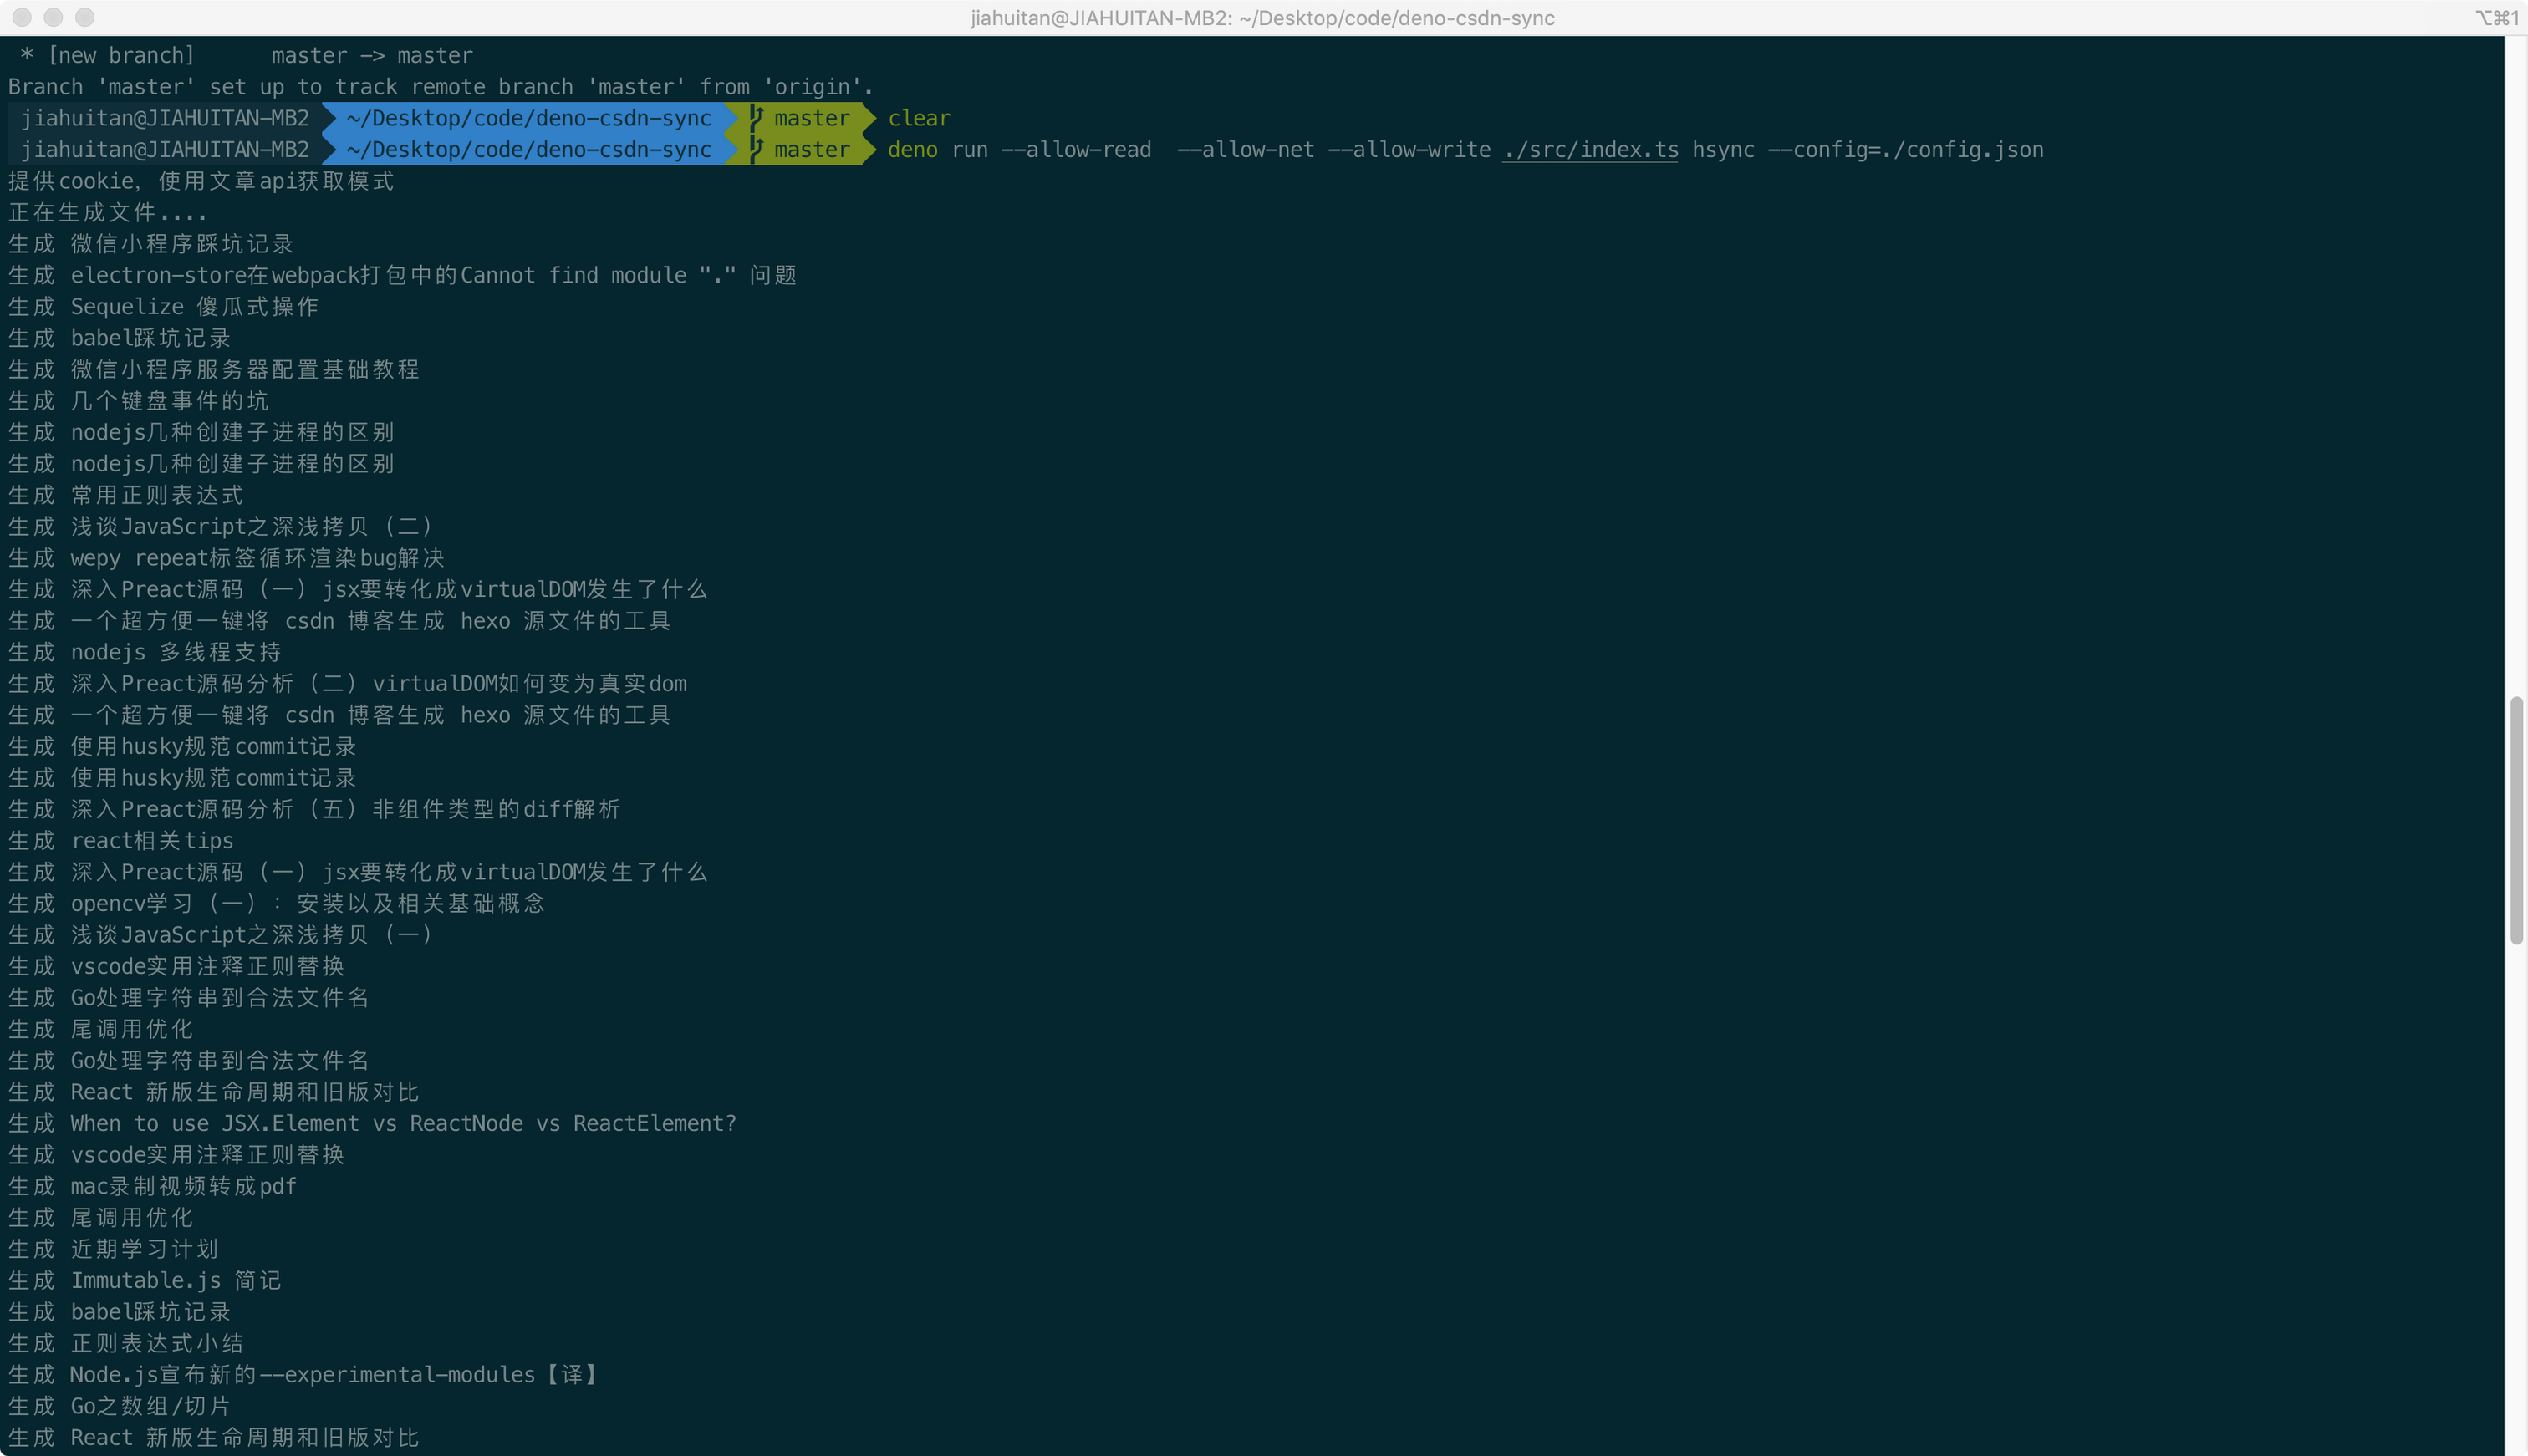
对于 node,deno 有严格的权限管理,例如如果我们需要网络权限,必须添加--allow-net才能实现网络请求。
本项目会用到文件读写、网络请求权限,所以我们执行的时候需要deno run --allow-read --allow-net --allow-write ./src/index.ts hsync --config=./config.json执行
可能你还怀念npm..每次执行一堆参数很爽,我们可以利用Makefile来实现脚本编写
# makefile
run:
	deno run --allow-read  --allow-net --allow-write ./src/index.ts hsync --config=./config.json

cache:
	deno cache ./src/index.ts
直接根目录下新建makefile文件,这时候我们直接执行make run即可执行我们的程序了..可见,成功搞定
打包
deno bundle自带打包和tree shaking功能,可以将我们的代码打包成单文件
deno install可以将我们的代码生成可执行文件进行直接使用
可以建立对应的make脚本
bundle:
	deno bundle ./src/index.ts ./hsync.js
install:
	deno install --allow-read  --allow-net --allow-write -n hsync ./src/index.ts
cli
deno cli 对比node就强大很多了。具备了测试、打包、运行、格式化等于一体
SUBCOMMANDS:
    bundle         Bundle module and dependencies into single file
    cache          Cache the dependencies
    completions    Generate shell completions
    doc            Show documentation for a module
    eval           Eval script
    fmt            Format source files
    help           Prints this message or the help of the given subcommand(s)
    info           Show info about cache or info related to source file
    install        Install script as an executable
    repl           Read Eval Print Loop
    run            Run a program given a filename or url to the module
    test           Run tests
    types          Print runtime TypeScript declarations
    upgrade        Upgrade deno executable to given version
经过一系列操作,一个简单的 node 项目就迁移成 deno 项目了,今天经历了从装 deno 到使用 deno。对于 deno 的直观感受如下
优点
1、自带 ts 支持,不要再装ts-node、babel等东西
2、deno命令具备了测试、打包、运行、格式化等于一体,不需按照额外一堆东西
缺点
1、第三方库报错信息不好看,因为是一个远程 url,需要点过去,没有本地那么直观
2、目前生态还不太好
